
Popular categories
Looking for a yarn?


Comments / Questions (36)
![]() Kasia wrote:
Kasia wrote:
Witam, proszę jeszcze o radę co zrobić w przypadku , gdy wszystkich oczek mam 176 a nie 174 czyli o 2 za dużo w rozm. X . Podzieliłam na przód, tył i rękawy nie licząc narzutów, no i zostały mi dwa oczka. Bardzo nie chciałabym pruć robótki . Nie rozumiem również polecenia aby przerobić 6 dodanych oczek pod rękawem, nie przerabiając razem oczek i narzutów? Bardzo proszę o pomoc
18.11.2021 - 20:30DROPS Design answered:
Witaj Kasiu, 1. skoro musisz mieć parzystą liczbę oczek na ścieg angielski na okrągło, to podziel robótkę tak: przód i tył bez zmian, czyli po 53 oczka (106), a na rękawy zdejmij o 1 oczko (to nadplanowe) więcej. Później nabierz pod rękawem nie 6, ale 5 oczek. Nic nie będzie widać. 2. nabierasz oczka pod rękawem i przerabiasz je na prawo, dopiero od kolejnego okrążenia wykonuj ścieg angielski. Pozdrawiamy!
19.11.2021 - 08:55
![]() Kasia wrote:
Kasia wrote:
Dzień dobry, Jeśli chodzi o podział robótki na tył przód i rękawy , jak liczyć oczka , bez narzutów i jak te dwa ( w sumie trzy) oczka dodane do każdego markera?
18.11.2021 - 16:48DROPS Design answered:
Witaj Kasiu, jak dzielisz robótkę to liczysz oczka następująco: 1 oczko = oczko i narzut. Co do tych 2 dodanych oczek, to przerabiasz je w kolejnym okrążeniu następująco: 'W następnym okrążeniu przerobić te 3 oczka następująco: wykonać 1 narzut, zdjąć 1 oczko jak do przerobienia na lewo, przerobić narzut na prawo, wykonać 1 narzut, zdjąć 1 oczko jak do przerobienia na lewo'.> patrz DODAWANIE OCZEK. Koniecznie prześlij zdjęcia do naszej galerii :) Pozdrawiamy!
19.11.2021 - 09:03
![]() Kasia wrote:
Kasia wrote:
Jeśli chodzi o moje poprzednie pytanie, to po prostu inaczej zaczynają się oczka , bo w objaśnieniu do wzoru w drugim okrążeniu jest narzut,zdjąć oczko jak na lewo i razem przerobić na lewo narzut i o. zdjęte. Natomiast w opisie do filmu jest inna kolejność. Czy to ma znaczenie?
25.10.2021 - 19:47DROPS Design answered:
Witaj Kasiu, opis ściegu angielskiego we wzorze jest ok. Po prostu jest każdorazowo przesunięty w stosunku do tego jak jest pokazane na filmie jak przerabiać ścieg angielski na okrągło. Pozdrawiam!
25.10.2021 - 23:12
![]() Kasia wrote:
Kasia wrote:
Witam, nie wiem co robię źle, bo przy drugim okrążeniu ściegiem angielskim, gdy dodam po dwa oczka w każde oczko z markerem wychodzi mi 89 oczek a nie 62. Robię sweter w rozmiarze S . Nabrałam 62o., zamknęłam 8 i zostało 54o. W drugim okrążeniu powinno być 62 a ja za każdym razem mam 89o. Proszę o pomoc bo nie wiem dlaczego mi tak wychodzi. Prułam już kilka razy.
25.10.2021 - 19:41DROPS Design answered:
Witaj Kasiu, narzuty w ściegu angielskim nie są liczone jako oczka. Pozdrawiam
25.10.2021 - 23:22
![]() Kasia wrote:
Kasia wrote:
Chciałam zapytać czy nie ma pomyłki w objaśnieniu do wzoru ściegu angielskiego z narzutami i video pokazujące ten ścieg. Przyznam, że jest to bardzo mylące . Proszę o wyjaśnienie, którego objaśnienia mam się trzymać? Pierwszy raz wykonuję taki projekt . Pozdrawiam
22.10.2021 - 18:17DROPS Design answered:
Kasiu, napisz dokładnie o co chodzi w opisie ściegu angielskiego na okrągło, czyli w którym okrążeniu/okrążeniach widzisz pomyłkę.
24.10.2021 - 19:42
![]() Kasia wrote:
Kasia wrote:
Witam, nie rozumiem instrukcji (ramion) dodawania oczek w oczka z markerem, chodzi o dodawanie w te oczka czy przed 1 markerem, między 2 i 3 oraz za 4 ? Proszę o wyjaśnienie
20.10.2021 - 23:20DROPS Design answered:
Witaj Kasiu, dodajesz 2 oczka w każde z oczek z markerem – patrz DODAWANIE OCZEK-1. Jest video pokazujące całą tą sekwencję, patrz TUTAJ. Pozdrawiamy!
21.10.2021 - 10:09
![]() Jette wrote:
Jette wrote:
Jeg kunne godt tænke mig at strikke en højere hals. Skal jeg stadig tage masker ind efter 1. omgang, eller vente til f.eks.efter 4 cm med at tage ind, inden start på patentstrik?
25.08.2021 - 15:05DROPS Design answered:
Hei Jette. Den vil nok sitte /falle penest om du feller på 1. omgang. mvh DROPS design
27.08.2021 - 10:49
![]() Anette Schwarz wrote:
Anette Schwarz wrote:
Liebes Drops-Team, ich stricke 3xl, beim halben Rückenteil stricke uch 11 Maschen, in der 12 nehme ich zu, wenn ich 9x zunehme, habe ich aber keine 37 Maschen, sondern nur 30. Ich schaue mir die Videos an und stricke es genauso. Wo liegt das Problem? Danke im Voraus
27.02.2021 - 19:19DROPS Design answered:
Liebe Frau Schwarz, in 3xl haben Sie 250 M nach allen Zunahmen; dazu sind es 42 Maschen für das 1. Halb-Rückenteil bis zu den 3 Maschen mit der Markierung in der Mitte (die ganz letzte Zunahme); nur die ersten 39 M (in 3xl) werden für das Rückenteil gestrickt, die nächsten 48 Maschen werden für die 1. Ärmel stillgelegt. In 2xl haben Sie 39 Maschen bis zu den 3 Maschen mit der Markierung in der Mitte, die ersten 37 stricken Sie für das Rückenteil und die nächsten 46 M für die Ärmel. Hoffentlich kann es Ihnen weiterhelfen. Viel Spaß beim stricken!
01.03.2021 - 09:02
![]() Anette Schwarz wrote:
Anette Schwarz wrote:
Ich bin total verwirrt, ich habe, denke ich, richtig nach Anleitung gestrickt, nur habe ich am Vorderteil 81 Maschen und am Rückenteil nur 49 Maschen. Wo ist mein Fehler? Die Ärmel haben beide die gleiche Maschenzahl, auch zuviel. Ich habe zuviel Zunahmen gemacht, klar. Aber wieso haben Vorderteil und Rückenteil nicht die gleiche Maschenzahl? Danke im Voraus
16.02.2021 - 11:54DROPS Design answered:
Liebe Frau Schwarz, dieses Video zeigt, wie man für die Schultern bei diesem Modell zunimmt, sicher wird es Ihnen am besten helfen. Viel Spaß beim stricken!
16.02.2021 - 13:26
![]() Babeth wrote:
Babeth wrote:
Bonjour Je désire tricoter ce modèle Cloud Fluff by DROPS Design, mais il est bien au-dessus de mon budget J'ai cherché des alternaitves et trouvé une laine de remplacement pour le fil kid silk mais pas pour le sky Pouvez vous m'aidez Je désire garder ce côté " lousse aérien " quand même Merci beaucoup Babeth
14.01.2021 - 11:07DROPS Design answered:
Bonjour Babeth, consultez notre convertisseur pour trouver les alternatives possibles (pour Sky ou Kid-Silk) - Rappelez-vous que des laines alternatives ont des qualités différentes et donneront donc un résultat différent; votre magasin DROPS saura vous conseiller la meilleure alternative possible en fonction de vos souhaits - vous pouvez le contacter même par mail ou téléphone. Bon tricot!
14.01.2021 - 15:44
|
||||
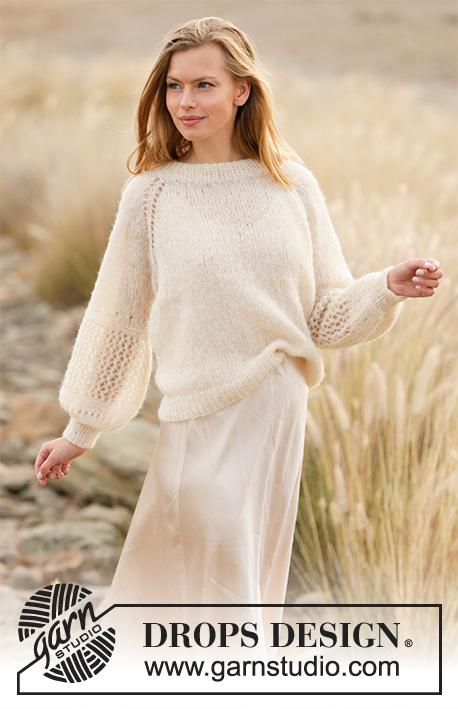
Cloud Fluff#cloudfluffsweater |
||||
 |
 |
|||
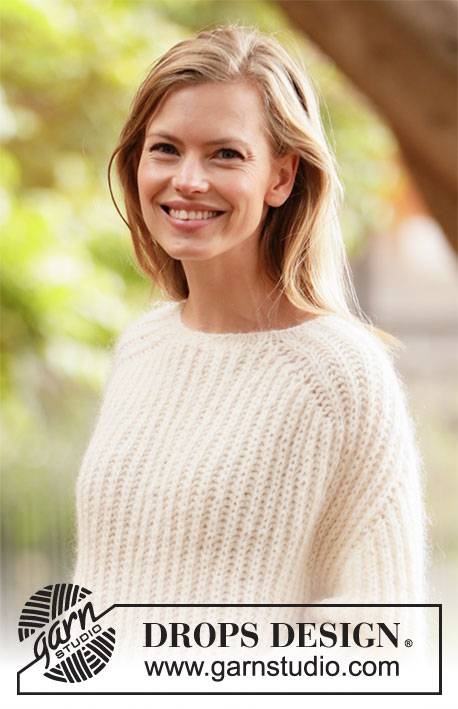
Knitted jumper with set-in sleeves without seams in DROPS Sky and DROPS Kid-Silk. The piece is worked top down in English rib. Sizes S - XXXL.
DROPS 212-14 |
||||
|
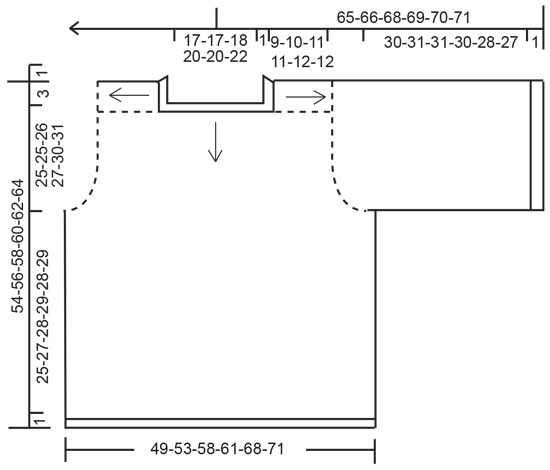
------------------------------------------------------- EXPLANATIONS FOR THE PATTERN: ------------------------------------------------------- DECREASE TIP-1 (evenly spaced): To work out how to decrease evenly, count the total number of stitches on needle (e.g. 66 stitches) and divide by number of decreases to be made (e.g. 8) = 8.25. In this example decrease by knitting approx. each 7th and 8th stitch together. ENGLISH RIB WITH YARN OVERS – in the round: ROUND 1: * Knit 1, make 1 yarn over, slip 1 stitch as if to purl *, work from *-* to end of round. ROUND 2: * Make 1 yarn over, slip 1 stitch as if to purl, purl the yarn over and slipped stitch together *, work from *-* to end of round. ROUND 3: * Knit the yarn over and slipped stitch together, make 1 yarn over, slip 1 stitch as if to purl *, work from *-* to end of round. Repeat rounds 2 and 3 onwards. INCREASE TIP-1: All increases are worked on a round where yarn overs and stitches are purled together. Work 3 stitches in the stitch and yarn-over with the markers as follows: Purl together the yarn over and stitch but do not slip the stitch and yarn-over off the left needle, make 1 yarn over the right needle and purl together the stitch and yarn-over 1 more time = 3 stitches (= 2 stitches increased = a total of 8 stitches increased). On the next round work the 3 stitches as follows: Make 1 yarn over, slip 1 stitch as if to purl, knit the yarn over, make 1 yarn over, slip 1 stitch as if to purl. Then continue these stitches in English rib. NOTE! These markers should not be moved, increase continues in the same stitch. i.e. the number of stitches between 1st and 2nd increase on each shoulder remains the same. INCREASE TIP-2: All increases are worked on a round where yarn overs and stitches are purled together. INCREASE 1 ON SLEEVE CAP IS WORKED AS FOLLOWS: Work 3 stitches in the stitch and yarn-over and move the marker as follows: Purl together the yarn-over and stitch, insert 1 marker in this stitch (i.e. stitch on right needle), but do not slip the stitch and yarn over off the left needle, make 1 yarn over the right needle and purl together the stitch and yarn-over 1 more time = 3 stitches (= 2 stitches increased). The marker sits in the first increased stitch (= purled stitch). The next increase is worked in the stitch with the marker. INCREASE 2 ON SLEEVE CAP WORKED AS FOLLOWS: Work 3 stitches in the stitch and yarn over and move the marker as follows: Purl together the yarn over and stitch, but wait with slipping the stitch and yarn over off the left needle, make 1 yarn over the right needle, purl together the stitch and yarn-over 1 more time and insert the marker in this stitch = 3 stitches (= 2 stitches increased). The marker sits in the last increased stitch (= purled stitch). The next increase is worked in the stitch with the marker. On the next round work the 3 stitches as follows: Make 1 yarn over, slip 1 stitch as if to purl, knit the yarn over, make 1 yarn over, slip 1 stitch as if to purl. Then continue these stitches in English rib. CASTING-OFF TIP: To avoid the cast-off edge being tight you can cast off with a larger size needle. If the edge is still tight, make 1 yarn over after approx. each 4th stitch at the same time as casting off; the yarn overs are cast off as normal stitches. ------------------------------------------------------- START THE PIECE HERE: ------------------------------------------------------- JUMPER – SHORT OVERVIEW OF THE PIECE: The jumper is worked in one piece from the top down. You increase for the shoulders and sleeve caps. The yoke is divided for body and sleeves and the body continued in the round with circular needle. The sleeves are worked in the round with double pointed needles/ short circular needle. NECK: Cast on 62-62-66-72-72-76 stitches with circular needle size 6 mm and 1 strand Sky and 1 strand Kid-Silk. Knit 1 round. Knit 1 round and decrease 8-8-8-10-10-10 stitches evenly spaced – read DECREASE TIP = 54-54-58-62-62-66 stitches. On the next round insert 4 markers as follows (the markers are inserted in the stitches; round begins approx. mid-back): Knit 7-7-9-9-9-11, insert marker 1 in the next stitch and knit this stitch, knit 13, insert marker 2 in the next stitch and knit this stitch, knit 11-11-13-15-15-17, insert marker 3 in the next stitch and knit this stitch, knit 13, insert marker 4 in the next stitch and knit this stitch, knit the remaining 6-6-6-8-8-8 stitches. The stitches between markers 1 and 2 are the right shoulder, between markers 3 and 4 the left shoulder. You will increase in the stitches with markers later. Insert 1 marker at the beginning of the round; the yoke is measured from this marker! YOKE: Work ENGLISH RIB WITH YARN OVERS in the round – read description above, over all stitches and increase for the shoulders as follows: SHOULDER: The first increase is worked on round 2 in the English rib (the stitches with markers are purled stitches). Increase 2 stitches in each of the stitches with markers – read INCREASE TIP-1. Increase like this every 4th round a total of 6-7-8-8-9-9 times = 102-110-122-126-134-138 stitches. Increase in the same stitch, i.e. the number of stitches between markers 1 and 2, and between markers 3 and 4 remain the same; the increased stitches are worked before marker 1, between markers 2 and 3 and after marker 4. REMEMBER THE KNITTING TENSION! The piece measures approx. 9-10-11-11-12-12 cm from the marker in the neck. Now increase for the sleeve caps as follows: SLEEVE CAP: Work 3 rounds after the final increase on the shoulder. On the next round with purl (i.e. yarn over and stitch are purled together) increase for the sleeve cap and the markers are moved as follows: HALF BACK PIECE: Work as before as far as the stitch with marker 1. RIGHT SLEEVE CAP: Increase-1 on the right sleeve cap is worked in the next stitch (= stitch with marker 1 = purled stitch) – read INCREASE TIP-2, knit 1, increase-2 on the right sleeve cap is worked in the next stitch (= purled stitch) (= 4 stitches increased). FRONT PIECE: Work as before until there are 2 stitches left before the stitch with marker 4, remove markers 2 and 3. LEFT SLEEVE CAP: Increase-1 on the left sleeve cap is worked in the next stitch (= purled stitch), knit 1, increase-2 on the right sleeve cap is worked in the next stitch (= stitch with marker 4 = purled stitch) (= 4 stitches increased). HALF BACK PIECE: Work as before to end of round. You have now inserted 4 new markers in the piece. Increase 2 stitches in each stitch with a marker and move the markers every 4th round a total of 8-9-10-10-12-13 times = 166-182-202-206-230-242 stitches. The markers are moved to the outermost stitch on each side of each sleeve cap each time you increase, i.e. there are 4 more new stitches between the markers on the sleeve caps each time you increase. The piece measures approx. 20-22-24-24-28-29 cm, measured from the marker mid-back. Continue in the round with English rib until the piece measures 24-24-25-26-29-30 cm, measured from the marker mid-back. Now increase 2 stitches in each stitch with a marker (= 8 stitches increased) = 174-190-210-214-238-250 stitches. Work 1 round then divide for the body and sleeves as follows, working English rib as before: Work 27-29-31-33-37-39 stitches (= half back piece), place the next 34-38-42-42-46-48 stitches on a thread for sleeve and cast on 6-6-6-8-8-8 new stitches under the sleeve, work 53-57-63-65-73-77 stitches (= front piece), place the next 34-38-42-42-46-48 stitches on a thread for sleeve and cast on 6-6-6-8-8-8 new stitches under the sleeve and work the remaining 26-28-32-32-36-38 stitches (= half back piece). BODY: = 118-126-138-146-162-170 stitches. Continue in the round with English rib. On the first round work the 6-6-6-8-8-8 new stitches under each sleeve without working the stitches and yarn-overs together. When the piece measures 25-27-28-29-28-29 cm from where body and sleeves were divided, knit 3 rounds. Cast off with knit – read CASTING-OFF TIP. SLEEVES: Place the 34-38-42-42-46-48 stitches from the thread on the one side of the piece on double pointed needles/ short circular needle size 6 mm and knit up 1 stitch in each of the 6-6-6-8-8-8 stitches cast on under the sleeve = 40-44-48-50-54-56 stitches. Continue in the round with English rib. On the first round work the 6-6-6-8-8-8 new stitches under the sleeve without working the stitches and yarn-overs together. When the piece measures 30-31-31-30-28-27 cm from where the sleeve was divided from the body, knit 3 rounds. Then cast off – remember CASTING-OFF TIP. Work the other sleeve in the same way. |
||||
Diagram explanations |
||||
|
||||
 |
||||
Have you finished this pattern?Tag your pictures with #dropspattern #cloudfluffsweater or submit them to the #dropsfan gallery. Do you need help with this pattern?You'll find 14 tutorial videos, a Comments/Questions area and more by visiting the pattern on garnstudio.com. © 1982-2026 DROPS Design A/S. We reserve all rights. This document, including all its sub-sections, has copyrights. Read more about what you can do with our patterns at the bottom of each pattern on our site. |
||||


With over 40 years in knitting and crochet design, DROPS Design offers one of the most extensive collections of free patterns on the internet - translated to 17 languages. As of today we count 324 catalogues and 12239 patterns translated into English (UK/cm). 12239
We work hard to bring you the best knitting and crochet have to offer, inspiration and advice as well as great quality yarns at incredible prices! Would you like to use our patterns for other than personal use? You can read what you are allowed to do in the Copyright text at the bottom of all our patterns. Happy crafting!
Post a comment to pattern DROPS 212-14
We would love to hear what you have to say about this pattern!
If you want to leave a question, please make sure you select the correct category in the form below, to speed up the answering process. Required fields are marked *.