
Popular categories
Looking for a yarn?


Comments / Questions (4)
![]() Linn wrote:
Linn wrote:
Står det fel i mönstret vid första ökningen för tummen? Får det inte att gå ihop med färgerna. Första ökningen ska väl vara ytterligare en maska från mitten av tummen. Alltså att det blir tre maskor i mitten och ökad utanför dem, inte en i mitten?
08.10.2023 - 05:02DROPS Design answered:
Hej Linn, du øger med rødt ifølge diagrammet, med 1 m i midten, men når du strikker dem på næste varv, strikkes de ifølge farven i diagrammet, så det bliver lodrette striber :)
17.10.2023 - 12:00
![]() Helena wrote:
Helena wrote:
Hej! Har börjat sticka vantarna men får dem väldigt små? Har bytt till stickor nr 3 för att få dem större . Jag har inga stora händer 20 cm äver handflatan . Tittade på ett annat vantmönsterbför fabel , christmas rose och där är 64 maskor istället för 56 maskor som i detta mönster . Är maskantalet rätt för en damvante?
05.03.2021 - 10:15DROPS Design answered:
Hej Helena, vanterne bliver 22 cm i omkreds hvis man strikker med DROPS Fabel og overholder strikkefastheden. God fornøjelse! :)
05.03.2021 - 12:58
![]() Lonni Puggaard wrote:
Lonni Puggaard wrote:
En video af hvordan man laver tommelfingeren, når man nu ikke kan finde ud af at læse en opskrift 🙏🙏🙏
19.11.2020 - 19:46
![]() Thelma wrote:
Thelma wrote:
Hi! I have designed a shawl. I have the written instructions. I tried making charts for it but haven’t succeeded. Can you please help me make the charts or can someone please help me in teaching me how to make the charts? Please do let me know soon. Thanks, Thelma
12.12.2019 - 17:14
|
|||||||||||||||||||||||||||||||||||||
Holiday Hearts#holidayheartsmittens |
|||||||||||||||||||||||||||||||||||||
 |
 |
||||||||||||||||||||||||||||||||||||
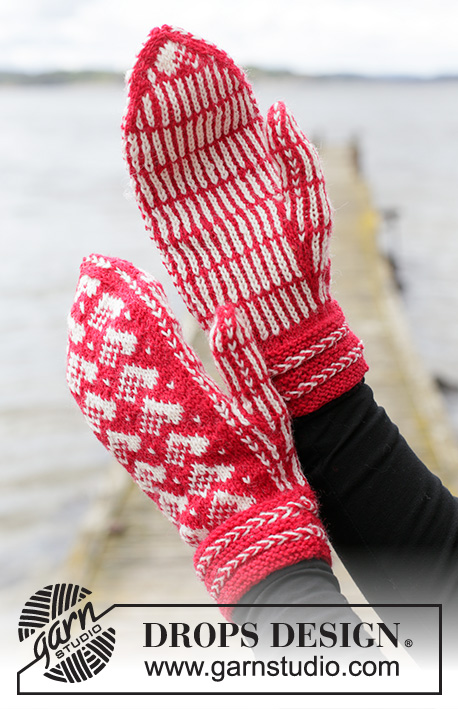
Knitted mittens with hearts in DROPS Fabel. The piece is worked with Nordic pattern and Latvian cables. Theme: Christmas.
DROPS Extra 0-1469 |
|||||||||||||||||||||||||||||||||||||
|
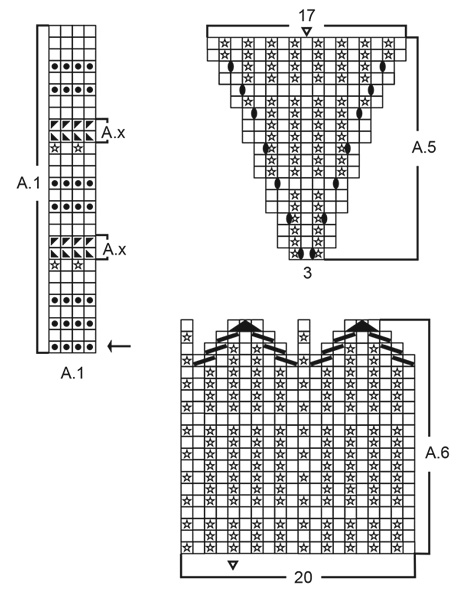
EXPLANATIONS FOR THE PATTERN: ------------------------------------------------------- LATVIAN CABLE: The cable consists of 3 rounds – all the rounds are included in A.1 and marked A.x. The 3 rounds are worked as follows: ROUND 1: * Knit 1 using red, knit 1 using off-white *, work from *-* to end of round. ROUND 2: Bring both strands to the front of the piece (towards you). Take the red strand to the back, purl 1 and bring the strand to the front. Take the off-white strand under the red strand and then to the back of the piece, purl 1 and bring the strand to the front. Continue like this, purling alternately with red and off-white, but always take the strand UNDER the strand from the last stitch worked. ROUND 3: Work as round 2, but now always take the strand OVER the strand from the last stitch worked. PATTERN: See diagrams A.1 to A.9. KNITTING TIP-1: To avoid the knitting tension becoming tighter when working pattern it is important that the strands at the back are not tight. Use a half-size larger needle when working pattern if this is a problem. KNITTING TIP-2: To avoid a hole in the transition where stitches are knitted up at the back of the thumb, the loop-strand between 2 stitches can be placed twisted on the left needle and knitted together with the first stitch on the left needle. ------------------------------------------------------- START THE PIECE HERE: ------------------------------------------------------- MITTENS – SHORT OVERVIEW OF THE PIECE: The piece is worked in the round with double pointed needles. LEFT MITTEN: Read KNITTING TIP-1! Cast on 56 stitches with double pointed needles size 2.5 mm and red. Work A.1 in the round. When A.1 has been completed in height work A.2 in the round (= 56 stitches). AT THE SAME TIME on round 2 in A.2 work A.5 over the 3 black squares in A.2. Increase in A.5 as shown in the diagram. Continue this pattern (note; you always knit 1 round of red over all stitches after a row of hearts). REMEMBER THE KNITTING TENSION! When A.5 has been completed, place the 17 stitches in A.5 on 1 thread for the thumb. On the next round cast on 3 new stitches over the thumb stitches = 56 stitches on the needles. Continue A.2 in the round. When A.2 has been completed in height, work A.3 (= 56 stitches). A.3 is repeated a total of 2 times in height (when A.3 has been worked 2 times in height the mitten measures approx. 19 cm and there is 5 cm left to finished length; you can try the mitten on and continue to desired length). Now work A.4 (= 56 stitches). Decrease as shown in the diagram. When A.4 has been completed there are 8 stitches left. Cut the strand, pull it through the remaining stitches, tighten and fasten well. The mitten measures approx. 24 cm from the cast-on edge. THUMB: Place the 17 stitches from the thread on double pointed needles size 2.5 mm and knit up 1 stitch in each of the 3 stitches cast on behind the thumb – read KNITTING TIP-2 = 20 stitches. Work A.6 in the round but make sure the stitches marked with triangles in A.5 and A.6 are above each other. Be also careful not to work the thumb too tightly as it will then be too small. Decrease at the top of the thumb as shown in the diagram. When A.6 has been completed there are 4 stitches left. Cut the strand, pull it through the remaining stitches, tighten and fasten well. The thumb measures approx. 6 cm in length. RIGHT MITTEN: Cast on 56 stitches with double pointed needles size 2.5 mm and red. Work A.1 in the round. When A.1 has been completed, work A.7 in the round (= 56 stitches). AT THE SAME TIME on round 2 in A.7 work A.5 over the 3 black squares in A.7. Increase in A.5 as shown in the diagram. Continue this pattern. When A.5 has been completed, place the 17 stitches in A.5 on 1 thread for thumb. On the next round cast on 3 new stitches over the thumb stitches = 56 stitches on the needles. Continue A.7 in the round. When A.7 has been completed in height work A.8 (= 56 stitches). A.8 is repeated a total of 2 times in height (or to desired length; match with left mitten). Now work A.9 (= 56 stitches). Decrease as shown in the diagram. When A.9 has been completed there are 8 stitches left. Cut the strand, pull it through the remaining stitches, tighten and fasten well. The mitten measures approx. 24 cm from the cast-on edge. THUMB: Is worked in the same way as the thumb on the left mitten. |
|||||||||||||||||||||||||||||||||||||
Diagram explanations |
|||||||||||||||||||||||||||||||||||||
|
|||||||||||||||||||||||||||||||||||||
 |
|||||||||||||||||||||||||||||||||||||
 |
|||||||||||||||||||||||||||||||||||||
 |
|||||||||||||||||||||||||||||||||||||
Have you finished this pattern?Tag your pictures with #dropspattern #holidayheartsmittens or submit them to the #dropsfan gallery. Do you need help with this pattern?You'll find 22 tutorial videos, a Comments/Questions area and more by visiting the pattern on garnstudio.com. © 1982-2026 DROPS Design A/S. We reserve all rights. This document, including all its sub-sections, has copyrights. Read more about what you can do with our patterns at the bottom of each pattern on our site. |
|||||||||||||||||||||||||||||||||||||


With over 40 years in knitting and crochet design, DROPS Design offers one of the most extensive collections of free patterns on the internet - translated to 17 languages. As of today we count 324 catalogues and 12290 patterns translated into English (UK/cm). 12290
We work hard to bring you the best knitting and crochet have to offer, inspiration and advice as well as great quality yarns at incredible prices! Would you like to use our patterns for other than personal use? You can read what you are allowed to do in the Copyright text at the bottom of all our patterns. Happy crafting!
Post a comment to pattern DROPS Extra 0-1469
We would love to hear what you have to say about this pattern!
If you want to leave a question, please make sure you select the correct category in the form below, to speed up the answering process. Required fields are marked *.