
Popular categories
Looking for a yarn?


Comments / Questions (36)
![]() Claire Martin wrote:
Claire Martin wrote:
Bonjour, Pour le dos et devant, l'augmentation de 26 mailles pour la taille L se fait sur un seul rang juste avant les points en côtes ou doit-on les intégrer dans les 20 cm restants à tricoter avant les cotes ?
15.02.2026 - 23:36DROPS Design answered:
Bonjour Mme Martin, ces augmentations se font sur un seul tour, juste avant de tricoter les côtes, autrement dit, quand vous avez tricoté 20 cm après la division des manches, elles permettent d'avoir le bon nombre de mailles pour les côtes avec les aiguilles 7 (il faut davantage de mailles que pour le jersey/point fantaisie avec l'aiguille 8, raison pour laquelle on augmente). Tricotez ensuite les 4 cm de côtes sur ces 158 m. Bon tricot!
17.02.2026 - 14:51
![]() Bernarda wrote:
Bernarda wrote:
Guten Tag, leider kann ich das Diagramm A1 mit der ANleitung für das Muster nicht finden. Wie strickt man dieses Muster? Vielen Dank! Freundliche Grüße Bernarda Damme
26.01.2026 - 10:30DROPS Design answered:
Liebe Bernarda, das Diagramm finden Sie ganz unten neben der Maßskizze. Viel Spaß beim Weiterstricken!
26.01.2026 - 11:54
![]() Brigitte Legrain wrote:
Brigitte Legrain wrote:
Désolée de vous demander encore de l'aide pour ce modèle mais je bloque vraiment sur les augmentations du dos et du devant en devant respecter le point fantaisie. Faut-il tricoter le jeté du raglan toujours à l'endroit ? Et les jetés du dos et du devant peuvent-ils être tricotés à l'envers ? D'autre part, après les augmentations vous parlez du marqueur au milieu devant, mais quand a-t-il été mis ? Merci d'avance pour votre patience à me répondre
24.10.2024 - 12:56DROPS Design answered:
Bonjour Mme Legrain, ce paragraphe a été corrigé, les jetés des raglans doivent être tricotés torse pour éviter des tours, et donc (comme déjà indiqué) en jersey pour les manches et en point fantaisie A.1 pour le devant et le dos. Merci pour votre retour. Bonne continuation!
24.10.2024 - 15:04
![]() Brigitte Legrain wrote:
Brigitte Legrain wrote:
Merci de votre réponse mais j'ai un autre problème : comment faire les augmentations sur les 19 mailles du dos et du devant et respecter le point fantaisie A1 De plus le marqueur qui permettra de mesurer l'ouvrage, le place-t-on à la fin du tour des augmentations du col ?
18.10.2024 - 08:56DROPS Design answered:
Bonjour Mme Legrain, les augmentations du raglan vont être incorporées progressivement au point fantaisie, ainsi, en début du dos/du devant, tricotez les augmentations comme la maille suivante du diagramme quand on le lit de gauche à droite, et à la fin du dos/devant, tricotez les augmentations comme la maille suivante du diagramme quand on lit le diagramme de droite à gauche, ainsi, le point fantaisie va s'élargir sur les côtés tout en restant correct sur les autres mailles. Le marqueur qui sert à mesurer peut être placé sur une des mailles sur l'aiguille, après le rang d'augmentation du col. Bon tricot!
18.10.2024 - 15:36
![]() Brigitte Legrain wrote:
Brigitte Legrain wrote:
C,est la première fois que je tricote avec des aiguilles circulaires. Je ne sais pas comment passer d'une aiguille n°8 à une aiguille n°7 après un rang en n°8
16.10.2024 - 09:33DROPS Design answered:
Bonjour Mme Legrain, lorsque le dernier tour avec l'aiguille circulaire 7 est tricoté, prenez l'aiguille circulaire 8 et tricotez le tour suivant comme indiqué, et continuez ainsi, en rond. Bon tricot!
16.10.2024 - 12:25
![]() Deni wrote:
Deni wrote:
Thanks for your prompt reply however I didn't quite understood :(. Is it possible to maybe elaborate simpler with sketch maybe?
05.01.2023 - 18:08DROPS Design answered:
Dear Deni, the increases will let the pattern grow in width, ie when you increase before A.1 you have to work the new stitch either K or P depending of the next stitch: if the first st in A.1 is a P stitch (like 1st stitch then work the new st before A.1 with P and after A.1, if the last st worked is a P st, then work the new st as a K. the pattern should grow on each side incorporating new sts in the pattern. Happy knitting!
06.01.2023 - 08:41
![]() Deni wrote:
Deni wrote:
Hi,I'm knitting size xxl and need assistance with the increasing part of raglan,how do I knit newly increased stitches so that pattern outside of A1 section is maintained?
04.01.2023 - 16:12DROPS Design answered:
Dear Deni, the new stitches increased are worked following A.1, ie the new stitch before A.1 is worked like the last stitch of the next repeat and the new stitch after A.1 is worked like the first stitch of the next repeat, after 2nd increase, work the new sts as the next to last st before A.1 and like the 2nd st next repeat after A.1 and continue like this so that the pattern is growing on the sides but continue in the middle. Happy knitting!
05.01.2023 - 10:46
![]() Anna wrote:
Anna wrote:
Il gettato nel ferro successivo va lavorato esclusivamente a diritto ritorto o può essere lavorato anche a rovescio ritorto a seconda di quello che dice A1 (quando A1 comincia con un rovescio)?Cioè, A1 comincia dopo i nuovi gettati o questi fanno parte del motivo?
24.01.2022 - 08:42DROPS Design answered:
Buonasera Anna, i gettati si lavorano a diritto ritorto sul ferro successivo. Buon lavoro!
24.01.2022 - 22:42
![]() Mel wrote:
Mel wrote:
Thank you for your reply. Another question I have is, does that k1 overlap with the knit stitches involved in raglan increases? Because the increase is yo, k1, slip marker, k1, yo. Then do we k1 and do A1 or just A1? Thank you so much for your help
10.01.2022 - 08:48DROPS Design answered:
Dear Mel, this knit 1 on either side of A.1 is one of the raglan stitches, ie you should always have 2 knitted stitches on each raglan with the marker thread between these stitches and increase then on either side of these 2 sts. (as explained under RAGLAN). Happy knitting!
10.01.2022 - 09:16
![]() Mel wrote:
Mel wrote:
Hi, I'm knitting a size S and I'm confused by the yoke section. It says to K1, A1, K1, stocking stitch over, K1, A1, k1, stocking stitch. And then we continue this pattern while increasing every 2nd round. Do we always do K1, or does that sometimes become a P1 depending on what A1 says? Thank you!
09.01.2022 - 19:02DROPS Design answered:
Hi Mel, You knit 1 before and after each A.1, then work A.1 according to the diagram. Happy knitting! Happy knitting!
10.01.2022 - 08:29
|
|||||||
Remember When#rememberwhensweater |
|||||||
 |
 |
||||||
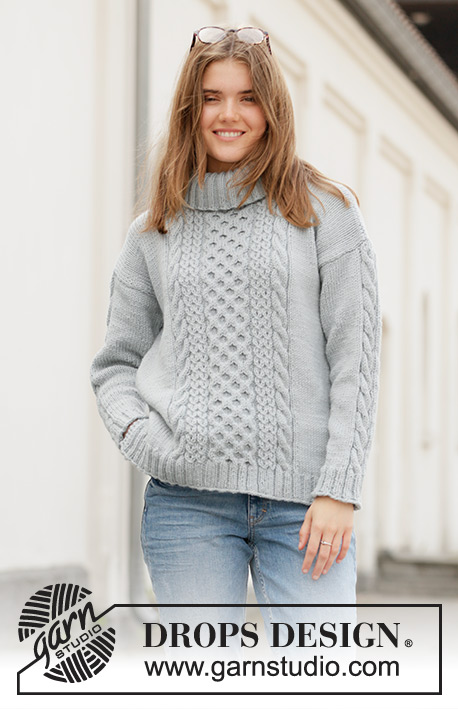
Knitted jumper with raglan and texture in DROPS Nepal and DROPS Brushed Alpaca Silk or 1 strand DROPS Wish. The piece is worked top down with folded neck. Sizes S – XXXL.
DROPS 205-23 |
|||||||
|
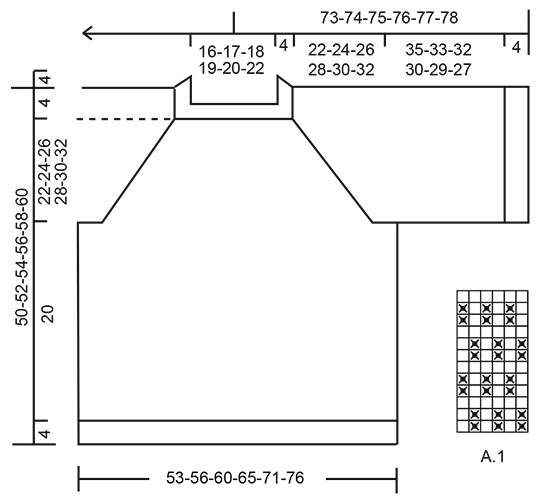
------------------------------------------------------- EXPLANATIONS FOR THE PATTERN: ------------------------------------------------------- PATTERN: See diagram A.1. INCREASE TIP (evenly spaced): To work out how to increase evenly, count the total number of stitches on the needle (e.g. 56 stitches) and divide by the number of increases to be made (e.g. 4) = 14. In this example, increase by making 1 yarn over after each 14th stitch. On the next round work the yarn overs twisted to avoid holes. RAGLAN: Increase to raglan on each side of the marker threads in each transition between body and sleeves as follows: Work until there is 1 stitch left before marker thread, 1 yarn over, knit 2 (marker thread sits between these 2 stitches), 1 yarn over (= 2 stitches increased). On the next round work the yarn overs twisted to avoid holes. Work the new stitches on the sleeves in stocking stitch and on the front/back pieces in pattern A.1. CASTING-OFF TIP: To avoid the cast-off edge being tight you can cast off with a larger size needle. ------------------------------------------------------- START THE PIECE HERE: ------------------------------------------------------- JUMPER – SHORT OVERVIEW OF THE PIECE: The piece is worked in the round with circular needle, top down. The sleeves are worked in the round with short circular needle. JUMPER: NECK: Cast on 56-58-60-64-64-68 stitches with circular needle size 8 mm and 1 strand Nepal + 1 strand Brushed Alpaca Silk (= 2 strands) or 1 strand Wish. Knit 1 round. Change to circular needle size 7 mm and work rib (= knit 1 / purl 1) for 9 cm (= folding neck). Knit 1 round where you increase 4-2-0-0-4-4 stitches evenly spaced – read INCREASE TIP = 60-60-60-64-68-72 stitches. Insert a marker here. THE PIECE IS NOW MEASURED FROM HERE. YOKE: Change to circular needle size 8 mm and work pattern as follows: Insert a marker thread here (= transition between left sleeve and back piece), knit 1, A.1 over the next 19-19-19-21-23-25 stitches, knit 1, insert a marker thread here (= transition between back piece and right sleeve), stocking stitch over the next 9 stitches, insert a marker thread here (= transition between right sleeve and front piece), knit 1, A.1 over the next 19-19-19-21-23-25 stitches, knit 1, insert a marker thread here (= transition between front piece and left sleeve), stocking stitch over the next 9 stitches. REMEMBER THE KNITTING TENSION! There are 4 marker threads in the piece; they follow your work onwards and show the transitions between body and sleeves. Continue this pattern in the round; at the same time on the next round start to increase to RAGLAN – read description above. Increase like this every 2nd round a total of 15-17-18-19-19-21 times = 180-196-204-216-220-240 stitches. Then increase only on front and back pieces (= 4 stitches increased on each increase-round) 1-1-1-2-3-3 more times. You have now increased a total of 16-18-19-21-22-24 times on front and back pieces and 15-17-18-19-19-21 times on the sleeves = 184-200-208-224-232-252 stitches. When all the increases are finished the piece measures approx. 21-24-25-28-29-32 cm from the marker mid front and down. Continue with pattern and stocking stitch until the piece measures 22-24-26-28-30-32 cm. The next round is worked as follows: Work the first 53-57-59-65-69-75 stitches (= back piece), place the next 39-43-45-47-47-51 stitches on a thread (= sleeve), cast on 5-5-7-7-9-9 new stitches on the needle (= in side under sleeve), work the next 53-57-59-65-69-75 stitches (= front piece), place the next 39-43-45-47-47-51 stitches on a thread (= sleeve), cast on 5-5-7-7-9-9 new stitches on the needle (= in side under sleeve). Body and sleeves are finished separately. THE PIECE IS NOW MEASURED FROM HERE! BODY: = 116-124-132-144-156-168 stitches. Work pattern A.1 in the round as before, NOTE: the pattern continues as before over the stitches from the yoke and fits all the way around the body. Continue like this until the piece measures approx. 20 cm. Knit 1 round where you increase 20-24-26-26-30-34 stitches evenly spaced – remember INCREASE TIP = 136-148-158-170-186-202 stitches. Change to circular needle size 7 mm and work rib (= knit 1 / purl 1) for 4 cm. Cast off with knit over knit and purl over purl. Make sure the cast-off edge is not tight – read CASTING OFF TIP. The jumper measures approx. 50-52-54-56-58-60 cm from the shoulder down. SLEEVE: Place the 39-43-45-47-47-51 stitches from the thread on the one side of the piece on short circular needle size 8 mm and knit up 1 stitch in each of the 5-5-7-7-9-9 stitches cast on under the sleeve = 44-48-52-54-56-60 stitches. Work stocking stitch in the round. When the sleeve measures 35-33-32-30-29-27 cm increase 8-8-10-10-10-10 stitches evenly spaced = 52-56-62-64-66-70 stitches. Change to circular needle size 7 mm and work rib (= knit 1 / purl 1) for 4 cm. Cast off with knit over knit and purl over purl. Make sure the cast-off edge is not tight – remember CASTING OFF TIP. The sleeve measures approx. 39-37-36-34-33-31 cm (shorter sleeve in the larger sizes due to longer yoke). Work the other sleeve in the same way. ASSEMBLY: Fold the top half of the neck to the inside and sew down so the neck is double. To avoid the neck being tight it is important that the seam is elastic and not tight. |
|||||||
Diagram explanations |
|||||||
|
|||||||
 |
|||||||
Have you finished this pattern?Tag your pictures with #dropspattern #rememberwhensweater or submit them to the #dropsfan gallery. Do you need help with this pattern?You'll find 20 tutorial videos, a Comments/Questions area and more by visiting the pattern on garnstudio.com. © 1982-2026 DROPS Design A/S. We reserve all rights. This document, including all its sub-sections, has copyrights. Read more about what you can do with our patterns at the bottom of each pattern on our site. |
|||||||


With over 40 years in knitting and crochet design, DROPS Design offers one of the most extensive collections of free patterns on the internet - translated to 17 languages. As of today we count 324 catalogues and 12290 patterns translated into English (UK/cm). 12290
We work hard to bring you the best knitting and crochet have to offer, inspiration and advice as well as great quality yarns at incredible prices! Would you like to use our patterns for other than personal use? You can read what you are allowed to do in the Copyright text at the bottom of all our patterns. Happy crafting!
Post a comment to pattern DROPS 205-23
We would love to hear what you have to say about this pattern!
If you want to leave a question, please make sure you select the correct category in the form below, to speed up the answering process. Required fields are marked *.