
Popular categories
Looking for a yarn?


Comments / Questions (16)
![]() Susanne wrote:
Susanne wrote:
Er der ingen der kan sige mig hvor vidioen er til denne opskrift 173-48
25.02.2026 - 16:34DROPS Design answered:
Hei Susanne, Vi har dessverre ikke en video for selve mønsteret, men en del hjelpevideoer for teknikkene finner du på toppen av sida. Hilsen, Drops Team.
26.02.2026 - 06:16
![]() Susanne wrote:
Susanne wrote:
Hvor finder jeg hjælp til model 173-48 Jeg kan simpel hen ikke finde ud af og starte op på den
23.02.2026 - 14:51DROPS Design answered:
Hei Susanne. Arbeidet strikkes frem og tilbake og sidelengs. Arbeidet starter midt foran på venstre forstykket, deretter strikkes ermkant, bakstykket, den andre ermkanten, og til slutt høyre forstykke. Om du fremdeles ikke kjønner, send oss gjerne en beskrivelse på hvor det stopper opp for deg og hvilken str. du strikker etter. mvh DROPS Design
03.03.2026 - 14:15
![]() AnneP wrote:
AnneP wrote:
Ist die Maschenprobe wirklich so wie bei Euch angegeben in Ordnung? Ich stricke mit der angegebenen Wolle und mit der empfohlenen Nadelstärke 3. Ich stricke nicht besonders fest oder locker. 10 cm sind bei mir so 20 M und 54 Reihen.
29.01.2025 - 22:14DROPS Design answered:
Liebe AnneP, stricken Sie mit DROPS Alpaca? 24 Maschen für 10 cm ist die gewöhnliche Maschenprobe in der Breite für diese Wolle - 32 Reihen für Glattrechgts und 48 Reihen für Krausrechts. Viel Spaß beim Stricken!
30.01.2025 - 10:11
![]() Ast wrote:
Ast wrote:
Bonjour je voudrais savoir si la bordure est au point mousse on fait diagrammes on a du jersey le diagrammes et du jersey merci dans l'attente de votre réponse
26.10.2021 - 13:50DROPS Design answered:
Bonjour, le gilet est tricote au point mousse avec torsades. Les bordures sont au point mousse aussi. Bon tricot!
26.10.2021 - 16:51
![]() Mareile wrote:
Mareile wrote:
Habe den Fehler gefunden!
21.07.2018 - 20:37
![]() Mareile wrote:
Mareile wrote:
Hallo, ich habe das linke Vorderteil bis zu dem Punkt gestrickt wo das Seitenteil beginnt und fand die Anleitung schon sehr unklar. Insgesamt 2 cm über 91 M, in der Mitte am unteren Rand den Markierer? Danach soll für die verkürzten Reihen Ärmelblende mit Rückreihe begonnen werden. Das geht nicht, da dann das Muster nicht passt. Auch bis zu 4. Markierer kann ich nicht zurück stricken, da der innerhalb der 91 stillgelegten Maschen liegt. Was ist da falsch?
21.07.2018 - 13:17
![]() Catherine Viallet wrote:
Catherine Viallet wrote:
Est-ce de toutes les zones qui ne font pas partie des torsades A1 se tricotent au point mousse? Si c'est le cas,il me semble qu'il y a une erreur dans la version française des explications, à la fin de la première ligne des paragraphes rangs raccourcis:"à l'endroit sur l'endroit et à l'envers sur l'envers",ce qui est la définition du point jersey. Ne faut-il pas lire: "à l'endroit sur l'endroit et sur l'envers"?
22.10.2017 - 22:31DROPS Design answered:
Bonjour Madame Viallet, vous avez raison, ces mailles se tricotent au point mousse, la correction a été faite. Bon tricot!
23.10.2017 - 12:07
![]() Conny wrote:
Conny wrote:
Im Muster A1 werden Umschläge gearbeitet, die im Model nicht als Löcher erscheinen. Werden diese verschränkt in der Rückrunde gearbeitet? 2. Frage: "Die M, die nicht im Muster A 1 gestr. werden,..." Nach meinem Verständnis werden doch alle Maschen in A1 gestrickt , oder?
19.10.2017 - 07:30DROPS Design answered:
Liebe Conny, bei der Rückreihen werden die Umschläge normal gestrickt - A.1 wird oben am Hals und unten gestrickt, alle andere Maschen werden kraus rechts gestrickt. Viel Spaß beim stricken!
19.10.2017 - 09:35
![]() Brown wrote:
Brown wrote:
Bonjour, je ne comprends pas les explications, quand on commence les rangs raccourcies, quand fait-on les points mousses, doit -on fait A1 à chaque rang? Merci
10.07.2017 - 18:42DROPS Design answered:
Bonjour Mme Brown, tout à fait on continue A.1 comme dans le diagramme, même pendant les rangs raccourcis, les mailles sont croisées tous les 6 rangs pour la grande torsade. Bon triot!
11.07.2017 - 09:27
![]() Joan Reib wrote:
Joan Reib wrote:
Jeg forstår ikke at der under vendinger skal strikkes 1 pind ret FRA VRANGEN over alle masker. Det giver da nogle underlige striber ???
06.02.2017 - 15:56DROPS Design answered:
Hej Joan. Nej, det burde det ikke. Underdelen er strikket i retstrik og du skal kun strikke ret over de masker som ikke hörer med i A.1: De m som ikke strikkes efter A.1 strikkes ret fra retsiden og ret fra vrangen.
07.02.2017 - 13:49
|
|||||||||||||||||||
Square Off#squareoffcardigan |
|||||||||||||||||||
|
|
|||||||||||||||||||
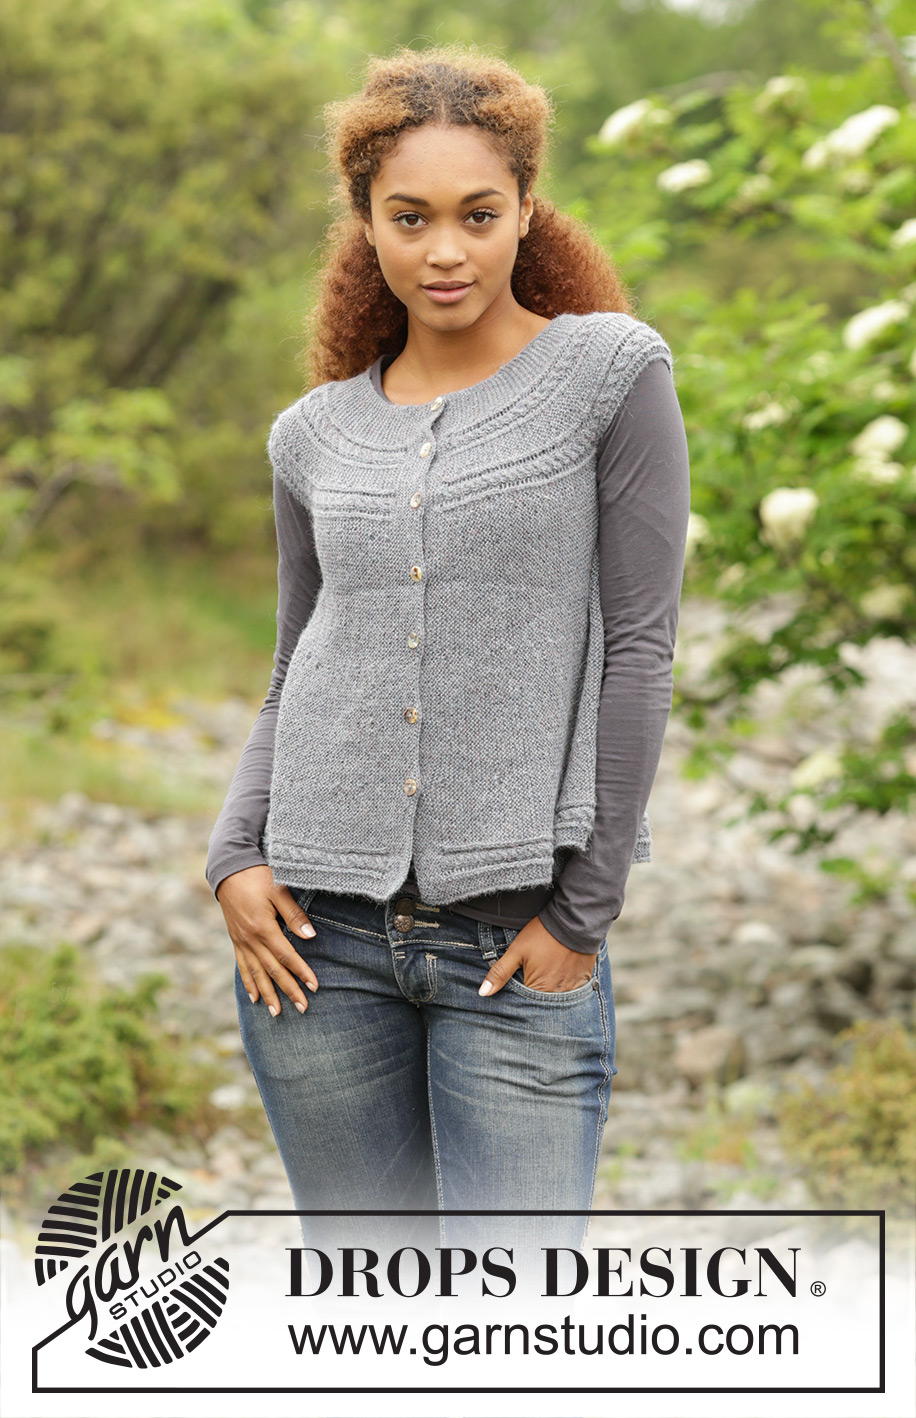
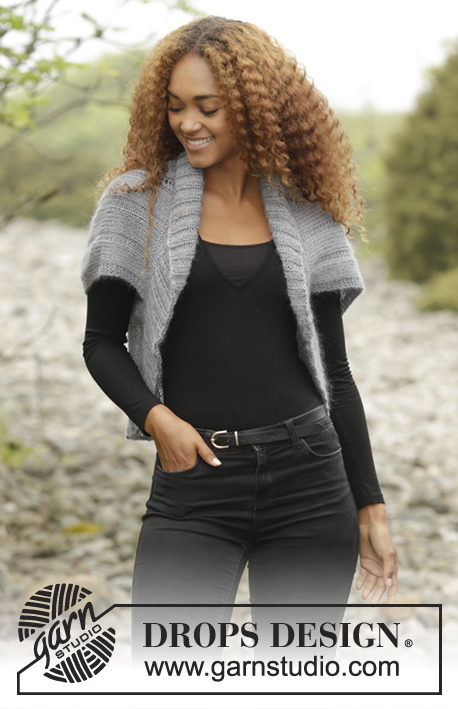
Knitted DROPS vest in garter st with cables worked sideways in "Alpaca". Size: S - XXXL.
DROPS 173-48 |
|||||||||||||||||||
|
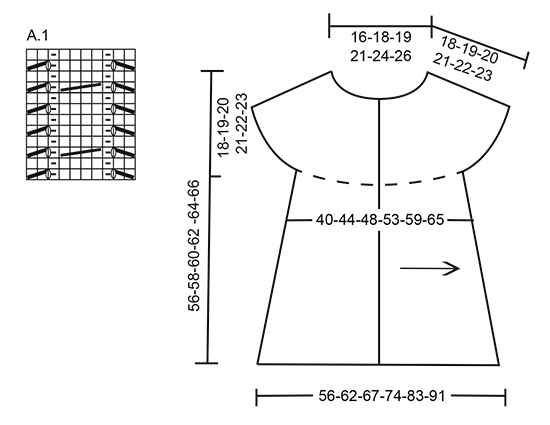
GARTER ST (back and forth): K all rows. 1 ridge = 2 rows K. PATTERN: See diagram A.1. The diagram show all rows in pattern seen from RS. SHORT ROWS: The sts that are not worked according to A.1 are worked K from RS and K from WS. * K 1 row from WS over all sts (= from the neck towards bottom edge). Work until 1st marker, turn piece and work back. Work until 2nd marker, turn piece and work back. Work all sts, turn and work back. Work until 5th marker, turn piece and work back. Work until 4th marker, turn piece and work back. Work until 3rd marker, turn piece and work back. K 1 row from RS over all sts *, repeat from *-*. 14 rows have been worked at bottom edge and 4 rows at upper edge. SHORT ROWS SLEEVE EDGE: The sts that are not worked according to A.1 are worked K from RS and K from WS. * K 1 row from WS over all sts (= from the neck towards bottom edge). Work until 5th marker, turn piece and work back. Work until 4th marker, turn piece and work back. K 1 row from RS over all sts *, repeat from *-*. 6 rows have been worked at bottom edge and 2 rows at upper edge. KNITTING TIP: To avoid holes in transitions in short rows tighten yarn on every turn. ---------------------------------------------------------- VEST: Worked sideways and back and forth on needle. Beg mid front on left front piece, then work sleeve edge, back piece, the other sleeve edge and then right front piece. LEFT FRONT PIECE: Loosely cast on 134-140-144-148-154-158 sts on circular needle size 3 mm with Alpaca. 1st row = RS (from bottom edge and up to neck). Work 3 cm in GARTER ST - see explanation above - over all sts = band. REMEMBER THE KNITTING TENSION Work next row as follows from RS: K 5, A.1 (= 10 sts), K 78-81-83-85-88-90, A.1, K 7-9-10-11-12-15, A.1, K 14-15-16-17-19-18. Insert 5 markers in piece (without working the row, seen from bottom edge and RS as follows): 1st marker after 31-31-32-33-34-35 sts, 2nd marker after 60-62-64-66-67-69 sts, 3rd marker after 91-94-96-98-101-103 sts, 4th marker after 106-111-114-117-121-124 sts and 5th marker after 122-128-132-136-142-146 sts. Then work SHORT ROWS - see explanation above. READ KNITTING TIP! Continue like this with short rows, garter st and A.1 until piece measures approx. 22-24-26-29-32-35 cm from cast-on edge (measured at 3rd marker), finish with 1 row from WS. Then work side piece as follows: Work 1 cm back and forth over only the 91-94-96-98-101-103 sts from bottom edge (without short rows). Insert 1 marker (= middle of the side). Work 1 cm more back and forth over the 91-94-96-98-101-103 sts and slip these sts on a stitch holder (sts are used for back piece later). Then work sleeve edge. LEFT SLEEVE EDGE: = 43-46-48-50-53-55 sts on needle. Continue with SHORT ROWS SLEEVE EDGE, garter st and A.1. Repeat until sleeve edge measures approx. 22-24-26-28-30-32 cm (bottom), finish with 1 row from WS. BACK PIECE: Slip the 91-94-96-98-101-103 sts from stitch holder back on needle = 134-140-144-148-154-158 sts. Work short rows, garter st and A.1 until piece measures 39-43-47-52-58-64 cm from marker in the side (measured along 3rd marker), finish with 1 row from WS. Work side piece as follows: Work 1 cm back and forth over only the 91-94-96-98-101-103 sts from bottom edge. Insert 1 marker (= middle of the side). Work 1 cm more back and forth over the 91-94-96-98-101-103 sts and slip these sts on a stitch holder. RIGHT SLEEVE EDGE: Work as left sleeve edge. RIGHT FRONT PIECE: Slip the 91-94-96-98-101-103 sts from stitch holder back on needle = 134-140-144-148-154-158 sts. Continue with short rows. When piece measures 19-21-23-26-29-32 cm from marker in the side, work band as follows: Work approx. 1 ½ cm in garter st, on next row from RS dec for buttonholes as follows: K 22-28-32-18-24-28, K 2 tog, 1 YO, * K 16, K 2 tog, 1 YO *, repeat from *-* 5-5-5-6-6-6 more times, K 2. Continue in garter st until band measures 3 cm. Loosely cast off. ASSEMBLY: Sew the buttons on to left front piece. |
|||||||||||||||||||
Diagram explanations |
|||||||||||||||||||
|
|||||||||||||||||||
 |
|||||||||||||||||||
Have you finished this pattern?Tag your pictures with #dropspattern #squareoffcardigan or submit them to the #dropsfan gallery. Do you need help with this pattern?You'll find 21 tutorial videos, a Comments/Questions area and more by visiting the pattern on garnstudio.com. © 1982-2026 DROPS Design A/S. We reserve all rights. This document, including all its sub-sections, has copyrights. Read more about what you can do with our patterns at the bottom of each pattern on our site. |
|||||||||||||||||||


With over 40 years in knitting and crochet design, DROPS Design offers one of the most extensive collections of free patterns on the internet - translated to 17 languages. As of today we count 324 catalogues and 12290 patterns translated into English (UK/cm). 12290
We work hard to bring you the best knitting and crochet have to offer, inspiration and advice as well as great quality yarns at incredible prices! Would you like to use our patterns for other than personal use? You can read what you are allowed to do in the Copyright text at the bottom of all our patterns. Happy crafting!
Post a comment to pattern DROPS 173-48
We would love to hear what you have to say about this pattern!
If you want to leave a question, please make sure you select the correct category in the form below, to speed up the answering process. Required fields are marked *.