
Popular categories
Looking for a yarn?


Comments / Questions (118)
![]() Claudie wrote:
Claudie wrote:
Bonjour et merci pour les vidéos M1 + M3 que je cherchais. Par contre, pouvez-vous me dire s'il y a du son ? si oui, je ne trouve pas où le mettre en route. Merci et bonne journée
24.03.2014 - 13:41DROPS Design answered:
Bonjour Claudie, nos vidéos n'ont pas de son, car notre site est visité par des internautes du monde entier. Suivez bien les diagrammes en même temps pour bien comprendre comment les réaliser. Bon crochet !
24.03.2014 - 14:36
![]() Linda wrote:
Linda wrote:
How many balls of yarn are needed for this pattern?
10.03.2014 - 17:38DROPS Design answered:
Dear Linda, amount of yarn is given at the right side of the picture under tab "Materials". Divide the total weight by the weight of 1 ball Muskat to get the number of balls, ie in 1st size, 500 g Muskat/50 g 1 ball Muskat = 10 balls Muskat are required in size M. Happy crocheting!
11.03.2014 - 09:06
![]() Esther wrote:
Esther wrote:
Bij Panden staat: deel het werk in tweeën en haak afzonderlijk verder. Het pand heeft nu 60 boogjes dus dat is 30 voor achterpand en 15 elk voor de voorpanden. elk voorpand is 2 herhalingen, dit snap ik niet bedoel je met herhalingen 1 teltekening? want dat zijn 6 boogjes dus dan kom is aan 12 boogjes wat niet de 15 boogjes zouden moeten zijn. Wat wordt er met herhaling(en) bedoelt?
05.03.2014 - 09:54DROPS Design answered:
Hoi Esther. 1 herhaling is inderdaad 1 herhaling van de teltekening. Maar je moet ook 1-2 herhalingen laten staan aan beide zijkanten voor de armsgaten:
05.03.2014 - 15:13
![]() Deb Fisher wrote:
Deb Fisher wrote:
Sorry to labour this, but I must repeat - to complete the neck according to your instructions would mean having only 24 chain spaces in total. The actual number is more than twice that!
27.12.2013 - 21:39DROPS Design answered:
Dear Mrs Fisher, you should have a total of 24 ch-sp for neckline on back piece, ie. 4 repeats Pattern 3 x 6 ch-sp each repeat. Do not hesitate to contact your Drops store for further indivudal help. Happy crocheting!
30.12.2013 - 15:15
![]() Deb Fisher wrote:
Deb Fisher wrote:
Hi - once again I am having difficulty, this time with the neck shaping. The pattern says " work over 7 ch-spaces = shoulder, sc over the following 10 ch-spaces = neck (crochet 1 sc in every ch-space and 1 sc in each sc between ch-spaces), work over 7 ch-spaces = shoulder." However, this means a total of only 24 chain spaces, and I have far more than that. The neck shaping doesn't seem to be shown in the videos - please help.
20.12.2013 - 22:22DROPS Design answered:
Dear Mrs Fisher, you will first work 1 row over first 7 ch-spaces (=7 ch-spaces for 1st shoulder), then over the next 10 ch-loop (neckline): 1 sc in each ch-space + 1 sc between each ch-space, then 7 ch-spaces over the last 7 ch spaces for 2nd shoulder. Turn, on next row, work 1 row over the first 7 ch-spaces, cut the yarn and work 1 row over the 7 ch-spaces on the other shoulder. Happy knitting!
27.12.2013 - 13:00
![]() Cinzia wrote:
Cinzia wrote:
Grazie, in realtà non ho ancora iniziato, stavo cercando di capire il modello. Ho fatto il campione e mi risulta molto grande in cm, posso usare un uncinetto più piccolo ad esempio il 3 x mantenere il numero delle ripetizioni? Ancora grazie mille
23.11.2013 - 20:47DROPS Design answered:
Buonasera Cinzia. Sì può usare la misura dell'uncinetto che le consente di ottenere il campione delle misure indicate. Buon lavoro!
24.11.2013 - 17:45
![]() Cinzia wrote:
Cinzia wrote:
Salve, vorrei sapere cosa significa "dividere e lavorare ogni parte del corpo in modo separato".come faccio a dividere il lavoro in 2 parti? grazie per la disponibilita' e complimenti x i vs bellissimi modelli
23.11.2013 - 14:34DROPS Design answered:
Buona sera Cinzia. Fino ad ora ha lavorato i due davanti e il dietro insieme. Adesso è all'altezza degli scalfi. Prosegue quindi lavorando solo sulle maglie del davanti destro, come indicato subito sotto nelle spiegazioni, poi sulle m del davanti sinistro e infine sulle m del dietro. Ci riscriva se non è chiaro. Buon lavoro!
23.11.2013 - 18:13
![]() Joy wrote:
Joy wrote:
OOps I had just sent a comment and forget to change the country. I'm US not Canada.
17.09.2013 - 18:28
![]() Joy wrote:
Joy wrote:
This is a beautiful pattern. I haven't read the whole thing yet, but will find the schematics very helpful. This I will make for ME! :)
17.09.2013 - 18:26
![]() Barbarosa wrote:
Barbarosa wrote:
On the graph row 2 of pattern 2 shows the dc's as quite long when compared to the other dc's in the design. Does mean I need to make expand the loop?
17.08.2013 - 13:58DROPS Design answered:
Dear Barbarosa, row 2 in pattern M.2 is worked with dc, even if they look quite different than the other one in the graph, just work them as usual. Happy crocheting!
20.08.2013 - 11:10
|
|||||||||||||||||||||||||||||||||||||
Midnight Lace |
|||||||||||||||||||||||||||||||||||||
|
|
|||||||||||||||||||||||||||||||||||||
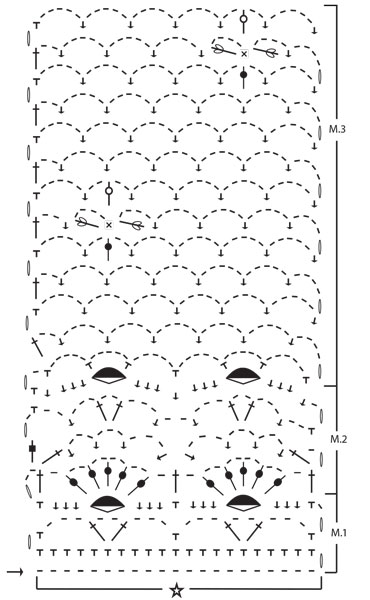
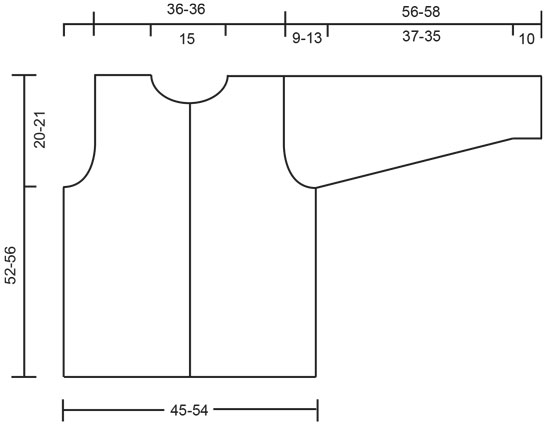
Crocheted Cardigan in DROPS Muskat. Piece is worked bottom up with lace pattern and flower pattern. Size M-L/XL.
DROPS 68-15 |
|||||||||||||||||||||||||||||||||||||
|
Tension: 1 diagram = approx. 9 cm in width. 12 rows of Pattern 2 = approx. 10 cm in height. Pattern: See chart. The pattern is seen from the right side. «1 rapport» = «1 repeat». Note: All measurements in pattern refer to the garment when held up or worn, because the pattern pulls in and lengthens. Body: Ch 201-241 loosely. Turn and crochet Pattern 1 once across row (10-12 repeats = 60-72 ch-st bows). Then crochet Pattern 2 on the next row and repeat a total of 5 times, the piece measures approx. 20 cm. Crochet Pattern 3. At the same time when the piece measures approx. 32-35 cm divide and crochet each part of Body separately. Each front = 2 repeats; back = 4 repeats, bind off 1-2 repeats at each side for armhole. Right front: Continue with Pattern 3 over 2 repeats starting at center front. When the piece measures approx. 42-46 cm adjust to finish after 1 flower) continue with Pattern 3 but do not make flowers. At the same time shape the neck as follows: Crochet until 2 ch-st bows remain at center front. Turn and crochet back. Then crochet over 1 less ch-st bow at neck edge of every other row 3 times. Continue to crochet in pattern until the piece measures 52-56 cm, fasten off. Left front: Crochet the same as right front, reversing all shaping. Back: Continue to crochet Pattern 3 until piece measures approx. 42-46 cm, then crochet the rest without flowers (as on front). When the piece measures approx. 49-53 cm crochet the next row as follows: 7 ch-st bows = shoulder, dc over the following 10 ch-st bows = neck (crochet 1 dc in every ch-st bow and 1 dc in every dc between bows), 7 ch-st bows = shoulder. Finish with 1 row of ch-st bows on each shoulder. The piece measures approx. 52-56 cm, fasten off. Sleeve: Ch 51-51 loosely. Turn and crochet Pattern 1 once across row (2.5 repeats = 15 ch-st bows), then crochet Pattern 2 twice, then continue in Pattern 3. When the piece measures approx. 10 cm inc 1 ch-st bow at end of row on alternately right and left side of piece a total of 8-10 times, inc at the end of every 3rd and 4th rows - make inc by ch 4, then 1 dc in the last sc from previous row = 23-25 ch-st bows on row. Continue until piece measures approx. 52-54 cm. Then crochet over 1 less ch-st bow at end of every row until the piece measures 56-58 cm, fasten off. Assembly: Crochet together shoulder seams as follows: * 1 dc in first ch-st bow on front, ch 1, 1 dc in first ch-st bow on back, ch 1 *, repeat from * - * on each shoulder. Crochet together the sleeve as follows from bottom edge: * 1 dc in one side, ch 2, 1 dc in *, repeat from * - * until approx. 5-9 cm remains. Crochet sleeves to Body in the same way as sleeves were crocheted together. Crochet 1 row dc along both button bands and around the neck - crochet snugly around the neck so that the neckline will not sag. Buttonhole loops: Make 3 buttonhole loops along right front. Start at top edge: * 1 dc, ch 3, fasten with 1 dc 1 cm below, sl st approx. 8-9 cm lower on band * repeat from * - * until there are 3 loops. Sew on buttons on left front. |
|||||||||||||||||||||||||||||||||||||
Diagram explanations |
|||||||||||||||||||||||||||||||||||||
|
|||||||||||||||||||||||||||||||||||||
 |
|||||||||||||||||||||||||||||||||||||
 |
|||||||||||||||||||||||||||||||||||||
Have you finished this pattern?Tag your pictures with #dropspattern or submit them to the #dropsfan gallery. Do you need help with this pattern?You'll find 7 tutorial videos, a Comments/Questions area and more by visiting the pattern on garnstudio.com. © 1982-2026 DROPS Design A/S. We reserve all rights. This document, including all its sub-sections, has copyrights. Read more about what you can do with our patterns at the bottom of each pattern on our site. |
|||||||||||||||||||||||||||||||||||||


With over 40 years in knitting and crochet design, DROPS Design offers one of the most extensive collections of free patterns on the internet - translated to 17 languages. As of today we count 324 catalogues and 12290 patterns translated into English (UK/cm). 12290
We work hard to bring you the best knitting and crochet have to offer, inspiration and advice as well as great quality yarns at incredible prices! Would you like to use our patterns for other than personal use? You can read what you are allowed to do in the Copyright text at the bottom of all our patterns. Happy crafting!
Post a comment to pattern DROPS 68-15
We would love to hear what you have to say about this pattern!
If you want to leave a question, please make sure you select the correct category in the form below, to speed up the answering process. Required fields are marked *.