
Popular categories
Looking for a yarn?


Comments / Questions (61)
![]() Susanne wrote:
Susanne wrote:
Noch eine Frage: Die Lm zwischen jeweils den beiden Stb wird nur aus dem Faden geholt oder muss ich dabei auch in die Lm einstechen? Dann würde es eigentlich eine feste Mache ergeben? Danke ;) Auch wenn ich so viele Fragen stelle, die Videos sind toll...
22.06.2021 - 16:39DROPS Design answered:
Liebe Susanne, leider verstehe nicht ganz was Sie hier meinen, am Ende der 1. Hälfte (in die erste Luftmasche der Luftmaschenkette) häkeln Sie 2 Stb + 1 Lm + 2 Stb, dann bei jeder den nächsten Reihen häkeln Sie wieder (2 Stb, 1 Lm, 2 Stb) um diese mittlere Lm (= in der Mitte der Reihe = oben am Cup. Kann es Ihnen helfen?
23.06.2021 - 07:44
![]() Susanne wrote:
Susanne wrote:
Noch eine Ergänzung zu den Fragen von eben: wenn ich die Arbeit um 180 Grad gewendet habe um auf der anderen Seite der Lm-Reihe weiter zu häkeln, muss ich doch wieder 3 Wende-Lm häkeln und dann das erste Stäbchen, oder? Vielen Dank. LG, Susanne
22.06.2021 - 15:01DROPS Design answered:
Liebe Susanne, (siehe vorrige Antwort unten) die 3 Luftmaschen werden nur als 1. Stb am Anfang jeder Reihe gehäkelt, 1 ganze Reihe hier beginnt mit 1 Stb in die 4. Luftmaschen von der Nadel, dann häkeln Sie die eine Seite von der Luftmaschenkette, 2 Stb, 1 Lm, 2 Stb in die letzte Lm, und wieder auf die andere Seite von der Luftmaschenkette, dann nun wenden und die nächste Reihe mit 3 Lm (als 1. Stb) anfangen. Viel Spaß beim häkeln!
22.06.2021 - 16:38
![]() Susanne wrote:
Susanne wrote:
Hallo liebes Drops-Team. Bin am Anfang der Cups. Habe die Wendeluftmaschen+1+18 Stäbchen fertig und noch 4 Lm übrig. Die 2Stb+1Lm+2Stb sollen in die letzte Lm gehäkelt werden? Dann müsste ich 3 Lm überspringen. Ist das richtig? Nach dem Drehen der Arbeit um 180 Grad, weiß ich nicht, wo ich genau weitermachen soll. Gibt es dazu auch ein Video? Ich bin absoluter Anfänger. Danke für Ihre Unterstützung. Viele Grüße, Susanne
22.06.2021 - 14:38DROPS Design answered:
Liebe Susanne, das Anfang vom Cups wird beidseitig von der Luftmaschenkette gehäkelt (wie z.B. hier nur wird hier nicht am Ende der Reihe mit 1 fM geschlossen aber am Ende der Reihe gewendet um Hin und Rückreihen zu häkeln). Dh, nach 2 Stb+1 Lm+1 Stb, häkeln Sie jetzt 1 Stb in die andere Seite von der Luftmaschenkette von Anfant, dh 1 Stb in jeder die nächsten 20 Luftmaschen (= 18 Stb + 1 Stb in die 4. Lm am Anfang der Reihe + 3 Lm als 1. Stb bei der 1. Hälfte). Hoffentich kann das Ihnen helfen. Viel Spaß beim Häkeln!
22.06.2021 - 16:35
![]() Susanne wrote:
Susanne wrote:
Hallo bin mit den cups dran.was meinen sie das der faden ab geschnitten werden muss und neu an setzten.wo muss ich den Faden wieder neu ansetzten? Gruß Susanne
14.06.2021 - 10:21DROPS Design answered:
Liebe Susanne, in die Größen S, L und XXXL wurde die letzte Reihe eine Hinreihe, und die nächste Reihe muss wieder eine Hinreihe, deshalb muss man den Faden abschneiden (= am Ende der Hinreihe) und am Anfang einer neue Rückreihe einsetzen (so haben Sie 2 Hin-reihen hintereinander). Viel Spaß beim häkeln!
14.06.2021 - 16:24
![]() Jo wrote:
Jo wrote:
What are the finished measurements for each of the sizes?
11.06.2021 - 00:15DROPS Design answered:
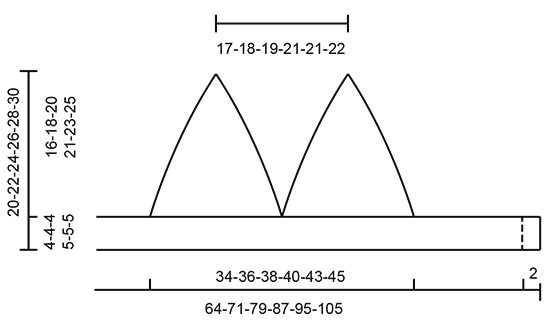
Dear Jo, the measurements of the finished piece are given (in cm-s) on the shcematic drawing at the bottom of the pattern. Happy Stitching!
11.06.2021 - 01:44
![]() Eivor Alvim wrote:
Eivor Alvim wrote:
Går det an å bade med denne uten at den mister passformen?
06.07.2020 - 10:16DROPS Design answered:
Hei Eivor. Om du får tatt den av deg rett etter du har badet, klemt ut mestparten av vannet og legger den flatt til tørk, skal den beholde passformen. Men den egner seg best til en solbikini. mvh DROPS design
06.07.2020 - 14:44
![]() Nina Smedegaad Christensen wrote:
Nina Smedegaad Christensen wrote:
Har jeg misforstået opskriften eller er der en fejl?? Jeg synes det ser ud som om at hver anden række skal være fastmasker.... men det står da ikke i opskriften... Eller skal det forstås sådan at man hækler en række fastmasker efter hver række stangmasker... Vh Nina
21.06.2020 - 16:28DROPS Design answered:
Hei Nina. Nei, det er bare rekker med staver. Når det hekles staver frem og tilbake slik det gjøres i denne oppskriften, kan det kanskje se ut for noen at det er en fastmaske rekke mellom stavene. mvh DROPS design
22.06.2020 - 13:45
![]() Franca Bruno wrote:
Franca Bruno wrote:
NEL BORDO PEZZO SUPERIORE QUANDO DICE "INSERIRE UN SEGNAPUNTI" NELL 1A CATENELLA LAVORATA, INTENDE LA PRIMA CATENELLA DELLA COPPA?QUINDI LA PARTE ANTERIORE E' PIù ALTA RISPETTO AL PRIMO BORDO CHE ARRIVA SUL DIETRO?. dAL DISEGNO NON CAPISCO. GRAZIE FRANCA
25.05.2020 - 16:04DROPS Design answered:
Buongiorno Franca. Deve inserire il segnapunti nella prima catenella delle 47-56-65-75-84-98 catenelle che avvia quando unisce le due coppe. Più avanti, inizierà a lavorare il bordo da questo segnapunti. Buon lavoro!
26.05.2020 - 12:20
![]() Lucila wrote:
Lucila wrote:
Me encantó ,por la forma bien esplicado de sus patrones y el paso a paso que dan a seguir. , Felicitaciones,que tengan un buen día.
01.04.2020 - 16:23
![]() Lucy wrote:
Lucy wrote:
Me encantó esta página ,muy bien esplicado ,, gracias y muchas bendiciones.
01.04.2020 - 16:14
|
|
Tahiti#tahitibikini |
|
 |
 |
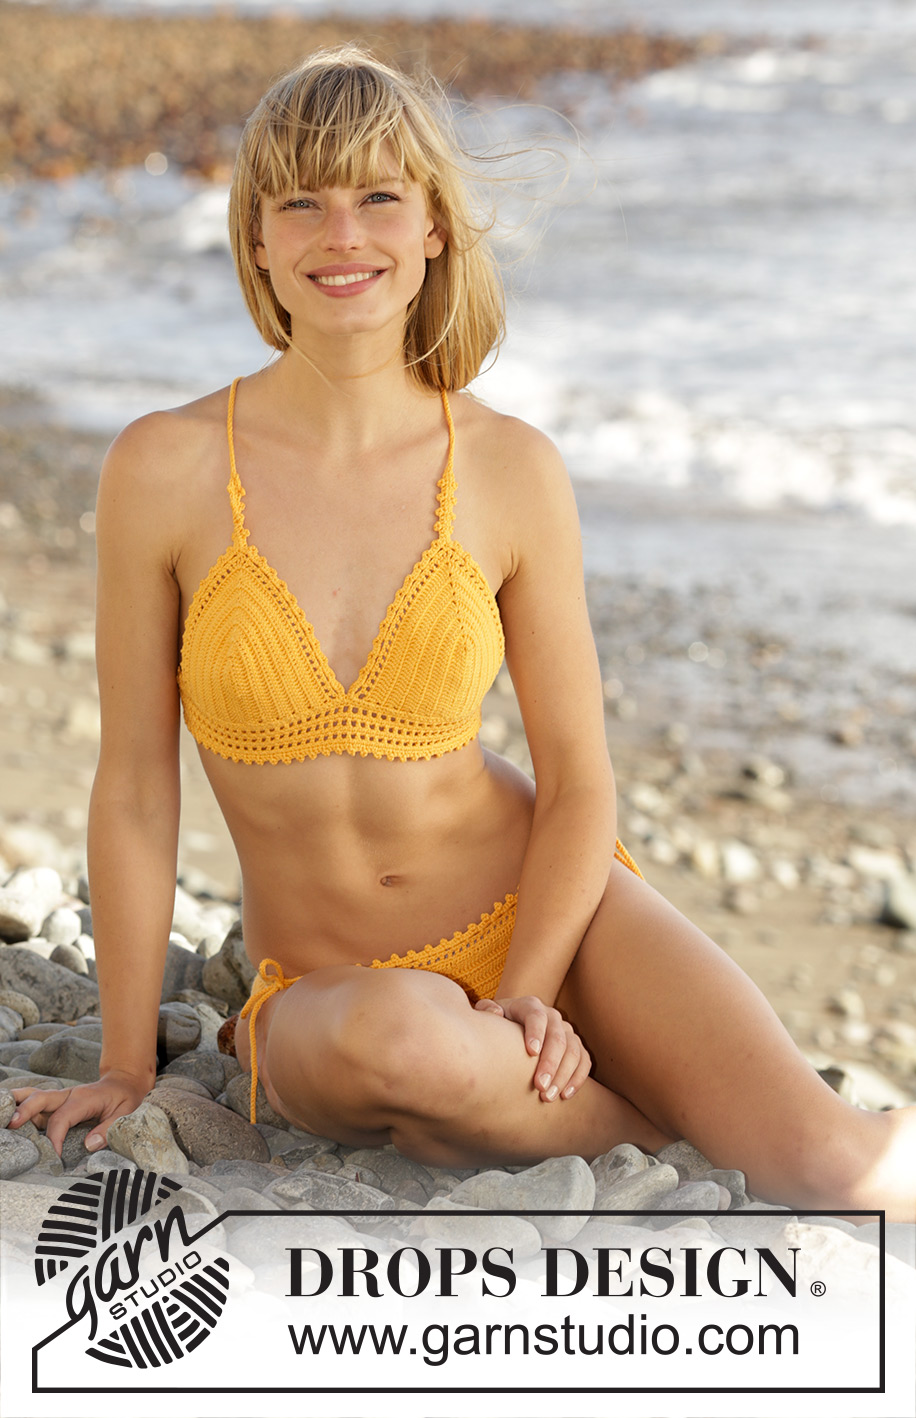
Crochet DROPS bikini with lace pattern and ties in ”Safran”. Size S-XXXL.
DROPS 170-15 |
|
|
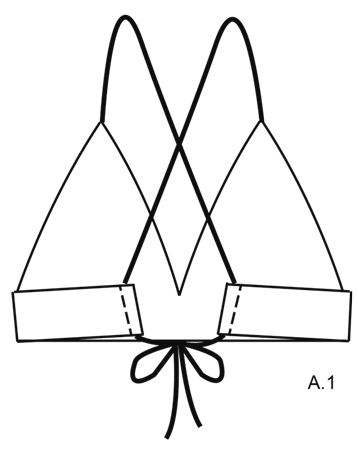
CROCHET INFO: On first row in piece work first tr in 5th ch from hook (= 2 tr). Replace first tr at beg of every tr row with 3 ch. Replace first dc at beg of every dc row with 1 ch. ---------------------------------------------------------- BIKINI TOP: First work 2 loose bra cups. The work the 2 bra cups tog. BRA CUP: Work 21-24-27-27-32-38 ch with Safran on hook size 2.5 mm. Work back and forth as follows (1st row = from RS): Work 1 tr in 5th ch from hook (= 2 tr) - READ CROCHET INFO, then work 1 tr in each of the next 15-18-21-21-26-32 ch, work (2 tr, 1 ch, 2 tr) in the last ch on row, rotate piece, skip last ch (i.e. ch just worked in) and continue with 1 tr in each of the remaining 17-20-23-23-28-34 ch on the other side of ch-row = 38-44-50-50-60-72 tr + 1 ch. Turn piece and continue back and forth with 1 tr in every tr on each side of ch-row and work (2 tr, 1 ch, 2 tr) around ch at the top of each row. REMEMBER THE CROCHET TENSION! Continue like this until 11-12-13-14-14-15 rows in total with tr have been worked, but on last row adjust no of sts so that there are 40-44-48-52-56-64 tr on each side of ch at the top (= 80-88-96-104-112-128 tr in total). Piece measures approx. 7-7½-8-9-9-9½ cm from ch-row and outwards. NOTE: Next row worked is from RS. I.e. the yarn must be cut in size S, L and XXXL before continuing. Now work an edge as follows: ROW 1 (= RS): Work * 1 tr, 1 ch, skip next tr *, repeat from *-* until 2 tr remain before ch at the top of bra cup, work 1 tr in next tr, 1 ch, 1 tr in next tr (= last tr before ch at the top), work (1 ch, 1 tr, 1 ch, 1 tr, 1 ch) around ch, then work the same way but reversed down on opposite side of bra cup as follows: Work 1 tr in first tr after ch at the top, 1 ch, 1 tr in next tr, continue with * 1 ch, skip next tr, 1 tr *, repeat from *-* the rest of the row. ROW 2: Turn and work 1 dc in first tr, * work 3 ch, skip (1 ch, 1 tr, 1 ch), 1 dc in next tr *, repeat from *-* up to ch at the top of bra cup but work last dc around the middle ch at the top of bra cup. Then work ch for tie by working ch for 85-90-90-95-100-100 cm (measured from the top of bra cup). Turn and work 1 sl st in every ch. NOTE: Make sure that sl sts does not tighten ch row. Then work reversed of the other side of bra cup as follows: 1 dc around ch-space at the top of bra cup (i.e. there are 2 dc around same ch-space), * work 3 ch, skip (1 ch, 1 tr, 1 ch), 1 dc in next tr *, repeat from *-* down along the entire edge. Cut the yarn. Work another bra cup the same way. Now work the 2 bra cups tog into a top. NOTE: Make sure to work over both bra cups seen from RS. ROW 1 (= RS): Work 47-56-65-75-84-98 loose ch and insert a marker in the first ch worked (work an edge beg from this marker later in piece). Then work 48-50-53-56-59-62 dc evenly around the outermost tr/dc (i.e. along edge at the bottom on one bra cup), work 1 ch (= between the 2 bra cups), work 48-50-53-56-59-62 dc evenly around the outermost tr/dc (i.e. along edge at the bottom on the other bra cup), them work 47-56-65-75-84-98 loose ch (incl 1 ch to turn with) at the end of row = 191-213-237-263-287-321 sts. ROW 2: Work 1 dc in 2nd ch from hook (= 2 dc), work 1 dc in each of the next 3-5-7-3-5-5 ch, * skip 1 ch, work 1 dc in each of the next 6 ch *, repeat from *-* 5-6-7-9-10-12 more times (= 41-49-57-65-73-85 dc), now work 1 dc in each of the next 97-101-107-113-119-125 dc/ch, * work 1 dc in each of the next 6 ch, skip 1 ch *, repeat from *-* 5-6-7-9-10-12 more times, work 1 dc in each of the last 5-7-9-5-7-7 ch (= 41-49-57-65-73-85 dc) = 179-199-221-243-265-295 dc on row. ROW 3: Work 1 tr in each of the first 5 dc, * work 1 ch, skip 1 dc, 1 tr in next dc *, repeat from *-* until 4 dc remain, work 1 tr in each of the last 4 dc. ROW 4: Work 1 dc in every tr and around every ch. Repeat 3rd and 4th row 2-2-2-3-3-3 more times. Then work as follows: Work 1 dc in each of the first 5-8-5-6-6-6 dc, * work 1 dc in each of the next 2 dc, work 3 ch, work 1 sl st in last dc worked (= picot), 1 dc in next dc *, repeat from *-* until 6-8-6-6-7-7 dc remain, work 1 dc in each of the last 6-8-6-6-7-7 dc. Fasten off. EDGE: Now work an edge, beg from marker. NOTE: Skip the ch sts not worked. Work as follows from RS: Work 1 dc in each of the first 5 ch, * work 1 dc in next ch, 3 ch, 1 sl st in last dc worked (= picot), work 1 dc in each of the next 4 ch *, repeat from *-* until 1-4-2-0-3-0 ch remain before bra cup, work 1 dc in each of the next 1-4-2-0-3-0 ch and 1 dc in corner in transition for bra cup. Then work * 1 dc around first ch-space on bra cup, 3 ch, 1 dc around same ch-space, work 1 dc in next dc *, repeat from *-* up to strap on bra cup. Now work in sl st row:* 1 dc in each of the first 3 sl sts, 3 ch, 1 sl st in last dc worked *, repeat from *-* 3-3-4-4-5-5 more times, work 1 dc in each of the next 2 dc, 1 sl st in next sl st. Now do not work up along the strap but turn and work down towards bra cup again: Work 1 sl st through 1 ch on the back of strap and continue with edge the same way but reversed in ch-row on strap, then along opposite side of bra cup, work 1 dc in ch between the 2 bra cups. Continue with edge the same way as on first bra cup and strap and then along the remaining ch cast on. Fasten off. ASSEMBLY: Sew a tunnel for the ties in each side of top as follows: Fold the 1st tr/dc inwards on WS so that it meets the 5th tr/dc and sew neatly tog through both layers. Place ties in a cross on the back and thread ends of tie through tunnel - see A.1. ---------------------------------------------------------- BIKINI PANTIES: CROCHET INFO: Replace first tr at beg of every tr row with 3 ch. Replace first dc at beg of every dc row with 1 ch. DEC ON DC-ROW: Dec 1 dc in each side on a row as follows: Work 1 dc, * insert hook in next st, get thread *, repeat from *-*, make a YO and pull thread through all 3 loops on hook. Then work 1 dc in every st until 3 sts remain on row, repeat dec in the next 2 sts, 1 dc in last st. INCREASE TIP: Inc 1 dc in each side on a row as follows: Work 2 dc in first dc, work 1 st in every dc until 1 dc remains, work 2 dc in last dc. ---------------------------------------------------------- BIKINI PANTIES: Work bikini panties in dc with an edge on front and back piece and ties in the sides. Start at top of front piece and work in one until back piece. Work 80-90-95-105-110-120 ch on hook size 2.5 mm with Safran. Turn and work 1 dc in 2nd ch from hook (= 2 dc) - READ CROCHET INFO, then work 1 dc in each of the next 3 ch, * skip 1 ch, 1 dc in each of the next 4 ch *, repeat from *-* 14-17-18-20-21-23 more times = 65-73-77-85-89-97 dc. Then work 1 dc in every dc, and on next row dec 1 dc in each side as follows - READ DECREASE TIP: Dec every 3rd row 13-13-14-14-16-16 times, every other row 6-9-9-10-10-13 times, every row 2-2-2-4-3-3 times and on every other row 2 times in all sizes = 19-21-23-25-27-29 dc. Piece measures 16-18-19-20-21-23 cm. REMEMBER THE CROCHET TENSION! Continue with 1 dc in every dc until piece measures 21-23-25-26-28-30 cm. On next row inc 1 st in each side as follows: Inc every other row 2 times in all sizes, every row 0-2-3-5-8-13 times and every other row 31-32-32-31-31-29 times = 85-93-97-101-109-117 dc. Continue with 1 dc in every dc until piece measures 44-46-48-50-52-55 cm. Cut the yarn. Now work an edge and ties as follows: EDGE AND TIES: Work an edge on back piece as follows: ROW 1 (= RS): Work 1 tr in first dc, * work 1 ch, skip 1 dc, 1 tr in next dc *, repeat from *-* the rest of row. Cut the yarn. ROW 2: Work loose ch for approx. 29-30-31-32-33-34 cm, then continue over edge at the back as follows: * 1 dc in first/next tr, 3 ch, skip 1 tr, work 1 dc in next tr *, repeat from *-* the rest of row, then work ch for 29-30-31-32-33-34 cm. ROW 3: Turn piece and work 1 sl st in every ch on tie (make sure to avoid tight sl sts), then continue over edge at the back as follows: Work 1 dc in first dc, * 2 dc around ch-space, 3 ch, 1 sl st in last dc worked, 1 dc around same ch-space, 1 dc in next dc *, repeat from *-* the entire row, and continue with 1 sl st in every ch worked for tie in the side. Fasten off. Work an edge on front piece as follows: Work 1 dc in every dc. NOTE: Skip the ch sts not worked = 65-73-77-85-89-97 dc. Then work an edge and ties as on back piece. |
|
 |
|
 |
|
Have you finished this pattern?Tag your pictures with #dropspattern #tahitibikini or submit them to the #dropsfan gallery. Do you need help with this pattern?You'll find 10 tutorial videos, a Comments/Questions area and more by visiting the pattern on garnstudio.com. © 1982-2026 DROPS Design A/S. We reserve all rights. This document, including all its sub-sections, has copyrights. Read more about what you can do with our patterns at the bottom of each pattern on our site. |
|


With over 40 years in knitting and crochet design, DROPS Design offers one of the most extensive collections of free patterns on the internet - translated to 17 languages. As of today we count 324 catalogues and 12290 patterns translated into English (UK/cm). 12290
We work hard to bring you the best knitting and crochet have to offer, inspiration and advice as well as great quality yarns at incredible prices! Would you like to use our patterns for other than personal use? You can read what you are allowed to do in the Copyright text at the bottom of all our patterns. Happy crafting!
Post a comment to pattern DROPS 170-15
We would love to hear what you have to say about this pattern!
If you want to leave a question, please make sure you select the correct category in the form below, to speed up the answering process. Required fields are marked *.