
Popular categories
Looking for a yarn?


Comments / Questions (41)
![]() Kamilla Bergstrøm Kristensen wrote:
Kamilla Bergstrøm Kristensen wrote:
I rude 1 står der at man skal stille A1 over de sidste 8 m. Og så A1 over de næste 27 m og igen A1 ved de sidste 8 m igen. Er det en fejl.
16.05.2015 - 01:18DROPS Design answered:
Hej Kamilla, Nej der står at du strikker de sidste 8 m i A.1 (dvs at du kun har 1 r inden mønsteret) så strikker du hele A.1 3 gange og til sidst strikkes de første 8 m i A.1, så du også kun har 1 r i den anden side. God fornøjelse!
20.05.2015 - 15:59
![]() Inger Nina Yndestad Eide wrote:
Inger Nina Yndestad Eide wrote:
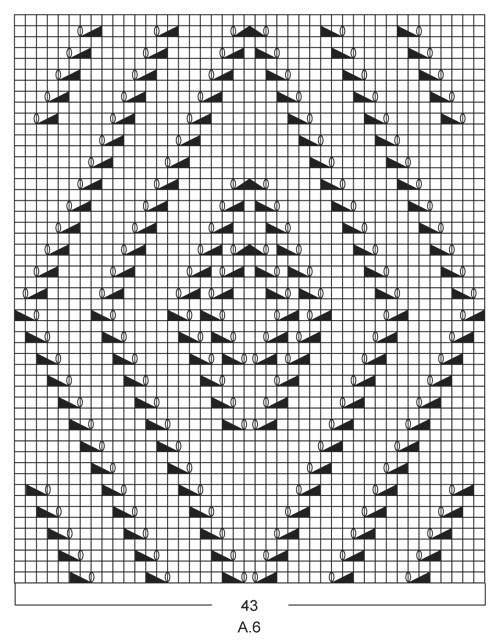
Hei. I mønster A6 trur eg der ein feil. På første omgang skal det strikkes 5 rett og så 2 sammen og eit kast. og det gjentas 2 ganger og så er det 1 rett og 1 kast og 1 maske løs av og 1 rett, trekk den løse masken over og så 5 rett og det trudde eg også skulle gjenta seg ut pinnen, men da er det plutselig 6 rett og det slutter med 4 rett. Skal ikkje det vere 5 rett mellom alle? Mvh Inger Nina.
14.05.2015 - 12:47DROPS Design answered:
Hej Inger, Jeg tror du har ret, du kan flytte masken et tak til højre i diagrammet. Vi skal lade Design se på det og så kommer der et nyt diagram. God fornøjelse!
15.05.2015 - 09:32
![]() Petra wrote:
Petra wrote:
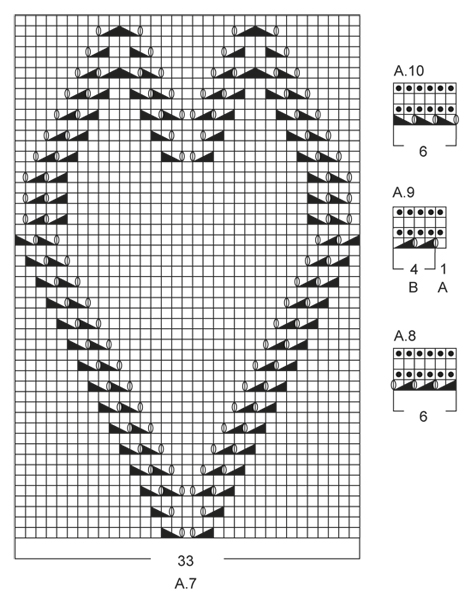
Bei den Mustern A.1 bis A.6 und in der Erklärung zum Diagramm werden immer maximal 3 Maschen zusammengestrickt und mit 2 Umschlägen wieder auf die erforderliche Maschenanzahl gebracht. Im Muster A.7 (Reihe 45 und 49) taucht nun ein Symbol über 4 Maschen auf, welches in der Erklärung nicht aufgeführt ist. Da auch nur 2 Umschläge gestrickt werden, können nicht 4 Maschen zu einer zusammengestrickt werden. Es würde dann eine Masche fehlen. Welche Bedeutung hat dieses Symbol?
28.04.2015 - 08:46DROPS Design answered:
Das ist kein Symbol über 4 M, sondern es handelt sich um die "altbekannten" Symbole über 2 M, die einfach direkt aufeinander folgen. Also 2 M durch Überziehen re zusammenstricken und 2 M re zusammenstricken direkt nacheinander, dann haben Sie auch wieder 2 M abgenommen, was zu den 2 Umschlägen passt.
28.04.2015 - 23:32
![]() Gerda Canrinus wrote:
Gerda Canrinus wrote:
Een vraag over ruit A7. Er staat een dakje over 4 steken hoe moet dat? Er is alleen een dakje in de beschrijving over 3 steken. Volg ik de geplaatste tekening dan kom ik niet uit met de steken. Ik moet 4 i.p.v. de getekende 3 weg krijgen. Graag uw antwoord. Alvast mijn dank. Vr.gr.Gerda T.Canrinus
08.02.2015 - 16:15DROPS Design answered:
Hoi Gerda. Het is een samenvoeging van de twee liggende driehoekjes: 1 r afh, 1 r, afgeh st overh en 2 r samen. Zie de symbolen.
09.02.2015 - 14:10
![]() Marie wrote:
Marie wrote:
Krása :)
03.01.2015 - 21:09
![]() Enrica wrote:
Enrica wrote:
Da copiare per fare un regalo a chi aspetta un bambino!
30.12.2014 - 21:23
![]() Lara wrote:
Lara wrote:
Per il mio cucciolo!!!!
30.12.2014 - 02:35
![]() W Van Leeuwen-van Onselen wrote:
W Van Leeuwen-van Onselen wrote:
Mooie steken voor een ............... vul maar in want je kan er heel veel kanten mee op.
28.12.2014 - 16:41
![]() Claudia Helferich wrote:
Claudia Helferich wrote:
Ich freue mich schon auf diese Anleitung, eine wunderwunderschöne Decke
16.12.2014 - 13:00
![]() Linsfia wrote:
Linsfia wrote:
Jättevacker! Hade inga röster kvar, men denna var verkligen fin!
14.12.2014 - 15:57
|
||||||||||||||||||||||
Timeless#timelessblanket |
||||||||||||||||||||||
 |
 |
|||||||||||||||||||||
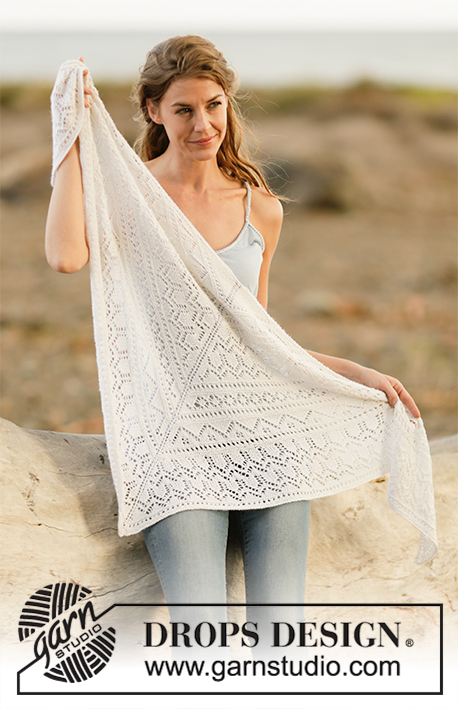
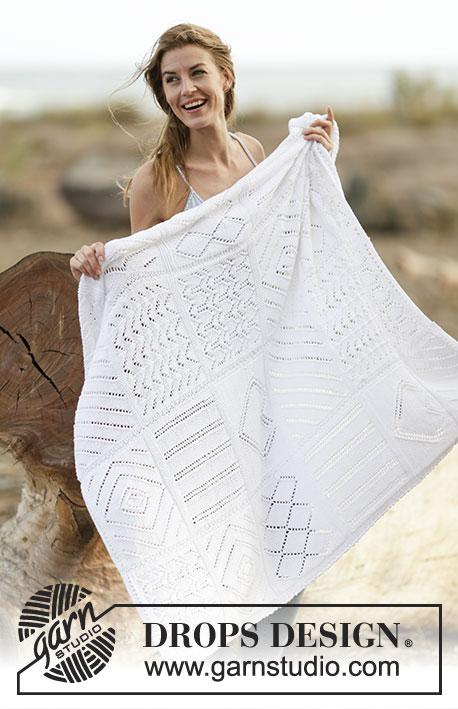
Knitted DROPS blanket with lace patterns in ”Cotton Light”.
DROPS 159-34 |
||||||||||||||||||||||
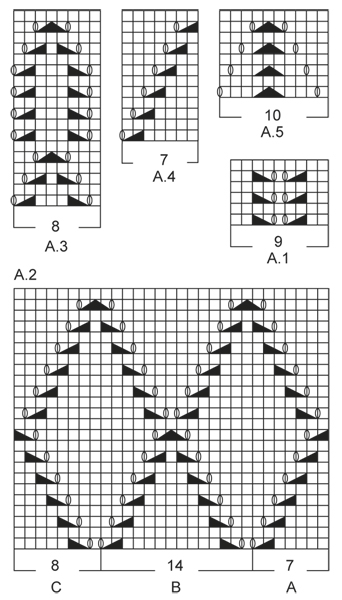
|
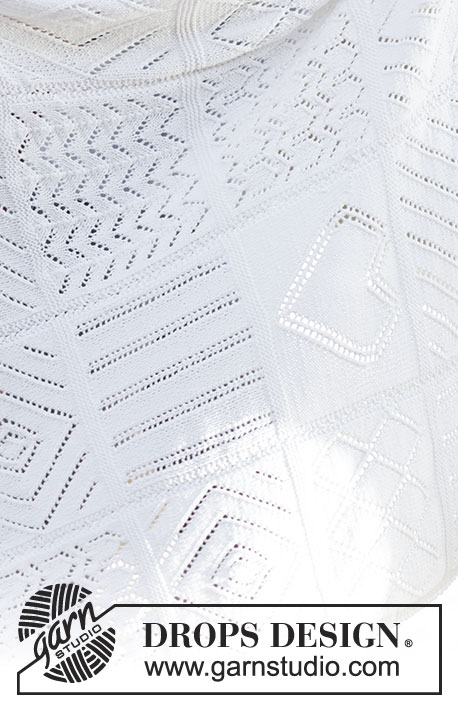
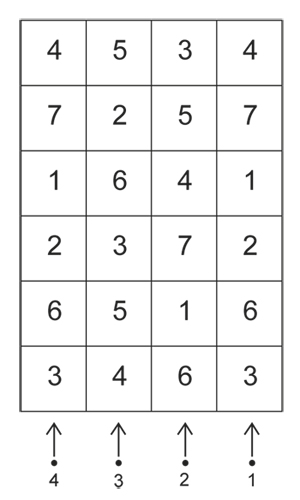
GARTER ST (back and forth): K all rows. 1 ridge = 2 rows K. PATTERN: See diagrams A.1 - A.10. Diagrams show pattern seen from RS, first row = RS. NOTE: Diagram A.4: Diagram does not fit vertically when repeated, but eyelet rows will continue to displace as before, AT THE SAME TIME beg a new eyelet row every 15th row. SQUARE ORDER: Strip 1: Square 3, 6, 2, 1, 7 and 4. Strip 2: Square 6, 1, 7, 4, 5 and 3. Strip 3: Square 4, 5, 3, 6, 2 and 5. Strip 4: Square 3, 6, 2, 1, 7 and 4. SQUARE PATTERN: There are 7 different square patterns, they are worked as follows: Square 1: = 43 sts. Work 2 row in stocking st. Work next row from RS as follows: Work the last 8 sts in A.1, A.1 over the next 27 sts (= 3 times), work the first 8 sts in A.1. Work A.1 9 times in total vertically. Square 2: = 43 sts. Work 4 row in stocking st. Work next row from RS as follows: A.2A (= 7 sts), A.2B over the next 28 sts (= 2 times), finish with A.2C (= 8 sts). Work A.2 2 times in total vertically. Work 4 row in stocking st. Square 3: = 43 sts. Work 2 row in stocking st. Work next row from RS as follows: 1 st in stocking st, A.3 over the next 40 sts (= 5 times), 2 sts in stocking st. Work A.3 3 times in total vertically. Square 4: = 43 sts. Work 2 row in stocking st. Work next row from RS as follows: Work the last 5 sts in A.4, A.4 over the next 35 sts (= 5 times), work the first 3 sts in A.4. Repeat A.4 until piece measures approx. 21.5 cm (adjust so that next row is from RS). Square 5: = 43 sts. Work next row from RS as follows: 1 st in stocking st, A.5 over the next 40 sts (= 4 times), 2 sts in stocking st. Repeat A.5 7 times in total vertically. Square 6: = 43 sts. Work 2 row in stocking st. Work next row from RS as follows: A.6 (= 43 sts). Work A.6 1 time vertically. Work 2 row in stocking st. Square 7: = 43 sts. Work 4 rows in stocking st. Work next row from RS as follows: 5 sts in stocking st, A.7 (= 33 sts) and 5 sts in stocking st. Work A.7 1 time vertically. Work 2 rows in stocking st. ---------------------------------------------------------- BLANKET: Piece is worked back and forth on needle in 4 strips and sewn tog when finished. Each strip consists of 6 squares, squares are worked in 7 different textures - read SQUARE ORDER above. STRIP 1: Cast on 51 sts on needle size 4.5 mm with Cotton Light. Work an edge on 8 rows as follows (1st row = RS): Work 2 ridges in GARTER ST - see explanation above. Work diagram A.8 (= 6 sts), A.9A (= 1 st), A.9B over the next 44 sts. Then work as follows: A.8 (= 6 sts), SQUARE PATTERN – read explanation above (= 43 sts), 2 sts in garter st. Finish 1st-5th square in strip with 4 ridges. REMEMBER THE KNITTING TENSION After last square in strip has been worked, work 2 ridges. Then work an edge on 4 rows as follows: A.8 (= 6 sts), A.9A (= 1 st), A.9B over the next 44 sts. Cast off. STRIP 2 and 3: Cast on 47 sts on needle size 4.5 mm with Cotton Light. Work an edge on 8 rows as follows (1st row = RS): Work 2 ridges. Work diagram A.9A (= 1 st), A.9B over the next 46 sts. Then work as follows: 2 sts in garter st, square pattern (= 43 sts) and 2 sts in garter st. Finish 1st-5th square in strip with 4 ridges. After last square in strip has been worked, work 2 ridges. Then work an edge on 4 rows as follows: A.9A (= 1 st), A.9B over the next 46 sts. Cast off. STRIP 4: Cast on 51 sts on needle size 4.5 mm with Cotton Light. Work an edge on 8 rows as follows (1st row = RS): Work 2 ridges. Work diagram A.9A (= 1 st), A.9B over the next 44 sts, A.10 (= 6 sts). Then work as follows: 2 sts in garter st, square pattern (= 43 sts) and A.10 (= 6 sts). Finish 1st-5th square in strip with 4 ridges. After last square in strip has been worked, work 2 ridges. Then work an edge as follows: A.9A (= 1 st), A.9B over the next 44 sts, A.10 (= 6 sts). Cast off. ASSEMBLY: Sew tog strips in outer loops of edge sts. |
||||||||||||||||||||||
Diagram explanations |
||||||||||||||||||||||
|
||||||||||||||||||||||
 |
||||||||||||||||||||||
 |
||||||||||||||||||||||
 |
||||||||||||||||||||||
 |
||||||||||||||||||||||
Have you finished this pattern?Tag your pictures with #dropspattern #timelessblanket or submit them to the #dropsfan gallery. Do you need help with this pattern?You'll find 14 tutorial videos, a Comments/Questions area and more by visiting the pattern on garnstudio.com. © 1982-2026 DROPS Design A/S. We reserve all rights. This document, including all its sub-sections, has copyrights. Read more about what you can do with our patterns at the bottom of each pattern on our site. |
||||||||||||||||||||||


With over 40 years in knitting and crochet design, DROPS Design offers one of the most extensive collections of free patterns on the internet - translated to 17 languages. As of today we count 324 catalogues and 12291 patterns translated into English (UK/cm). 12291
We work hard to bring you the best knitting and crochet have to offer, inspiration and advice as well as great quality yarns at incredible prices! Would you like to use our patterns for other than personal use? You can read what you are allowed to do in the Copyright text at the bottom of all our patterns. Happy crafting!
Post a comment to pattern DROPS 159-34
We would love to hear what you have to say about this pattern!
If you want to leave a question, please make sure you select the correct category in the form below, to speed up the answering process. Required fields are marked *.