
Popular categories
Looking for a yarn?


|
||||||||||||||||||||||
Timeless |
||||||||||||||||||||||
 |
 |
|||||||||||||||||||||
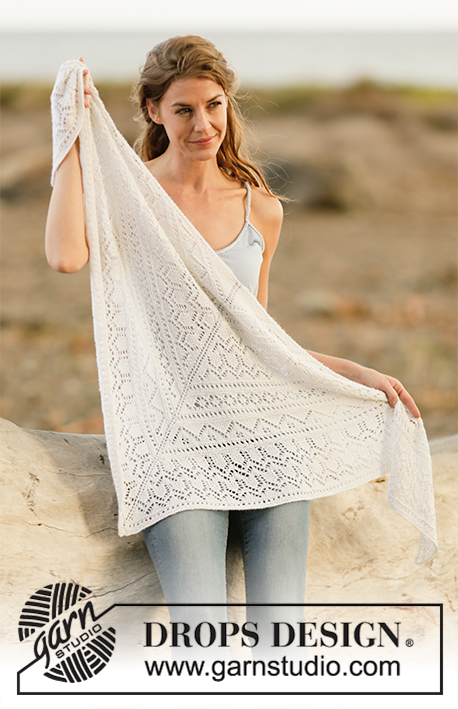
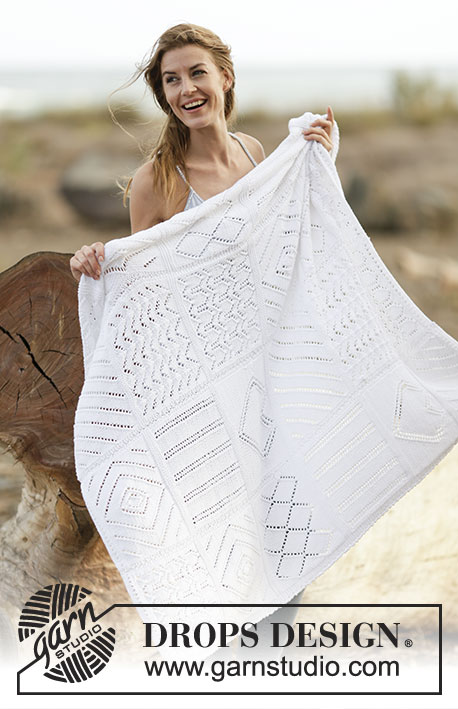
Knitted DROPS blanket with lace patterns in ”Cotton Light”.
DROPS 159-34 |
||||||||||||||||||||||
|
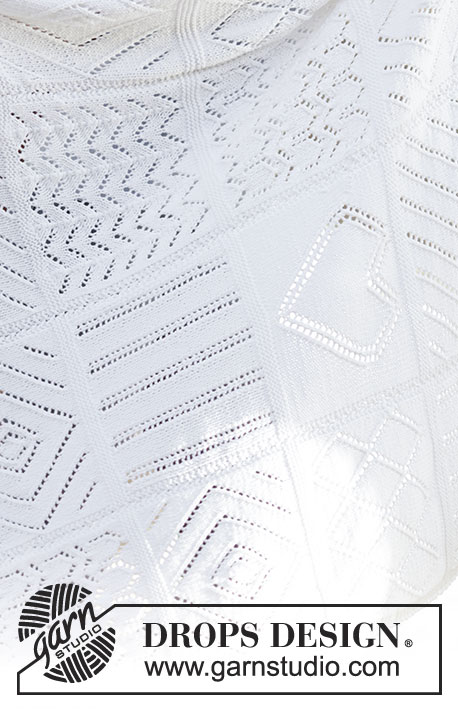
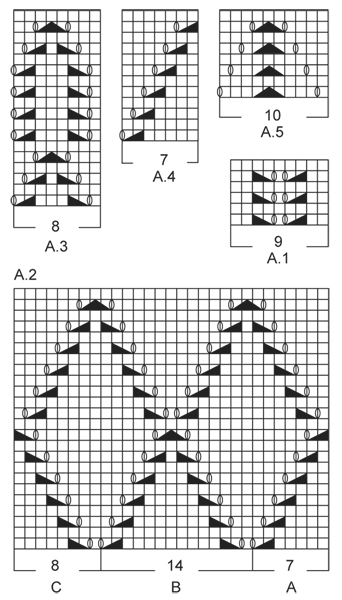
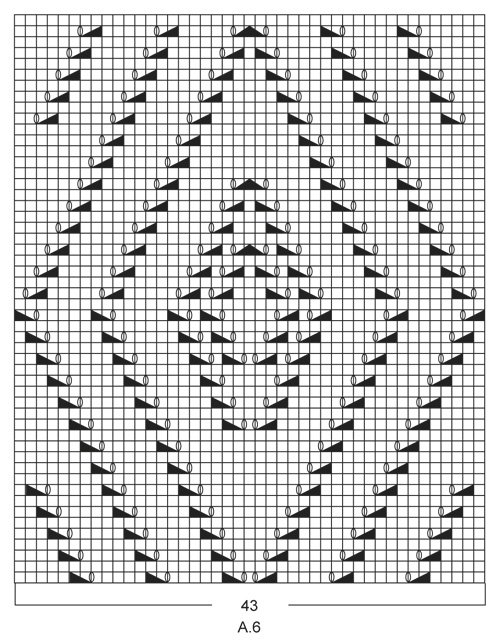
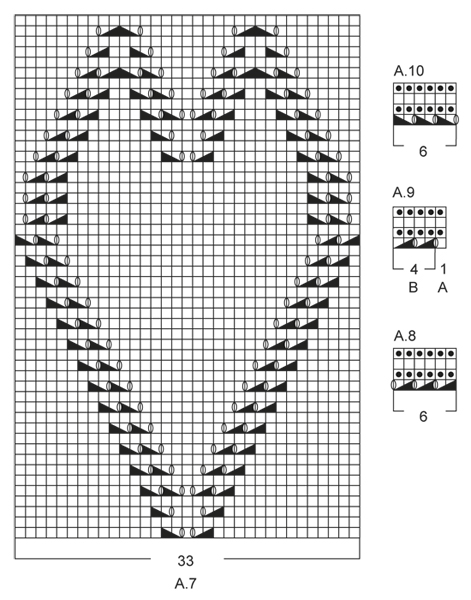
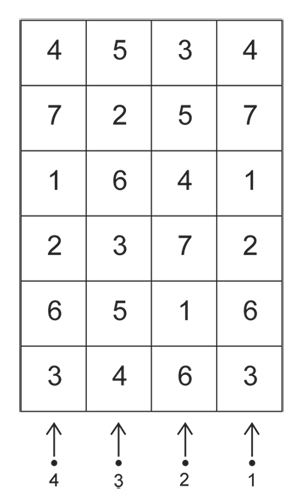
GARTER ST (back and forth): K all rows. 1 ridge = 2 rows K. PATTERN: See diagrams A.1 - A.10. Diagrams show pattern seen from RS, first row = RS. NOTE: Diagram A.4: Diagram does not fit vertically when repeated, but eyelet rows will continue to displace as before, AT THE SAME TIME beg a new eyelet row every 15th row. SQUARE ORDER: Strip 1: Square 3, 6, 2, 1, 7 and 4. Strip 2: Square 6, 1, 7, 4, 5 and 3. Strip 3: Square 4, 5, 3, 6, 2 and 5. Strip 4: Square 3, 6, 2, 1, 7 and 4. SQUARE PATTERN: There are 7 different square patterns, they are worked as follows: Square 1: = 43 sts. Work 2 row in stocking st. Work next row from RS as follows: Work the last 8 sts in A.1, A.1 over the next 27 sts (= 3 times), work the first 8 sts in A.1. Work A.1 9 times in total vertically. Square 2: = 43 sts. Work 4 row in stocking st. Work next row from RS as follows: A.2A (= 7 sts), A.2B over the next 28 sts (= 2 times), finish with A.2C (= 8 sts). Work A.2 2 times in total vertically. Work 4 row in stocking st. Square 3: = 43 sts. Work 2 row in stocking st. Work next row from RS as follows: 1 st in stocking st, A.3 over the next 40 sts (= 5 times), 2 sts in stocking st. Work A.3 3 times in total vertically. Square 4: = 43 sts. Work 2 row in stocking st. Work next row from RS as follows: Work the last 5 sts in A.4, A.4 over the next 35 sts (= 5 times), work the first 3 sts in A.4. Repeat A.4 until piece measures approx. 21.5 cm (adjust so that next row is from RS). Square 5: = 43 sts. Work next row from RS as follows: 1 st in stocking st, A.5 over the next 40 sts (= 4 times), 2 sts in stocking st. Repeat A.5 7 times in total vertically. Square 6: = 43 sts. Work 2 row in stocking st. Work next row from RS as follows: A.6 (= 43 sts). Work A.6 1 time vertically. Work 2 row in stocking st. Square 7: = 43 sts. Work 4 rows in stocking st. Work next row from RS as follows: 5 sts in stocking st, A.7 (= 33 sts) and 5 sts in stocking st. Work A.7 1 time vertically. Work 2 rows in stocking st. ---------------------------------------------------------- BLANKET: Piece is worked back and forth on needle in 4 strips and sewn tog when finished. Each strip consists of 6 squares, squares are worked in 7 different textures - read SQUARE ORDER above. STRIP 1: Cast on 51 sts on needle size 4.5 mm with Cotton Light. Work an edge on 8 rows as follows (1st row = RS): Work 2 ridges in GARTER ST - see explanation above. Work diagram A.8 (= 6 sts), A.9A (= 1 st), A.9B over the next 44 sts. Then work as follows: A.8 (= 6 sts), SQUARE PATTERN – read explanation above (= 43 sts), 2 sts in garter st. Finish 1st-5th square in strip with 4 ridges. REMEMBER THE KNITTING TENSION After last square in strip has been worked, work 2 ridges. Then work an edge on 4 rows as follows: A.8 (= 6 sts), A.9A (= 1 st), A.9B over the next 44 sts. Cast off. STRIP 2 and 3: Cast on 47 sts on needle size 4.5 mm with Cotton Light. Work an edge on 8 rows as follows (1st row = RS): Work 2 ridges. Work diagram A.9A (= 1 st), A.9B over the next 46 sts. Then work as follows: 2 sts in garter st, square pattern (= 43 sts) and 2 sts in garter st. Finish 1st-5th square in strip with 4 ridges. After last square in strip has been worked, work 2 ridges. Then work an edge on 4 rows as follows: A.9A (= 1 st), A.9B over the next 46 sts. Cast off. STRIP 4: Cast on 51 sts on needle size 4.5 mm with Cotton Light. Work an edge on 8 rows as follows (1st row = RS): Work 2 ridges. Work diagram A.9A (= 1 st), A.9B over the next 44 sts, A.10 (= 6 sts). Then work as follows: 2 sts in garter st, square pattern (= 43 sts) and A.10 (= 6 sts). Finish 1st-5th square in strip with 4 ridges. After last square in strip has been worked, work 2 ridges. Then work an edge as follows: A.9A (= 1 st), A.9B over the next 44 sts, A.10 (= 6 sts). Cast off. ASSEMBLY: Sew tog strips in outer loops of edge sts. |
||||||||||||||||||||||
Diagram explanations |
||||||||||||||||||||||
|
||||||||||||||||||||||
|
||||||||||||||||||||||
|
||||||||||||||||||||||
|
||||||||||||||||||||||
|
||||||||||||||||||||||
|
Have you made this or any other of our designs? Tag your pictures in social media with #dropsdesign so we can see them! Do you need help with this pattern?You'll find tutorial videos, a Comments/Questions area and more by visiting the pattern on garnstudio.com. © 1982-2024 DROPS Design A/S. We reserve all rights. This document, including all its sub-sections, has copyrights. Read more about what you can do with our patterns at the bottom of each pattern on our site. |
||||||||||||||||||||||


With over 40 years in knitting and crochet design, DROPS Design offers one of the most extensive collections of free patterns on the internet - translated to 17 languages. As of today we count 304 catalogues and 11422 patterns - 11422 of which are translated into English (UK/cm).
We work hard to bring you the best knitting and crochet have to offer, inspiration and advice as well as great quality yarns at incredible prices! Would you like to use our patterns for other than personal use? You can read what you are allowed to do in the Copyright text at the bottom of all our patterns. Happy crafting!
Comments / Questions (41)
Hoeveel bolletjes Drops Cotton Light heb ik nodig voor een sprei van 220 cm x 220 cm?
11.03.2024 - 15:16DROPS Design answered:
Dag Marianne,
Je zou dit uit kunnen rekenen aan de hand van de oppervlakte. Dus je doet de lengte keer de breedte van de afmetingen van de deken in het patroon. Dan doe je de lengte keer de breedte van de afmetingen die je wilt hebben. Je deelt dit getal door de oppervlakte van de deken in het patroon en dan heb je de factor waarmee je de benodigde hoeveelheid garen zoals aangegeven in het patroon, moet vermenigvuldigen. Bij je verkooppunt kun je vaak overgebleven bollen retourneren binnen een bepaalde termijn. Vraag je verkooppunt naar de voorwaarden.
11.03.2024 - 20:43Ik begrijp het bolletje van patroon A.10, A.9 en A.8. Ik heb geprobeerd zoals ik het begrijp maar er klopt precies iets niet, mijn rand is helemaal niet recht. Graag jullie hulp.
07.08.2023 - 19:01DROPS Design answered:
Dag Pascale,
Op de eerste naald van A.9 en A.10 brei je eerst 1 recht, dan maak je een omslag, dan 2 recht samen, dan een omslag, dan 2 recht samen. Op de tweed naald brei je aan de goede kant averecht en aan de verkeerde kant recht. Op de derde naald brei je aan de goede kant recht en aan de verkeerde kant averecht. Tot slot op de vierde naald aan de goede kant averecht en aan de verkeerde kant recht.
08.08.2023 - 09:49Ik begrijp het patroon. Maar ik heb een meer algemene vraag over de web site. Omdat ik de pagina's niet langer kan uitvergroten. Om een patroon beter te kunnen zien. In engels: I can not enlarge the pages anymore so I can read the pattern better. Has something changed? I asked someone who knows more about these things and she said it has to be something in your website. Thanks in advance to look into this.
07.08.2022 - 19:30DROPS Design answered:
Dag Siska,
Je zou het patroon uit kunnen vergroten door het lettertype te vergroten bij de instellingen van je computer of browser.
16.08.2022 - 21:23Grüezi\r\nHabe eine Frage zur Decke Timeless zum Diagramm A4. Verstehe Bahnhof. Der Rapport geht ja über 12 Reihen. Wie soll ich dann in der 15. Reihe einen neuen Lochstreifen beginnen. Ich hoffe auf Ihre Hilfe. Danke. R. Keller
09.07.2022 - 16:19DROPS Design answered:
Liebe Frau Keller, das Diagram wiederholen Sie immer so, daß das Lochmuster immer noch im Diagonal weitergstrickt wird, mit immer 5 rechten Maschen zwischen (2 M re zs, 1 Umschlag) - wenn Sie aber nicht genügend Maschen für das Lochmuster haben, dann stricken Sie diese Maschen rechts. Viel Spaß beim stricken!
11.07.2022 - 08:19Zuerst vielen Dank für die schnelle Antwort. Nun verstehe ich Bahnhof beim Diagramm 4. Der Rapport geht ja über 12 Reihen. Wie soll ich in der 15 Reihe einen neuen diagonalen Lochstreifen beginnen. Fange ich mit 5 Maschen rechts an? Auch der Anfang des Rechteckes 4 beginnt ja mit einem Umschlag da die letzten 5 Maschen gestrickt werden. Aber dieses Loch steht ja völlig alleine da. Ich hoffe auf Ihre Hilfe. Danke1000. Mit besten Grüssen Susanne Borer Frei
09.07.2022 - 16:13DROPS Design answered:
Liebe Frau Borer Frei, A.4 wiederholen Sie in der Höhe, so daß die Löcher immer im Diagonal weitergestrickt werden. Zwischen jedes Loch in der Breite sollen Sie immer 5 Maschen rechts haben - ein neues Lochmuster stricken, nur wenn Sie genügend Maschen um 2 M re zs + 1 Umschlag haben. Viel Spaß beim stricken!
11.07.2022 - 08:16Grüezi Ich habe eine Frage zur Decke Timeless. Und. zwar: Anschlag ist ja 51 Maschen. Die Muster der Rechtecke sind immer 43 Maschen. Sehe ich das richtig dass über die restlichen 8 Maschen jeweils die Diagramme A8 (6 Maschen) gestrickt werden? und die Rückreihe immer ohne Muster gestrickt wird? Können Sie helfen? Danke. MfG Susanne Borer
06.07.2022 - 15:29DROPS Design answered:
Liebe Frau Borer, die Decke wird in 4 Streifen gestrickt, jeweils mit 51 M aber dann jede Streife wird unterschiedlich gestrickt: die 1. mit A.8/A.9 dann A.8, Muster und 2 M kraus rechts, die 2. + 3. mit jeweils 2 M kraus rechts beidseitig und die 4. mit 2 M kraus rechts, Muster und A.9. Die Hinreihen lesen Sie rechts nach links und die Rückreihen lesen Sie links nach rechts (A.8, A.9, A.10 sind kraus rechts mit Lochmuster). Viel Spaß beim stricken!
07.07.2022 - 08:31Skjønte det! Blir riktig :)
25.08.2021 - 17:11Diagram A7; Det må være feil i toppen av hjertet. Trekanten går over 4 masker og ikke 3.
25.08.2021 - 17:07DROPS Design answered:
Hei Gunn. Så bra du fant ut av det. God Fornøyelse videre, mvh DROPS design
27.08.2021 - 12:45Bonjour sur la ligne 45 et 49 la pointe du cœur est sur 4 mailles sur le diagramme et sur l explication il se fait sur 3 mailles je ne comprend pas Merci
08.07.2021 - 18:51DROPS Design answered:
Bonjour Mme Delaine, pour les pointes du coeur, vous allez tricoter 1 surjet simple sur 2 mailles (= glissez 1 m à l'end, 1 m end, passez la m glissée par-dessus la m tricotée) et 2 m ens à l'end (= 4 mailles au total, soit les 2 triangles des symboles 4 et 3). Bon tricot!
09.07.2021 - 07:11Ich muss meinen Kommentar von eben korrigieren: Man darf nicht 4 Maschen zusammen stricken! Jedoch sollte in der Strickschrift darauf hingewiesen werden, dass in Reihe 55 und 59 in der Mitte 7 bzw. 11 Maschen gestrickt werden müssen 😊 Viele Grüße Miriam
10.01.2021 - 16:30