
Popular categories
Looking for a yarn?


Comments / Questions (12)
![]() Ditte Pettersson wrote:
Ditte Pettersson wrote:
Hej! Jag undrar om man kan ersätta det här garnet för det här mönstret med Kids Silk och i så fall hur många trådar?
31.03.2021 - 08:50DROPS Design answered:
Hej Ditte, ja i stedet for 2 tråde DROPS Brushed Alpaca Silk, kan du bruge 3 eller 4 tråde DROPS Kid Silk, sørg for at lave en strikkeprøve så du overholder strikkefastheden som står i opskriften :)
06.04.2021 - 14:01
![]() Antonella wrote:
Antonella wrote:
Buon giorno...vorrei fare questo modello con un filo col. lavanda chiaro; che colore mi consigli per il secondo filato? Ho i capelli grigio-biondi.grazie in anticipo.Antonella
13.04.2019 - 16:52DROPS Design answered:
Buongiorno Antonella. La scelta del colore è sempre molto personale. Le suggeriamo di rivolgersi al suo rivenditore Drops di fiducia che saprà consigliarla al meglio. Buon lavoro!
13.04.2019 - 18:42Ronald Thomas wrote:
Can we buy Stormy Weather Cardigan kind of dresses from Amazon?
19.07.2018 - 16:00
![]() GLORIA RIUS CASALS wrote:
GLORIA RIUS CASALS wrote:
No entiendo para que se tienen que poner marcadores a los 8 cm de trabajo. Dice que empieza la abertura, a qué abertura se refiere? Gracias
22.12.2016 - 12:56DROPS Design answered:
Hola Gloria. Este modelo tiene aberturas laterales en la parte inferior de la chaqueta. Los marcadores se colocan justo hasta donde debes coser las costuras laterales.
14.01.2017 - 12:58
![]() Giulia wrote:
Giulia wrote:
Salve, se io volessi fare questo cardigan in cotone (o misto cotone) per l'autunno, quale tipo mi consiglierebbe? quanti gomitoli dovrei comprare? Ho visto che bisogna usare due fili insieme, quindi in cotone, usando i ferri da 9, verrebbe bene?
09.09.2015 - 11:31DROPS Design answered:
Buongiorno Giulia, questo modello è fatto con 2 capi di un filato che appartiene al gruppo C, per cui potrebbe usare 2 capi di Paris o Bomull-Lin, controllando che il campione corrisponda, ma il capo perderebbe in sofficità e risulterebbe alquanto pesante. Buon lavoro!
09.09.2015 - 12:09
![]() Manuela wrote:
Manuela wrote:
Per il modello Stormy Weather Cardigan proponete all'inizio ferri nr 9. Poi cercando nell alternativa filati vedo che sono tutti per ferri molto più piccoli. Posso prendere un alternativa che voi proponete e usate ferri n° 9? Grazie
22.03.2015 - 17:35DROPS Design answered:
Buongiorno Manuela. Vengono consigliati i ferri n° 9, perché si lavora con 2 capi del filato. Brushed Alpaca Silk è un filato molto morbido e leggero. Nella scelta di un eventuale filato alternativo, dovrebbe valutare anche queste caratteristiche. Un filato con caratteristiche diverse, anche se lavorato con ferri grossi, potrebbe portare ad un risultato finale diverso soprattutto in termini di peso e morbidezza. Buon lavoro!
23.03.2015 - 14:32Fani Dekouli wrote:
Chic and simple
23.01.2014 - 11:21
![]() Gelinotta wrote:
Gelinotta wrote:
Léger, et sûrement rapide à tricoter. Tout pour plaire !
30.12.2013 - 07:55
![]() Taina Madol wrote:
Taina Madol wrote:
AlpacaSilk, on Suomen kylmyyteen, oivallinen materiaali! Talvella lämmin ja kesällä sopivan viileä!
14.12.2013 - 09:42
![]() Britta wrote:
Britta wrote:
Enkel och snygg! Ändrar mig och tar den istället.
13.12.2013 - 19:24
|
|
Stormy Weather Cardigan#stormyweathercardigan |
|
|
|
|
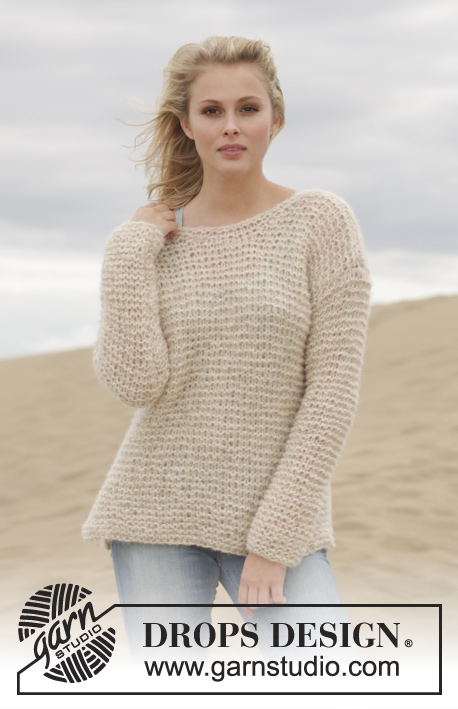
Knitted DROPS jacket in garter st in 2 strands "Brushed Alpaca Silk". Size: S - XXXL.
DROPS 155-17 |
|
|
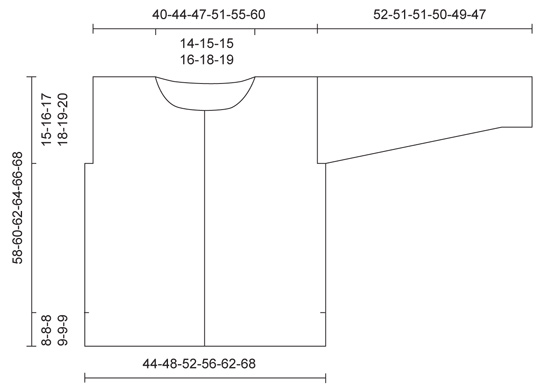
GARTER ST (back and forth on needle): K all rows. 1 ridge = 2 rows K. BUTTONHOLES: Dec for buttonholes on right band. 1 buttonhole = K tog third and fourth st from edge and make 1 loose YO. Dec for buttonholes when piece measures: SIZE S: 12, 22, 31, 41 and 50 cm SIZE M: 12, 22, 32, 42 and 52 cm SIZE L: 12, 23, 33, 44 and 54 cm SIZE XL: 12, 21, 29, 38, 46 and 55 cm. SIZE XXL: 12, 21, 30, 39, 48 and 57 cm. SIZE XXXL: 12, 21, 31, 40, 50 and 59 cm. INCREASE TIP: Inc 1 st by making 1 YO inside 1 edge st in each side. On next row K YO twisted to avoid holes. ---------------------------------------------------------- BACK PIECE: Worked back and forth on circular needle. Loosely cast on 44-48-52-56-62-68 sts on circular needle size 9 mm with 1 strand of each colour. Work in GARTER ST - see explanation above. REMEMBER THE KNITTING TENSION! When piece measures 8-8-8-9-9-9 cm, insert 1 marker in each side of piece (vent beg here). When piece measures 43-44-45-46-47-48 cm, cast off for armholes as follows: Cast off 2-2-2-3-4-4 sts at beg of the next 2 rows = 40-44-48-50-54-60 sts. Work until piece measures 55-57-59-61-63-65 cm, then cast off for neck as follows: Cast off the middle 10-10-12-12-14-14 sts for neck and finish each shoulder separately. On next row from the neck, cast off 2 sts = 13-15-16-17-18-21 sts remain for shoulder. LOOSELY cast off all sts when piece measures 58-60-62-64-66-68 cm. RIGHT FRONT PIECE: Worked back and forth on circular needle. Loosely cast on 26-28-30-32-35-38 sts (incl 4 band sts) on circular needle size 9 mm with 1 strand of each colour. Work in garter st. When piece measures 8-8-8-9-9-9 cm, insert 1 marker in each side of piece (vent beg here). When piece measures 12 cm, beg dec for BUTTONHOLES – see explanation above. Work until piece measures 43-44-45-46-47-48 cm, cast off 2-2-2-3-4-4 sts for armhole at beg of next row from WS = 24-26-28-29-31-34 sts. When piece measures 51-53-55-56-58-60 cm, cast off for neck towards mid front as follows: Cast off 7-7-8-8-9-9 sts 1 time. Continue to cast off 1 st on every row from neck 4 times in total = 13-15-16-17-18-21 sts. Loosely cast off when piece measures 58-60-62-64-66-68 cm. LEFT FRONT PIECE: Work as right front piece but reversed, cast off for armhole at beg of row from RS and do not dec for buttonholes. SLEEVE: Worked back and forth on circular needle. Loosely cast on 20-20-22-22-24-24 sts on circular needle size 9 mm with 1 strand of each colour. Work in garter st. When piece measures 6-6-6-6-8-6 cm, inc 1 st in each side - READ INCREASE TIP. Repeat inc every 11-8½-8½-7-6½-5½ cm 4-5-5-6-6-7 more times (= 5-6-6-7-7-8 times in total) = 30-32-34-36-38-40 sts. Insert 1 marker in each side of sleeve when it measures 50-49-49-47-45-43 cm (for assembly). When piece measures 52-51-51-50-49-47 cm (shorter measurements in the larger sizes because of wider shoulders), loosely cast off all sts. ASSEMBLY: Sew shoulder seams inside cast-off edges. Sew in sleeves, sew sleeve seams in outer loops of edge sts - NOTE: Section worked back and forth after marker at the top of sleeve should fit the cast off for armhole. Sew side seam from armhole down to marker on back piece and front piece in outer loops of edge sts: Vent = 8-8-8-9-9-9 cm. NECK EDGE: Worked back and forth on circular needle. Pick up from RS approx. 50-60 sts along the neck on circular needle size 9 mm with 1 strand of each colour. Work 2 ridges. Loosely cast off. |
|
 |
|
Have you finished this pattern?Tag your pictures with #dropspattern #stormyweathercardigan or submit them to the #dropsfan gallery. Do you need help with this pattern?You'll find 13 tutorial videos, a Comments/Questions area and more by visiting the pattern on garnstudio.com. © 1982-2026 DROPS Design A/S. We reserve all rights. This document, including all its sub-sections, has copyrights. Read more about what you can do with our patterns at the bottom of each pattern on our site. |


With over 40 years in knitting and crochet design, DROPS Design offers one of the most extensive collections of free patterns on the internet - translated to 17 languages. As of today we count 324 catalogues and 12290 patterns translated into English (UK/cm). 12290
We work hard to bring you the best knitting and crochet have to offer, inspiration and advice as well as great quality yarns at incredible prices! Would you like to use our patterns for other than personal use? You can read what you are allowed to do in the Copyright text at the bottom of all our patterns. Happy crafting!
Post a comment to pattern DROPS 155-17
We would love to hear what you have to say about this pattern!
If you want to leave a question, please make sure you select the correct category in the form below, to speed up the answering process. Required fields are marked *.