
Popular categories
Looking for a yarn?


Comments / Questions (93)
![]() Juani wrote:
Juani wrote:
Necesito ayuda para el patron 153-27. cuando dice A.1A, repetir A.1B 2 veces, A1C, 10 p.b/p.a en el Lado. a qué se refiere. hay q trabajar de drerecha a izqda la fila de 166 cadenetas? cómo se trabaja este chaleco de arriba a abajo?
10.04.2014 - 20:16DROPS Design answered:
Hola Juani! El patrón se trabaja de ida y vta desde el centro del delantero. Se comienza desde abajo.
11.04.2014 - 11:56
![]() Juani wrote:
Juani wrote:
Necesito ayuda para el patron 153-27. cuando dice A.1A, repetir A.1B 2 veces, A1C, 10 p.b/p.a en el Lado. a qué se refiere. hay q trabajar de drerecha a izqda la fila de 166 cadenetas? cómo se trabaja este chaleco de arriba a abajo?
10.04.2014 - 20:13DROPS Design answered:
Hola Juani! El patrón se trabaja de ida y vta desde el centro del delantero. Se comienza desde abajo.
11.04.2014 - 11:58
![]() Jean wrote:
Jean wrote:
I am an experienced crochet person for 42 years, in the USA. We don't typically crochet with diagrams nor charts. I would love to make some many things from these patterns,BUT, cannot do it. Here in USA we read crochet patterns, not follow charts nor diagrams. I have tried to make many of the patterns and I am just going to give up trying.
02.04.2014 - 23:52
![]() Debora wrote:
Debora wrote:
Mi piacerebbe realizzare il gilet 153-27 ma non capisco il grafico dei punti e anche le spiegazioni non sono molto chiare-vorrei fare la taglia xxxl-mi potete aiutare grazie!!
27.03.2014 - 23:37DROPS Design answered:
Buongiorno Debora, se ci dice esattamente il punto che le crea problemi la possiamo aiutare. Se segue esattamente le spiegazioni indicate riuscirà sicuramente a lavorare il modello. Buon lavoro!!
28.03.2014 - 15:28
![]() Lori wrote:
Lori wrote:
I love the patterns and love to crochet. I would love to make 153-27 but I don't understand the pattern can someone please as Dr help me understand all the patterns. Thanks
23.03.2014 - 21:18DROPS Design answered:
Dear Lory, each symbol in diagram correspond to 1 st/group of sts as stated under diagram text. Vertical lines delimit the repetitions of each part of diagram. Read 1st row (and all odd rows) in A.1 from left towards the right, and 2nd row (and all even rows) in A.1 from right to the left. Happy crocheting!
24.03.2014 - 08:57
![]() Lori wrote:
Lori wrote:
I love the patterns and love to crochet. I would love to make 153-27 but I don't understand the pattern can someone please as Dr help me understand all the patterns. Thanks
23.03.2014 - 21:17
![]() Lori wrote:
Lori wrote:
I love the patterns and love to crochet. I would love to make 153-27 but I don't understand the pattern can someone please as Dr help me understand all the patterns. Thanks
23.03.2014 - 21:13
![]() Linda wrote:
Linda wrote:
Can you explain what this means? A.1B 2-2-2-2-3-3 times, A.1C, 4-10-18-26-16-26 dc/tr in the SIDE - see explanation above -, repeat A.1B 5-5-5-5-7-7 times, A.1C, 4-10-18-26-16-26 dc/tr in the SIDE
16.03.2014 - 00:31DROPS Design answered:
Dear Lina, if you are working on size S, you will work : diag. A.1B 2 times, A.1C 1 time, 4 dc/tr in the side, then repeat A.1B 5 times, A.1C 1 time, and 4 dc/tr in the side. Each number refers to the size. Happy crocheting!
17.03.2014 - 08:59
![]() Dina De Man wrote:
Dina De Man wrote:
Ik kom er niet uit het komt niet boven mekaar de stokjes kan u helpen
12.03.2014 - 23:35DROPS Design answered:
Hoi Dina. Als je de telpatronen boven elkaar haakt, dan zou de motieven (de stokjes) ook boven elkaar komen.
14.03.2014 - 16:53
![]() D De Man wrote:
D De Man wrote:
Ik weet niet of u mij kan helpen ik begrijp het tel patroon niet zo goed moet je eerst een a vijf maal herhalen dan die anderetel patroon
07.03.2014 - 16:26DROPS Design answered:
Hoi D de Man. Je herhaalt het patroon zo veel keer als vermeld voor de maat die je haakt. Dus bijvoorbeeld, haak je maat S: A.1A, A.1B 2 keer, A.1C 4 keer enzovoort
10.03.2014 - 12:59
|
|||||||||||||
Delphine#delphinevest |
|||||||||||||
|
|
|||||||||||||
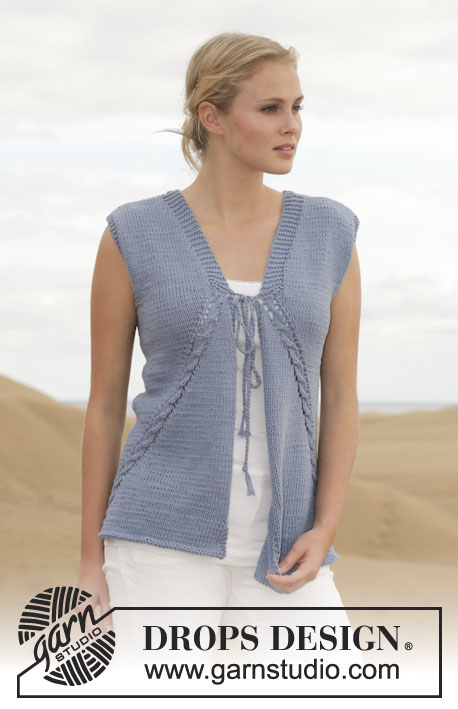
Crochet DROPS vest with fan pattern in ”Muskat”. Size: S - XXXL.
DROPS 153-27 |
|||||||||||||
|
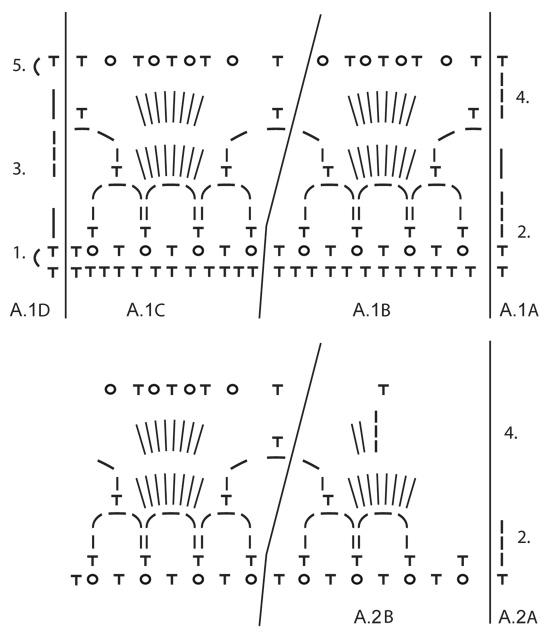
PATTERN: See diagrams A.1 and A.2. In A.1 start to work on the row marked with 1st in the diagram. Repeat rows 2 to 5. In A.2 start to work on the row marked with 2nd in the diagram. SIDE: In the side work tr/dc as shown in diagrams A.1A and A.1D. I.e. Work dc on row 1 and 5 in diagram, work row 2, 3 and 4 with tr. Marker is in the middle of st in each side. -------------------------------------------------------- VEST: Work 155-167-183-199-227-247 LOOSE ch on hook size 4 mm with Muskat. Turn piece. Skip 1st ch, then work 1 dc in every ch the entire row = 154-166-182-198-226-246 dc. Insert 1 marker after 39-42-46-50-57-62 dc in from each side (back piece = 76-82-90-98-112-122 dc). Then work as follows (beg on 1st row in diagram): A.1A, repeat A.1B 2-2-2-2-3-3 times, A.1C, 4-10-18-26-16-26 dc/tr in the SIDE - see explanation above -, repeat A.1B 5-5-5-5-7-7 times, A.1C, 4-10-18-26-16-26 dc/tr in the SIDE – see explanation above, repeat A.1B 2-2-2-2-3-3 times, A.1C and A.1D. Continue to work like this until piece measures approx. 15-15-16-16-17-17 cm. Now inc 1 dc/tr in each side on each side of each marker one time. Inc by working 2 dc/tr in 1 dc/tr on each side of each marker (= 4 dc/tr inc in total). Continue as before with 2 dc/tr more in each side. Continue like this until piece measures approx. 35-36-37-38-39-40 cm, adjust after one whole repetition vertically. Cut the yarn. Now divide the piece and finish each part separately. BACK PIECE: = 3-6-10-14-9-14 dc/tr in each side. Beg by working inside 2-3-7-11-6-11 dc/tr. Work 1-3-3-3-3-3 dc/tr, repeat A.1B 5-5-5-5-7-7 times, A.1C and 1-3-3-3-3-3 dc/tr (2-3-7-11-6-11 dc/tr remain on row), turn piece. Work pattern as before until 0-1-1-1-1-1 dc/tr remain, turn piece. Work pattern as before until 0-1-1-1-1-1 dc/tr remain, turn piece. Work pattern as before until 0-1-1-1-1-1 dc/tr remain, turn piece. Work pattern as before until 0-1-1-1-1-1 dc/tr remain. There are now 1 dc/tr in each side. Continue back and forth with pattern as before and 1 dc/tr in each side. When piece measures approx. 50-52-54-56-58-60 cm (adjust after whole repetition vertically), divide the piece for neck and finish each shoulder separately. RIGHT SHOULDER: Beg in the side. Work over 1 dc/tr in the side, A.1B 1-1-1-1-2-2 times, A.1C and 1 dc/tr. Continue like this until repetition has been worked vertically. Piece measures approx. 54-56-58-60-62-64 cm. LEFT SHOULDER: Work as right but reversed, (i.e. 2 repetitions mid back = neck). RIGHT FRONT PIECE: = 3-6-10-14-9-14 dc/tr in the side.Start mid front and work as follows: A.1A, repeat A.1B 2-2-2-2-3-3 times, A.1C and 1-3-3-3-3-3 dc/tr (2-3-7-11-6-11 dc/tr remain in the side). Turn piece. Work pattern as before. Turn piece. Work pattern as before until 0-1-1-1-1-1 dc/tr remain in the side, turn piece. Work pattern as before, turn piece. Work pattern as before until 0-1-1-1-1-1 dc/tr remain in the side, turn piece. Work pattern as before. There are now 1 dc/tr in the side. Continue back and forth with pattern as before. AT THE SAME TIME when 1 repetition has been worked vertically after piece was divided, dec for neck. Work as follows from RS: A.2 A, A.2 B, A.1B 1-1-1-1-2-2 times, A.1C, A.1D. When all dec for armhole and neck are done, work as follows - from mid front: A.1A, A.1B 1-1-1-1-2-2 times, A.1C and A.1D. Continue like this until piece measures approx. 54-56-58-60-62-64 cm (adjust according to back piece to work the no of repetitions on front piece vertically as on back piece). Fasten off. LEFT FRONT PIECE: Work as right front piece but reversed. ASSEMBLY: Sew the shoulder seams. Sew edge to edge with small stitches to avoid a chunky seam. ARMHOLE EDGE: Work an edge around the armhole as follows: ROUND 1: Beg mid under sleeve. Work 1 ch, then work dc around the armhole, finish with 1 sl st in ch from beg of round. ROUND 2: Work 3 ch, then work 1 tr in every dc the entire round, finish with 1 sl st in 3rd ch from beg of round. Fasten off. Work the same way around the other armhole. EDGE AROUND BODY: Work an edge around the body. Beg at the bottom of right front piece, work up along front piece, around the neck, down along left front piece and along bottom edge. Work as follows: ROUND 1: Work 1 ch, then work dc around the body, finish with 1 sl st in ch from beg of round. ROUND 2: 1 ch, then work 1 dc in every dc, finish with 1 sl st in ch from beg of round. ROUND 3: 1 ch, then work 1 dc in first dc, * 3 ch, then work 1 tr in the first of the 3 ch, skip 2 dc, 1 dc in next dc *, repeat from *-* and finish with 1 sl st in ch from beg of round. Fasten off. ASSEMBLY: Sew 2 buttons on left front piece, the top button directly below neck dec and the other approx. 6 cm from first button. Button between tr in edge on right front piece. |
|||||||||||||
Diagram explanations |
|||||||||||||
|
|||||||||||||
 |
|||||||||||||
 |
|||||||||||||
Have you finished this pattern?Tag your pictures with #dropspattern #delphinevest or submit them to the #dropsfan gallery. Do you need help with this pattern?You'll find 6 tutorial videos, a Comments/Questions area and more by visiting the pattern on garnstudio.com. © 1982-2026 DROPS Design A/S. We reserve all rights. This document, including all its sub-sections, has copyrights. Read more about what you can do with our patterns at the bottom of each pattern on our site. |
|||||||||||||


With over 40 years in knitting and crochet design, DROPS Design offers one of the most extensive collections of free patterns on the internet - translated to 17 languages. As of today we count 324 catalogues and 12290 patterns translated into English (UK/cm). 12290
We work hard to bring you the best knitting and crochet have to offer, inspiration and advice as well as great quality yarns at incredible prices! Would you like to use our patterns for other than personal use? You can read what you are allowed to do in the Copyright text at the bottom of all our patterns. Happy crafting!
Post a comment to pattern DROPS 153-27
We would love to hear what you have to say about this pattern!
If you want to leave a question, please make sure you select the correct category in the form below, to speed up the answering process. Required fields are marked *.