
Popular categories
Looking for a yarn?


Comments / Questions (93)
![]() Michelle wrote:
Michelle wrote:
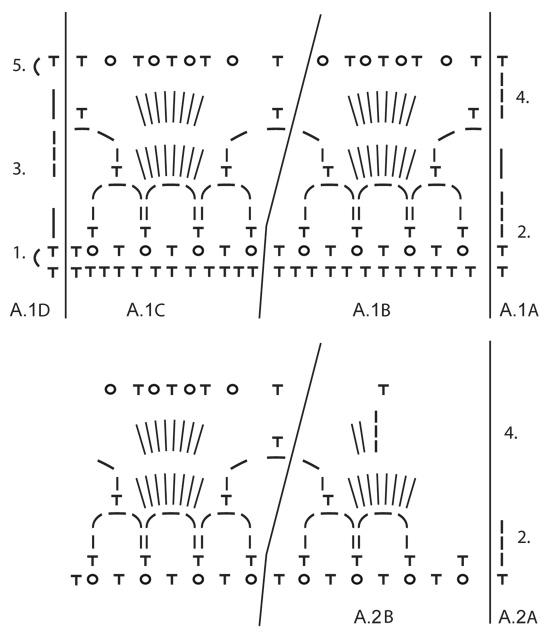
Is this pattern available with row by row directions? I do not know how to read the diagram.
09.04.2019 - 03:58DROPS Design answered:
Dear Michelle! Unfortunately not. Please see the lesson How to reed crochet diagrams. Happy crocheting!
09.04.2019 - 07:23
![]() Bianca wrote:
Bianca wrote:
Goedemiddag, toch nog een vraag, nu over rij 2. Ik moet A.1B 2x herhalen en A.1C 1x herhalen, dan zou ik op 9 boogjes uit moeten komen, maar dan hou ik nog picotjes uit vorige rij over. Als ik dan doorhaak, krijg ik dus 11 boogjes, klopt dat? Ik neem aan dat de overgang van a1b en a1c ook met boogje van 5 lossen gaat? Groetjes Bianca
05.02.2019 - 14:04DROPS Design answered:
Dag Bianca,
Nee, tussen a1b en a1c moet je geen boogjes van 5 lossen haken. Je haakt dan dus gewoon verder door een vaste in het volgende picotje van de vorige toer te haken en je slaat dus de vaste van de vorige toer over.
14.02.2019 - 14:11
![]() Bianca wrote:
Bianca wrote:
A.1A, herhaal A.1B 2-2-2-2-3-3 keer, A.1C, 4-10-18-26-16-26 v/stk aan de ZIJKANT - zie uitleg boven - is het nu dat ik na A.1C, 16 vasten moet haken in toer 1 en 5, en 16 stokjes in de toeren 2-3-4?
01.02.2019 - 15:20DROPS Design answered:
Dag Bianca,
Ja, dat klopt; waar stokjes in het patroon zijn, haak je stokjes in de zijkanten en waar vasten in het patroon zijn, haak je vasten in de zijkanten. Op deze manier zet het patroon zich voort.
03.02.2019 - 11:19Ingelund wrote:
Beste DROPS, Ik wil beginnen aan rij 5. Ik begrijp dat er een picot voor en na de waaier moet komen en op de waaier (v,pic,v,pic,v(=7steken) ) voor en na lukt niet omdat daar de ruimte niet voor is en op de waaier houd ik een steek over. Welke sla ik over. Volgens de beschrijving moeten er na een picot twee steken overgeslagen worden. Een afwijking wordt nergens vermeld. Kunt u hier duidelijkheid in geven. Alvast mijn dank.
08.05.2018 - 07:45
![]() Carla Steunenberg wrote:
Carla Steunenberg wrote:
Ik kom niet uit dit patroon Wat moet ik met die schuine strepen Lees ik toer 3 ook van links naar rechts? Hoe eindig ik dan? Mijn waaiers komen niet recht boven elkaar.
26.03.2018 - 18:09DROPS Design answered:
Hallo Carla, De schuine strepen geven de scheiding aan tussen 2 telpatronen; hier hoef je verder niks me te doen. Toer 3 gaat lees je inderdaad van links naar rechts en deze eindig je in de derde losse van de vorige toer. De waaiers zouden wel recht boven elkaar moeten komen. Helaas kan ik vanaf hier niet meekijken wat er evt. mis is gegaan. Evt. kun je ook hulp vragen in de winkel waar je het garen hebt gekocht.
02.04.2018 - 14:48
![]() Carla wrote:
Carla wrote:
Kom niet uit dit patroon. De waaiers komen niet boven elkaar en ik weet ook niet of dit patroon herzien is wat betreft toer 2 . Moeten er 5 of 6 lossen tussen de waaiers in toer3 ?
26.03.2018 - 18:04
![]() Angelique Woldberg wrote:
Angelique Woldberg wrote:
Als ik het goed begrijp zitten er aan de zijnaden in maat L 18 v/st. Maar op ee foto zie je dat niet
05.11.2017 - 14:03DROPS Design answered:
Hallo Angelique, Deze vasten zitten er wel in, alleen zie je dit eigenlijk niet omdat bij de foto van voren is gefotografeerd (en dit is maat S, dus minder vasten in de zijkant) Op toer 2, 3 en 4 haak je wel gewoon volgens het telpatroon in stokjes, waardoor het telpatroon gewoon doorloopt. Als je de instructies volgt, zul je zien dat het klopt en goed komt.
06.11.2017 - 12:57
![]() Karin Robbers wrote:
Karin Robbers wrote:
Ik begrijp iets niet. In de beschrijving moet je beginnen met A1a en eindigen met A1d, maar in de tekening staat de 1 van toer 1 aan de kant van A1d en lijkt het dus of je daar moet beginnen. Dat is ook logischer als je naar de lossen kijkt waar toer 2 mee begint. Hoe zit het?
27.07.2017 - 12:58DROPS Design answered:
Hoi Karin, Zo te zien heb je gelijk en staat het niet duidelijk in de beschrijving. Je kunt dus gewoon beginnen aan de linkerkant bij A.1D. (Ik zal het even doorgeven aan de designafdeling)
31.07.2017 - 12:53
![]() Monika Andersen wrote:
Monika Andersen wrote:
DROPS 153-27. I'm confused! Size XL, I understand row 1 as: A.1A- 1x, A.1B- 2x, A1C- 1x, NOW I'M CONFUSED ... Am I suppose to do 26 sc ??? So the "shell" pattern does not go completely around (?) .. it's just in the front and back and under the arms it's either sc or dc dependent on which row your on? Please advise.
19.06.2017 - 23:52DROPS Design answered:
Dear Mrs Andersen, on 1st row in A.1 work (from 1.): A.1D = 1 sc, A.1C (= *1 dc in next st, 1 picot, skip 2 sts* repeat fom *-* a total of 4 times), A.1B (= *1 dc in next st, 1 picot, skip 2 sts*, repeat from *-* a total of 4 times = 1 repeat in width (make 2 repeats)) and A.1A = 1 sc in last sc on row. Happy crocheting!
22.06.2017 - 16:51
![]() Janine wrote:
Janine wrote:
Hallo, ich weiß nicht wir ich in Reihe 2 die 10lm zwischen A1B und A1C unterbringen soll. Das Muster geht dann nicht auf. Gibt es vielleicht ein Video dazu? Vielen Dank für Ihre Hilfe.
14.03.2016 - 15:02DROPS Design answered:
Hallo Janine, haben Sie gesehen, dass wir auf diese Frage von Ihnen bereits geantwortet haben?
14.03.2016 - 15:05
|
|||||||||||||
Delphine#delphinevest |
|||||||||||||
|
|
|||||||||||||
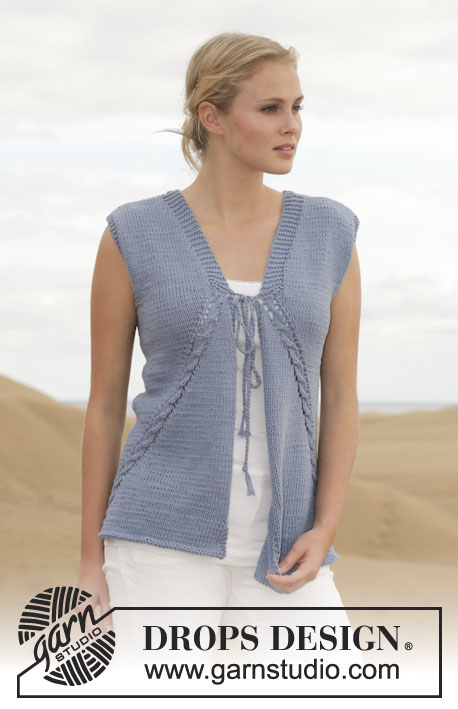
Crochet DROPS vest with fan pattern in ”Muskat”. Size: S - XXXL.
DROPS 153-27 |
|||||||||||||
|
PATTERN: See diagrams A.1 and A.2. In A.1 start to work on the row marked with 1st in the diagram. Repeat rows 2 to 5. In A.2 start to work on the row marked with 2nd in the diagram. SIDE: In the side work tr/dc as shown in diagrams A.1A and A.1D. I.e. Work dc on row 1 and 5 in diagram, work row 2, 3 and 4 with tr. Marker is in the middle of st in each side. -------------------------------------------------------- VEST: Work 155-167-183-199-227-247 LOOSE ch on hook size 4 mm with Muskat. Turn piece. Skip 1st ch, then work 1 dc in every ch the entire row = 154-166-182-198-226-246 dc. Insert 1 marker after 39-42-46-50-57-62 dc in from each side (back piece = 76-82-90-98-112-122 dc). Then work as follows (beg on 1st row in diagram): A.1A, repeat A.1B 2-2-2-2-3-3 times, A.1C, 4-10-18-26-16-26 dc/tr in the SIDE - see explanation above -, repeat A.1B 5-5-5-5-7-7 times, A.1C, 4-10-18-26-16-26 dc/tr in the SIDE – see explanation above, repeat A.1B 2-2-2-2-3-3 times, A.1C and A.1D. Continue to work like this until piece measures approx. 15-15-16-16-17-17 cm. Now inc 1 dc/tr in each side on each side of each marker one time. Inc by working 2 dc/tr in 1 dc/tr on each side of each marker (= 4 dc/tr inc in total). Continue as before with 2 dc/tr more in each side. Continue like this until piece measures approx. 35-36-37-38-39-40 cm, adjust after one whole repetition vertically. Cut the yarn. Now divide the piece and finish each part separately. BACK PIECE: = 3-6-10-14-9-14 dc/tr in each side. Beg by working inside 2-3-7-11-6-11 dc/tr. Work 1-3-3-3-3-3 dc/tr, repeat A.1B 5-5-5-5-7-7 times, A.1C and 1-3-3-3-3-3 dc/tr (2-3-7-11-6-11 dc/tr remain on row), turn piece. Work pattern as before until 0-1-1-1-1-1 dc/tr remain, turn piece. Work pattern as before until 0-1-1-1-1-1 dc/tr remain, turn piece. Work pattern as before until 0-1-1-1-1-1 dc/tr remain, turn piece. Work pattern as before until 0-1-1-1-1-1 dc/tr remain. There are now 1 dc/tr in each side. Continue back and forth with pattern as before and 1 dc/tr in each side. When piece measures approx. 50-52-54-56-58-60 cm (adjust after whole repetition vertically), divide the piece for neck and finish each shoulder separately. RIGHT SHOULDER: Beg in the side. Work over 1 dc/tr in the side, A.1B 1-1-1-1-2-2 times, A.1C and 1 dc/tr. Continue like this until repetition has been worked vertically. Piece measures approx. 54-56-58-60-62-64 cm. LEFT SHOULDER: Work as right but reversed, (i.e. 2 repetitions mid back = neck). RIGHT FRONT PIECE: = 3-6-10-14-9-14 dc/tr in the side.Start mid front and work as follows: A.1A, repeat A.1B 2-2-2-2-3-3 times, A.1C and 1-3-3-3-3-3 dc/tr (2-3-7-11-6-11 dc/tr remain in the side). Turn piece. Work pattern as before. Turn piece. Work pattern as before until 0-1-1-1-1-1 dc/tr remain in the side, turn piece. Work pattern as before, turn piece. Work pattern as before until 0-1-1-1-1-1 dc/tr remain in the side, turn piece. Work pattern as before. There are now 1 dc/tr in the side. Continue back and forth with pattern as before. AT THE SAME TIME when 1 repetition has been worked vertically after piece was divided, dec for neck. Work as follows from RS: A.2 A, A.2 B, A.1B 1-1-1-1-2-2 times, A.1C, A.1D. When all dec for armhole and neck are done, work as follows - from mid front: A.1A, A.1B 1-1-1-1-2-2 times, A.1C and A.1D. Continue like this until piece measures approx. 54-56-58-60-62-64 cm (adjust according to back piece to work the no of repetitions on front piece vertically as on back piece). Fasten off. LEFT FRONT PIECE: Work as right front piece but reversed. ASSEMBLY: Sew the shoulder seams. Sew edge to edge with small stitches to avoid a chunky seam. ARMHOLE EDGE: Work an edge around the armhole as follows: ROUND 1: Beg mid under sleeve. Work 1 ch, then work dc around the armhole, finish with 1 sl st in ch from beg of round. ROUND 2: Work 3 ch, then work 1 tr in every dc the entire round, finish with 1 sl st in 3rd ch from beg of round. Fasten off. Work the same way around the other armhole. EDGE AROUND BODY: Work an edge around the body. Beg at the bottom of right front piece, work up along front piece, around the neck, down along left front piece and along bottom edge. Work as follows: ROUND 1: Work 1 ch, then work dc around the body, finish with 1 sl st in ch from beg of round. ROUND 2: 1 ch, then work 1 dc in every dc, finish with 1 sl st in ch from beg of round. ROUND 3: 1 ch, then work 1 dc in first dc, * 3 ch, then work 1 tr in the first of the 3 ch, skip 2 dc, 1 dc in next dc *, repeat from *-* and finish with 1 sl st in ch from beg of round. Fasten off. ASSEMBLY: Sew 2 buttons on left front piece, the top button directly below neck dec and the other approx. 6 cm from first button. Button between tr in edge on right front piece. |
|||||||||||||
Diagram explanations |
|||||||||||||
|
|||||||||||||
 |
|||||||||||||
 |
|||||||||||||
Have you finished this pattern?Tag your pictures with #dropspattern #delphinevest or submit them to the #dropsfan gallery. Do you need help with this pattern?You'll find 6 tutorial videos, a Comments/Questions area and more by visiting the pattern on garnstudio.com. © 1982-2026 DROPS Design A/S. We reserve all rights. This document, including all its sub-sections, has copyrights. Read more about what you can do with our patterns at the bottom of each pattern on our site. |
|||||||||||||


With over 40 years in knitting and crochet design, DROPS Design offers one of the most extensive collections of free patterns on the internet - translated to 17 languages. As of today we count 324 catalogues and 12290 patterns translated into English (UK/cm). 12290
We work hard to bring you the best knitting and crochet have to offer, inspiration and advice as well as great quality yarns at incredible prices! Would you like to use our patterns for other than personal use? You can read what you are allowed to do in the Copyright text at the bottom of all our patterns. Happy crafting!
Post a comment to pattern DROPS 153-27
We would love to hear what you have to say about this pattern!
If you want to leave a question, please make sure you select the correct category in the form below, to speed up the answering process. Required fields are marked *.