
Popular categories
Looking for a yarn?


Comments / Questions (96)
![]() Sophie wrote:
Sophie wrote:
Bonjour, Merci pour votre réponse. Pour les châles pourquoi les diagrammes n'ont plus la forme du châle ( ex : un châle triangle, le schéma devrait avoir la forme d'un triangle). Pas des morceaux de diagrammes qui ne ressemble à rien. Concernant les symboles par exemple les brides ne ressemblent plus à ceux d'avant. Les dessins des symboles ont étaient changés, pour un graphisme plus moderne mais pas compréhensible. Merci pour votre réponse Cordialement
08.09.2025 - 16:08DROPS Design answered:
Bonjour Sophie, il est rare que nous proposions des diagrammes entiers pour la réalisation de nos ouvrages, la plupart du temps seuls les motifs à répéter sont représentés. Pour la légende des symboles utilisés, reportez-vous systématiquement à chaque modèle, car d'un modèle à l'autre, il peut y avoir des différences. Bon tricot!
11.09.2025 - 11:25
![]() Sophie wrote:
Sophie wrote:
Bonjour, Pourquoi les diagrammes de châles ne sont plus avec les anciens symboles et n'ont plus la forme du châle ? Faire une version ancienne et version moderne, serait beaucoup mieux ?
05.09.2025 - 19:10DROPS Design answered:
Bonjour Sophie, je ne suis pas sûre de bien comprendre ce que vous entendez par là, la légende des symboles peut varier d'un modèle/d'une collection à l'autre mais ce qui compte à chaque fois c'est la légende du modèle tricoté, et, quelle que soit la version, retrouvez plus d'infos sur les diagrammes ici si besoin. Bon tricot!
08.09.2025 - 10:04
![]() Lise wrote:
Lise wrote:
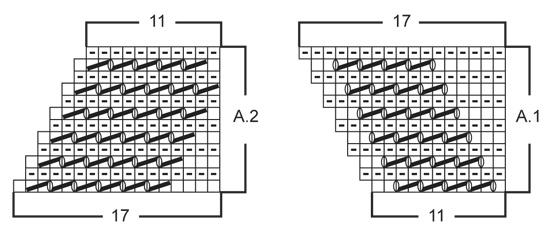
Pour le châle , le rang 1 on a 15 mailles .Ça va pour le rang 2 com bien de mailles. Comment passer à 17 mailles au rang 3?
26.06.2025 - 17:18DROPS Design answered:
Bonjour Lise, au 3ème rang, vous tricotez jusqu'au marqueur, vous faites 1 jeté et vous tricotez A.1 = vous augmentez 2 m= 1 m avant A1 et 1 m dans A1 = 17 m. Bon tricot!
27.06.2025 - 07:47
![]() Dorit Ligaard Petersen wrote:
Dorit Ligaard Petersen wrote:
Kan ikke finde ud af at komme videre - og få flere masker på pinden i henhold til diagramforklaring. Kan finde ud af diagram, men ikke hvordan der kommer flere masker på pinden.
20.09.2024 - 13:12DROPS Design answered:
Hei Dorit. Følg diagrammet og les oppskriften. Under SJAL i oppskriften og ved 3.pinne, 7. pinne og 11. pinne gjøres det 1 kast = økninger (husk les ØKETIPS). F.eks når det er strikket 1 rapport av A.1 er det også økt 3 masker. mvh DROPS Design
23.09.2024 - 12:01
![]() Kinou wrote:
Kinou wrote:
Bonjour, je suis sur la 2nde partie du châle. Est-il normal qu’au rang 11il n’y ait q 4 jetés ? Visuellement on verra bien qu’il manque un trou. Ça me semble très bizarre :) merci, il est superbe !
28.08.2024 - 18:17DROPS Design answered:
Bonjour Kinou, quand on tricote A.2, on va toujours avoir 1 jeté de moins que le nombre de mailles tricotées ensemble à l'endroit, autrement dit, à l'avant dernier rang de A.2, on a 4 jetés et on tricote 5 fois 2 m ens à l'end (on diminue ainsi 1 maille). Bon tricot!
29.08.2024 - 09:54
![]() Lisette Charest wrote:
Lisette Charest wrote:
Je voudrais avoir un vidéo sur ce patron pour savoir si je refais toujours le même chemat pour les rangs 1 à 12 en commençant les travaux jusqu'au centre plus explications sur ce tricot. Merci
07.08.2024 - 00:14DROPS Design answered:
Bonjour Mme Charest, lorsque vous avez tricoté les 12 premiers rangs du châle, tricotez 1 x les rangs raccourcis-1 comme expliqué, puis alternez A.1 (vous augmentez le nombre de mailles) et les rangs raccourcis 18 fois au total, puis tricotez 1.x les rangs raccourcis-2, et alternez ensuite les rangs raccourcis-3 et A.2 (vous diminuez les nombre de mailles). Bon tricot!
07.08.2024 - 08:02
![]() Eva Hanslien wrote:
Eva Hanslien wrote:
Hei. Jeg står mellom dette sjalet og Opaline. Hvilket er enklest? Lurer også på at det stemmer at man kun trenger 25g•2 på dette sjalet, men 75g•2 på Opaline. De er ikke så forskjellige i størrelsen synes jeg. Mvh Eva
29.07.2024 - 09:20DROPS Design answered:
Hej Eva, det er en smags sag :) 2 skal bruge 2 x 75 gr i begge sjaler (tror du kigger på luen)
01.08.2024 - 10:17
![]() Lisette Charest wrote:
Lisette Charest wrote:
Je voudrais savoir s'il y a un erreur dans le patron du chal tricot aiguilles numéro drops 151-8 moi je ne comprends le chema les rangs raccourcis très difficile à comprendre
27.07.2024 - 00:55DROPS Design answered:
Bonjour Mme Charest, aucune erreur n'a été reportée à présent sur ce modèle, quel souci avez-vous précisément avec les rangs raccourcis? pouvez-vous nous en dire plus?
29.07.2024 - 11:29
![]() Catherine Charles wrote:
Catherine Charles wrote:
Bonjour, Il y a une erreur après le rang 12 des rangs raccourcis 3, il est indiqué qu’on a « augmenté » 3 mailles alors qu’on en a effectivement DIMINUÉ 3 vu qu’on a passé le milieu du châle et qu’on diminue progressivement les rangs. Merci de corriger.
02.07.2024 - 10:08DROPS Design answered:
Bonjour Mme Charles et merci pour votre retour, la correction a été faite. Bonne continuation!
02.07.2024 - 10:33
![]() Paris wrote:
Paris wrote:
Bonjour J’ai fait la bordure en suivant le diagramme A1 Ensuite une série de rangs raccourcis 1 Si bien que j’arrive encore à 17 mailles Même si je fais 18 fois ça va me faire une bande ajourée Il y a quelque chose que je ne comprends pas au moment de faire les rangs raccourcis . Merci de votre réponse Joli modèle .
23.06.2024 - 16:37DROPS Design answered:
Bonjour Mme Paris, lorsque le diagramme A.1 a été tricoté, tricotez les 4 rangs des rangs raccourcis ainsi: (1 rang sur l'endroit sur toutes les mailles, sur l'envers: tricotez les 17 premières mailles seulement, tournez et tricotez les 17 mailles sur l'endroit, tournez, rabattez les 6 premières mailles au début du rang sur l'envers, tournez et tricotez toutes les mailles à l'endroit). Au rang suivant, reprenez le diagramme A.1 et les augmentations comme vous avez fait la 1ère fois. Continuez ainsi en tricotant A.1 (avec les augm.) et les 4 rangs raccourcis pour former un joli arrondi. Bon tricot!
24.06.2024 - 09:52
|
|||||||||||||
Ladylike#ladylikeset |
|||||||||||||
 |
 |
||||||||||||
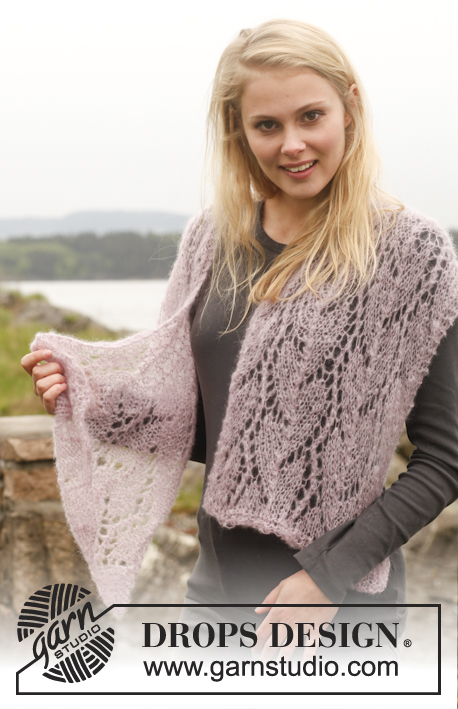
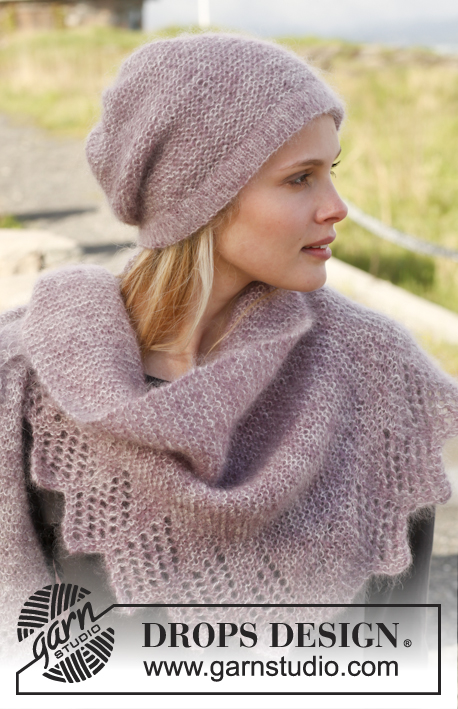
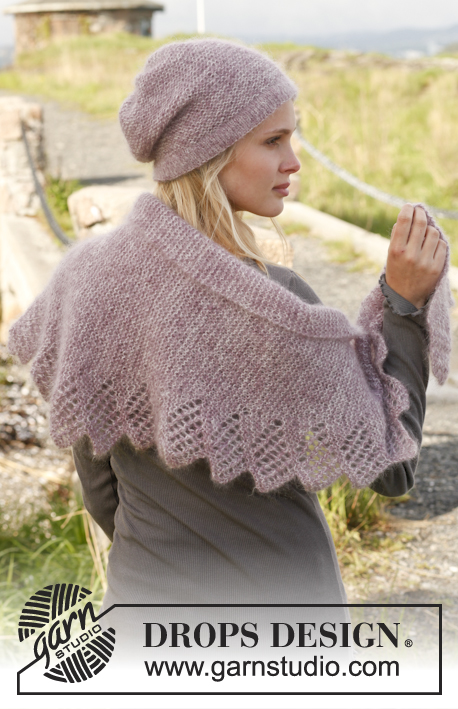
Set consists of: Knitted DROPS hat and shawl in garter st with lace pattern in 2 strands ”Kid-Silk”.
DROPS 151-8 |
|||||||||||||
|
GARTER ST (back and forth on circular needle): K all rows. 1 ridge = 2 rows K. INCREASE TIP: Inc 1 st by making 1 YO, K YO twisted on next row to avoid holes. PATTERN: See diagrams A.1 and A.2. The diagrams show all rows in pattern seen from RS. SHORT ROWS 1: Work short rows to get a nice shape on lace edge as follows: Beg from RS and K over all sts, turn piece and K 17 from WS (i.e. until marker), turn piece and K 17 from RS, turn piece, cast off the first 6 sts and K over all sts on row = 1 repetition with short rows. SHORT ROWS 2: Beg from RS and K over all sts, turn piece and K 11 from WS (i.e. until marker), turn piece and K 11 from RS, turn piece and K 8 from WS, turn piece and K 8 from RS, turn piece and K 5 from WS, turn piece and K 5 from RS, turn piece and K 2 from WS, turn piece and K 2 from RS. Work 2 ridges in garter st back and forth over all 68 sts, the shawl has been worked to the middle. Then work as follows, beg from WS: K 2, turn piece and K 2 from RS, turn piece and K 5 from WS, turn piece and K 5 from RS, turn piece and K 8 from WS, turn piece and K 8 from RS, turn piece and K 11 from WS, turn piece and K 11 from RS, turn piece and K back over all sts = 1 repetition with short rows. SHORT ROWS 3: Beg from RS, K over all sts and cast on 6 new sts at end of row, turn piece and K 17 from WS (i.e. until marker), turn piece and K 17 from RS, turn piece and K back over all sts on row = 1 repetition with short rows. DECREASE TIP: Dec 1 st by K 2 sts tog. ---------------------------------------------------------- HAT: Worked back and forth on circular needle. Cast on 100 sts with 1 strand of each colour (= 2 strands) on circular needle size 3.5 mm. Work in stocking st for 3 cm with 1 edge st in GARTER ST in each side - see explanation above. K 1 row from WS (= folding edge) and continue in stocking st with 1 edge st in garter st in each side for 3 cm – adjust so that next row is from RS. Switch to circular needle size 5 mm and work 1 ridge in garter st AT THE SAME TIME dec 16 sts evenly on 1st row = 84 sts. NOW MEASURE THE PIECE FROM HERE. Continue in garter st back and forth until piece measures 20 cm. On next row from RS K all sts tog 2 by 2 = 42 sts remain on needle. K 3 rows. On next row (= RS) K all sts tog 2 by 2 = 21 sts remain on needle. K 3 rows. On next row (= RS) K all sts tog 2 by 2 = 11 sts remain on needle. Cut the yarn and pull it through the remaining sts, tighten tog and fasten. ASSEMBLY: Fold the bottom edge on hat double towards WS in folding edge and fasten with small stitches - make sure to avoid a tight seam. Then sew hat tog mid back, sew in front loop of outermost st to avoid a chunky seam. Hat measures approx. 26 cm vertically (incl 3 cm edge at the bottom). ---------------------------------------------------------- SHAWL: Shawl is worked in garter st with an edge in lace pattern and worked back and forth on circular needle. Cast on 14 sts on circular needle size 5 mm with 1 strand of each colour (= 2 strands). Work 1 ridge in GARTER ST - see explanation above (1st row = RS). Then work as follows: Row 1 (= RS): K 3, insert 1 marker, work pattern according to diagram A.1 (= 11 sts) = 15 sts on needle, turn piece. Row 2 (= WS): Work A.1 over the first 12 sts, marker, K the rest of row, turn piece. Row 3 (= RS): K until marker, 1 YO – READ INCREASE TIP, marker, A.1 over the last 12 sts = 17 sts on row, turn piece. Row 4 (= WS): Work A.1 over the first 13 sts, marker, K YO twisted and K the rest of row, turn piece. Row 5 (= RS): K until marker and work A.1 over the last 13 sts = 18 sts on row, turn piece. Row 6 (= WS): Work A.1 over the first 14 sts, marker, K the rest of row, turn piece. Row 7 (= RS): K until marker, 1 YO (READ INCREASE TIP), marker, A.1 over the last 14 sts = 20 sts on row, turn piece. Row 8 (= WS): Work A.1 over the first 15 sts, marker, K the rest of row, turn piece. Row 9 (= RS): K until marker, A.1 over the last 15 sts = 21 sts on row, turn piece. Row 10 (= WS): Work A.1 over the first 16 sts, marker, K the rest of row, turn piece. Row 11 (= RS): K until marker, 1 YO, marker, A.1 over the last 16 sts = 23 sts on row, turn piece. Row 12 (= WS): Work A.1 over the first 17 sts, marker, K the rest of row. 1 repetition with A.1 has now been worked and 3 sts have been inc in garter st before marker (seen from RS). Work 1 repetition with SHORT ROWS 1 - see explanation above, over sts in lace edge (do not work the other sts on row). Then work alternately 1 repetition A.1 vertically and 1 repetition SHORT ROWS 1 (NOTE: Every time 1st row in A.1 is worked, there will be 3 sts more before marker). REMEMBER THE KNITTING TENSION! When A.1 and SHORT ROWS 1 have been worked 18 times vertically in total, there are 57 sts in garter st before marker and 11 sts in lace edge after marker = 68 sts on needle. Work 1 repetition SHORT ROWS 2 - see explanation above. After short rows 2 work 1 repetition with SHORT ROWS 3 - see explanation above = 74 sts on needle. Then work back and forth over all sts as follows: Row 1 (= RS): K until marker, work pattern according to diagram A.2 (= 17 sts) = 73 sts on row, turn piece. Row 2 (= WS): Work A.2 over the first 16 sts, marker, K the rest of row, turn piece. Row 3 (= RS): K until 2 sts remain before marker, K 2 tog, marker, A.2 over the last 16 sts = 71 sts on row, turn piece. Row 4 (= WS): Work A.2 over the first 15 sts, marker, K the rest of row, turn piece. Row 5 (= RS): K until marker and work A.2 over the last 15 sts = 70 sts on row, turn piece. Row 6 (= WS): Work A.2 over the first 14 sts, marker, K the rest of row, turn piece. Row 7 (= RS): K until 2 sts remain before marker, K 2 tog, marker, A.2 over the last 14 sts = 68 sts on row, turn piece. Row 8 (= WS): Work A.2 over the first 13 sts, marker, K the rest of row, turn piece. Row 9 (= RS): K until marker and work A.2 over the last 13 sts = 67 sts on row, turn piece. Row 10 (= WS): Work A.2 over the first 12 sts, marker, K the rest of row, turn piece. Row 11 (= RS): K until 2 sts remain before marker, K 2 tog, marker, A.2 over the last 12 sts = 65 sts on row, turn piece. Row 12 (= WS): Work A.2 over the first 11 sts, marker, K the rest of row, turn piece. 1 repetition with A.2 has now been worked and 3 sts have been dec in garter st before marker (seen from RS). Work 1 repetition with SHORT ROWS 3 - see explanation above, over sts in lace edge (do not work the other sts on row). Then work alternately 1 repetition A.2 vertically and 1 repetition SHORT ROWS 3 (NOTE: Every time 1st row in A.2 is worked, there will be 3 sts less before marker). When A.2 and SHORT ROWS 3 have been worked 18 times vertically in total there are 14 sts on needle. Work 1 ridge in garter st over all sts and loosely cast off. Shawl measures approx. 145 cm in width and approx. 40 cm in the middle. |
|||||||||||||
Diagram explanations |
|||||||||||||
|
|||||||||||||
 |
|||||||||||||
Have you finished this pattern?Tag your pictures with #dropspattern #ladylikeset or submit them to the #dropsfan gallery. Do you need help with this pattern?You'll find 17 tutorial videos, a Comments/Questions area and more by visiting the pattern on garnstudio.com. © 1982-2026 DROPS Design A/S. We reserve all rights. This document, including all its sub-sections, has copyrights. Read more about what you can do with our patterns at the bottom of each pattern on our site. |
|||||||||||||


With over 40 years in knitting and crochet design, DROPS Design offers one of the most extensive collections of free patterns on the internet - translated to 17 languages. As of today we count 324 catalogues and 12245 patterns translated into English (UK/cm). 12245
We work hard to bring you the best knitting and crochet have to offer, inspiration and advice as well as great quality yarns at incredible prices! Would you like to use our patterns for other than personal use? You can read what you are allowed to do in the Copyright text at the bottom of all our patterns. Happy crafting!
Post a comment to pattern DROPS 151-8
We would love to hear what you have to say about this pattern!
If you want to leave a question, please make sure you select the correct category in the form below, to speed up the answering process. Required fields are marked *.