
Popular categories
Looking for a yarn?


Comments / Questions (24)
![]() Isabelle Urban wrote:
Isabelle Urban wrote:
Bonjour Je souhaite réaliser ce modèle en 1 seule couleur. Ai-je besoin de autant de pelotes que le modèle rayé ? C'est à dire, pour la taille L : 1150g, soit 23 pelotes. Merci Salutations
07.10.2016 - 11:27DROPS Design answered:
Bonjour Mme Urban, il vous en faudra probablement un peu moins, mais vous pouvez vous baser sur la quantité des 4 couleurs pour être sûre de ne pas en manquer. Bon tricot!
07.10.2016 - 11:32
![]() HUET wrote:
HUET wrote:
Lorsque j'ai fait le dos et devant en un seul, morceau et les manche, au moment de l'assemblage, dois prendre en considération en même temps les chapitres empiècement, manches, dos et devant ? autre chose, toutes les explications de diminutions pour le raglan et les manches ainsi que le dos&devant se font sur le rang endroit et le rang envers se tricote t-il comme les mailles se présentent ? Merci
12.04.2016 - 10:03DROPS Design answered:
Bonjour Mme Huet, Commencez comme indiqué sous "EMPIÈCEMENT" (= placez vos marqueurs, tricotez A.1 à chaque transition et augmentez le nbe de mailles point mousse pour le col, et en même temps, diminuez pour le raglan comme indiqué sous les paragraphes MANCHES et DOS & DEVANTS. Sur l'envers, tricotez les bordures devants/le col au point mousse, A.1 comme dans le diagramme et au point de riz comme avant. Bon tricot!
12.04.2016 - 12:03
![]() Elisabeth Nagel wrote:
Elisabeth Nagel wrote:
Hat sich ein Fehler eingeschlichen? Die Gesamtmaschenzahl am Rumpfteil muss ungerade sein, damit die Blende an beiden Seitenteilen gleich breit wird (Perlmuster trifft auf Krausrippe). Außerdem ist die Vorderseite breiter als das Rückenteil da die Blendenmaschen doppelt dazugerechnet wurden. Normalerweise wird bei der Berechnung nur eine Blendenbreite eingerechnet. Liebe Grüße
20.10.2015 - 22:28DROPS Design answered:
Liebe Elisabeth, die abgebildete Jacke ist genau so gestrickt wie in der Anleitung beschrieben. Bitte erklären Sie etwas genauer, was Sie mit der ungeraden Maschenzahl meinen.
01.03.2016 - 17:05
![]() Marga Augustijn wrote:
Marga Augustijn wrote:
Ik vergat de maat te vermelden voor het vest. Maat XL
25.10.2014 - 17:44
![]() Marga Augustijn wrote:
Marga Augustijn wrote:
Hoeveel wol heb ik nodig als ik dit vest in een kleur wil breien maar wel de gerstekorrel?
25.10.2014 - 17:20DROPS Design answered:
U kunt de hoeveelheid bollen van elke kleur bij elkaar optellen. Wellicht heeft u iets minder nodig, maar dat merkt u vanzelf, dat kunnen wij niet bepalen.
25.10.2014 - 18:42
![]() Helen Kelly Jones wrote:
Helen Kelly Jones wrote:
I have trouble understanding pattern for sleeves,ie.( inc 1st on each side of P sts.) Does this mean inc. each side of EVERY P st. which means after on row you have 44 sts. If not, then which P st does pattern refer to?
18.11.2013 - 15:48DROPS Design answered:
Hi Helen, the P st the pattern refers to is the last P st, so 2 inc sts for a row for 15 times = 30 inc sts. Happy knitting!!
18.11.2013 - 19:32
![]() Heimpel wrote:
Heimpel wrote:
Ich bräuchte ihre hilfe beim arm einstricken .ich stricke erst das vorterteil dann den arm rein wobei den habe ich doch rund gestrickt ist das richtig das ich nach den vorterteil die maschen vom arm dann auf die nadel einfach gebe und im muster weiterstricke . danke in vorraus
31.08.2013 - 19:44DROPS Design answered:
Liebe Frau Heimpel, ja genau so wird es gemacht. Am Ärmel wurden ja beidseitig 3 Maschen abgekettet, das hilft, dass man den runden Ärmel zu den anderen Teilen auf die Nadel nehmen kann.
01.09.2013 - 17:57
![]() Eva A. Christensen wrote:
Eva A. Christensen wrote:
Super flot varm og på en måde klassisk vinter sweater
30.06.2013 - 20:34Vicky Williams wrote:
Looks so warm and cosy. Lovely shades of soft colours.
20.06.2013 - 15:53
![]() Kari wrote:
Kari wrote:
Denne vil jeg ha!
20.06.2013 - 13:26
|
|||||||
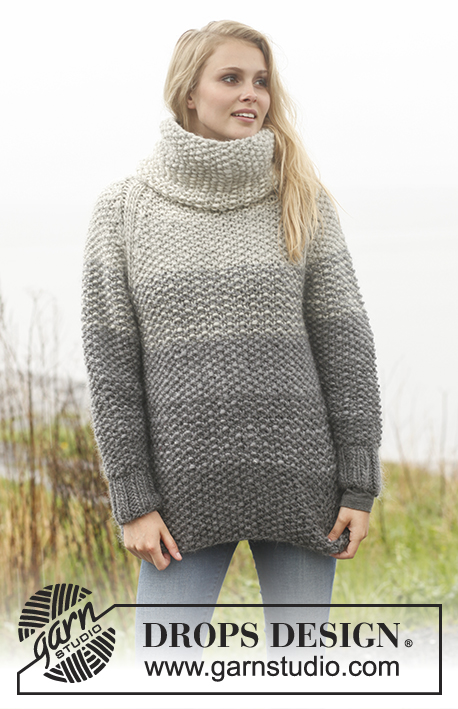
Grey Sunset Jacket#greysunsetjacket |
|||||||
|
|
|||||||
Knitted DROPS jacket with stripes in moss st and raglan in ”Snow”. Size: S - XXXL.
DROPS 150-45 |
|||||||
|
GARTER ST (back and forth on circular needle): K all rows. 1 ridge = 2 rows K. RAGLAN: Dec for raglan on each side of all 4 markers as follows: Before A.1: K 2 tog. After A.1: Slip 1 st as if to K, K 1, psso. NOTE: Work last dec in each side on sleeve as follows: Slip last st in A.1 (= 1 P st) as if to P, P 1, psso. P the next 2 sts tog (i.e. next st on sleeve and first st in A.1). KNITTING TIP: To make the stripes marbled work back and forth on a circular needle as follows: Work 1st row with colour 1, then move all sts on circular needle to the other end of circular needle so that next row can be worked with colour 2 from the same side of piece. Then turn piece and work the next 2 rows as the first 2 – i.e. work 1 row with each colour and work 2 rows in total from the same side. STRIPES (applies to body and sleeves): Stripes are worked in moss st - see explanation in pattern. Work 12-12-14-14-13-13 cm on body and 15-13-14-13-10-9 cm on sleeves with colour no 14, dark grey. Then work stripes as follows on body and sleeve: Work 10-10-10-10-11-11 cm with colour no 14, dark grey and colour no 46, medium grey as follows: Round/row 1: Medium grey Round/row 2: Dark grey Repeat 1st and 2nd round/row. Work 10-10-10-10-11-11 cm with colour no 46, medium grey Work 10-10-10-10-11-11 cm with colour no 46, medium grey and colour no 53, light grey as follows: Round/row 1: Light grey Round/row 2: Medium grey Repeat 1st and 2nd round/row. Work 10-11-11-12-12-13 cm with colour no 53, light grey Work 10-11-11-12-12-13 cm with colour no 53, light grey and colour no 01, off white as follows: Round/row 1: Light grey Round/row 2: Off white Repeat 1st and 2nd round/row. PATTERN: See diagram A.1. The diagram shows all rows in pattern seen from RS. MOSS ST: Round/row 1: * K 1, P 1 *, repeat from *-*. Round/row 2: K over P and P over K. Repeat 2nd row. BUTTONHOLE: Cast off for buttonholes on right band. 1 buttonhole = cast off 3rd st from mid front and cast on 1 new st on next row over this st. Cast off for buttonholes when piece measures: SIZE S: 12, 22, 32 and 42 cm SIZE M: 14, 24, 34 and 44 cm SIZE L: 16, 26, 36 and 46 cm SIZE XL: 18, 28, 38 and 48 cm SIZE XXL: 15, 26, 37 and 48 cm SIZE XXXL: 17, 28, 39 and 50 cm ---------------------------------------------------------- BODY: Work back and forth on circular needle from mid front in STRIPES - see explanation above. READ KNITTING TIP! Cast on 100-108-116-124-132-144 sts (incl 8 band sts in each side towards mid front) on circular needle size 10 mm with dark grey. Work first row as follows from RS: 8 band sts in GARTER ST – see explanation above, MOSS ST – see explanation above – over the next 84-92-100-108-116-128 sts and finish with 8 band sts in garter st. Insert 1 marker after 29-31-33-35-37-40 sts in from each side (= 42-46-50-54-58-64 sts on back piece). Continue pattern like this with 8 band sts in garter st in each side. When piece measure 12-14-16-18-15-17 cm dec for BUTTONHOLES- see above, on right front band - AT THE SAME TIME when piece measures 15 cm, dec 1 st on each side of marker in each side (= 4 dec sts). Repeat dec when piece measures 25-26-27-28-29-30 cm = 92-100-108-116-124-136 sts. When piece measures 33-33-35-35-37-37 cm, cast off 3 sts on each side of marker in each side (= 6 sts cast off in each side) = 24-26-28-30-32-35 sts remain on each front piece and 32-36-40-44-48-54 sts remain on back piece = 80-88-96-104-112-124 sts remain on needle. Put piece aside and knit the sleeves. SLEEVE: Work in the round on double pointed needles, switch to circular needle when needed. Loosely cast on 24-24-28-28-32-32 sts on double pointed needles size 9 mm with dark grey and work Stripes AT THE SAME TIME work rib (= K 2/P 2) for 7 cm. Switch to double pointed needles size 10 mm and work 1 round in stocking st while AT THE SAME TIME dec 2-2-4-4-6-6 sts evenly = 22-22-24-24-26-26 sts. Work next round as follows: 21-21-23-23-25-25 sts moss st, P 1. Continue pattern like this AT THE SAME TIME when piece measures 9 cm, inc 1 st on each side of P sts. Repeat inc every 2 cm 9-6-7-5-6-2 more times, then every cm 5-10-8-12-10-16 times in total (= inc 15-17-16-18-17-19 times in total) = 52-56-56-60-60-64 sts. NOTE: Work the inc sts in moss st. Continue to work until piece measures 36-34-35-34-34-33 cm. Work next round as follows: Cast off 3 sts, work the next 46-50-50-54-54-58 sts, cast off the last 3 sts on round (= 6 sts cast off) = 46-50-50-54-54-58 sts. Put piece aside and knit another sleeve - NOTE: Work reversed, i.e. beg round with P 1 and then work 21-21-23-23-25-25 sts moss st. YOKE: Slip sleeves on to same circular needle size 10 mm as body where armholes were cast off = 172-188-196-212-220-240 sts - CONTINUE WITH STRIPES. Insert 1 marker in all transitions between body and sleeves (= 4 markers) - insert 1st marker in transition between right sleeve and front piece. Work as follows from RS: Work 8 band sts in garter st, 16-18-20-22-24-27 sts moss st (= front piece), A.1 over the next 4 sts (i.e. after 1st marker), moss st over the next 38-42-42-46-46-50 sts, A.1 (= 4 sts before 2nd marker = right sleeve), moss st over the next 32-36-40-44-48-54 sts (= back piece), A.1 (= 4 sts after 3rd marker), moss st over the next 38-42-42-46-46-50 sts, A.1 over the next 4 sts (i.e. before 4th marker = left sleeve), 16-18-20-22-24-27 sts moss st (= front piece) and finish with 8 band sts in garter st. Continue pattern like this. AT THE SAME TIME work 1 st of moss st into band, i.e. no of sts in garter st in band inc and no of sts in moss st on front piece dec (no of sts does not vary), repeat displacement every 4th row 6-7-7-7-8-8 more times (= 7-8-8-8-9-9 times in total) = 15-16-16-16-17-17 sts in garter st on band. AT THE SAME TIME on 4th row after body and sleeve have been placed tog, beg dec for RAGLAN - see explanation above. Repeat dec as explained below. NOTE: The dec on body and sleeves are uneven. SLEEVES: Dec every 4th row 2-1-1-1-1-0 more times and then every other row 16-19-19-21-21-24 times in total (= 19-21-21-23-23-25 dec in total on each side of A.1 in towards sleeves). NOTE: Work last dec on sleeve as follows: Slip last st in A.1 (= 1 P st) as if to P, P 1, psso. P the next 2 sts tog (i.e. next st on sleeve and first st in A.1). BODY: Dec every 8th row 2-1-0-1-0-0 more times, every 6th row 4-5-5-3-3-0 times in total and then every 4th row 0-1-3-5-7-12 times in total (= 7-8-9-10-11-13 dec in total on each side of A.1 in towards front piece and back piece) = 17-18-19-20-21-22 sts remain on front piece and 18-20-22-24-26-28 sts remain on back piece. After all dec are done, 68-72-76-80-84-88 sts remain on needle. Work next row as follows from WS: Work in garter st over the first 15-16-16-16-17-17 sts, then slip them on 1 stitch holder, cast off the next 38-40-44-48-50-54 sts and work in garter st over the last 15-16-16-16-17-17 sts. COLLAR: Then work short rows with off white over the 15-16-16-16-17-17 sts on needle for collar as follows (1st row = RS): * 2 rows back and forth over the first 11-12-12-12-13-13 sts, 2 rows over all sts *, repeat from *-* until collar measures approx. 21-22-24-27-28-30 cm on the inside at the shortest. Cast off. Slip the 15-16-16-16-17-17 band sts from stitch holder in the other side of piece on to circular needle size 10 mm and work short rows the same way but beg from WS. ASSEMBLY: Sew collar tog mid back and sew on to neck line at the back of neck. Sew the opening under the sleeves. Sew the buttons on to left band. |
|||||||
Diagram explanations |
|||||||
|
|||||||
 |
|||||||
Have you finished this pattern?Tag your pictures with #dropspattern #greysunsetjacket or submit them to the #dropsfan gallery. Do you need help with this pattern?You'll find 20 tutorial videos, a Comments/Questions area and more by visiting the pattern on garnstudio.com. © 1982-2026 DROPS Design A/S. We reserve all rights. This document, including all its sub-sections, has copyrights. Read more about what you can do with our patterns at the bottom of each pattern on our site. |
|||||||


With over 40 years in knitting and crochet design, DROPS Design offers one of the most extensive collections of free patterns on the internet - translated to 17 languages. As of today we count 324 catalogues and 12290 patterns translated into English (UK/cm). 12290
We work hard to bring you the best knitting and crochet have to offer, inspiration and advice as well as great quality yarns at incredible prices! Would you like to use our patterns for other than personal use? You can read what you are allowed to do in the Copyright text at the bottom of all our patterns. Happy crafting!
Post a comment to pattern DROPS 150-45
We would love to hear what you have to say about this pattern!
If you want to leave a question, please make sure you select the correct category in the form below, to speed up the answering process. Required fields are marked *.