
Popular categories
Looking for a yarn?


Comments / Questions (197)
![]() Lisette Corthouts wrote:
Lisette Corthouts wrote:
Hoe gaat het verder met rij 8 Jammer stopt de video En lukt het me niet uit te komen met het patroon Grtjs
28.08.2019 - 13:37DROPS Design answered:
Dag Lisette,
In de video wordt inderdaad alleen het begin uitgelegd. De volgende toeren staan beschreven in het patroon. Bij toer 8 haak je eerst 4 lossen, 3 stokjes en 1 losse en 3 stokjes om de eerste lus. Dan herhaal je 6 keer wat tussen * staat. Vervolgens sla je 6 stokjes over en haak je nog 3 stokjes en 1 losse en 3 stokjes en 1 losse om de laatste losse en 1 stokje in het laatste stokje. Dan keer je het werk en ga je verder met toer 9.
31.08.2019 - 12:58
![]() Patricia wrote:
Patricia wrote:
Pardon, oubliez ma question précédente. J’avais fait une erreur au 7e rang.
02.07.2019 - 19:59
![]() Patricia wrote:
Patricia wrote:
Bonjour, Je ne comprends pas le 8e rang. Si je suis les instructions, cela ne fonctionne: je n’aurai pas 6 répétition, mais 10 je crois. Je lis et relis les directives du 8e rang et je ne vois pas ce que je dois faire pour que cela fonctionne. Existe-t-il un schéma? Merci.
02.07.2019 - 19:37DROPS Design answered:
Bonjour Patricia, vérifiez que votre rang 7 est correct, au rang 8, vous aurez 1 groupe de 3 b de chaque côté, et 4 groupes de 3 b espacés de 3 ml dans chacun des arceaux de 3 ml. Le rang 9 va ensuite former les pointes. Bon crochet!
03.07.2019 - 07:17
![]() Pernille wrote:
Pernille wrote:
Hej! Har virkelig brug for hjælp😰 har valgt at strikke det med 1 tråd og nål 3,5 Er nu nået til række 8 og der begynder det at bøje op som en hagesmæk!!! Hvad gør jeg galt???🙏🏻
24.06.2019 - 21:30DROPS Design answered:
Hei Pernille. Vær obs på at ved å endre heklefastheten kommer sjalet ditt til å bli mye mindre enn de målene som er angitt. Det kan høres ut som du hekler litt for stramt, da vil arbeidet bøye seg. Det er fort gjort å hekle luftmasker stramt, da disse ofte feilaktig hekles ytterst på nålen. 1 luftmaske skal være like lang som en stav er bred. Normalt ville jeg rådet deg til å kontrollere heklefastheten din, men siden du har endret den kan jeg ikke fortelle deg hvilken heklefasthet du burde ha på nål nummer 3,5 - da det er individuelt hvor løst/stramt man hekler på en gitt nålstørrelse. Forsøk å hekle luftmaskene løsere å se om det hjelper. God fornøyelse
26.06.2019 - 08:01
![]() Marjon wrote:
Marjon wrote:
Heb problemen met toer 9. Het overslaan van 6 stokjes en hetgeen wat beschreven staat in patroon krijg ik niet gehaakt binnen de l-lus. Met als gevolg dat er totaal geen verband in patroon zit. Neem aan dat 6 stokjes overslaan elke keer op de zelfde plaateen hoort te gebeuren? Help!
21.06.2019 - 09:04DROPS Design answered:
Dag Marjon,
Het overslaan van de 6 stokjes gebeurt inderdaad steeds op dezelfde plek, Op deze plek zal uiteindelijk de omslagdoek in de hoogte op zijn kortst zijn; dus het zijn de binnenste 'punten', als je begrijpt wat ik bedoel. In de volgende lus (dus nadat je de 6 stokjes hebt overgeslagen) haak je weer 3 stokjes. Misschien kun je het beter zien als je inzoomt op de detailfoto.
23.06.2019 - 20:11
![]() Pernille wrote:
Pernille wrote:
Skal lige høre, Op billedet er der 5 forskellige farver på sjalet. Men under jeres menu til sjalet henviser i til 3?? Hvordan kan det være??
09.06.2019 - 22:48DROPS Design answered:
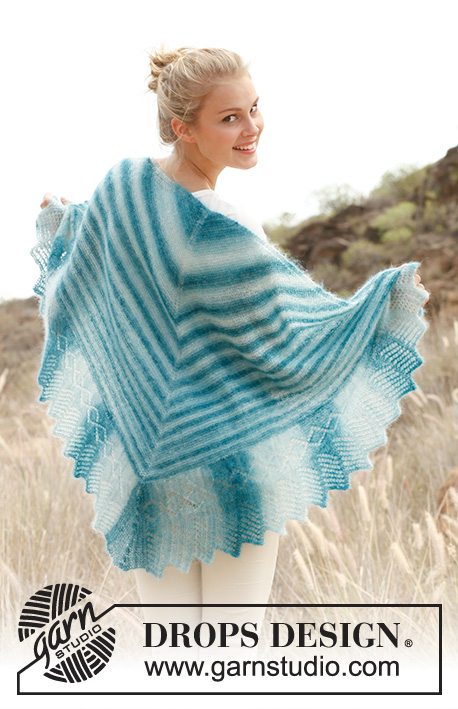
Hej Pernille, det er fordi striberne er strikket i en kombination af de 3 farver. Se STRIBER: Der hækles striber således: 0-27 cm: 2 tråde naturhvid 27-37 cm: 1 tråd naturhvid og 1 tråd isblå 37-47 cm: 2 tråde isblå 47 -57cm: 1 tråd isblå og 1 tråd gråblå 57-67 cm: 2 tråde gråblå
10.06.2019 - 12:02
![]() Augusta Jensen wrote:
Augusta Jensen wrote:
Hvad betyder. Næste række hækles som 13.række, men der hækles 3 st + 1lm mere "mellem hver spids/bund i mønsteret" ?
05.06.2019 - 17:19DROPS Design answered:
Hei Augusta. Omgangen før så økte du som på rad 12, dvs at når du så skal hekle som rad 13 igjen så er det fler masker mellom spissen og "bunnen av spissen" i mønsteret. Altås på hver side av trekantene/spissene. Du må derfor hekle 3 staver + 1 luftmaske mer på hver side av spissene/trekantene enn det du gjorde sist gang du heklet som rad 13. God fornøyelse
06.06.2019 - 07:48
![]() Liesbeth Mennen wrote:
Liesbeth Mennen wrote:
Ik heb deze omslagdoek gemaakt. Wat een mooi en super makkelijk patroon. Ben er heel blij mee. Ga er zeker nog 1 in najaarskleuren maken
05.06.2019 - 17:05
![]() Nicola Kutz wrote:
Nicola Kutz wrote:
Könnten Sie dafür nicht (endlich mal, ich gucke es zum x-ten Mal an :) ) einen Chart machen?
17.05.2019 - 13:13DROPS Design answered:
Liebe Frau Kutz, es gibt zu diesem Modell kein Diagram, hier wird im Video gezeigt wie man das Tuch beginnt, dann häkeln Sie weiter wie in der Anleitung geschrieben ist. Viel Spaß beim häkeln!
20.05.2019 - 08:49
![]() Orsi wrote:
Orsi wrote:
A magyar nyelvű leírásban a 8. sor csillagok közötti része el van írva. Az angol leírásban jól szerepel. Helyesen: * 6 fp-t kihagyunk, 3 erp + 1 lsz + 3 erp + 3 lsz + 3 erp + 1 lsz + 3 erp a köv lsz-ívbe *
02.04.2019 - 09:21
|
|
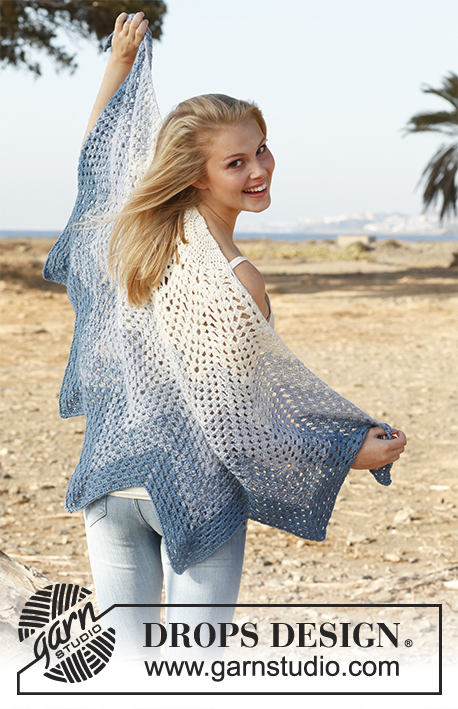
Edelweiss#edelweissshawl |
|
 |
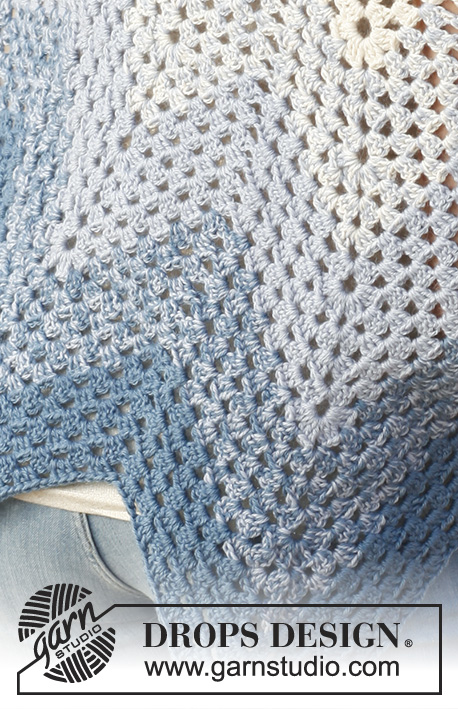 |
Crochet DROPS shawl with zig-zag pattern in 2 threads ”BabyAlpaca Silk”.
DROPS 145-6 |
|
|
MAGIC CIRCLE: When piece is worked in the round, start with this technique to avoid holes in the middle (instead of ch-ring): Hold the yarn end and wind the yarn one time around the index finger to make a loop. Hold the loop with left thumb and middle finger, place the thread over left index finger. Insert hook through the loop, make a YO and pull thread through loop, work 3 ch, then work 11 tr around the loop. Pull yarn end to tighten the loop. Fasten the yarn end on the back side. CROCHET TIP: Replace 1 htr at beg of round with 2 ch. STRIPES: Work stripes as follows: 0-27 cm: 2 threads off white 27-37 cm: 1 thread off white and 1 thread ice blue 37-47 cm: 2 threads ice blue 47-57 cm: 1 thread ice blue and 1 thread grey blue 57-67 cm: 2 threads grey blue ---------------------------------------------------------- SHAWL: Shawl is worked in stripes - see explanation above. Work a magic circle with 12 tr on hook size 5 mm – see explanation above. Turn. ROW 1: READ CROCHET TIP! 2 htr in first tr, * 1 htr in each of the next 2 tr, 2 htr in next tr *, repeat from *-* until 2 tr remain and finish with 1 htr in each of the last 2 tr = 16 htr. Turn. ROW 2: 2 htr in first htr, * 1 htr in each of the next 3 htr, 2 htr in next htr *, repeat from *-* until 3 htr remain and finish with 1 htr in each of the last 3 htr = 20 htr. Turn. ROW 3: 2 htr in first htr, * 1 htr in each of the next 4 htr, 2 htr in next htr *, repeat from *-* until 4 htr remain and finish with 1 htr in each of the last 4 htr = 24 htr. Turn. ROW 4: 2 htr in first htr, * 1 htr in each of the next 5 htr, 2 htr in next htr *, repeat from *-* until 5 htr remain and finish with 1 htr in each of the last 5 htr = 28 htr. Turn. ROW 5: 2 htr in first htr, * 1 htr in each of the next 6 htr, 2 htr in next htr *, repeat from *-* until 6 htr remain and finish with 1 htr in each of the last 6 htr = 32 htr. Turn. ROW 6: 4 ch, work 3 tr in next htr, * skip 3 htr, work 3 tr + 1 ch + 3 tr in next htr *, repeat from *-* 6 times in total, skip 3 htr, work 3 tr + 1 ch in next htr, skip 1 htr, work 1 tr in last htr. Turn. ROW 7: 4 ch, work 3 tr in first ch, * skip 6 tr, work 3 tr + 3 ch + 3 tr in next ch-loop *, repeat from *-* 6 times in total, skip 6 tr, work 3 tr + 1 ch in next ch, 1 tr in last tr. Turn. ROW 8: 4 ch, work 3 tr + 1 ch + 3 tr in first ch, * skip 6 tr, work 3 tr + 1 ch + 3 tr + 3 ch + 3 tr + 1 ch + 3 tr in next ch-loop *, repeat from *-* 6 times in total, skip 6 tr, work 3 tr + 1 ch + 3 tr + 1 ch in last ch and 1 tr in last tr. Turn. ROW 9: 4 ch, work 3 tr + 1 ch in first ch, skip 3 tr, work 3 tr + 1 ch in next ch, * skip 6 tr, work 3 tr + 1 ch in next ch, skip 3 tr, work 3 tr + 3 ch + 3 tr + 1 ch in next ch-loop, skip 3 tr, work 3 tr + 1 ch in next ch *, repeat from *-* 6 times in total, skip 6 tr, work 3 tr + 1 ch in next ch, skip 3 tr, work 3 tr + 1 ch in next ch and 1 tr in last tr. Turn. ROW 10-11: Work as 9th row. ROW 12: 4 ch, work 3 tr + 1 ch + 3 tr + 1 ch in first ch, skip 3 tr, work 3 tr in next ch,* skip 6 tr, work 3 tr + 1 ch in next ch, skip 3 tr, work 3 tr + 1 ch + 3 tr + 3 ch + 3 tr + 1 ch + 3 tr + 1 ch in next ch-loop, skip 3 tr, work 3 tr in next ch *, repeat from *-* 6 times in total, skip 6 tr, work 3 tr + 1 ch in next ch, skip 3 tr, work 3 tr + 1 ch + 3 tr +1 ch in last ch and 1 tr in last tr. Turn. ROW 13: 4 ch, work 3 tr + 1 ch in first ch, skip 3 tr, work 3 tr + 1 ch in next ch, skip 3 tr, work 3 tr + 1 ch in next ch,* skip 6 tr, work 3 tr + 1 ch in next ch, skip 3 tr, work 3 tr, + 1 ch in next ch, skip 3 tr, work 3 tr + 3 ch + 3 tr + 1 ch in next ch-loop, skip 3 tr, work 3 tr + 1 ch in next ch, skip 3 tr, work 3 tr in next ch *, repeat from *-* 6 times in total, skip 6 tr, work 3 tr + 1 ch in next ch, skip 3 tr, work 3 tr + 1 ch in next ch, skip 3 tr, work 3 tr + 1 ch in next ch and 1 tr in last tr. Turn. ROW 14-15: Work as 13th row. When 3 rows have been worked as row 13, inc the same way as on row 12 (in ch-loop work 3 tr + 1 ch + 3 tr + 3 ch +3 tr + 1 ch +3 tr + 1 ch, and work 3 tr + 1 ch + 3 tr + 1 ch in first and last ch). Work next row as 13th row but work 3 tr + 1 ch more between every top/bottom in pattern. Work 3 rows in total like this, then inc again. Continue like this upwards, on every 4th row inc in every top and in each side. Continue until shawl measures 67 cm measured along the middle of shawl. Cut and fasten the threads. |
|
Have you finished this pattern?Tag your pictures with #dropspattern #edelweissshawl or submit them to the #dropsfan gallery. Do you need help with this pattern?You'll find 5 tutorial videos, a Comments/Questions area and more by visiting the pattern on garnstudio.com. © 1982-2026 DROPS Design A/S. We reserve all rights. This document, including all its sub-sections, has copyrights. Read more about what you can do with our patterns at the bottom of each pattern on our site. |
|


With over 40 years in knitting and crochet design, DROPS Design offers one of the most extensive collections of free patterns on the internet - translated to 17 languages. As of today we count 324 catalogues and 12290 patterns translated into English (UK/cm). 12290
We work hard to bring you the best knitting and crochet have to offer, inspiration and advice as well as great quality yarns at incredible prices! Would you like to use our patterns for other than personal use? You can read what you are allowed to do in the Copyright text at the bottom of all our patterns. Happy crafting!
Post a comment to pattern DROPS 145-6
We would love to hear what you have to say about this pattern!
If you want to leave a question, please make sure you select the correct category in the form below, to speed up the answering process. Required fields are marked *.