
Popular categories
Looking for a yarn?


Comments / Questions (65)
![]() Marianne Edlund wrote:
Marianne Edlund wrote:
Det står att det virkas ränder fram och bakstycket. Jag undrar om det menas vilka färger man ska ha i rutorna? Det står ju också om att rutorna förlängs till fram och bakstycket.
23.08.2012 - 17:33DROPS Design answered:
Ja rutorna är framst och rutan förlängs till bakst. Så förklaringen för färgerna på varje varv gäller rutorna.
25.08.2012 - 02:17
![]() Marianne wrote:
Marianne wrote:
Graag het patroon, erg leuk om in maxi vest te maken
10.07.2012 - 22:54
![]() Edith wrote:
Edith wrote:
Trop joli aussi ! vite aussi les explications même si on aura pas le temps de tout faire pendant les vacances... Merci à vous !!
06.07.2012 - 13:39
![]() Gitte wrote:
Gitte wrote:
Håber der snart er mønster,jeg skal bruge vesten til kølige sommer aftener:-D
05.07.2012 - 19:35
![]() Robert wrote:
Robert wrote:
Jolie il arrive quand l explication merci vous faite de tres jolie travailles merci a vous tous
05.07.2012 - 14:50
![]() Marjan wrote:
Marjan wrote:
GEWELDIG! Wacht op het patroon.
05.07.2012 - 14:20
![]() Lella wrote:
Lella wrote:
När kommer mönstret på svenska? Väntar och väntar...
03.07.2012 - 09:28
![]() Marietje wrote:
Marietje wrote:
Erg mooi vest.Hoop dat het patroon snel komt. Kan er in de vacantie aan beginnen.
30.06.2012 - 14:08
![]() Susan wrote:
Susan wrote:
This is just what I've been looking for - when will the pattern be available?
29.06.2012 - 17:26
![]() Sabinci wrote:
Sabinci wrote:
Wun-der-schön! Würde ich gerne nacharbeiten....
28.06.2012 - 17:17
|
||||||||||||||||
Arabica#arabicacardigan |
||||||||||||||||
|
|
||||||||||||||||
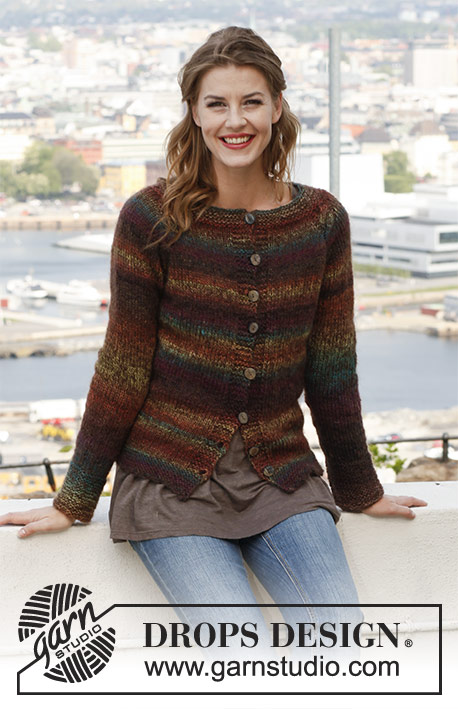
Crochet DROPS jacket with granny squares in ”Delight”, “Fabel and “Kid-Silk”. Size: S - XXXL.
DROPS 143-22 |
||||||||||||||||
|
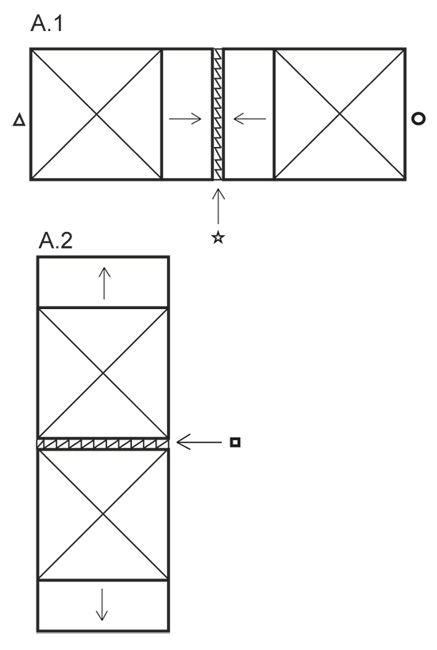
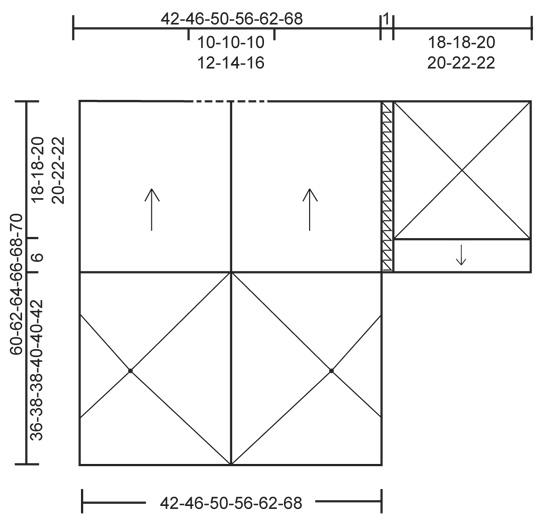
STRIPES BODY: DE = Delight, F = Fabel, KS = Kid-Silk ROUND 1: 1 thread brown F + 1 thread dark brown KS ROUND 2: 1 thread DE + 1 thread dark brown KS ROUND 3: 1 thread DE + 1 thread light beige KS ROUND 4: 1 thread brown F + 1 thread dark brown KS ROUND 5-6: 1 thread DE + 1 thread dark brown KS ROUND 7: 1 thread black F + 1 thread dark brown KS Repeat rounds 1 to 7. STRIPES SLEEVE: ROUND 1: 1 thread DE + 1 thread light beige KS ROUND 2-3: 1 thread DE + 1 thread dark brown KS ROUND 4: 1 thread black F + 1 thread dark brown KS Repeat rounds 1 to 4. -------------------------------------------------------- JACKET: Work 2 large granny squares for front piece which are then lengthened for back piece. Work 4 squares for sleeves which are lengthened before working 2 and 2 tog on overarm. Finally work yoke upwards with tr-groups back and forth before working all parts tog. RIGHT FRONT PIECE + BACK PIECE: Crochet 6 ch on hook size 4 mm with 1 thread brown Fabel and 1 thread dark brown Kid-Silk (= 2 threads) and form a ring with 1 sl st in first ch. ROUND 1: 3 ch (= 1 tr), 2 tr in ch-ring, 3 ch, * 3 tr in ch-ring, 3 ch *, repeat from *-* a total of 3 times and finish with 1 sl st in 3rd ch from beg of round, turn piece (= 4 tr-groups with 3 ch between each). Then work STRIPES BODY – see explanation above, AT THE SAME TIME continue in the round as explained below. ROUND 2: 3 ch (= 1 tr), 2 tr in first ch-loop, 3 ch, 3 tr in same ch-loop, * 1 ch, 3 tr in next ch-loop, 3 ch, 3 tr in same ch-loop *, repeat from *-* a total of 3 times and finish with 1 ch and 1 sl st in 3rd ch from beg of round, turn piece. ROUND 3: 3 ch (= 1 tr), 2 tr in first ch-loop, 1 ch, * 3 tr in next ch-loop, 3 ch, 3 tr in same ch-loop, 1 ch, 3 tr in next ch-loop, 1 ch *, repeat from *-* a total of 3 times, 3 tr in next ch-loop, 3 ch, 3 tr in same ch-loop, 1 ch and finish with 1 sl st in 3rd ch from beg of round, turn piece. Continue in the round like this (on every round worked there is 1 tr-group more between every corner) until square measures approx. 36-38-38-40-40-42 cm along each side (= approx. 18-19-19-20-20-21 rounds in the round). Cut and fasten the threads. Now lengthen the square and work tr-groups back and forth along one side of the square as follows (continue STRIPES BODY as before - adjust so that when 1 row remains until finished measurements, work last row with 1 thread black Fabel + 1 thread dark brown Kid Silk): ROW 1: 1 sl st in ch-loop in the corner on square, 4 ch (= 1 tr + 1 ch), * 3 tr in next ch-loop, 1 ch *, repeat from *-* until last ch-loop (= corner) and finish with 3 tr in ch-loop in the corner, turn piece. ROW 2: 4 ch (= 1 tr + 1 ch), * 3 tr in next ch-loop, 1 ch *, repeat from *-* until last ch-loop and finish with 3 tr in last ch-loop. Repeat 2nd row until square measures approx. 24-27-31-36-42-47 cm from the centre and outwards (i.e. 42-46-50-56-62-68 cm from one side to the other side measured at the widest). Cut and fasten the threads. LEFT FRONT PIECE + BACK PIECE: Work as right part. Work the 2 squares tog mid back so that rows worked back and forth are against each other - see illustration A.1. Work with 1 thread black Fabel + 1 thread dark brown Kid-Silk as follows: 1 dc in outermost tr in the corner on one square, 1 ch, 1 dc in ch-loop in the corner on the other square, * 3 ch, 1 dc in ch-loop on first square, 1 ch, 1 dc in ch-loop on the other square *, repeat from *-* and finish with 3 ch, 1 dc in tr on first square, 1 ch and 1 sl st in tr on the other square. SLEEVE: Beg as on right front piece but from and with 2nd round work STRIPES SLEEVE – see explanation above. When 1 round remains before square measures 18-18-20-20-22-22 cm, work last round with 1 thread black Fabel + 1 thread dark brown Kid-Silk. Then work back and forth along one side on the square the same way as on back piece (continue stripes as before - adjust so that when 1 row remains until finished measurements, work last row with 1 thread black Fabel + 1 thread dark brown Kid Silk). When square measures 24-24-26-26-28-28 cm at the widest, cut and fasten the thread. Sleeve at the front is now done. Work another part the same way (= sleeve at the back). Then work the 2 squares tog on overarm as shown in illustration A.2 – work them tog the same way as piece was worked tog mid back. Work 2 squares with lengthening the same way for the other sleeve and work them tog on overarm as explained above. BACK PIECE: Insert 1 marker in the middle of one front piece so that there are 21-23-25-28-31-34 cm from mid back until marker and 21-23-25-28-31-34 cm from marker mid front – insert marker between 2 tr-groups. Insert another marker on the other front piece. There are now approx. 42-46-50-56-62-68 cm between the 2 markers on back piece and approx. 21-23-25-28-31-34 tr-groups between markers. Then work tr-groups back and forth between the 2 markers at the back with 1 thread Delight + 1 thread dark brown Kid-Silk (= 2 threads – NOTE: Work with these 2 threads until finished measurements) as follows: 1 sl st in ch-loop between 2 tr-groups, 4 ch (= 1 tr + 1 ch), * 3 tr in next ch-loop, 1 ch *, repeat from *-* and finish with 3 tr in ch-loop at the marker, turn piece. Work next row as follows: 4 ch (= 1 tr + 1 ch), * 3 tr in next ch-loop, 1 ch *, repeat from *-* and finish with 3 tr in last ch-loop, turn piece. Work back and forth like this until 2 rows remain before piece measures 60-62-64-66-68-70 cm from bottom edge and up (i.e. piece measures approx. 22-22-24-24-26-26 cm from where back piece beg). Now work 2 rows with tr-groups back and forth over the outermost 16-18-20-22-24-26 cm on one shoulder (i.e. over approx. 8-9-10-11-12-13 tr-groups). Cut the thread and work 2 rows with tr-groups over the outermost 16-18-20-22-24-26 cm on the other shoulder (make sure to work the same no of tr-groups on both shoulders = approx. 5-5-5-6-7-8 tr-groups mid back of neck). Piece measures approx. 60-62-64-66-68-70 cm from the shoulder to bottom edge and 24-24-26-26-28-28 cm from the shoulder and down to where back piece beg. RIGHT FRONT PIECE: Work tr-groups the same way back and forth over right front piece, from mid front and to marker in the side with 1 thread Delight + 1 thread dark brown Kid-Silk (= 2 threads – NOTE: Work with these 2 threads until finished measurements). When front piece is the same length as back piece, work neck edge with tr-groups back and forth over the other tr-groups mid front (do not work over tr-groups on shoulder and make sure that same no of tr-groups have been worked on the shoulder at the front and back). Work back and forth until neck edge measures approx. 7-7-7-8-9-10 cm, cut and fasten the thread. LEFT FRONT PIECE: Work as right front piece but reversed. ASSEMBLY: Work shoulders tog the same way as the other parts were worked tog. Sew neck edge to neck line at the back of neck without sewing it tog mid back (to make an open vent at the back). Work sleeve on to sleeve line. And work the openings under the sleeves tog. CROCHET EDGE: Work a finishing edge at the bottom around both sleeves and around the entire opening of jacket with 1 thread black Fabel + 1 thread dark brown Kid-Silk as follows: ROW/ROUND 1: Beg at the outer edge in the corner on neck edge at the back of neck, work towards front piece around the entire jacket and to the corner on the neck edge at the back of neck in the other side with 1 thread black Fabel + 1 thread dark brown Kid-Silk as follows: 1 sl st in outermost st in the corner on neck edge, 4 ch (= 1 tr + 1 ch), then work 3 tr in every ch or ch-loop and 1 ch between every tr-group, finish with 1 tr in outermost st in the corner on neck edge. ROUND 2: Work around the entire opening on jacket (also along mid back in vent on neck edge): 1 sl st in first st, * 4 ch, 1 dc in next ch-loop *, repeat from *-* and finish with 4 ch and 1 sl st in sl st from beg of round. Cut and fasten the threads. Work 1 buttonhole loop approx. 30-30-32-32-34-34 cm from the shoulder and down on left front piece (try the jacket on for desired placement). Work with 1 thread black Fabel + 1 thread dark brown Kid-Silk as follows: 1 dc in first st, 7 ch, 1 dc in same st. Cut and fasten the threads. Sew the button on to right front piece. |
||||||||||||||||
Diagram explanations |
||||||||||||||||
|
||||||||||||||||
 |
||||||||||||||||
 |
||||||||||||||||
Have you finished this pattern?Tag your pictures with #dropspattern #arabicacardigan or submit them to the #dropsfan gallery. Do you need help with this pattern?You'll find 9 tutorial videos, a Comments/Questions area and more by visiting the pattern on garnstudio.com. © 1982-2026 DROPS Design A/S. We reserve all rights. This document, including all its sub-sections, has copyrights. Read more about what you can do with our patterns at the bottom of each pattern on our site. |
||||||||||||||||


With over 40 years in knitting and crochet design, DROPS Design offers one of the most extensive collections of free patterns on the internet - translated to 17 languages. As of today we count 324 catalogues and 12290 patterns translated into English (UK/cm). 12290
We work hard to bring you the best knitting and crochet have to offer, inspiration and advice as well as great quality yarns at incredible prices! Would you like to use our patterns for other than personal use? You can read what you are allowed to do in the Copyright text at the bottom of all our patterns. Happy crafting!
Post a comment to pattern DROPS 143-22
We would love to hear what you have to say about this pattern!
If you want to leave a question, please make sure you select the correct category in the form below, to speed up the answering process. Required fields are marked *.