
Popular categories
Looking for a yarn?


Comments / Questions (82)
![]() Magali wrote:
Magali wrote:
Pouvez vous m'aider à réaliser ce modèle. Il faut faire 2 séries de rgs raccourcis, sur la 1ère bande ? et en même temps faire des diminutions à 6cm du bas de quoi ? Et comment faire la 2éme bande. Merci pour vos beaux modèles
16.04.2025 - 08:46DROPS Design answered:
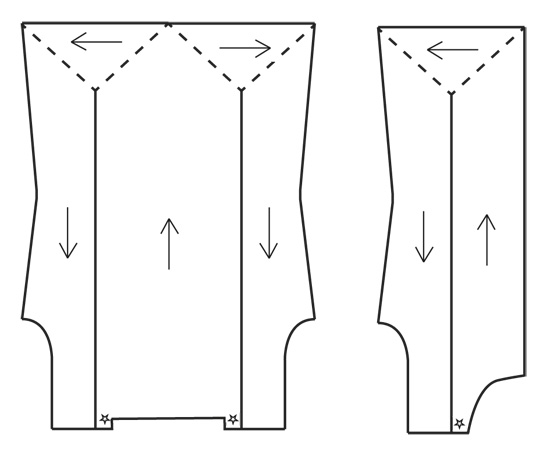
Bonjour Magali, vous tricotez les 2 séries des rangs raccourcis pour créer les 2 angles du bas et ainsi "remonter" - cette partie correspond aux pointillés et flèche vers la gauche dans le schéma. Les diminutions commencent à 6 cm après le début de la 2ème série des rangs raccourcis - vous diminuez sur le côté qui sera cousu au dos. la 2ème bande se tricote ensuite au point mousse, avec des diminutions et augmentations, et, en même temps, vous les assemblez en tricotant les mailles comme indiqué dans le paragraphe: EN MÊME TEMPS, tricoter les 2 bandes ensemble ainsi - cf aussi vidéo. Bon tricot!
22.04.2025 - 10:18
![]() Maria wrote:
Maria wrote:
Dalle spiegazioni non riesco a capire come unire le due strisce del davanti. Accavallano la maglia mi rimane un buco .
28.03.2025 - 10:07DROPS Design answered:
Buongiorno Maria, a quale parte del lavoro sta facendo riferimento? Buon lavoro!
29.03.2025 - 12:03
![]() Laura wrote:
Laura wrote:
Vedendo il disegno di questo modello, i fianchi dei davanti e del dietro sono sancrati. Nella spiegazione non dice di diminuire e aumentare . Cosa devo fare?
18.03.2025 - 17:18DROPS Design answered:
Buonasera Laura, al momento non sono segnalati errori per questo modello: l'effetto è dovuto alla costruzione del capo. Buon lavoro!
18.03.2025 - 20:21
![]() Maura Domenica Gottero wrote:
Maura Domenica Gottero wrote:
Per fare questo modello con le giuste sfumature occorre usare più gomitoli contemporaneamente ?
25.02.2025 - 20:30DROPS Design answered:
Buongiorno Maria, l'effetto deriva dal filato e dalla lavorazione, deve procedere come indicato. Buon lavoro!
28.02.2025 - 15:25
![]() Rita Kragh wrote:
Rita Kragh wrote:
Jeg har problemer med at forstå forstykket. Når jeg har lavet det ene hjørne og skal videre til næste hjørne af forstykke og op af siden på forstykket så forestår jeg ikke helt den forklaring som i skriver. Hvad jeg kan se så er de mål som der står i opskriften passer ikke helt sammen med diagrammet. Det kan godt være at jeg skal have det skåret ud i pap så kan det være jeg forstår det.
10.08.2021 - 15:05DROPS Design answered:
Hej Rita, har du set videoen nederst i opskriften, som vi har lavet for at vise vendingerne?
25.08.2021 - 10:14
![]() Ulrika Nielsen wrote:
Ulrika Nielsen wrote:
Jag har löst det!
22.08.2020 - 16:57
![]() Ulrika Nielsen wrote:
Ulrika Nielsen wrote:
Hej! Jag är på första delen av framstycket, och har nu kommit till där det står: ”när arbetet mäter 6 cm från längst ner på framstycket...” Där hänger jag inte med. Varifrån ska dessa 6 cm mätas? Är det lodrätt eller vågrätt på dominorutan? Tacksam för snabbt svar!!
22.08.2020 - 15:29DROPS Design answered:
Hej. Så bra att det löste sig :)
24.08.2020 - 07:55
![]() Ulrika Nielsen wrote:
Ulrika Nielsen wrote:
Hej! Jag är på första delen av framstycket, och har nu kommit till där det står: ”när arbetet mäter 6 cm från längst ner på framstycket...” Där hänger jag inte med. Varifrån ska dessa 6 cm mätas? Är det lodrätt eller vågrätt på dominorutan? Tacksam för snabbt svar!!
22.08.2020 - 15:21
![]() Karin Brookey wrote:
Karin Brookey wrote:
I am confused on the short rows not sure what it means to work until 2 rows have been worked over the first st. Also what does it mean to work 1 row over the first 2 sets? Thanks for any help you can give me.
13.06.2017 - 15:29DROPS Design answered:
Dear Mrs Brookey, you work the short rows over one st less (= in first size for example work: 2 rows over 26 sts, 2 rows over 25 sts, 2 rows over 24 sts, 2 rows over 23 sts and so on until you have worked 2 rows over 2 sts, then work 2 rows over 3 sts 2 rows over 4 sts, 2 rows over 5 sts and so on until you have worked 2 rows over all sts. Happy knitting!
13.06.2017 - 17:36
![]() Donatella wrote:
Donatella wrote:
Mi scusi per le tante domande che le faccio ma mi è venuto un dubbio. Finiti i ferri accorciati l'asola esterna la devo prendere solo nel primo ferro e fare il ferro di ritorno normalmente o riprenderla anche nel secondo ferro? Grazie per l'immensa disponibilità.
16.10.2016 - 12:18DROPS Design answered:
Buongiorno Donatella, deve riprendere una maglia lavorandola come indicato all'inizio del f dal rovescio del lavoro, poi finisce il ferro e lavora il ferro di ritorno (diritto del lavoro), poi deve girare il lavoro e ripprendere la m nella striscia continuando come prima. In questo modo riprenderà 1 m ogni 2 f (1 m in ogni "costa" a m legaccio). Ci riscriva se ha altri dubbi, siamo qui per questo. Buon lavoro!
16.10.2016 - 13:10
|
||||||||||
Loreen#loreencardigan |
||||||||||
 |
 |
|||||||||
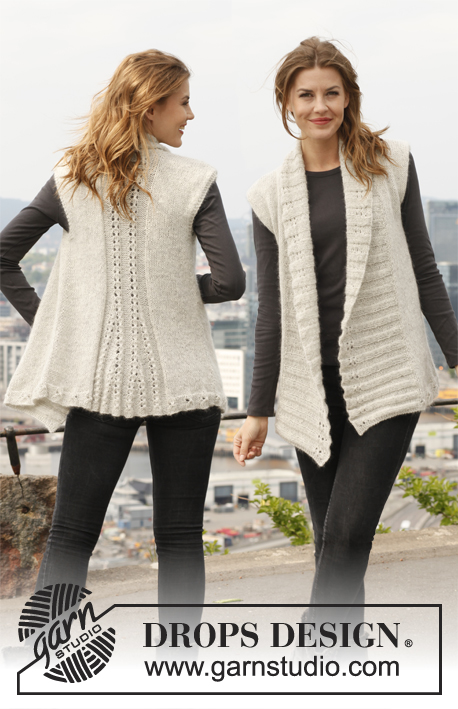
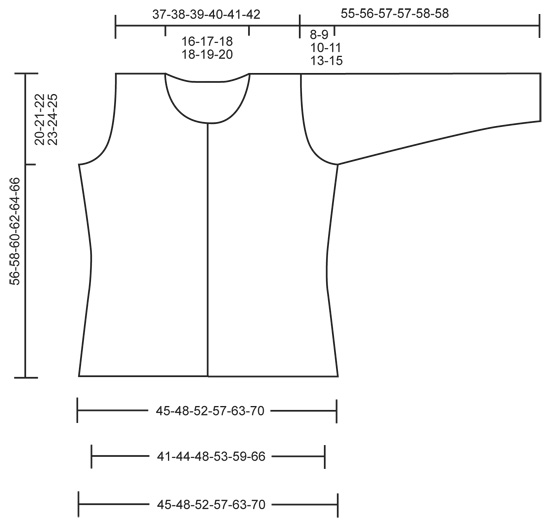
Knitted DROPS jacket with short rows in "Fabel".
DROPS 140-4 |
||||||||||
|
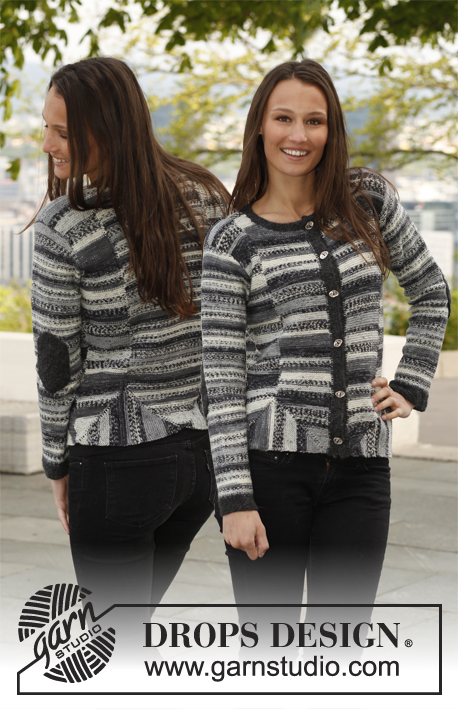
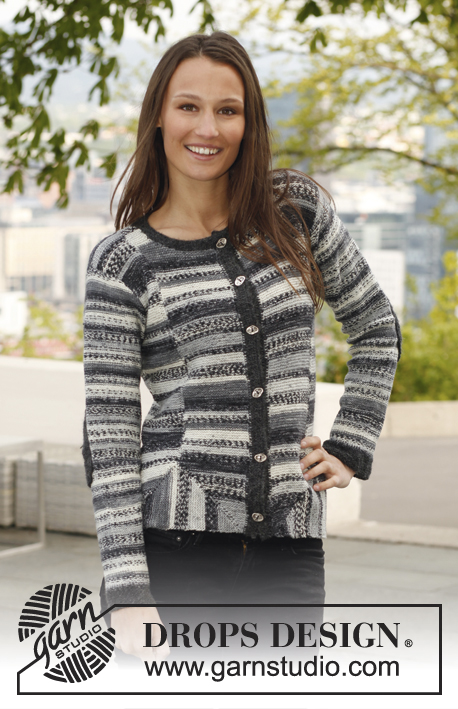
GARTER ST (back and forth on needle): K all rows. 1 ridge = 2 rows K. GARTER ST (in the round on circular needle): 1 ridge = 2 rounds * K 1 round and P 1 round *, repeat from *-*. SHORT ROWS: Work 1 row over the first 26-28-30-33-37-41 sts, turn and work back. Work 1 row over the first 25-27-29-32-36-40 sts, turn and work back. Continue with short rows, work one st less every time until two rows have been worked only over the first st. Then work 1 row over the first 2 sts, turn and work back, 1 row over the first 3 sts, turn and work back. Continue with short rows, work one st more every time, until 1 row has been worked over all sts, turn and work back. 1 repetition with short rows = 104-112-120-132-148-164 rows. BUTTONHOLES: Cast off for buttonholes on right band from RS. 1 buttonhole = K tog 3rd and 4th st from mid front, then make 1 YO. Cast off for buttonholes when piece measures: SIZE S: 3, 12, 21, 30, 39 and 48 cm. SIZE M: 3, 10, 18, 26, 34, 42 and 50 cm. SIZE L: 3, 11, 19, 27, 35, 43 and 52 cm. SIZE XL: 3, 11, 19, 27, 36, 45 and 54 cm. SIZE XXL: 3, 11, 20, 29, 38, 47 and 56 cm. SIZE XXXL: 3, 10, 18, 26, 34, 42, 50 and 58 cm. (NOTE: Work last buttonhole when 1 cm remains on neck edge.) ---------------------------------------------------------- LEFT FRONT PIECE: The entire piece is worked in GARTER ST - see explanation above. Work piece from shoulder down to bottom edge, then from bottom edge and back to shoulder. Cast on 8-9-10-12-15-18 sts on needles size 3 mm with Fabel. Work in garter st for 5 cm, then cast on new sts at the end of every row from WS as follows: 1 st 3 times, 2 sts 3 times and 10-11-12-13-14-15 sts 1 time = 27-29-31-34-38-42 sts. Continue in garter st until piece measures 45-46-47-47-48-49 cm. Work 2 repetitions with short rows – see explanation above, first row = from RS. AT THE SAME TIME when piece measures 6 cm from bottom on front piece (measured up along the side), K tog the first 2 sts on row (from RS), repeat dec every 3 cm 4 more times = 22-24-26-29-33-37 sts. When short rows have been worked, work in garter st over all sts. AT THE SAME TIME work the two stripes tog as follows - beg from WS: Pick up the outermost st in front loop from previous stripe, work first st from left needle, pass the new st over, work the rest of row. Repeat these two rows upwards until 1 st has been knitted up in every ridge along the entire side of previous stripe. AT THE SAME TIME when piece measures 22 cm from bottom edge, work 2 sts in first st on row (from RS), repeat inc every 2½-3-3-3½-3½-4 cm 4 more times = 27-29-31-34-38-42 sts. When piece measures 36-37-38-39-40-41 cm from bottom edge, cast off for armholes at the beg of every row from RS as follows: 3 sts 1-1-1-2-2-2 times, 2 sts 2-3-4-5-7-9 times and 1 st 3-3-4-4-7-10 times = 17-17-16-14-11-8 sts. Work until piece measures 56-58-60-62-64-66 cm, cast off. RIGHT FRONT PIECE: The entire piece is worked in garter st. Work piece from shoulder down to bottom edge, then from bottom edge and back to shoulder. Cast on 8-9-10-12-15-18 sts on needles size 3 mm with Fabel. Work in garter st for 5 cm, then cast on new sts at the end of every row from RS as follows: 1 st 3 times, 2 sts 3 times and 10-11-12-13-14-15 sts 1 time = 27-29-31-34-38-42 sts. Continue in garter st until piece measures 45-46-47-47-48-49 cm. Work 2 repetitions with short rows – see explanation above, first row = from WS. AT THE SAME TIME when piece measures 6 cm from bottom on front piece (measured up along the side), K tog the last 2 sts on row (from RS), repeat dec every 3 cm 4 more times = 22-24-26-29-33-37 sts. When short rows have been worked, work in garter st over all sts. AT THE SAME TIME work the two stripes tog as follows - beg from RS: Pick up the outermost st in front loop from previous stripe, work first st from left needle, pass the new st over, work the rest of row. Repeat these two rows upwards until 1 st has been knitted up in every ridge along the entire side of previous stripe. AT THE SAME TIME when piece measures 22 cm from bottom edge, work 2 sts in last st on row (from RS), repeat inc every 2½-3-3-3½-3½-4 cm 4 more times = 27-29-31-34-38-42 sts. When piece measures 36-37-38-39-40-41 cm, cast off for armholes at the beg of every row from WS as follows: 3 sts 1-1-1-2-2-2 times, 2 sts 2-3-4-5-7-9 times and 1 st 3-3-4-4-7-10 times = 17-17-16-14-11-8 sts. Work until piece measures 56-58-60-62-64-66 cm, cast off. BACK PIECE: The entire piece is worked in garter st. Work piece from shoulder down to bottom edge, then from bottom edge and back to shoulder. RIGHT SHOULDER: Cast on 8-9-10-12-15-18 sts on needles size 3 mm with Fabel. Work in garter st for 2 cm. Put piece aside. Work left shoulder the same way, keep sts on needle, cast on 38-40-42-44-46-48 new sts, and work sts from right shoulder back on needle = 54-58-62-68-76-84 sts. Work in garter st until piece measures 45-46-47-47-48-49 cm. Continue in garter st, AT THE SAME TIME on every other row slip 1 st in each side on a stitch holder. Continue until 2 sts remain on needle = 26-28-30-33-37-41 sts on each stitch holder. Slip the left of the 2 sts on stitch holder, then finish the right side of back piece. RIGHT SIDE OF BACK PIECE: = 1 st on needle. Continue in garter st, AT THE SAME TIME at the end of every row from RS work 1 st from stitch holder back on needle. Continue like this until all the sts have been worked back on to needle = 27-29-31-34-38-42 sts. Work 1 repetition with short rows – see explanation above, first row = from RS. AT THE SAME TIME when piece measures 6 cm from bottom on back piece (measured up along the side), K tog the first 2 sts on row (from RS), repeat dec every 3 cm 4 more times = 22-24-26-29-33-37 sts. When short rows have been worked, work in garter st over all sts. AT THE SAME TIME work the two stripes tog as follows - beg from WS: Pick up the outermost st in front loop from previous stripe, work first st from left needle, pass the new st over, work the rest of row. Repeat these two rows upwards until 1 st has been knitted up in every ridge along the entire side of previous stripe. AT THE SAME TIME when piece measures 22 cm, continue inc in the side and cast off for armhole as explained on left front piece. Work until piece measures 56-58-60-62-64-66 cm, cast off. LEFT SIDE OF BACK PIECE: Slip last st slipped on stitch holder back on needle size 3 mm = 1 st on needle. Continue in garter st, AT THE SAME TIME at the end of every row from WS work 1 st from stitch holder back on needle. Continue like this until all the sts have been worked back on to needle = 27-29-31-34-38-42 sts. Work 1 repetition with short rows – see explanation above, first row = from WS. AT THE SAME TIME when piece measures 6 cm from bottom on back piece (measured up along the side), K tog the last 2 sts on row (from RS), repeat dec every 3 cm 4 more times = 22-24-26-29-33-37 sts. When short rows have been worked, work in garter st over all sts. AT THE SAME TIME work the two stripes tog as follows - beg from RS: Pick up the outermost st in front loop from previous stripe, work first st from left needle, pass the new st over, work the rest of row. Repeat these two rows upwards until 1 st has been knitted up in every ridge along the entire side of previous stripe. AT THE SAME TIME when piece measures 22 cm, continue inc in the side and cast off for armhole as explained on right front piece. Work until piece measures 56-58-60-62-64-66 cm, cast off. SLEEVE: Worked in the round on double pointed needles. Cast on 56-58-60-62-64-68 sts on double pointed needles size 3 mm with Alpaca. Work in GARTER ST for 4 cm - see explanation above. Switch to Fabel, then work in stocking st (sleeve is sewn on with WS outwards). Insert 1 marker at the beg of round. When piece measures 8-8-8-8-6-6 cm, inc 1 st in each side of marker, repeat inc every 2½-2-2-1½-1½-1½ cm 14-16-18-20-22-23 more times = 86-92-98-104-110-116 sts. When piece measures 47-47-47-46-45-43 cm (shorter measurements in the larger sizes because of longer sleeve cap and broader shoulder width), cast off 6 sts mid under sleeve (= 3 sts on each side of marker). Then work back and forth and cast off for sleeve cap. Cast off at beg of every row in each side: 3 sts 1 time, 2 sts 5-6-6-6-6-6 times and 1 st 1-1-2-4-7-10 times, then cast off 2 sts in each side until piece measures 54-55-56-56-57-57 cm, then cast off 3 sts 1 time in each side. Cast off the remaining sts, piece measures approx. 55-56-57-57-58-58 cm in all sizes. LEFT BAND: Cast on 6 sts on needle size 3 mm with Alpaca. Work in garter st back and forth AT THE SAME TIME work them tog with front piece as follows - beg from RS: Pick up the outermost st in front loop from bottom of front piece, work first st from left needle, pass the new st over, work the rest of row. Repeat these two rows upwards until 1 st has been knitted up in every ridge along the entire front piece. Repeat on right front piece, first row = from WS. Cast off for BUTTONHOLES on right band - see explanation above. ASSEMBLY: Sew the shoulder seams. Sew side seams. Sew in sleeves, with WS outwards. NECK EDGE: Knit up approx. 120-130 sts around neck edge (also over bands) with Alpaca. Work in garter st for 2 cm, cast off. ELBOW PATCH: Work piece back and forth. Cast on 20 sts on needle size 3 mm with Alpaca. Work as follows: Row 1: K all sts. Row 2: K 1, 1 YO, K 1, 1 YO, K 6, 1 YO, K 1, 1 YO, K 2, 1 YO, K 1, 1 YO, K 6, 1 YO, K 1, 1 YO, K 1 = 28 sts. Row 3: K over all sts, K YO twisted. Row 4: K 1, 1 YO, K 2, 1 YO, K 8, 1 YO, K 2, 1 YO, K 2, 1 YO, K 2, 1 YO, K 8, 1 YO, K 2, 1 YO, K 1 = 36 sts. Row 5: K over all sts, K YO twisted. Row 6: K 1, 1 YO, K 3, 1 YO, K 10, 1 YO, K 3, 1 YO, K 2, 1 YO, K 3, 1 YO, K 10, 1 YO, K 3, 1 YO, K 1 = 44 sts. Row 7: K over all sts, K YO twisted. Row 8: K 1, 1 YO, K 4, 1 YO, K 12, 1 YO, K 4, 1 YO, K 2, 1 YO, K 4, 1 YO, K 12, 1 YO, K 4, 1 YO, K 1 = 52 sts. Row 9: K over all sts, K YO twisted. Row 10: K 1, 1 YO, K 5, 1 YO, K 14, 1 YO, K 5, 1 YO, K 2, 1 YO, K 5, 1 YO, K 14, 1 YO, K 5, 1 YO, K 1 = 60 sts. Row 11: K over all sts, K YO twisted. Row 12: K 1, 1 YO, K 6, 1 YO, K 16, 1 YO, K 6, 1 YO, K 2, 1 YO, K 6, 1 YO, K 16, 1 YO, K 6, 1 YO, K 1 = 68 sts. Row 13: K over all sts, K YO twisted. Row 14: K 1, 1 YO, K 7, 1 YO, K 18, 1 YO, K 7, 1 YO, K 2, 1 YO, K 7, 1 YO, K 18, 1 YO, K 7, 1 YO, K 1 = 76 sts. Row 15: K over all sts, K YO twisted. Row 16: K 1, 1 YO, K 8, 1 YO, K 20, 1 YO, K 8, 1 YO, K 2, 1 YO, K 8, 1 YO, K 20, 1 YO, K 8, 1 YO, K 1 = 84 sts. Row 17: Cast off all sts. Sew the elbow patch tog in the middle with neat little stitches. Knit another elbow patch. Sew an elbow patch at the back of each sleeve with stitches (try the jacket on for correct placing). |
||||||||||
Diagram explanations |
||||||||||
|
||||||||||
 |
||||||||||
 |
||||||||||
Have you finished this pattern?Tag your pictures with #dropspattern #loreencardigan or submit them to the #dropsfan gallery. Do you need help with this pattern?You'll find 15 tutorial videos, a Comments/Questions area and more by visiting the pattern on garnstudio.com. © 1982-2026 DROPS Design A/S. We reserve all rights. This document, including all its sub-sections, has copyrights. Read more about what you can do with our patterns at the bottom of each pattern on our site. |
||||||||||


With over 40 years in knitting and crochet design, DROPS Design offers one of the most extensive collections of free patterns on the internet - translated to 17 languages. As of today we count 324 catalogues and 12290 patterns translated into English (UK/cm). 12290
We work hard to bring you the best knitting and crochet have to offer, inspiration and advice as well as great quality yarns at incredible prices! Would you like to use our patterns for other than personal use? You can read what you are allowed to do in the Copyright text at the bottom of all our patterns. Happy crafting!
Post a comment to pattern DROPS 140-4
We would love to hear what you have to say about this pattern!
If you want to leave a question, please make sure you select the correct category in the form below, to speed up the answering process. Required fields are marked *.