
Popular categories
Looking for a yarn?


Comments / Questions (39)
![]() Lena wrote:
Lena wrote:
Jeg er ved at hækle Country Dream 136-25 og har hæklet hele ryggen og er godt i gang med forstykket - jeg er kommet til det stykke hvor forstykket skal deles. og der står hækle 4 (str.) rapp . M1 mønster, men på billedet ser det meget ud, som at der hækles 4 rkr. stangmasker først - Håber meget på jeres snarlige svar Venlig hilsen Lena Fink Rasmussen, Nørresundby
28.01.2026 - 10:05
![]() Lena Fink Rasmussen wrote:
Lena Fink Rasmussen wrote:
Jeg er ved at hækle Country Dream 136-25 og har hæklet hele ryggen og er godt i gang med forstykket - jeg er kommet til det stykke hvor forstykket skal deles. og der står hækle 4 (str.) rapp . M1 mønster, men på billedet ser det meget ud, som at der hækles 4 rkr. stangmasker først - Håber meget på jeres snarlige svar Venlig hilsen Lena Fink Rasmussen, Nørresundby
18.01.2026 - 19:31DROPS Design answered:
Hej Lena, ja det kan se ud til at slidsen starter lidt længere nede på forstykket på billedet. Det kan være at design har bestemt sig for at udskæringen bliver for dyb, så de har flyttet den lidt op. Men du må naturligvis gerne dele forstykket 2-3 rækker længere nede hvis du vil have samme udskæring som på billedet :)
29.01.2026 - 10:39
![]() Monique wrote:
Monique wrote:
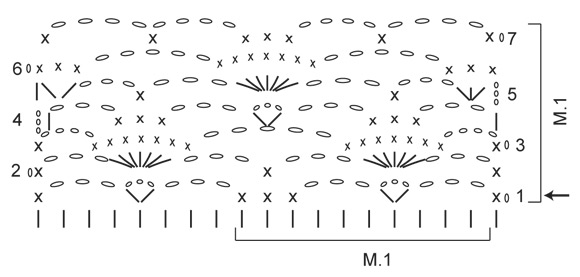
Achterpand. Toer 4 beschrijving en toer 4 diagram. In de beschrijving lees ik 1 v in de middelste van de 3 v van de 3e toer. Het diagram laat zien dat ik 3 v moet haken in de 3, 4 en 5 v van toer 3. Ik ga er vanuit dat ik het op de juiste manier doe. Klopt dat?
07.06.2025 - 22:44DROPS Design answered:
Dag Monique,
Zoals in het telptroon is aangegeven is inderdaad juist, dus in de 3e, 4e en 5e van toer 3 33n vaste haken.
10.06.2025 - 19:57
![]() Margaretha wrote:
Margaretha wrote:
Den "extra" stolpen i början på varvet, är utfyllnad. Det blir annars ett mellanrum som kan bli synligt när den ska monteras. Den ska vara en stolpe ovanpå dessa två, annars blir det en ofrivillig ökning.
09.04.2025 - 22:20
![]() Arhi wrote:
Arhi wrote:
Ich würde die Tunika gerne mit dem Garn "cotton light" häkeln. Wie müsste ich da umrechnen um zu wissen wieviel Garn ich zb für xl / xxl bräuchte?
04.09.2021 - 23:17DROPS Design answered:
Liebe Arhi, dieses Modell wird mit Safran, ein Garn der Garngruppe A, Cotton Light gehört zur Garngruppe B und wird hier keine Alternative sein. Hier finden Sie alle unsere Pullover, die mit einem Garn der Garngruppe B (wie Cotton Light) gehäkelt wurde, so können Sie ruhig unseren Garnumrechner benutzen. Viel Spaß beim häkeln!
06.09.2021 - 07:32
![]() Essi wrote:
Essi wrote:
Hei! Mulla meni L kokoiseen paitaan yli 500 g, vaikka ohjeessa sanottiin että 500 g riittäisi.
13.04.2021 - 14:56
![]() Disa Carlsson wrote:
Disa Carlsson wrote:
Hej! Jag förstår inte den här biten gällande bakstycket: "Sedan virkas det 1 st-varv över de yttersta 35-34-43-42-51-50 m i varje sida (dvs det virkas inte över de mittersta 29-31-33-35-37-39 m (= hals), sedan maskas det av 1 m på nästa varv mot halsen = 34-33-42-41-50-49 m kvar på axeln. Klipp av tråden och fäst den, nu mäter arb ca 62-64-66-68-70-72 cm". Hur virkar jag på två sidor utan att virka i mitten? Och vad menar ni med "nästa varv mot halsen"?
03.11.2020 - 11:23DROPS Design answered:
Hej Disa. Du får virka färdigt ena sidan först och sedan göra färdigt den andra. När vi skriver nästa varv mot halsen så menar vi bara att du maskar av mot den sidan som är in mot halsen. Mvh DROPS Design
05.11.2020 - 09:01
![]() Heidi Cecilie Brandshaug Løken wrote:
Heidi Cecilie Brandshaug Løken wrote:
Går denne fint å hekle med Safran? Fsrgetips?
26.04.2020 - 09:37DROPS Design answered:
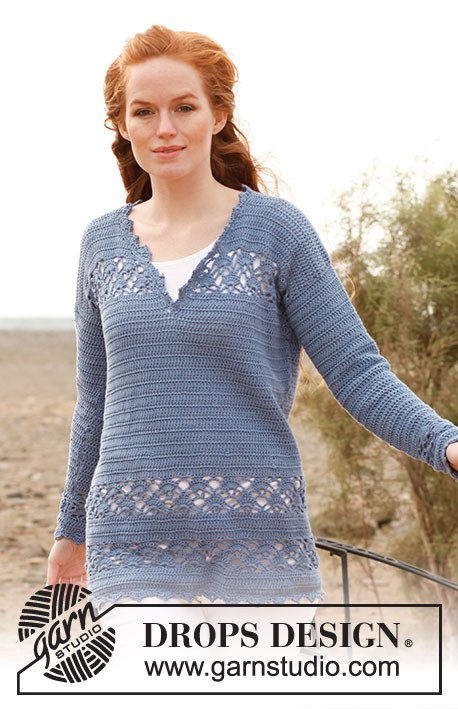
Hei Denne er heklet i DROPS Safran nr 06, jeansblå. Mvh DROPS Design
27.04.2020 - 10:08
![]() Sylvaine wrote:
Sylvaine wrote:
Je ne comprends pas pourquoi la photo présente un pull col en V et le dessin explicatif :un col rond fendu.
25.02.2020 - 15:10DROPS Design answered:
Bonjour Sylvaine, parce que lorsque l'on divise le devant pour l'encolure, on ne va pas de suite diminuer pour l'encolure, on crochète d'abord quelques rangs "droit" et alors seulement, on diminuera pour l'encolure. L'effet obtenu sera celui sur la photo. Bon crochet!
25.02.2020 - 15:33
![]() Elly wrote:
Elly wrote:
Na het lezen van de opmerkingen kom ik er toch niet helemaal uit. Ben nu bij de hals en als ik 9 st. overhou en daarna het werk keer en verder haak volgens patroon, hou ik een hoek over in de V hals. komt dat bij de afwerking van de hals goed? wil graag zoals op de foto een V hals maken in de trui. Hoor graag of dit klopt.
09.10.2017 - 18:05DROPS Design answered:
Hallo Elly, Voor de V-hals haak je tot de middelste steek van de vorige toer en dan keer je. Ik weet niet welke maat je haakt, maar bijvoorbeeld voor maat S heb je op dat moment 99 steken op de toer en je haakt 49 steken. Als je straks voor de andere helft ook 49 steken haakt kom je op 98 steken uit. Geen hoek dus, maar 1 steek midden waar niet in gehaakt wordt.
11.10.2017 - 22:03
|
|||||||||||||
Country Dream#countrydreamsweater |
|||||||||||||
 |
 |
||||||||||||
Crochet DROPS tunic in ”Safran”. Size: S - XXXL.
DROPS 136-25 |
|||||||||||||
|
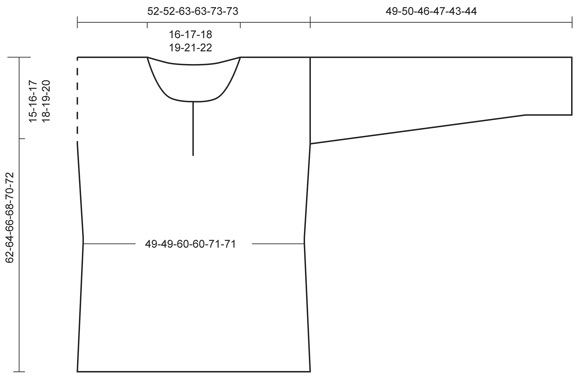
TR ROWS: Beg every tr row with 3 ch (not counted as 1st tr), work 1 tr in 1st st, then 1 tr in every st, turn. PATTERN: See diagram M.1. 1 repetition of diagram M.1 = 10 tr in width and 7 rows vertically. DECREASE TIP: Work 1 tr but wait with last pull through (= 2 sts on hook), then work next tr but on last pull through, pull thread through all sts on hook = 1 st dec. INCREASE TIP: Inc 1 st in each side of piece by working 2 tr in 1st and last st on row. --------------------------------------------------------- BACK PIECE: Worked back and forth. Loosely work 102-102-122-122-142-142 ch on hook size 3.5 mm with Safran. Work 1st row (= RS) as follows: Work 1 tr in 4th ch from hook, then 1 tr in every ch, turn = 99-99-119-119-139-139 tr (= 9-9-11-11-13-13 repetitions of diagram M.1 + 9 sts). REMEMBER THE CROCHET TENSION! Then work 3-3-4-4-5-5 TR ROWS - Read explanation above = 4-4-5-5-6-6 tr rows vertically. Continue to work diagram M.1 as follows: ROW 1: 1 ch, 1 dc in 1st tr, * 3 ch, skip the next 3 tr, in next tr work as follows: 1 tr, 3 ch, 1 tr, then 3 ch, skip the next 3 tr, 1 dc in each of the next 3 tr (= 3 dc) *, repeat from *-* the rest of row. When repeating from *-* the last time work 3 ch, skip the next 3 tr and work 1 dc in last tr, turn. ROW 2: 1 ch, 1 dc in 1st dc, * 3 ch, skip next ch-loop, 7 tr in next ch-loop (between 2 tr), 3 ch, 1 dc in the middle dc from 1ST ROW *, repeat from *-* the rest of row. When repeating from *-* the last time work 3 ch and 1 dc in last dc, turn. ROW 3: 1 ch, 1 dc in 1st dc, 4 ch, * 1 dc in each of the next 7 tr (= 7 dc), 5 ch *, repeat from *-* the rest of row, finish with 4 ch and 1 dc in last dc, turn. ROW 4: 3 ch, 1 tr in 1st ch-loop, * 3 ch, 1 dc in the middle of the 3 dc from 3RD ROW (= 3 dc), 3 ch, [1 tr, 3 ch, 1 tr] in next ch-loop *, repeat from *-* the rest of row. When repeating from *-* the last time work 3 ch and 1 tr in last ch-loop, turn. ROW 5: 3 ch, 3 tr in 1st ch-loop, * 3 ch, 1 dc in the middle dc from 4TH ROW, 3 ch, skip next ch-loop, 7 tr in next ch-loop (between 2 tr) *, repeat from *-* the rest of row. When repeating from *-* the last time work 3 ch, 2 tr in last ch-loop and 1 tr in 3rd ch from 4TH ROW, turn. ROW 6: 1 ch, 1 dc in each of the next 3 tr (= 3 dc), * 5 ch, 1 dc in each of the next 7 tr (= 7 dc) *, repeat from *-* the rest of row. When repeating from *-* the last time work 1 dc in each of the last 3 tr (= 3 dc), turn. ROW 7: 1 ch, 1 dc in 1st dc, * 4 ch, 1 dc in next ch-loop, 4 ch, 1 dc in each of the middle 3 dc from 6TH ROW (= 3 dc) *, repeat from *-* the rest of row. When repeating from *-* the last time work 4 ch and 1 dc in last dc, turn. Then work 1 dc row as follows: 1 ch, 1 dc in 1st dc, * 4 dc in next ch-loop, 3 dc in next ch-loop, 1 dc in each of the next 3 dc *, repeat from *-* the rest of row. When repeating from *-* the last time, work 1 dc in last dc = 99-99-119-119-139-139 dc. Work another 4-4-5-5-6-6 tr rows, then diagram M.1 1 time vertically, and then 1 dc row the same way - while AT THE SAME TIME dec 1 st at the end of row - Read DECREASE TIP above = 98-98-118-118-138-138 sts. Piece now measures approx. 20-20-22-22-24-24 cm. Then work 2-3-2-3-2-3 tr rows (piece measures approx. 22-23-24-25-26-27 cm). On next row dec 4 sts evenly on row = 94-94-114-114-134-134 tr. Continue with tr rows until piece measures 27-28-29-31-32-33 cm. On next row, inc 1 st in each side of piece - Read INCREASE TIP above. Repeat inc one more time when piece measures 34-35-36-37-38-39 cm. When piece measures 40-41-42-44-45-46 cm, inc 1 st at end of row = 99-99-119-119-139-139 tr. When piece measures 47-48-49-50-51-52 cm, work from RS as follows: Diagram M.1 1 time and 1 dc row as before. NOTE: Insert a marker in each side of piece on 1st row in diagram M.1 (armhole beg here). Continue with tr rows until piece measures 60-62-64-66-68-70 cm. Then work 1 tr row over the outermost 35-34-43-42-51-50 sts in each side (i.e. do not work over the middle 29-31-33-35-37-39 sts (= neck), then dec 1 st on next row towards the neck = 34-33-42-41-50-49 sts remain on shoulder. Cut and fasten the thread, piece measures approx. 62-64-66-68-70-72 cm. FRONT PIECE: Work as back piece until piece measures 42-44-45-47-48-50 cm. LEFT FRONT PIECE: On next row from RS work vent as follows: Work 49-49-59-59-69-69 tr (= 4-4-5-5-6-6 repetitions of diagram + 9 sts), turn. Continue with tr rows. When piece measures 47-48-49-50-51-52 cm, work diagram M.1 (beg from RS) 1 time vertically. NOTE: Insert a marker in the left side of piece (seen from RS) on 1st row in diagram M.1 (armhole beg here). Then work 1 dc row as before = 49-49-59-59-69-69 dc. On next row from RS work neck as follows: Work until 8-8-9-9-10-10 sts remain on row, turn. Then dec on every row towards the neck as follows: Dec 2 sts 2 times - Read DECREASE TIP above, 1 st 3-4-4-5-5-6 times = 34-33-42-41-50-49 sts remain on shoulder. Continue until piece measures 62-64-66-68-70-72 cm, cut and fasten the thread. RIGHT FRONT PIECE: = 50-50-60-60-70-70 tr. On next row dec 1 st at beg of row = 49-49-59-59-69-69 tr. Work as left front piece but reversed. SLEEVE: Worked back and forth. Work 42-42-42-52-52-52 ch on hook size 3.5 mm. Work 1st row (= RS) as follows: Work 1 tr in 4th ch from hook, then 1 tr in every ch, turn = 39-39-39-49-49-49 tr (= 3-3-3-4-4-4 repetitions of diagram M.1 + 9 sts), turn. Then work 2 tr rows = 3 tr rows vertically. Then work diagram M.1 1 time and 1 dc row = 39-39-39-49-49-49 dc. On next row work tr - while AT THE SAME TIME inc 1 st in each side of piece. Continue with tr rows and repeat inc every 4½-3½-2½-3½-2½-2½ cm a total of 9-11-13-10-12-13 times = 57-61-65-69-73-75 sts. Continue until piece measures 49-50-46-47-43-44 cm (shorter measurements in the larger sizes because of broader shoulder width), cut and fasten the thread. ASSEMBLY: Sew the shoulder seams. Sew in sleeves between markers in each side. Sew sleeve and side seams in one. CROCHET EDGE - BODY: Work along the bottom edge of tunic as follows: ROUND 1: Beg in left side seam, work 1 ch, 1 dc in every tr - AT THE SAME TIME inc 2 dc evenly on round = 200-200-240-240-280-280 dc (no of sts divisible by 8), finish with 1 sl st in 1st dc. ROUND 2: 1 ch, 1 dc in 1st dc, * 3 ch, skip 3 dc, 1 dc in next dc *, repeat from *-* the entire round, finish with 3 ch, skip the last 3 dc and work 1 sl st in 1st dc. ROUND 3: 1 ch, in 1st ch-loop work as follows: 1 dc, 3 ch, 1 dc, * in next ch-loop work as follows: 3 tr, 3 ch, 1 sl st in 1st ch, 3 tr, in next ch-loop work as follows: 1 dc, 3 ch, 1 dc *, repeat from *-* the entire round, finish with 1 sl st in 1st dc, cut and fasten the thread. CROCHET EDGE - SLEEVE: Work an edge around bottom edge of sleeve as follows: Size S - L ROUND 1: Beg in sleeve seam, work 1 ch, 1 dc in every tr - AT THE SAME TIME inc 1 st at end of round = 40-40-40 dc (no of sts divisible by 8), finish with 1 sl st in 1st dc. ROUND 2: 1 ch, 1 dc in 1st dc, * 3 ch, skip 3 dc, 1 dc in next dc *, repeat from *-* the entire round, finish with 3 ch, skip the last 3 dc and work 1 sl st in 1st dc. ROUND 3: 1 ch, in 1st ch-loop work as follows: 1 dc, 3 ch, 1 dc, * in next ch-loop work as follows: 3 tr, 3 ch, 1 sl st in 1st ch, 3 tr, in next ch-loop work as follows: 1 dc, 3 ch, 1 dc *, repeat from *-* the entire round, finish with 1 sl st in 1st dc, cut and fasten the thread. Size XL - XXXL: ROUND 1: Beg in sleeve seam, work 1 ch, 1 dc in every tr - AT THE SAME TIME dec 1 st at end of round = 48-48-48 dc (no of sts divisible by 8), finish with 1 sl st in 1st dc. Work 2ND and 3RD round as size S - L. Repeat on the edge of the other sleeve. CROCHET EDGE - NECK: Work an edge back and forth along the vent and neck edge as follows: ROW 1: Beg at the bottom of vent mid front, work 1 ch, 21-21-21-17-17-17 dc along vent on right front piece (no of sts divisible by 4 + 1), then 83-83-91-91-99-99 dc along neck edge, finish with 21-21-21-17-17-17 dc along vent on left front piece = 125-125-133-125-133-133 dc in total, turn. ROW 2: 1 ch, 1 dc in 1st dc, * 3 ch, skip 3 dc, 1 dc in next dc *, repeat from *-* the rest of row, turn. ROW 3: 1 ch, in 1st ch-loop work as follows: 1 dc, 3 ch, 1 dc, * in next ch-loop work as follows: 3 tr, 3 ch, 1 sl st in 1st ch, 3 tr, in next ch-loop work as follows: 1 dc, 3 ch, 1 dc *, repeat from *-* the rest of row, cut and fasten the thread. |
|||||||||||||
Diagram explanations |
|||||||||||||
|
|||||||||||||
 |
|||||||||||||
 |
|||||||||||||
Have you finished this pattern?Tag your pictures with #dropspattern #countrydreamsweater or submit them to the #dropsfan gallery. Do you need help with this pattern?You'll find 5 tutorial videos, a Comments/Questions area and more by visiting the pattern on garnstudio.com. © 1982-2026 DROPS Design A/S. We reserve all rights. This document, including all its sub-sections, has copyrights. Read more about what you can do with our patterns at the bottom of each pattern on our site. |
|||||||||||||


With over 40 years in knitting and crochet design, DROPS Design offers one of the most extensive collections of free patterns on the internet - translated to 17 languages. As of today we count 324 catalogues and 12290 patterns translated into English (UK/cm). 12290
We work hard to bring you the best knitting and crochet have to offer, inspiration and advice as well as great quality yarns at incredible prices! Would you like to use our patterns for other than personal use? You can read what you are allowed to do in the Copyright text at the bottom of all our patterns. Happy crafting!
Post a comment to pattern DROPS 136-25
We would love to hear what you have to say about this pattern!
If you want to leave a question, please make sure you select the correct category in the form below, to speed up the answering process. Required fields are marked *.