
Popular categories
Looking for a yarn?


Comments / Questions (14)
![]() Edina wrote:
Edina wrote:
Köszönöm szépen a kiegészített magyar leírást.
01.02.2025 - 06:10
![]() Edina wrote:
Edina wrote:
Üdvözlöm! A minta gyönyörű, jó dolgozni a fonalakkal. Viszont a magyar leírásban nem szerepel a hónalj, az ujjak, az összeállítás, és az öv leírása. Le tudnák írni, kerem szépen. Köszönöm.
25.01.2025 - 07:35DROPS Design answered:
Kedves Edina, igaza van, egy régi technikai hiba miatt valóban hiányzik a leírás egy része. Néhány nap alatt újra fordítjuk és feltöltjük a teljes mintát. Köszönjük a türelmét.
28.01.2025 - 22:31
![]() Kim wrote:
Kim wrote:
I’m a bit confused about the increases and decreases for the collar/neck. Am I increasing/decreasing at the same time?
17.09.2024 - 17:51DROPS Design answered:
Dear Kim, yes you will increase for the collar, this means the number of stitches in garter stitch inside M.1 will increase but you will also decrease for V-neck inside all stitches in garter stitch (including M.1) this means you will decrease the number of sts worked in stocking stitch; note that the increase/decrease are worked on a different rhythm. Happy knitting!
18.09.2024 - 08:01
![]() Rikke wrote:
Rikke wrote:
Hej, er denne strikket i glatstrik eller retstrik? Det ligner glatstrik, men diagram siger ret på alle pinde🤔😊 Tak.
01.01.2021 - 21:37DROPS Design answered:
Hej Rikke, jakken er strikket i glatstrik men kanterne som strikkes ifølge diagrammet strikkes i retstrik. God fornøjelse!
07.01.2021 - 14:07
![]() Andrea Blümel wrote:
Andrea Blümel wrote:
Hallo, könnte an diese Strickjacke auch nur mit Fabel stricken? Vielen Dank für die Antwort
24.07.2019 - 10:51DROPS Design answered:
Liebe Frau Blümel, ja, das geht, wenn Sie 2 Fäden Fabel nehmen (d.h. wenn Sie doppelfädig mit Fabel stricken). Die Jacke wird ja durchweg mit 2 Fäden der Garngruppe A gestrickt, daher können Sie problemlos auch 2 Fäden Fabel nehmen. Achten Sie auf jeden Fall darauf, dass Sie die richtige Maschenprobe haben, dann sollte die Jacke gut gelingen! Viel Spaß beim Stricken! :-)
24.07.2019 - 17:05
![]() Inger Lise Løland wrote:
Inger Lise Løland wrote:
Jakken er lekker og fin å strikke! Men kraven på jakken bretter seg vel litt utover, og blir ikke da garnbyttet veldig synlig? Altså at trådene man trekker med oppover istedenfor å feste vil synes..? Jeg har ikke kommet så langt ennå, men aner at det ikke vil bli så pent. Noen råd/tips..?
19.04.2015 - 16:45
![]() Patricia wrote:
Patricia wrote:
Mooi model zou het willen breien in de nieuwe kleur fabel in een kleur waneer komen die uit
10.03.2012 - 14:49DROPS Design answered:
Wij hebben helaas nog geen levertijd voor de nieuwe Fabel kleuren. Zodra deze bekend zijn, dan publiceren we deze ook op de kleurenkaart (onder de kleur zelf).
12.03.2012 - 10:13
![]() Deirdre wrote:
Deirdre wrote:
Love the edging on this one
25.01.2012 - 23:51
![]() Barbara wrote:
Barbara wrote:
Till hösten önskar jag mig mönster på islandströjor,och lite anorlunda tröjor,mer ovanliga
15.01.2012 - 13:45
![]() Annasoer wrote:
Annasoer wrote:
Mooie pasvorm, zal heerlijk zitten! (kost wel wat tijd om te maken denk ik)
07.01.2012 - 12:49
|
||||||||||||||||||||||||||||
Emilia#emiliacardigan |
||||||||||||||||||||||||||||
 |
 |
|||||||||||||||||||||||||||
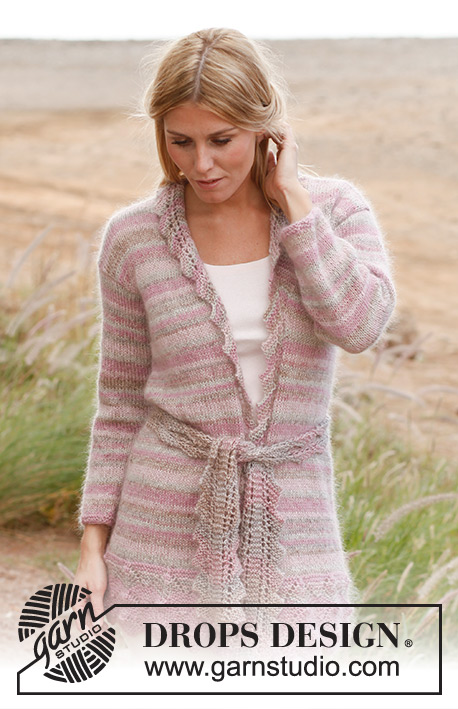
Knitted DROPS jacket with lace pattern and belt in "Fabel", "Alpaca" and "Kid-Silk". Size: S - XXXL.
DROPS 138-31 |
||||||||||||||||||||||||||||
|
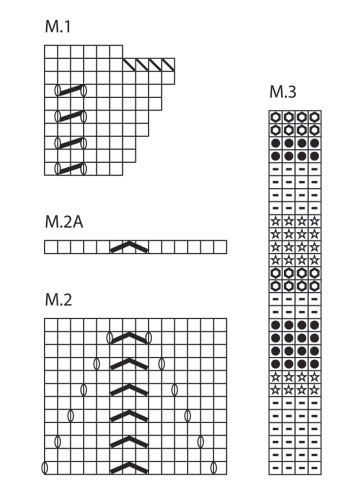
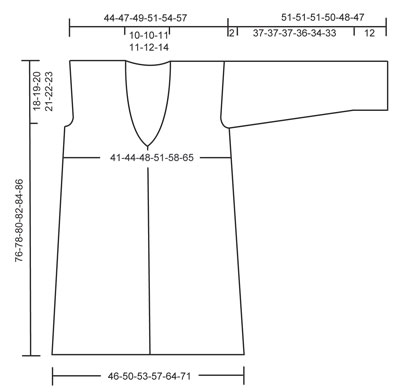
YARN CHANGE TIP: When working stripe pattern, it looks nicer if you change colour inside the band in one side to avoid long threads at the outer edge where they are easily visible. Change as follows: Work the rows to be worked in the stripe, turn and work the band (i.e. diagram M.1) back with the same colour, change colour. PS: Do not cut the threads for each stripe but let them follow upwards. EDGE PATTERN: See diagram M.1 – no of sts will vary from 6 to 10 depending on where you are in the diagram. LACE PATTERN: See diagram M.2, diagram shows pattern from RS. STRIPE PATTERN: See diagram M.3. GARTER ST (back and forth on needle): K all rows. INCREASE TIP (applies to collar): Inc sts for collar inside all sts in diagram M.1. All inc are done from RS. Inc by making 1 YO, on next row K YO twisted (i.e. work in back loop of st instead of front) to avoid holes. Work the inc sts in garter st. DECREASE TIP (applies to neck): Dec sts for neck inside all sts in diagram M.1 + the inc sts for collar. All dec are done from RS as follows: Right front piece: After all sts in diagram M.1 + the inc sts: K 2 twisted tog (i.e. work in back loop of st instead of front). Left front piece: Before all sts in diagram M.1 + the inc sts: K 2 tog. -------------------------------------------------------- BODY: Worked back and forth on a circular needle from mid front to make room for all the sts. READ YARN CHANGE TIP! Cast on 221-237-253-269-301-333 sts (incl 6 band sts in each side towards mid front) on circular needle size 5 mm with 1 thread medium pink Alpaca and 1 thread Kid-Silk. K 1 row from WS. Insert 2 markers in the piece; 58-62-66-70-78-86 sts in from each side, these marks the sides (= 105-113-121-129-145-161 sts between markers on back piece). Insert also a marker after 6 sts in from each side (= bands). Work next row as follows (from RS): Work 1st row in EDGE PATTERN - see diagram M.1, over the first 6 sts (= band), then * K 7, slip 1 st as if to K, K 2 tog, psso, K 6 *, repeat from *-* a total of 13-14-15-16-18-20 times, then K the last 7 sts = 196-210-224-238-266-294 sts. (26-28-30-32-36-40 sts dec and 1 new st inc on right band.) Work next row as follows (from WS): Work 1st row of diagram M.1 over the first 6 sts (= band). Then K 183-197-211-225-253-281 sts and work the last 7 sts as 2nd row in diagram M.1. Then work LACE PATTERN – see diagram M.2, over the middle 183-197-211-225-253-281 sts = 13-14-15-16-18-20 repetitions + 1 st (the last st is worked as first st in diagram so that the pattern is the same in each side mid front) and diagram M.1 over band sts in each side (i.e. the sts on the outside of outermost markers in each side mid front). When diagram M.2 has been worked 2 times vertically, work STRIPE PATTERN – see diagram M.3, and work diagram M.2 one more time vertically. When diagram M.2 has been worked for the third time, work diagram M.2A over all repetitions of diagram M.2 (i.e. dec 26-28-30-32-36-40 sts). There should now be 79-85-91-97-109-121 sts between markers on back piece - if no of sts is not correct, move the markers so that the no is correct and so that there are the same no of sts on both front pieces (= 39-42-45-48-54-60 + st in diagram M.1). Then continue in stocking st over the middle 157-169-181-193-217-241 sts with bands in diagram M.1 as before – AT THE SAME TIME work stripe pattern according to diagram M.3 over all sts until finished measurements. READ UNTIL LEFT FRONT PIECE BEFORE CONTINUING! SIDE DEC: When piece measures 20-21-22-23-24-25 cm, dec 1 st on each side of markers in the sides. Repeat dec every 7 cm a total of 5 times. COLLAR: When piece measures 51-52-53-54-55-56 cm, inc 1 st in each side towards mid front for collar - SEE INCREASE TIP. Repeat inc every other row a total of 8 times and then on every 4th row 6 times (= 14 inc sts), work all inc sts in GARTER ST – see explanation above! NECK DEC: When piece measures 54-55-56-57-58-59 cm (3 cm after inc for collar beg), dec 1 st in each side towards mid front for neck - SEE DECREASE TIP. Repeat dec every row from RS a total of 14-14-15-15-16-17 times. ARMHOLES: When piece measures 58-59-60-61-62-63 cm, cast off 6-6-8-10-12-14 sts for armholes in each side (i.e. 3-3-4-5-6-7 sts on each side of both side markers). Finish each part separately. LEFT FRONT PIECE: Continue inc for collar and dec for neck and work diagrams M.1 and M.3 as before – AT THE SAME TIME 2 cm after dividing for armhole, inc 1 st for broad shoulder (inc by working 2 sts in second outermost st). Repeat inc every 4th row a total of 6-5-5-5-2-0 times (there are no inc in size XXXL). When all inc and dec are done, 43-45-46-48-49-51 sts remain on needle (when working first or last row in diagram M.1). When piece measures approx. 76-78-80-82-84-86 cm (adjust so that next row is worked from RS), cast off the outermost 29-31-32-34-35-37 sts for shoulder, work the rest of row as before = 14-18 sts remain on needle (depending on where you are in diagram M.1). COLLAR: Continue diagram M.3 as before (but change colour at the innermost part towards shoulder sts, i.e. at beg of row from RS). Work diagram M.1 over the outermost 6-10 sts as before and in garter st over the remaining 8 sts, work as follows: * 2 rows only over diagram M.1 + 2 sts, 2 rows over all sts *, repeat from *-* until collar measures approx. 6-6-7-7-7-8 cm in the shortest side (i.e. the side worked only in garter st). Cast off all sts. RIGHT FRONT PIECE: Work as left front piece but reversed. When casting off shoulder sts, this is done from WS to continue on to collar without cutting the threads. When changing colour in diagram M.3, this must be done at the beg of row from WS. BACK PIECE: = 63-69-73-77-87-97 sts. Continue in stocking st and diagram M.3 as before - AT THE SAME TIME 2 cm after dividing for armhole, inc for broad shoulder in each side as on front piece (i.e. 1 st every 4th row a total of 6-5-5-5-2-0 times) = 75-79-83-87-91-97 sts. When piece measures 74-76-78-80-82-84 cm, cast off the middle 15-15-17-17-19-21 sts for neck and finish each shoulder separately. Then cast off 1 st on next row towards the neck = 29-31-32-34-35-37 sts remain on each shoulder. Cast off when piece measures approx. 76-78-80-82-84-86 cm, make sure to cast off on same row in diagram M.3 as on front piece. SLEEVE: Worked back and forth on needle. Cast on 44-46-48-50-52-54 sts on needle size 5 mm with 1 thread medium pink Alpaca and 1 thread Kid-Silk. Work 4 rows in garter st, then work in stocking st and stripe pattern according to diagram M.3 until finished measurements. AT THE SAME TIME when piece measures 12 cm, inc 1 st in each side. Repeat inc every 5-4-4-3½-3-3 cm a total of 8-9-9-10-11-11 times = 60-64-66-70-74-76 sts. When piece measures 49-49-49-48-46-45 cm (shorter measurements in the larger sizes because of broader shoulder width), cast off 5 sts at beg of every row, 2 times in each side. Then cast off the remaining sts, piece measures approx. 51-51-51-50-48-47 cm. ASSEMBLY: Sew the shoulder seams. Sew the collar tog mid back and sew it to the neckline. Sew sleeve seams inside 1 edge st and sew in the sleeves. BELT: Belt will be the same on both sides. Cast on 14 sts on needle size 5 mm with 1 thread Fabel and 1 thread Kid-Silk. Work as follows: First row in diagram M.1 over the first 6 sts, then K the last 8 sts. Turn piece, work first row in diagram M.1 over the first 6 sts, 2 sts in garter st and second row in diagram M.1 over the last 7 sts. Turn piece, work third row in diagram M.1 over the first 7 sts, 2 sts in garter st and second row in diagram M.1 over the last 7 sts. Continue like this with 2 sts in garter st in the middle and diagram M.1 on each side of these. No of sts on belt will vary from 14 to 22. Cast off after 1 whole repetition of diagram M.1 when belt measures approx. 110-120-130-140-150-160 cm. |
||||||||||||||||||||||||||||
Diagram explanations |
||||||||||||||||||||||||||||
|
||||||||||||||||||||||||||||
 |
||||||||||||||||||||||||||||
 |
||||||||||||||||||||||||||||
Have you finished this pattern?Tag your pictures with #dropspattern #emiliacardigan or submit them to the #dropsfan gallery. Do you need help with this pattern?You'll find 10 tutorial videos, a Comments/Questions area and more by visiting the pattern on garnstudio.com. © 1982-2026 DROPS Design A/S. We reserve all rights. This document, including all its sub-sections, has copyrights. Read more about what you can do with our patterns at the bottom of each pattern on our site. |
||||||||||||||||||||||||||||


With over 40 years in knitting and crochet design, DROPS Design offers one of the most extensive collections of free patterns on the internet - translated to 17 languages. As of today we count 324 catalogues and 12291 patterns translated into English (UK/cm). 12291
We work hard to bring you the best knitting and crochet have to offer, inspiration and advice as well as great quality yarns at incredible prices! Would you like to use our patterns for other than personal use? You can read what you are allowed to do in the Copyright text at the bottom of all our patterns. Happy crafting!
Post a comment to pattern DROPS 138-31
We would love to hear what you have to say about this pattern!
If you want to leave a question, please make sure you select the correct category in the form below, to speed up the answering process. Required fields are marked *.