
Popular categories
Looking for a yarn?


Comments / Questions (35)
![]() Aina wrote:
Aina wrote:
Concernant la capuche:Est-il vraiment nécessaire de monter 5 nouvelles mailles au debut et à la fin du montage de la capuche? Puisque on a laissé des mailles en attente et on va juste les reprendre en relevant des mailles au long du col pour former la capuche.
10.12.2025 - 11:08DROPS Design answered:
Bonjour Aina, les 5 mailles montées en plus de chaque côté seront ensuite pliées en double sur l'envers et cousues pour maintenir la bordure (cf. ASSEMBLAGE. Bon tricot!
11.12.2025 - 08:45
![]() Lenka wrote:
Lenka wrote:
Dobrý den, ráda bych se zeptala k přednímu dílů. V návodu je uvedeno, že ve výši 36-39-41-44-46 cm odložíme vnějších 13-14-16-17-18 ok na levé straně dílu (nahlíženo z lícové strany) na pomocnou jehlici (= průkrčník). S těmito odloženými oky se pak už nepracuje. Kdy se mají uzavírat? Děkuji
19.11.2025 - 20:59
![]() Kerstin wrote:
Kerstin wrote:
Nu har jag kommit till att sticka huvan. Hur många maskor ska jag sticka upp för storlek 122/128 och hur stickar upp? Går det inte att göra en instruktionsvideo med tekniken för detta mönster? Tack på förhand Mvh Kerstin
18.06.2023 - 11:00DROPS Design answered:
Hei Kerstin. Du legger opp ca 76-96 masker, siden du strikker str. 122/128 (den midterste størrelsen) kan du strikke opp et antall midt mellom 76 og 96 masker = 86 masker. Vi har ingen hjelpevideo på akkurat denne hetten, men vi legger ditt ønske på vår" videoønskeliste". mvh DROPS Design
19.06.2023 - 10:40
![]() Anna wrote:
Anna wrote:
Guten Abend, ich stricke gerade die Kapuze und bin vor dem Schritt an dem man die 12 mittleren Maschen abkettet. Bei der Anprobe und auch im Vergleich zu anderen Kapuzen von gekauften Jacken kommt sie mir relativ kurz vor, sie reicht kaum bis zur Stirn. Ist das so gewollt oder ist das jetzt nur mein Eindruck, weil sie oben noch nicht zusammen genäht ist? Viele Grüße und vielen Dank für die schöne Anleitung Anna
27.03.2023 - 23:13DROPS Design answered:
Liebe Anna, wenn diese 12 Maschen abgekettet sind, strickt man jede Seite separat weiter, es wird noch 3 cm dazu gestrickt, so insgesamt 6 cm wird die Kapuze noch sein (von einer Seite bis die andere). Viel Spaß beim stricken!
28.03.2023 - 10:21
![]() Marie wrote:
Marie wrote:
Guten Tag, noch eine Frage: Spricht etwas dagegen, unten zwei weitere Knopflöcher einzustricken, damit man die Jacke komplett schließen kann?
05.03.2023 - 22:59DROPS Design answered:
Liebe Marie, gerne können Sie die Knopflöcher je nach Wunsch anpassen. Viel Spaß beim stricken!
06.03.2023 - 10:35
![]() Marie wrote:
Marie wrote:
Guten Tag, spielt es für diese Anleitung eine Rolle, ob die Maschenprobe in der Höhe stimmt? In Runden stricken ich glatt rechts auch automatisch „enger“ als in Reihen, ist das normal und in der Anleitung bedacht oder soll ich für die Ärmel eine dickere Nadel verwenden?
05.03.2023 - 22:01DROPS Design answered:
Liebe Marie, die Maschenprobe soll diegleiche sein, ob Sie hin-und Rückreihen oder in Runden stricken, sollte es bei Ihnen verschieden sein, dann versuchen Sie die richtige Maschenprobe in Runden zu haben (mit grösseren Nadeln), oder stricken Sie die Ärmel in Hin- und Rückreihen (2 M mehr für die Naht anschlagen). Viel Spaß beim stricken!
06.03.2023 - 10:23
![]() Martina wrote:
Martina wrote:
Sollen die Taschen wirklich mit Nadeln Nr. 2 gestrickt werden ?
30.07.2022 - 19:52DROPS Design answered:
Liebe Martina, Es ist ein Fehler, Sie sollten 4-mm-Nadeln verwenden.
31.07.2022 - 19:20
![]() Lillian wrote:
Lillian wrote:
Hvor meget garn går der kun til hætten? Mit barnebarn vil gerne have jeg strikke denne model, men hætten skal være i en anden farve.
14.11.2021 - 13:09DROPS Design answered:
Hej Lillian, det har vi desværre ikke nogle tal på, men du skal nok regne med ca 2-3 nøgler alt efter hvilken størrelse du vælger.
16.11.2021 - 14:36
![]() Deni wrote:
Deni wrote:
Hi,I'd appriciate explanation about assembling the hood.
03.10.2021 - 14:40DROPS Design answered:
Dear Deni, THIS VIDEO might help you with knitting and assembling the hood. Happy Stitching!
03.10.2021 - 22:48
![]() Nerea wrote:
Nerea wrote:
Buongiorno. Non ho facebook. Non riuscite a rispondermi? Grazie
23.04.2021 - 12:20DROPS Design answered:
Buonasera Nerea, abbiamo riposto a tutte le sue domande: può trovare le risposte qui sotto sulla pagina del modello. Facebook con c'entra nulla. Buon lavoro!
24.04.2021 - 22:06
|
||||||||||
Snips and Snails#snipsandsnailscardigan |
||||||||||
 |
 |
|||||||||
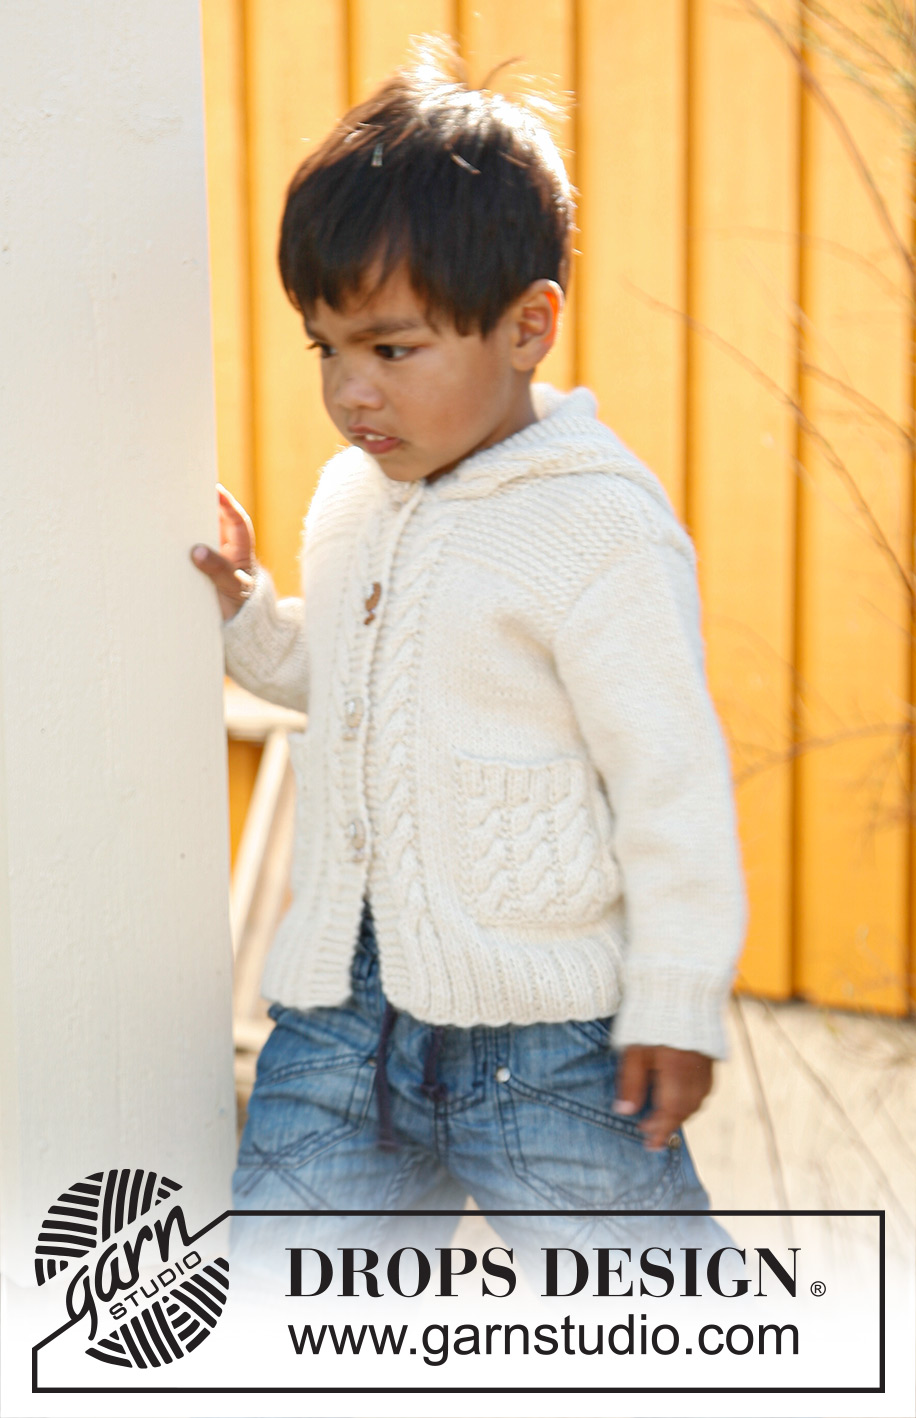
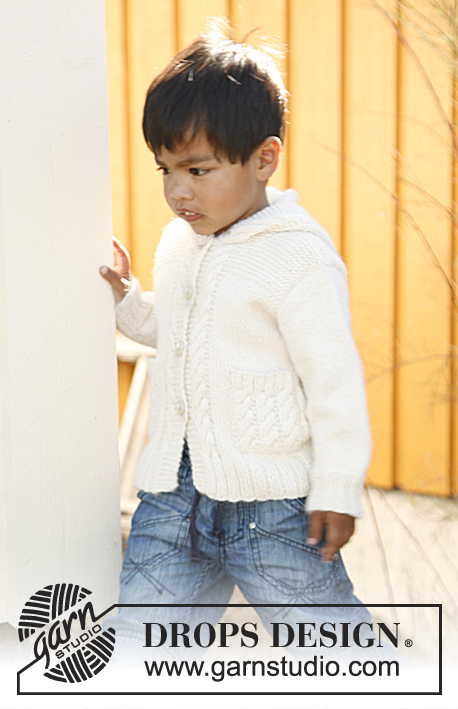
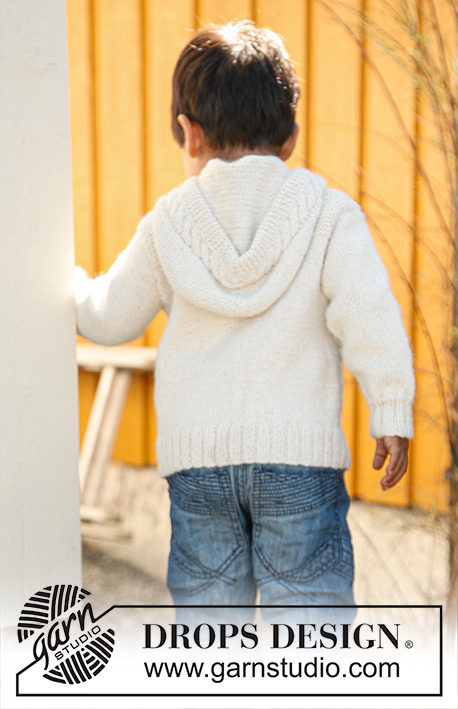
Knitted DROPS jacket with cables, hood and pockets in ”Karisma”. Size 3 - 12 years.
DROPS Children 22-21 |
||||||||||
|
GARTER ST (back and forth on needle): K all rows. PATTERN: See diagrams M.1 and M.2 – diagrams show pattern from RS. BUTTON HOLES: Cast off for button hole on right band from RS by K tog 2nd and 3rd st from mid front and then make 1 YO. Cast off for button holes when piece measures: SIZE 3/4 years: 14, 21, 28 and 35 cm. SIZE 5/6 years: 14, 20, 26, 32 and 38 cm SIZE 7/8 years: 14, 21, 27, 34 and 40 cm SIZE 9/10 years: 14, 20, 26, 32, 38 and 43 cm SIZE 11/12 years: 14, 21, 27, 33, 39 and 45 cm --------------------------------------------------------- BODY: Worked back and forth on circular needle from mid front. Cast on 176-184-196-204-212 sts (incl 5 band sts in each side towards mid front) on circular needle size 3 mm with Karisma. Work rib as follows (from RS): 5 band sts in GARTER ST - see explanation above - * K 2, P 2 *, repeat from *-* until 7 sts remain, K 2 and 5 band sts in garter st. When rib measures approx. 5 cm (adjust so that next row is worked from RS), switch to circular needle size 4 mm. Work next row as follows: SIZE 3/4 YEARS: 5 band sts in garter st, diagram M.1 (= 6 sts), 2 sts in garter st, K 6, * K 2 tog, K 6 *, repeat from *-* until 13 sts remain, work 2 sts in garter st, diagram M.2 (= 6 sts) and 5 band sts in garter st = 158 sts. SIZE 5/6 YEARS: 5 band sts in garter st, diagram M.1 (= 6 sts), 2 sts in garter st, K 5, * K 2 tog, K 6, K 2 tog, K 7 *, repeat from *-* until 13 sts remain, work 2 sts in garter st, diagram M.2 (= 6 sts) and 5 band sts in garter st = 166 sts. SIZE 7/8 YEARS: 5 band sts in garter st, diagram M.1 (= 6 sts), 2 sts in garter st, * K 2 tog, K 6, K 2 tog, K 7 *, repeat from *-* until 13 sts remain, work 2 sts in garter st, diagram M.2 (= 6 sts) and 5 band sts in garter st = 176 sts. SIZE 9/10 YEARS: 5 band sts in garter st, diagram M.1 (= 6 sts), 2 sts in garter st, K 8, * K 2 tog, K 6, K 2 tog, K 7 *, repeat from *-* until 13 sts remain, work 2 sts in garter st, diagram M.2 (= 6 sts) and 5 band sts in garter st = 184 sts. SIZE 11/12 YEARS: 5 band sts in garter st, diagram M.1 (= 6 sts), 2 sts in garter st, K 6, * K 2 tog, K 7 *, repeat from *-* until 13 sts remain, work 2 sts in garter st, diagram M.2 (= 6 sts) and 5 band sts in garter st = 192 sts. ALL SIZES: Continue with diagrams M.1 and M.2, bands and 2 sts on the outside of diagrams M.1 and M.2 in garter st and work the remaining sts in stocking st. REMEMBER THE KNITTING TENSION! When piece measures 14 cm, beg to cast off for BUTTON HOLES – see explanation above. When piece measures 26-28-30-32-34 cm, work next row as follows (from RS): Work 40-42-45-47-49 sts as before (= right front piece), cast off 6 sts for armhole, work 66-70-74-78-82 sts in stocking st (= back piece), cast off 6 sts for armhole and work 40-42-45-47-49 sts as before (= left front piece). Finish each part separately. LEFT FRONT PIECE: = 40-42-45-47-49 sts. Continue pattern as before – AT THE SAME TIME cast off for armhole at beg of every row from the side: 2 sts 1-1-1-1-1 time and 1 st 2-2-2-3-3 times = 36-38-41-42-44 sts. When piece measures 32-34-37-39-42 cm, work all the sts in stocking st in garter st until finished measurements, work the remaining sts as before. When piece measures 36-39-41-44-46 cm, slip the outermost 13-14-16-17-18 sts on a stitch holder for neck. Then cast off at beg of every row from neck: 2 sts 2 times and 1 st 3 times = 16-17-18-18-19 sts remain on shoulder. Cast off when piece measures 40-43-46-49-52 cm. RIGHT FRONT PIECE: Work as left front piece but reversed – remember button holes. BACK PIECE: = 66-70-74-78-82 sts. Continue in stocking st, at the same time cast off for armholes in each side as on front piece = 58-62-66-68-72 sts. When piece measures 32-34-37-39-42 cm, work in garter st over all sts until finished measurements. When piece measures 38-41-44-47-50 cm, cast off the middle 24-26-28-30-32 sts for neck and finish each shoulder separately. Then cast off 1 st on next row towards the neck = 16-17-18-18-19 sts remain on the shoulder. Cast off when piece measures 40-43-46-49-52 cm. SLEEVE: Worked in the round on double pointed needles. Cast on 40-44-44-48-48 sts on double pointed needles size 3 mm with Karisma. Work rib = K 2/P 2 for 5 cm. Switch to double pointed needles size 4 mm and continue in stocking st. Insert a marker at beg of round (= mid under sleeve). When piece measures 8-8-9-9-10 cm, inc 1 st on each side of marker. Repeat inc every 3-3½-3-3½-3 cm a total of 7-7-9-9-11 times = 54-58-62-66-70 sts. When piece measures 29-32-36-40-45 cm, cast off 6 sts mid under sleeve and work back and forth until finished measurements. Then cast off for sleeve cap at beg of every row in each side: 2 sts 2-2-2-3-3 times and 1 st 1-2-2-3-3 times. Then cast off 2 sts in each side until piece measures 33-37-41-46-51 cm. Then cast off 3 sts 1 time in each side. Cast off the remaining sts, piece measures approx. 34-38-42-47-52 cm. ASSEMBLY: Sew the shoulder seams. HOOD: Cast on 5 sts on circular needle size 4 mm, then knit up approx. 76 to 96 sts around the neck (incl sts on stitch holders at the front) and cast on 5 new sts at the end of row = 86 to 106 sts. Work as follows (1st row = WS): The 5 new sts + 5 band sts in garter st, diagram M.2 as before, K until 16 sts remain, work diagram M.1 as before and the last 10 sts in garter st. When 3 rows have been worked this way, work next row as follows (= from RS): 10 sts in garter st, diagram M.1, 2 sts in garter st, stocking st until 18 sts remain, 2 sts in garter st, diagram M.2 and 10 sts in garter st. Continue like this – AT THE SAME TIME on next row, inc evenly over the sts in stocking st so that there are 96-100-104-108-112 sts on needle in total. When hood measures 23-25-27-28-30 cm, cast off the middle 12-12-12-16-16 sts. Work each side separately for 3-3-3-4-4 cm as before. Cast off or slip sts on a stitch holder. POCKET: Worked back and forth on 2 double pointed needles. Cast on 17-17-22-22-22 sts on 1 double pointed needle size 4 mm with Karisma. K 1 row from WS. Work next row as follows (= RS): * 2 sts in garter st, K 2 sts in each of the next 3 sts (i.e. 3 sts become 6 sts) *, repeat from *-* a total of 3-3-4-4-4 times, finish with 2 sts in garter st = 26-26-34-34-34 sts. Work next row as follows: * 2 sts in garter st, P 6 *, repeat from *-* a total of 3-3-4-4-4 times and finish with 2 sts in garter st. Continue as follows: * 2 sts in garter st, diagram M.1 *, repeat from *-* a total of 3-3-4-4-4 times and finish with 2 sts in garter st. When pocket measures 7-8-9-10-11 cm, switch to needles size 3 mm. Then work rib as follows (seen from from RS): 2 sts in garter st, *K 2, P 2*, repeat from *-* until 4 sts remain, K 2 and 2 sts in garter st. When rib has been worked for 1½ cm, cast off with K over K and P over P. Work another pocket the same way but work diagram M.2 instead of diagram M.1. ASSEMBLY: Sew or use grafting/kitchener sts to work the hood tog at the top, then sew the 12-12-12-16-16 sts mid back to the top of the hood. Fold the sts in garter st along the opening of the hood double towards WS and fasten with stitches. Sew in sleeves. Sew on pockets so that they approx. 6-7-7-8-9 cm from mid front and 7-8-9-10-11 cm from bottom edge. Sew the pocket with diagram M.1 on right front piece and the pocket with diagram M.2 on left front piece. Sew on buttons. |
||||||||||
Diagram explanations |
||||||||||
|
||||||||||
 |
||||||||||
Have you finished this pattern?Tag your pictures with #dropspattern #snipsandsnailscardigan or submit them to the #dropsfan gallery. Do you need help with this pattern?You'll find 12 tutorial videos, a Comments/Questions area and more by visiting the pattern on garnstudio.com. © 1982-2026 DROPS Design A/S. We reserve all rights. This document, including all its sub-sections, has copyrights. Read more about what you can do with our patterns at the bottom of each pattern on our site. |
||||||||||


With over 40 years in knitting and crochet design, DROPS Design offers one of the most extensive collections of free patterns on the internet - translated to 17 languages. As of today we count 324 catalogues and 12290 patterns translated into English (UK/cm). 12290
We work hard to bring you the best knitting and crochet have to offer, inspiration and advice as well as great quality yarns at incredible prices! Would you like to use our patterns for other than personal use? You can read what you are allowed to do in the Copyright text at the bottom of all our patterns. Happy crafting!
Post a comment to pattern DROPS Children 22-21
We would love to hear what you have to say about this pattern!
If you want to leave a question, please make sure you select the correct category in the form below, to speed up the answering process. Required fields are marked *.