
Popular categories
Looking for a yarn?


Comments / Questions (65)
Yael R Berlinger wrote:
Theres a typo in the gauge for garter stitch. Pattern states gauge as 17 st/32 rows, when actual gauge is 17 st/22 rows, according to the bomull/lin page.
03.04.2016 - 06:06DROPS Design answered:
Dear Mrs Berlinger, the gauge with 17 sts / 22 rows is when you work in stockinette st, the tension here is in garter st and you should get 17 sts x 32 rows in garter st (= 16 ridges) = 10 x 10 cm. Happy knitting!
04.04.2016 - 09:39
![]() Maaike Boelhouwer wrote:
Maaike Boelhouwer wrote:
Ah, never mind, ik had gemist dat het om de ribbelsteek gaat...
14.06.2015 - 21:09
![]() Maaike Boelhouwer wrote:
Maaike Boelhouwer wrote:
De stekenproef voor de 4-naald, is 17x32. Ik kom op 22x27. De ene dus teveel, de andere te weinig. Hoe los ik dit op? (of klopt de stekenproef niet?)
14.06.2015 - 18:54DROPS Design answered:
Hoi Maaike. Je neemt probeert dan met een wat dikkere naald. Het gaat om dat je moet de naald kiezen voor de juist stekenverhouding. Wij raden 4 mm aan, maar het kan verschillen afhankelijk van je manier van breien. Succes.
15.06.2015 - 14:36
![]() Nadia Uyan wrote:
Nadia Uyan wrote:
Bonjour, Quand je regarde l'encolure du modèle,elle est magnifique,bien régulière.J'ai fait mon encolure ,elle fait des escaliers,des trous après le montage et premier rang,c'est vraiment pas beau,y'a t-il des astuces ,pour avoir une belle encolure régulière?
13.05.2015 - 19:16DROPS Design answered:
Bonjour Mme Uyan, vous pouvez terminer par une petite bordure au crochet autour de l'encolure et/ou des emmanchures pour une plus jolie finition (1 rang de ms, de picot ou de petits arceaux par ex. 1 ms, 1 ml). Bon tricot!
15.05.2015 - 09:03
![]() Christina Birgitte Jensen wrote:
Christina Birgitte Jensen wrote:
På billedet forfra er der en slags overgang mellem bryststykket og kjolestykket med udtagninger. Jeg har derfor lavet en pind med huller på hver 3. maske for at markere overgangen og er godt tilfreds med resultatet. Det var lidt utydeligt at udtagningerne til kjolestykket skulle være i siderne - billedet hjalp, især da jeg ventede længe nok til at sidebilledet kom på. Jeres hjemmeside er fantastisk og jeg bruger den ofte. Tak.
07.04.2015 - 09:30
![]() Stephanie Fowler wrote:
Stephanie Fowler wrote:
The left and right front shoulder pieces are not the same length. Later in the directions it indicates to continue until the piece measures 11 3/4". From where do I measure? Will the back right and left shoulder be commensurate with the front? Thx!
01.04.2015 - 03:56DROPS Design answered:
Dear Mrs Fowler, both shoulder should be same length and get same number of rows/inc. When it says then 11 3/4" (under right shoulder/size S-L, you should measure from the shoulder and down. Happy knitting!
01.04.2015 - 09:38
![]() Antje wrote:
Antje wrote:
Strickt man die Zunahmen für den Halsausschnitt gleichzeitig mit der Zunahme für das Ärmlloch? Oder alles nacheinander? Bin jetzt total irritiert. Das Wort Gleichzeitig erscheint mir zu oft. ;)
22.03.2015 - 13:57DROPS Design answered:
Bei der linken und rechten Schulter stricken Sie in den 3 größeren Größen die Zunahmen zeitweilig gleichzeitig. Für Gr. XL-XXL-XXXL beginnen die Halsausschnittzunahmen bei 13-14-15 cm und die Armausschnittzunahmen bei 15-14-12 cm. Bei den drei kleineren Größen beginnen die Armausschnittzunahmen erst, nachdem alle M auf einer Nadel liegen, bei einer Gesamtlänge von 17-17-16 cm. Falls Sie dazu noch Fragen haben, geben Sie bitte an, welche Größe Sie stricken. :-)
25.03.2015 - 11:15Mariola wrote:
Can I ask for a translation in Polish
27.12.2014 - 21:43
![]() Antje wrote:
Antje wrote:
Gibt es irgendwo eine Größentabelle? Welche Größe wäre die 46 oder die 48. Damit ich weis wieviele Knäule ich bestellen muss. Danke :)
08.11.2014 - 19:48DROPS Design answered:
Antwort siehe unten! :-)
09.11.2014 - 22:05
![]() Antje wrote:
Antje wrote:
Gibt es irgendwo eine Größentabelle? Welche Größe wäre die 46 oder die 48. Damit ich weis wieviele Knäule ich bestellen muss. Danke :)
08.11.2014 - 18:52DROPS Design answered:
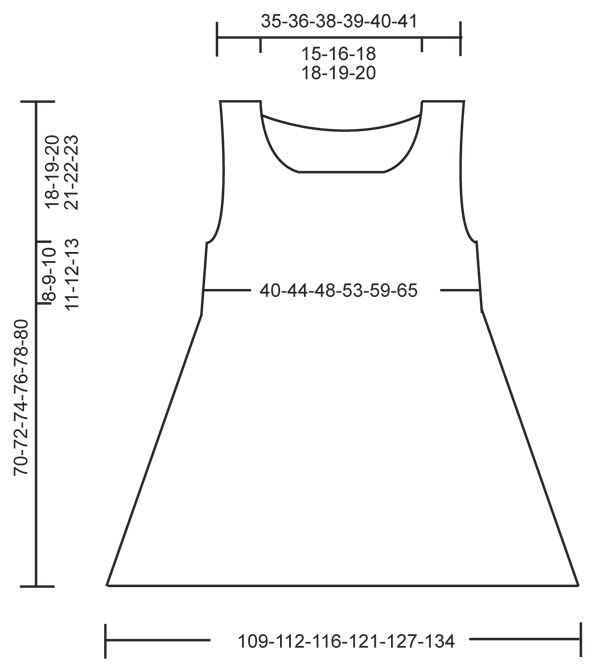
Sie finden die Maße unten in der Maßskizze. Gleichen Sie die Maße mit Ihren Körpermaßen ab. Die Maßangaben sind in der Reihenfolge S-M-L-XL-XXL-XXXL angegeben, suchen Sie also die für Sie richtige Größe aus und nehmen dementsprechend dann die passende Garnmenge. Viel Spaß beim Stricken!
09.11.2014 - 22:05
|
|
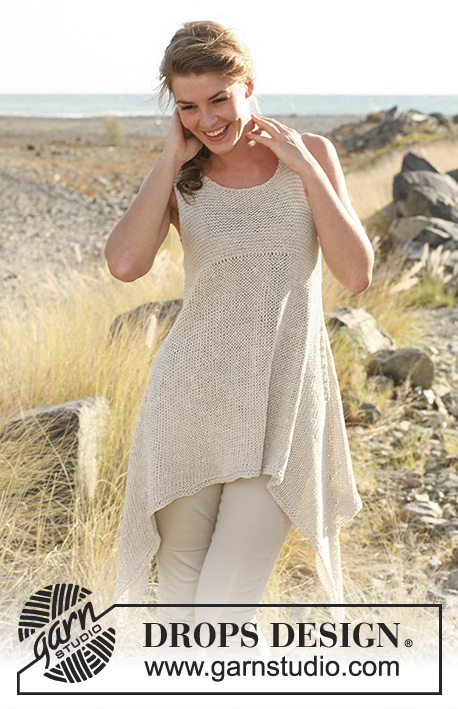
Western Sun#westernsuntunic |
|
 |
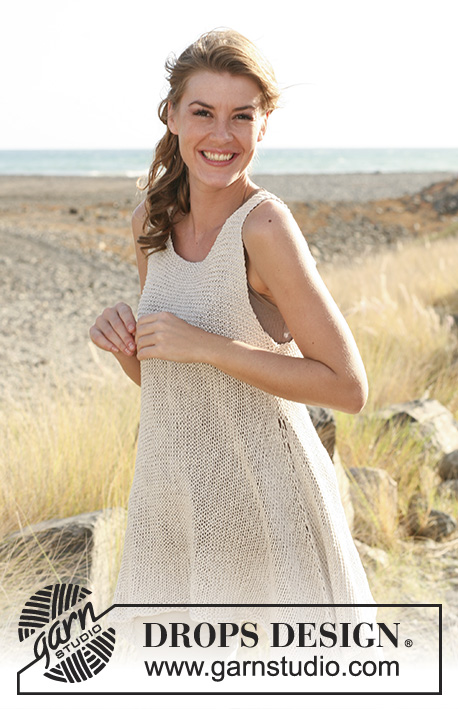 |
Knitted DROPS tunic, worked top down with extra width in ”Bomull-Lin”. Size: S - XXXL.
DROPS 129-16 |
|
|
GARTER ST (back and forth on needle): K all rows. INCREASE TIP 1: Inc 1 st by working 2 sts in the outermost st on needle. INCREASE TIP 2: Inc by making 1 YO on each side of st with marker in each side as follows: Work in stocking st until marker, 1 YO, K st with marker, 1 YO. K YOs on next round to make a hole. -------------------------------------------------------- The piece is worked top down. Front and back piece is worked back and forth separately down to body. Then all sts are slipped on the same circular needle. Then work in the round. FRONT PIECE: Left Shoulder: Worked back and forth on circular needle. Cast on 17-17-17-18-18-18 sts on circular needle size 4 mm with Bomull-Lin. Work in GARTER ST - see explanation above. REMEMBER THE KNITTING TENSION! (SIZE XL-XXXL: Read all of the following section before continuing!) When piece measures 10-11-12-13-14-15 cm, inc 1 st towards the neck at the end of next row from WS - READ INCREASE TIP 1! Repeat inc towards the neck at the end of every row from WS a total of 3 times. SIZE S-L: Then cast on 2 new sts at the end of every row from WS a total of 2 times, finish with K 1 row from RS = 24-24-24 sts. Put piece aside. Piece measures approx. 13-14-15 cm. Cut the thread. SIZE XL-XXXL: Read all of the following section before continuing: Then cast on 2 new sts at the end of every row from WS a total of 2 times, finish with K 1 row from RS. AT THE SAME TIME when piece measures 15-14-12 cm, inc 1 st at the end of every row from RS towards the armhole - READ INCREASE TIP 1! Repeat inc at the end of every row from RS a total of 9-13-17 times. AT THE SAME TIME when the last sts for neck have been cast on, put piece aside, last row is from RS (inc towards the armhole are not done yet, but continued later). Piece measures approx. 16-17-18 cm. Cut the thread. ALL SIZES: Right Shoulder: Cast on 17-17-17-18-18-18 sts and work in garter st. (SIZE XL-XXXL: Read all of the following section before continuing.) When piece measures 10-11-12-13-14-15 cm, inc 1 st towards the neck at the end of next row from RS. Repeat inc towards the neck at the end of every row from RS a total of 3 times. SIZE S-L: Then cast on 2 new sts at the end of every row from RS a total of 2 times and 12-14-16 sts 1 time (finish with this last inc row from RS) = 36-38-40 sts. Cut the thread. Slip sts from left shoulder on to same needle = 60-62-64 sts. Continue in garter st over all sts, start from WS. AT THE SAME TIME when piece measures 17-17-16 cm, inc 1 st at the end of every row in each side - READ INCREASE TIP 1! Repeat inc a total of 1-3-6 times in each side, then cast on 3 new sts at the end of the next 2 rows = 68-74-82 sts. Continue in garter st. Put piece aside when front piece measures 26-28-30 cm, measured from the shoulder and down (adjust so that next row is from RS). SIZE XL-XXXL: Then cast on 2 new sts at the end of every row from RS a total of 2 times and 16-18-20 sts 1 time (finish with this last inc row from RS). AT THE SAME TIME when piece measures 15-14-12 cm, start inc in the side towards the armhole as on left shoulder but at the end of every row from WS. AT THE SAME TIME when the last sts for neck have been cast on (finish from RS and cut the thread) slip sts from left shoulder on to same needle. Continue in garter st and inc in each side as before with start from WS. When inc have been done a total of 9-13-17 times in each side, cast on 3 new sts at the end of the next 2 rows = 90-100-110 sts. Continue in garter st. Put piece aside when front piece measures 32-34-36 cm, measured from shoulder and down (adjust so that next row is from RS). BACK PIECE (ALL SIZES): Left Shoulder: Cast on 17-17-17-18-18-18 sts on circular needle size 4 mm with Bomull-Lin. Work in garter st back and forth on needle. When piece measures 4 cm, inc 1 st towards the neck at the end of next row from RS = 18-18-18-19-19-19 sts. K 1 row from WS. Cut the thread and put piece aside. Right Shoulder: Cast on and work as left shoulder. When piece measures 4 cm, inc 1 st towards the neck at the end of next row from WS. Work 1 row from RS. Then cast on 24-26-28-28-30-32 sts for neck at the end of next row from WS = 42-44-46-47-49-51 sts. Cut the thread. Slip sts from left shoulder on to same needle = 60-62-64-66-68-70 sts. Continue in garter st, start from RS. When piece measures 17-17-16-15-14-12 cm, inc 1 st at the end of row in each side. Repeat inc a total of 1-3-6-9-13-17 times in each side, then cast on 3 new sts at the end of the next 2 rows = 68-74-82-90-100-110 sts. Continue in garter st until piece measures 26-28-30-32-34-36 cm. BODY Slip sts from front and back piece on to circular needle size 7 mm, now work piece in stocking st in the round on circular needle, start in one side = 136-148-164-180-200-220 sts. K 1 round while AT THE SAME TIME dec 12-14-18-20-24-26 sts evenly (dec same no of sts on front and back piece) = 124-134-146-160-176-194 sts. Insert a marker in the 62nd-67th-73rd-80th-88th-97th st and in the last st on the round = 61-66-72-79-87-96 sts between markers. REMEMBER THE KNITTING TENSION! When 4 cm have been worked in stocking st (piece measures approx. 30-32-34-36-38-40 cm, measured from the shoulder and down) work 1 round while inc 1 st on each side of st with marker in each side – READ INCREASE TIP 2! Continue to work as follows: 2 rounds with inc, 1 round without inc. Continue inc until finished measurements = approx. 45 rounds with inc (approx. 40 cm). AT THE SAME TIME when piece measures 69-71-73-75-77-79 cm, measured mid front (from shoulder and down), K 1 round, P 1 round, K 1 round, P 1 round. After all inc are done there are approx. 304-314-326-340-356-374 sts on circular needle. LOOSELY cast off. Piece now measures approx. 70-72-74-76-78-80 cm mid front (the sides are longer because of the inc that give extra width and length). ASSEMBLY: Sew the shoulder seams. Sew side seams on yoke edge to edge. |
|
 |
|
Have you finished this pattern?Tag your pictures with #dropspattern #westernsuntunic or submit them to the #dropsfan gallery. Do you need help with this pattern?You'll find 14 tutorial videos, a Comments/Questions area and more by visiting the pattern on garnstudio.com. © 1982-2026 DROPS Design A/S. We reserve all rights. This document, including all its sub-sections, has copyrights. Read more about what you can do with our patterns at the bottom of each pattern on our site. |
|


With over 40 years in knitting and crochet design, DROPS Design offers one of the most extensive collections of free patterns on the internet - translated to 17 languages. As of today we count 324 catalogues and 12290 patterns translated into English (UK/cm). 12290
We work hard to bring you the best knitting and crochet have to offer, inspiration and advice as well as great quality yarns at incredible prices! Would you like to use our patterns for other than personal use? You can read what you are allowed to do in the Copyright text at the bottom of all our patterns. Happy crafting!
Post a comment to pattern DROPS 129-16
We would love to hear what you have to say about this pattern!
If you want to leave a question, please make sure you select the correct category in the form below, to speed up the answering process. Required fields are marked *.