
Popular categories
Looking for a yarn?


Comments / Questions (65)
![]() Margriet wrote:
Margriet wrote:
Klopt het dat je begint op pen 4 en later naar pen 7 gast met hetzelfde materiaal? Of is dit een drukfout misschien?
28.04.2025 - 12:13DROPS Design answered:
Dag Margriet,
Ja, dat klopt. De pas brei je eerst op naald 4 en het lijf op naald 7. Voor beide naalden staan ook stekenverhoudingen aangegeven. Brei altijd wel een proeflapje en controleer of de stekenverhouding klopt. Pas eventueel de naalddikte aan totdat je de juiste stekenverhouding hebt.
04.05.2025 - 10:50
![]() Patricia wrote:
Patricia wrote:
Buenas noches. Cuando tejemos el cuerpo y empezamos con los aumentos antes y después de los marcadores colocados en puntos 62 67, 73, etc, tengo una duda sobre si el punto donde está el marcador se teje o no, ¿Cómo es la secuencia? Ejemplo: punto 61+ punto 62+ punto 63: (Aumento en el p.61+ el p.62 tejido a jersey+ aumento en el p.63) Gracias
02.03.2024 - 21:23DROPS Design answered:
Hola Patricia, trabajas un aumento antes y después del punto con marcapuntos, esto quiere decir que, por ejemplo, trabajas el punto 61, aumentas con 1 hebra entre el 61 y 62, trabajas el 62, aumentas con 1 hebra entre el 62 y 63, trabajas el punto 63. Lee TIP-2 PARA LOS AUMENTOS para más información.
04.03.2024 - 00:25
![]() Momo wrote:
Momo wrote:
Hallo, ich möchte dieses Modell stricken und habe jetzt die beiden Maschenproben gemacht. Ungewaschen hat die Krausrippe 17M x 38R und die glattgestrickte 13Mx 19R. Wenn ich jetzt aufgrund der zu vielen R größere Nadeln nehme, würde sich doch auch die M verändern die jetzt stimmt. Und wenn ich die Maschenproben wasche und dann alles stimmt, dann stimmt doch die Anleitung nicht mehr da ich diese mit der ungewaschenen Wolle stricke.
03.12.2021 - 10:54DROPS Design answered:
Liebe Momo, dann am besten eine neue Maschenprobe mit Krausrechts sowie glatt rechts stricken, um die richtige Nadelgröße zu finden. Hier lesen Sie mehr über Maschenprobe. Viel Spaß beim stricken!
03.12.2021 - 13:40
![]() Olga Toaza wrote:
Olga Toaza wrote:
Gracias x los patrones son muy lindos para aserles y nos enseñan muchas cosas
10.06.2021 - 06:44
![]() Olga Toaza wrote:
Olga Toaza wrote:
Gracias x los patrones son muy lindos para aserles y nos enseñan muchas cosas
10.06.2021 - 06:44
![]() Anita wrote:
Anita wrote:
Thank you for your reply I still need clarification. I started the counting at The middle of the side. The markers still end up in one cluster. How many sts do you have between the markers? And how many times do I need to increase one row? Based on the markers: you have 5-6-7-8-9 sts between the markers and you increasing on both side of them that’s 10 sts increase per row but close to each other. Is this correct?
29.05.2020 - 10:02DROPS Design answered:
Dear Anita, you should have 124-134-146-160-176-194 sts in total, this means: 1 st with marker (side = beg of round = last st on back piece for example)), 61-66-72-79-87-96 sts (= front piece), 1 st with marker (= other side), 61-66-72-79-87-96 sts (= back piece). Hope this will help :) happy knitting!
29.05.2020 - 11:48
![]() Anita wrote:
Anita wrote:
I am knitting the body part and trying to understand the increases. I added the markers as noted, but they are on all one side, the pictures shows longer knitting on both sides. If all increases happens on one side it does not make any sense. Where do you count the first marker from? I counted from the first side st. That’s how I ended up with all markers on one side. It would be better note how many markers need on each side...please help.
29.05.2020 - 02:14DROPS Design answered:
Dear Anita, start to count in the middle of the side and insert the marker in the last st of the round, then add a marker after 61-66-72-79-87-96 sts (= in the 62nd-67th-73rd-80th-88th-97th sts) you should have now 61-66-72-79-87-96 sts between the markers for both front and back piece and 2 sts with 1 marker each. Hope this helps. Happy knitting!
29.05.2020 - 08:47
![]() Ulrike wrote:
Ulrike wrote:
Hallo Drops Team Die Maschenmarkierer für die Zunahme wenn beide Teile in Runden gestrickt werden .....kommen die auf das Vorderteil oder das Rückenteil?
09.06.2019 - 23:33DROPS Design answered:
Liebe Ulrike, die Markierer sind beide auf je eine Seite: Die 62.-67.-73.-80.-88.-97. M. und die letzte M. markieren = 61-66-72-79-87-96 M. zwischen den Markierungen für je das Vorder- und das Rückenteil. Viel Spaß beim stricken!
11.06.2019 - 11:39
![]() Christine wrote:
Christine wrote:
Ist der Rock glatt rechts oder links gestrickt? Ich erkenne es leider nicht auf dem Bild!
06.04.2019 - 23:30DROPS Design answered:
Liebe Christine, der Rock wird hier glatt rechts gestrickt. Viel Spaß beim stricken!
08.04.2019 - 09:31
![]() Sarah Saggers wrote:
Sarah Saggers wrote:
Front left shoulder. End on RS or WS before increase? Is inc then: 1st at the end of every row (or just WS) followed by 2 new ads at end if every row (or just WS). Or are these done at the same time? At the same time: does this mean from the first increase row? What does every row from RS / WS mean? Is only increase at the end of every RS row or the side each individual stitch is worked. I an really struggling with the ambiguity of this pattern.
28.07.2018 - 01:09DROPS Design answered:
Dear Mrs Saggers, you increase first 1 st for neck at the end of WS a total of 3 times, then cast on 2 sts 2 times at the end of a WS row,after last increase work 1 more row from RS (size S, M, L) and put aside. Happy knitting!
31.07.2018 - 08:49
|
|
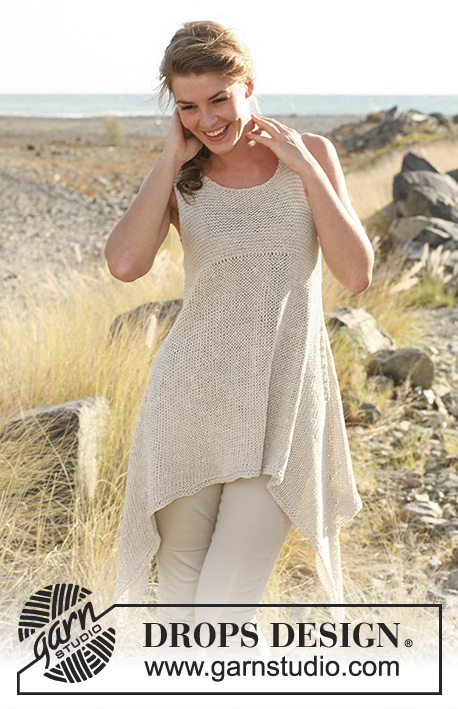
Western Sun#westernsuntunic |
|
 |
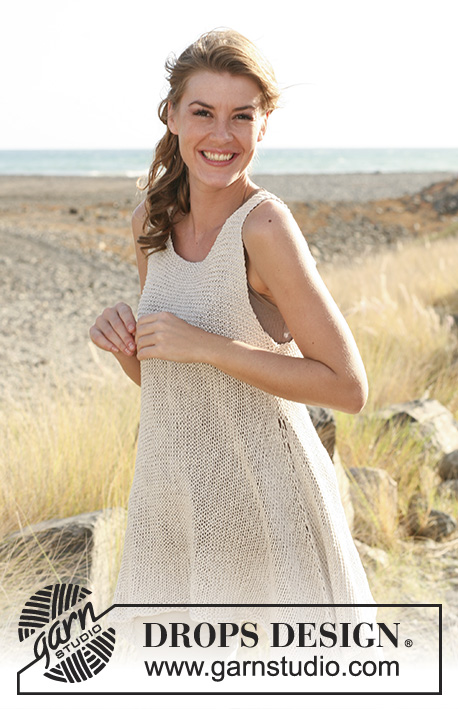 |
Knitted DROPS tunic, worked top down with extra width in ”Bomull-Lin”. Size: S - XXXL.
DROPS 129-16 |
|
|
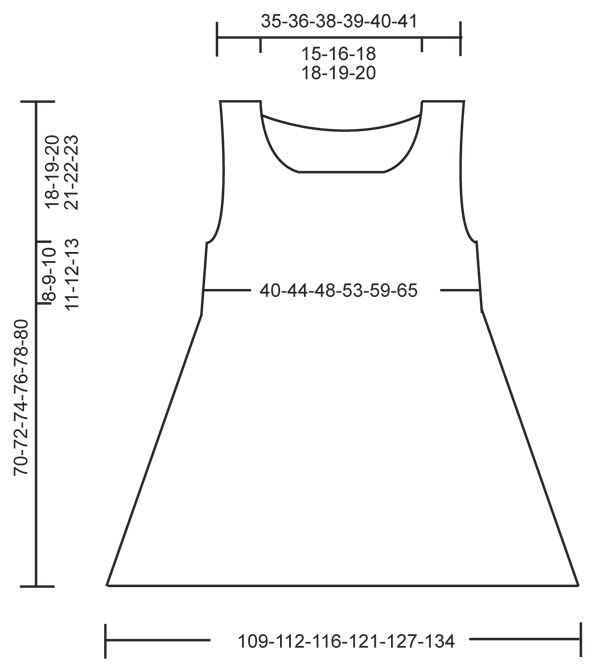
GARTER ST (back and forth on needle): K all rows. INCREASE TIP 1: Inc 1 st by working 2 sts in the outermost st on needle. INCREASE TIP 2: Inc by making 1 YO on each side of st with marker in each side as follows: Work in stocking st until marker, 1 YO, K st with marker, 1 YO. K YOs on next round to make a hole. -------------------------------------------------------- The piece is worked top down. Front and back piece is worked back and forth separately down to body. Then all sts are slipped on the same circular needle. Then work in the round. FRONT PIECE: Left Shoulder: Worked back and forth on circular needle. Cast on 17-17-17-18-18-18 sts on circular needle size 4 mm with Bomull-Lin. Work in GARTER ST - see explanation above. REMEMBER THE KNITTING TENSION! (SIZE XL-XXXL: Read all of the following section before continuing!) When piece measures 10-11-12-13-14-15 cm, inc 1 st towards the neck at the end of next row from WS - READ INCREASE TIP 1! Repeat inc towards the neck at the end of every row from WS a total of 3 times. SIZE S-L: Then cast on 2 new sts at the end of every row from WS a total of 2 times, finish with K 1 row from RS = 24-24-24 sts. Put piece aside. Piece measures approx. 13-14-15 cm. Cut the thread. SIZE XL-XXXL: Read all of the following section before continuing: Then cast on 2 new sts at the end of every row from WS a total of 2 times, finish with K 1 row from RS. AT THE SAME TIME when piece measures 15-14-12 cm, inc 1 st at the end of every row from RS towards the armhole - READ INCREASE TIP 1! Repeat inc at the end of every row from RS a total of 9-13-17 times. AT THE SAME TIME when the last sts for neck have been cast on, put piece aside, last row is from RS (inc towards the armhole are not done yet, but continued later). Piece measures approx. 16-17-18 cm. Cut the thread. ALL SIZES: Right Shoulder: Cast on 17-17-17-18-18-18 sts and work in garter st. (SIZE XL-XXXL: Read all of the following section before continuing.) When piece measures 10-11-12-13-14-15 cm, inc 1 st towards the neck at the end of next row from RS. Repeat inc towards the neck at the end of every row from RS a total of 3 times. SIZE S-L: Then cast on 2 new sts at the end of every row from RS a total of 2 times and 12-14-16 sts 1 time (finish with this last inc row from RS) = 36-38-40 sts. Cut the thread. Slip sts from left shoulder on to same needle = 60-62-64 sts. Continue in garter st over all sts, start from WS. AT THE SAME TIME when piece measures 17-17-16 cm, inc 1 st at the end of every row in each side - READ INCREASE TIP 1! Repeat inc a total of 1-3-6 times in each side, then cast on 3 new sts at the end of the next 2 rows = 68-74-82 sts. Continue in garter st. Put piece aside when front piece measures 26-28-30 cm, measured from the shoulder and down (adjust so that next row is from RS). SIZE XL-XXXL: Then cast on 2 new sts at the end of every row from RS a total of 2 times and 16-18-20 sts 1 time (finish with this last inc row from RS). AT THE SAME TIME when piece measures 15-14-12 cm, start inc in the side towards the armhole as on left shoulder but at the end of every row from WS. AT THE SAME TIME when the last sts for neck have been cast on (finish from RS and cut the thread) slip sts from left shoulder on to same needle. Continue in garter st and inc in each side as before with start from WS. When inc have been done a total of 9-13-17 times in each side, cast on 3 new sts at the end of the next 2 rows = 90-100-110 sts. Continue in garter st. Put piece aside when front piece measures 32-34-36 cm, measured from shoulder and down (adjust so that next row is from RS). BACK PIECE (ALL SIZES): Left Shoulder: Cast on 17-17-17-18-18-18 sts on circular needle size 4 mm with Bomull-Lin. Work in garter st back and forth on needle. When piece measures 4 cm, inc 1 st towards the neck at the end of next row from RS = 18-18-18-19-19-19 sts. K 1 row from WS. Cut the thread and put piece aside. Right Shoulder: Cast on and work as left shoulder. When piece measures 4 cm, inc 1 st towards the neck at the end of next row from WS. Work 1 row from RS. Then cast on 24-26-28-28-30-32 sts for neck at the end of next row from WS = 42-44-46-47-49-51 sts. Cut the thread. Slip sts from left shoulder on to same needle = 60-62-64-66-68-70 sts. Continue in garter st, start from RS. When piece measures 17-17-16-15-14-12 cm, inc 1 st at the end of row in each side. Repeat inc a total of 1-3-6-9-13-17 times in each side, then cast on 3 new sts at the end of the next 2 rows = 68-74-82-90-100-110 sts. Continue in garter st until piece measures 26-28-30-32-34-36 cm. BODY Slip sts from front and back piece on to circular needle size 7 mm, now work piece in stocking st in the round on circular needle, start in one side = 136-148-164-180-200-220 sts. K 1 round while AT THE SAME TIME dec 12-14-18-20-24-26 sts evenly (dec same no of sts on front and back piece) = 124-134-146-160-176-194 sts. Insert a marker in the 62nd-67th-73rd-80th-88th-97th st and in the last st on the round = 61-66-72-79-87-96 sts between markers. REMEMBER THE KNITTING TENSION! When 4 cm have been worked in stocking st (piece measures approx. 30-32-34-36-38-40 cm, measured from the shoulder and down) work 1 round while inc 1 st on each side of st with marker in each side – READ INCREASE TIP 2! Continue to work as follows: 2 rounds with inc, 1 round without inc. Continue inc until finished measurements = approx. 45 rounds with inc (approx. 40 cm). AT THE SAME TIME when piece measures 69-71-73-75-77-79 cm, measured mid front (from shoulder and down), K 1 round, P 1 round, K 1 round, P 1 round. After all inc are done there are approx. 304-314-326-340-356-374 sts on circular needle. LOOSELY cast off. Piece now measures approx. 70-72-74-76-78-80 cm mid front (the sides are longer because of the inc that give extra width and length). ASSEMBLY: Sew the shoulder seams. Sew side seams on yoke edge to edge. |
|
 |
|
Have you finished this pattern?Tag your pictures with #dropspattern #westernsuntunic or submit them to the #dropsfan gallery. Do you need help with this pattern?You'll find 14 tutorial videos, a Comments/Questions area and more by visiting the pattern on garnstudio.com. © 1982-2026 DROPS Design A/S. We reserve all rights. This document, including all its sub-sections, has copyrights. Read more about what you can do with our patterns at the bottom of each pattern on our site. |
|


With over 40 years in knitting and crochet design, DROPS Design offers one of the most extensive collections of free patterns on the internet - translated to 17 languages. As of today we count 324 catalogues and 12290 patterns translated into English (UK/cm). 12290
We work hard to bring you the best knitting and crochet have to offer, inspiration and advice as well as great quality yarns at incredible prices! Would you like to use our patterns for other than personal use? You can read what you are allowed to do in the Copyright text at the bottom of all our patterns. Happy crafting!
Post a comment to pattern DROPS 129-16
We would love to hear what you have to say about this pattern!
If you want to leave a question, please make sure you select the correct category in the form below, to speed up the answering process. Required fields are marked *.