
Popular categories
Looking for a yarn?


Comments / Questions (27)
![]() Barbara Lord wrote:
Barbara Lord wrote:
Love your site
28.11.2013 - 18:40
![]() Lisa wrote:
Lisa wrote:
Hallo, ich habe das Bündchen für die Mütze fertig und habe sie größentechnisch schon einmal über den Kopf gezogen. Sie scheint leider (trotz Maschenprobe) etwas zu groß (sitzt ganz locker am Kopf). Verändert sich das noch einmal, sobald ich das Muster stricke? Wird die Mütze nach dem Waschen kleiner?
06.07.2013 - 19:18DROPS Design answered:
Liebe Lisa, die Mütze wird bei dem Waschen nicht kleiner, Karisma ist superwash behandelte Wolle. Nehmen Sie für das Bündchen eine Nadelstärke kleiner, wenn die Mütze zu locker sitzt.
07.07.2013 - 08:32
![]() DROPS Design wrote:
DROPS Design wrote:
Dayis, arriba de los diagramas encuentras la explicación correspondiente. Empiezas desde abajo hacia arriba y como estás tejiendo en redondo, todas las vtas se leen de derecha a izquierda.
04.09.2011 - 08:56
![]() Dayis wrote:
Dayis wrote:
Como empiezo a tejer el diagrama
04.09.2011 - 07:38
![]() DROPS Design wrote:
DROPS Design wrote:
1 (Muster) Rapport = M.1 oder M.2 1 Mal in der Breiter oder in der Höhe.
04.02.2011 - 10:10
![]() Alperen wrote:
Alperen wrote:
Wie macht man rapporte? was ist das genau?
02.02.2011 - 19:49Sol Mary wrote:
El motivo de mi comentario es darles las gracias y felicitarlos por sus respuestas tan ràpidas y acertadas. Mil gracias.
25.04.2010 - 02:42
![]() DROPS Design wrote:
DROPS Design wrote:
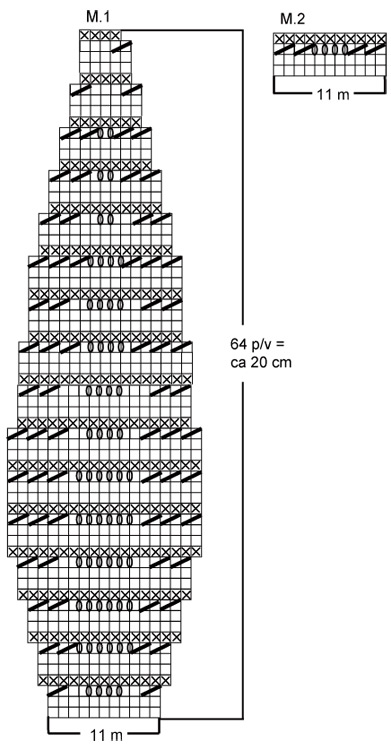
Sol Mary, el diagrama lo lees de abajo hacia arriba. No te olvides que cada motivo lo trabajas sobre 11 pts que irán aumentando a 19 pts, y disminuye nuevamente hasta terminar en 4 pts.
24.04.2010 - 17:51Sol Mary wrote:
En las indicaciones para hacer el gorro dice:Cont en M.1 (= 10 repeticiones en el contorno del gorro). Recuerde tejer la muestra! Mi pregunta es por donde empiezo a lleer el diagrama?. No lo entiendo.
24.04.2010 - 15:34
![]() Patricha wrote:
Patricha wrote:
Jeg er 14 og faldt pladask for huen.. har lige fået ny sort jakke, så huen strikker jeg i skrig pink.. håber det bliver flot :)
30.11.2008 - 15:33
|
|||||||||||||
DROPS 109-51 |
|||||||||||||
|
|
|||||||||||||
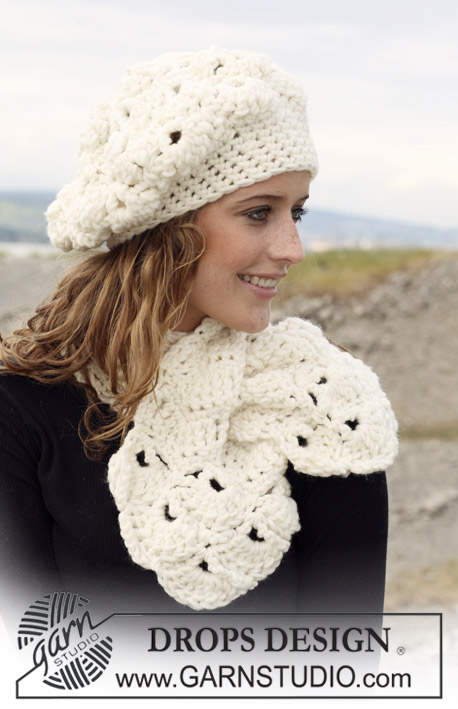
DROPS beret and gloves in ”Karisma Superwash” with wavy pattern. Yarn alternative ”Merino”.
DROPS 109-51 |
|||||||||||||
|
Pattern: Hat: See diagram M.1, diagram inc from 11 to 19 sts and dec again to 4 sts. Gloves: See diagram M.2. Diagrams show the pattern from RS. HAT: Cast on 110 sts on small circular needle size 3.5 mm with Karisma. Work 2 rounds stocking st and then 6 rounds rib, K1/P1. Continue in M.1 (= 10 repeats round the hat). Remember the knitting tension! After M.1 piece measures approx 22 cm and there are 40 sts left on round. Work 2 rounds stocking st. Work next round as follows: * K2, K2 tog *, repeat from *-* = 30 sts. Work 1 round stocking st. Work next round as follows: * K1, K2 tog *, repeat from *-* = 20 sts. Now work 1 round K all sts tog 2 by 2 = 10 sts. Cut the thread and pull through remaining sts. Tighten thread and fasten. Hat measures approx 24 cm. GLOVES: Right glove: Cast on 44 sts on double pointed needles size 3.5 mm with Karisma. P 1 round and continue in M.2 (= 4 repeats round the glove). When piece measures 5 cm (adjust to a full pattern repeat) work 1 round stocking st and now continue in rib, K1/P1, for 4 cm – on the last round dec 4 sts evenly = 40 sts. Now measure piece from here! Continue as follows: 2 repeats of M.2 (= upper hand), stocking st on the remaining 18 sts (= under hand) – insert a marker in the first stocking st (= thumb st). After 4 rows in M.2 inc for thumb as follows: inc 1 st on both sides of thumb st – inc by making 1 YO, on next round work YO into back of loop to avoid a hole. Inc like this on every 3rd round a total of 5 times = 11 thumb sts. When piece measures 6 cm slip the 11 thumb sts on a stitch holder. On next round cast on 1 new st over thumb sts = 40 sts in total. Continue in pattern and stocking st as before until piece measures 9 cm (from rib). Now keep the first 5 sts on needle, slip the next 32 sts on a stitch holder and keep the last 3 sts on needle. Little finger: = 8 sts, cast on 2 new sts towards the hand = 10 sts. Work 6 cm stocking st in the round, and now K tog all sts 2 by 2. Cut the thread, pull through remaining sts and fasten. Hand: Slip sts from stitch holder back on needle, pick up 3 sts towards little finger = 35 sts. Work 2 rounds stocking st. Now keep the 3 new sts towards little finger + 5 sts either side of these on needle. Slip the remaining 22 sts back on stitch holder. Ring finger: = 13 sts, cast on 1 new st towards sts on stitch holder = 14 sts. Work 7.5 cm stocking st in the round, and now K tog all sts 2 by 2. Cut the thread, pull through remaining sts and fasten. Middle finger: Slip 5 sts from each end of stitch holder back on needle, pick up 3 sts towards ring finger and cast on 1 new st towards sts on stitch holder = 14 sts. Work 8.5 cm stocking st in the round, and now K tog all sts 2 by 2. Cut the thread, pull through remaining sts and fasten. Index finger: Slip the remaining 12 sts from stitch holder back on needle, pick up 3 sts towards middle finger = 15 sts. Work 7 cm stocking st in the round, and now K tog all sts 2 by 2. Cut the thread, pull through remaining sts and fasten. Thumb: Slip thumb sts on stitch holder back on needle and pick up 3 sts in the edge behind thumb st (= st with marker) = 14 sts. Work 6 cm stocking st in the round, and now K tog all sts 2 by 2. Cut the thread, pull through remaining sts and fasten. Left glove: Like right glove, but mirrored, i.e. inc for thumb on each side of the last st on round. When working little finger beg as follows: Slip the first 17 sts on a stitch holder (= upper hand), keep the next 8 sts on needle and slip the last 15 sts on another stitch holder (= under hand). www.garnstudio.com |
|||||||||||||
Diagram explanations |
|||||||||||||
|
|||||||||||||
 |
|||||||||||||
Have you finished this pattern?Tag your pictures with #dropspattern or submit them to the #dropsfan gallery. Do you need help with this pattern?You'll find 19 tutorial videos, a Comments/Questions area and more by visiting the pattern on garnstudio.com. © 1982-2026 DROPS Design A/S. We reserve all rights. This document, including all its sub-sections, has copyrights. Read more about what you can do with our patterns at the bottom of each pattern on our site. |
|||||||||||||


With over 40 years in knitting and crochet design, DROPS Design offers one of the most extensive collections of free patterns on the internet - translated to 17 languages. As of today we count 324 catalogues and 12290 patterns translated into English (UK/cm). 12290
We work hard to bring you the best knitting and crochet have to offer, inspiration and advice as well as great quality yarns at incredible prices! Would you like to use our patterns for other than personal use? You can read what you are allowed to do in the Copyright text at the bottom of all our patterns. Happy crafting!
Post a comment to pattern DROPS 109-51
We would love to hear what you have to say about this pattern!
If you want to leave a question, please make sure you select the correct category in the form below, to speed up the answering process. Required fields are marked *.