
Popular categories
Looking for a yarn?


Comments / Questions (64)
![]() Elise wrote:
Elise wrote:
J'aime beaucoup ce modèle, avez-vous le diagramme pour le crochet ?
18.10.2025 - 09:49DROPS Design answered:
Bonjour Elise, ce modele est prevu pour les aiguilles. Vous trouverez les ponchos crochetes ICI. Bon travail!
18.10.2025 - 10:01
![]() Jolanda Wander wrote:
Jolanda Wander wrote:
Ik beantwoordt u vraag even op mij vraag waarop u gereageert heb. Ik heb al gereageert er op maar krijgt geen antwoordt. Ik heb 333 steken op gezet. En bijde kanten 5 ribbelsteken en tus de 5 ribbel steken en de 2de patroon. Houd ik 5 a 6 steken over . Mij eerste keer het patroon er in zet moest ook aan 1 kan 1 st recht en 5 ribbelsteek. Is dat bel elke toer zo of 1 x. Nu elke keer steken bij maken. Ik hoor u graag. Jolanda wander
27.08.2025 - 09:27
![]() Jolanda Wander wrote:
Jolanda Wander wrote:
Hoi ik ben al tijdje bezig met deze patroon. Als ik bij het patroon 1 MC komt dan hou ik stekken over. En dan moet ik die patroon nog doen. Snap het niet hoort dat of oet dat na 1 MC over blijven , dank u voor de moeiten Jolanda wander
13.08.2025 - 16:10DROPS Design answered:
Dag Jolanda,
Na M.1C moet je ook nog 5 steken in ribbelsteek breien. Welke maat brei je en hoeveel steken houd je over.?
18.08.2025 - 19:35
![]() Cinzia Fiorelli wrote:
Cinzia Fiorelli wrote:
Hallo, meine Frage bezieht sich nicht explizit auf diese Anleitung, sondern auf das Beilaufgarn (dort habe ich keine Möglichkeit gefunden, meine Frage unterzubringen): Sind diese Glitter, die ja Metall enthalten, leitfähig, so dass sie für taktile Handschuhe geeignet wären?
01.08.2025 - 17:25DROPS Design answered:
Liebe Frau Fiorelli, leider haben wird damit keine Erfahrung. Viel Spaß beim Stricken!
04.08.2025 - 09:39
![]() Wattel wrote:
Wattel wrote:
Je suis un peu perdue ! Lorsqu'il y a un triangle qui comporte 3 mailles, faut-il bien prendre la maille avant et la maille après le triangle ? et lorsqu'il y a un 1/2 triangle (qui comprend 2 mailles) avec 1 jeté de chaque côté, que fait-on pour le jeté ? je voudrais vraiment des explications ... Merci de me préciser les choses C.Wattel
22.03.2025 - 15:46DROPS Design answered:
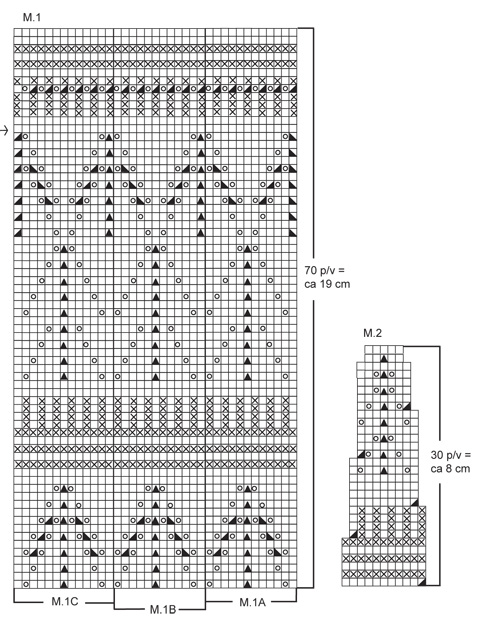
Bonjour Mme Wattel, dans les diagrammes de ce modèle, les jetés sont représentés sur une case du diagramme et les diminutions sur une seule case = celle de la maille qui va rester; autrement dit, tricotez le jeté quand indiqué dans le diagramme et tricotez le triangle sur le nombre de mailles indiqué par la légende, ainsi le 1er rang de M.1A va se tricoter ainsi: 1 m end, 1 jeté, 4 m endroit, glissez 1 m, 2 m ens à l'end, passez la m glissée par-dessus la m tricotée, 4 m end, 1 jeté. Bon tricot!
24.03.2025 - 08:34
![]() Jolanda Wander wrote:
Jolanda Wander wrote:
Ik vraag mij af mij 5st biess ribbelsteek 6 st r, 1 afh en 2 samen breien. 1 afh. Omslaan. En weer herhalen de 5 steken ook moet. Of moet ik alleen 6 st. R breien en 1 afh en 2 samen breien en omslaan. Wilt u even vertelen de 5 st er bij moet elke keer of juist niet.
22.01.2025 - 07:32DROPS Design answered:
Dag Jolanda,
Het patroon dat tussen de sterretjes staat (6 recht, 1 afhalen, 2 samen breien, afgehaalde steek overhalen, 5 recht) en dat je steeds moet herhalen is in totaal 13 steken. Als je 333 steken opzet en aan beide kanten 5 voorbiessteken hebt, houd je 325 steken over om het patroon over te breien. Je kunt dan het patroon 13 keer herhalen in de breedte. Je zou dan precies uit moeten komen.
26.01.2025 - 19:28
![]() Jolanda Wander wrote:
Jolanda Wander wrote:
Hoi even vraag wat is 5 st r biess in ribbelsteek. Ik doe nu 5st recht aan goede kant. En bij naald averecht breien de 5 st averecht . Is dat goed zo. Sorry met veel vragen. Ik ben een beginneling
22.01.2025 - 07:26DROPS Design answered:
Dag Jolanda,
De 5 biessteken brei je steeds in ribbelsteek, dus recht aan de goede kant en recht aan de verkeerde kant. Denk wel om de knoopsgaten.
26.01.2025 - 19:29
![]() Jolanda Wander wrote:
Jolanda Wander wrote:
Hoi . Wil u mee kijken wat ik fout doet , ik brei 5 st r, ( biess ribbel st, r. ) 6 st r. 1 afh, 2 samen breien. 1 afgehaald om slaan. 5 st r en 6 st r. 1 afh. 2samen breien 1 afh omslaan. Eindig met 1 st r. En 5 bies ribbel st. . Als dit zo goed is snap ik niet 322 st over hou ipv 287.
22.01.2025 - 07:22
![]() Jolanda Wander wrote:
Jolanda Wander wrote:
Hoi. Nu heb ik 333 steken op gezet. 5 biessteek in rib. 6 st. R. 1 st . Afh , 2 r samen breien , 5 r. Dan herhalen. Eindigt 1 r en 5 biessteek. Nu kwam ik uit. Moest Nu 287 st. Overhouden. Maar ik heb. 322 st. Hoe kan dat denk u. ?? Snap er niks van.. Jolanda wander
21.01.2025 - 21:34
![]() Jolanda Wander wrote:
Jolanda Wander wrote:
Hoi . 5 ribbelst. Dan m1A dan bij M1b begint met 1 r , omslaan. 4 r, 1 afh. 2 samen.br. het 1 afh. Over de 2 samen breien. 4 r. Omsl. 1 r. Geloof ik en herhaal het patroon 12 x , maar ik heb er 22 x herhaalt kloot dat dan m1c en 1 r en r ribbelst. Maar bij m1 c kom ik st te kort wat doe ik dan fout Hoort het graag
11.01.2025 - 15:46
|
|||||||||||||||||||
DROPS 105-27 |
|||||||||||||||||||
|
|
|||||||||||||||||||
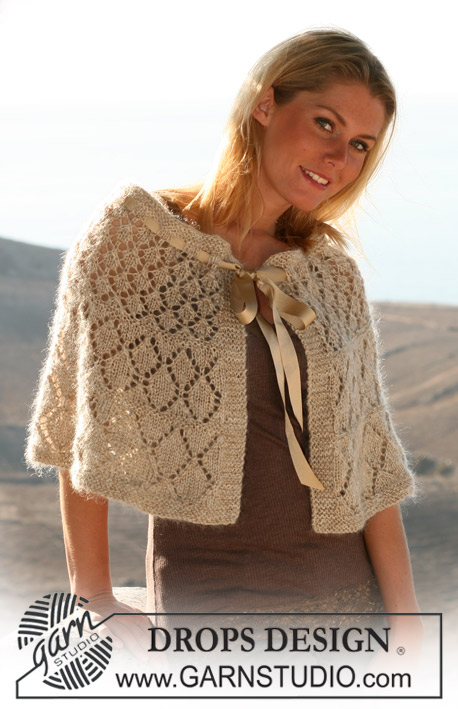
DROPS short cape with lace pattern in “Vivaldi” and “Glitter”.
DROPS 105-27 |
|||||||||||||||||||
|
Garter st, back and forth on needle: K all rows Pattern: See diagram M.1 and M.2. The diagram shows the pattern from the RS side. Buttonhole: Make buttonholes on right front piece. 1 buttonhole = K tog 3rd and 4th st from mid front and make 1 yo. Make buttonholes when piece measures 23, 28, 33, 38 and 43 cm. Cape: Knitted back and forth on circular needle. Loosely cast on 333-389-445 sts on circular needle size 3.5 mm with 1 thread Vivaldi and 1 thread Glitter. K 1 row from WS. Work next row as follows: 5 garter sts (= front band), *K6, slip 1 st as if to knit, K2 tog, psso, K5*, repeat from *-* and finish row with K1, 5 garter sts = 287-335-383 sts on row. P 1 row from WS. Work next row as follows: 5 garter sts, M.1A (= 12 sts), M.1B on 252-300-348 sts, M.1C (= 13 sts), 5 garter sts. Remember the knitting tension. Work 1 vertical repeat of M.1 + 1 repeat up to row marked by arrow in diagram. Piece now measures approx 35 cm. Now continue and dec in M.2 as follows: 5 garter sts, M.2 until 6 sts left on needle, incl the first of these 6 sts in pattern on the first 10 rows, then work it in stocking st, work the last 5 sts in garter st. Continue in M.2. After M.2 there are 126-146-166 sts left on row and piece measures approx 43 cm. Work 6 rows garter sts on all sts and then cast off loosely. Sew on buttons on left front band. |
|||||||||||||||||||
Diagram explanations |
|||||||||||||||||||
|
|||||||||||||||||||
 |
|||||||||||||||||||
Have you finished this pattern?Tag your pictures with #dropspattern or submit them to the #dropsfan gallery. Do you need help with this pattern?You'll find 13 tutorial videos, a Comments/Questions area and more by visiting the pattern on garnstudio.com. © 1982-2026 DROPS Design A/S. We reserve all rights. This document, including all its sub-sections, has copyrights. Read more about what you can do with our patterns at the bottom of each pattern on our site. |
|||||||||||||||||||


With over 40 years in knitting and crochet design, DROPS Design offers one of the most extensive collections of free patterns on the internet - translated to 17 languages. As of today we count 324 catalogues and 12290 patterns translated into English (UK/cm). 12290
We work hard to bring you the best knitting and crochet have to offer, inspiration and advice as well as great quality yarns at incredible prices! Would you like to use our patterns for other than personal use? You can read what you are allowed to do in the Copyright text at the bottom of all our patterns. Happy crafting!
Post a comment to pattern DROPS 105-27
We would love to hear what you have to say about this pattern!
If you want to leave a question, please make sure you select the correct category in the form below, to speed up the answering process. Required fields are marked *.