
Popular categories
Looking for a yarn?


Comments / Questions (238)
![]() Lilou wrote:
Lilou wrote:
Je voulais réaliser ce modèle avec Mérinos extra fine ... Est-ce possible d'avoir les explications avec ce groupe de fil ?? Par avance merci
14.01.2014 - 08:49DROPS Design answered:
Bonjour Lilou, nous ne sommes malheureusement pas en mesure de répondre aux demandes individuelles. Vous pouvez toutefois essayer de recalculer en fonction de votre échantillon. Votre magasin DROPS pourra probablement vous aider. Ou bien rechercher dans les modèles du groupe B ou avec votre tension. Bon tricot !
14.01.2014 - 10:34
![]() Angelique wrote:
Angelique wrote:
Het is mij niet duidelijk hoe ik na de afkanting van het armsgat verder moet breien. Moet ik de verkorte toeren voortzetten zoals Hiervoor of moet ik anders doorbreien voordatik verder ga met de verkorte toeren? Gr Angelique
04.11.2013 - 10:54DROPS Design answered:
Hoi Angelique. Je breit de twee delen afzonderlijk verder, met elke deel een eigen breinaald + bol. Je gaat nu door met de verkorte naalden + motief zoals eerder en volg verder de beschrijving voor elke deel. Ik denk dat het makkelijkste is dat je breit eerst 1 nld van deel 1, dan 1 nld van deel 2 om de hele tijd gelijk te blijven (of zien hoe jij het prettigst vindt). Veel plezier verder.
08.11.2013 - 16:38
![]() Angelique wrote:
Angelique wrote:
Hallo, ik vind het een prachtig patroon maar ik zit vast na de afkanting voor het armsgat. De 2 delen dienen afzonderlijk verder te worden gebreid om de Verkorte naald weerszijden gelijk tekrijgen. Moet ik hier dan gewoon verder tellen met de verkorte toeren en minderingen zoals hiervoor of moet ik anders doorbreien? Hoop dat ik duidelijk ben. Gr Angelique
04.11.2013 - 10:50
![]() Lena åberg wrote:
Lena åberg wrote:
Var görs vändningen?? görs den i den inre cirkeln när det bara finns några maskor kvar innan vändning? vad gör man på varv 3 och 4?
09.10.2013 - 12:10DROPS Design answered:
Vändningen görs för att få flera varv ytterst så det blir en cirkel. Följ beskrivningen i mönstret: "Vändningarna stickas så här". Fråga också gärna i butiken där du har köpt garnet!
10.10.2013 - 08:03
![]() Lena åberg wrote:
Lena åberg wrote:
Snälla snälla någon, hjälp mig med detta mönster. när ska jag göra vändningarna??i den inre cirkeln eller var? det ser inte ut så på mönstret. När man gjort alla vändningarna ska det finnas 20 m kvarytterst på cirkeln MEN det gör det ju redan från början. Kan någon förklara detta? MVH Lena
09.10.2013 - 12:04DROPS Design answered:
Tror inte du har förstått syftet med vändningarna. För att sticka en cirkel måste du sticka flera av yttersta varven. Se vår instuktionsvideo med Förkortade varv!
10.10.2013 - 08:11
![]() Linda wrote:
Linda wrote:
What is the sequence to this pattern? M1 rows first and then the short? On the 1/2 row do I knit 2tog or turn before the last two stiches. Help please
03.04.2013 - 20:52
![]() Microbe wrote:
Microbe wrote:
Je ne comprend pas pour la 1ere mesure. Je trouve le modele tres sympa mais les explications sont un tres flou
13.03.2013 - 00:57DROPS Design answered:
Bonjour Microbe, si vous avez besoin d'aide complémentaire détaillée pour ce modèle, je vous recommande de vous adresser au magasin où vous avez acheté votre laine ou sur le forum DROPS. Bon tricot!
13.03.2013 - 08:50
![]() Betzi wrote:
Betzi wrote:
Hallo! Wie ich sehe haben letzten Herbst einige dieses wunderschöne Modell gestrickt. Habt ihr Tipps, welches Garn man benutzen kann, da es Silke Alpaca ja nicht mehr gibt? Freue mich über Erfahrungsberichte!!
18.01.2013 - 13:27
![]() Anni wrote:
Anni wrote:
Vielen dank nun habe ich es vestanden!! dann kann ich ja fleißig weiter machen!!
29.10.2012 - 14:21
![]() Anni wrote:
Anni wrote:
Hallo!! ich stricke die jacke gerade in größe M/L und komme gut klar mit der anleitung. Eine frage hätte ich aber doch zum messtipp! Ich verstehe nicht so recht wie ich messen soll! könnten sie mir das bitte nochmal erklären?
23.10.2012 - 12:21DROPS Design answered:
Hallo Anni, legen Sie den Kreis zum Messen hin (nicht hängend) und messen Sie nicht die Diagonale sondern dem Bogen entlang.
26.10.2012 - 11:33
|
||||||||||||||||
Blue Moon |
||||||||||||||||
 |
 |
|||||||||||||||
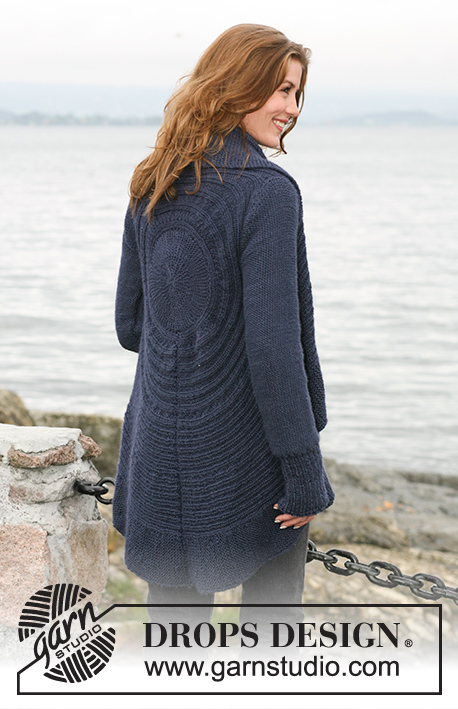
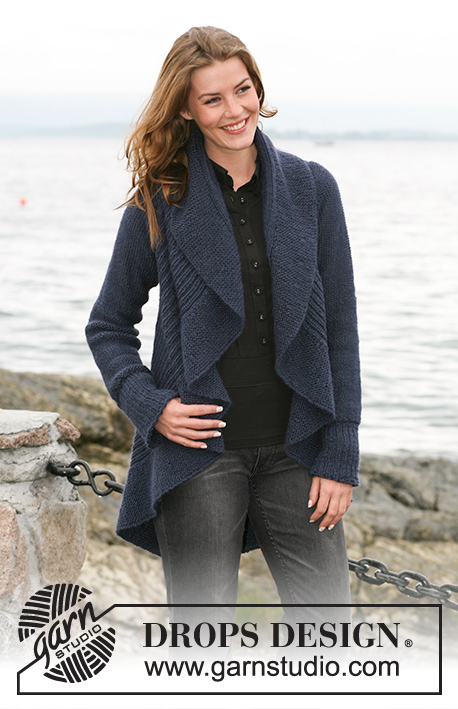
Knitted circular jacket in DROPS Silke Alpaca or DROPS Air, with texture pattern Size: S – XXXL
DROPS 102-6 |
||||||||||||||||
|
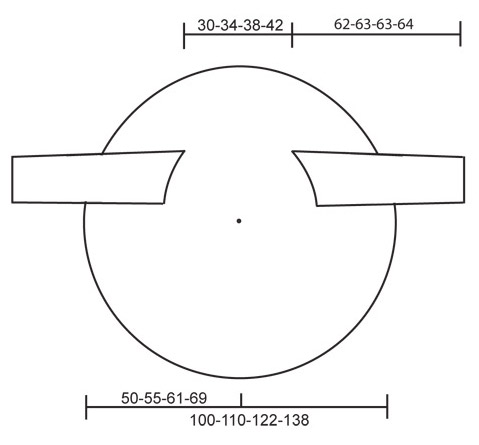
Knitting tension: 17 sts x 22 rows stocking sts = 10 x 10 cm Pattern: See diagram M.1. Diagrams are seen from RS. NOTE: Each size has own diagram. Short rows: Work short rows to ensure circular shape of piece, as follows: 1st / 2nd row: Knit 102-112-124-140 sts, turn piece and knit back. 3rd / 4th row: Knit back and forth over 18-16-20-20 first sts on row (these sts = outermost on circle) – read knitting tip 1 below. Repeat 1st to 4th rows, but reduce stitch number by 2 sts on every 1st/2nd row before turning piece – repeat this 10-10-12-12 times in total, then reduce sts number knitted by 4 sts before piece is turned – repeat this 6-9-8-12 times in total and from this point reduce sts number by 8 sts before piece is turned – repeat 5-5-6-6 times in total. Remaining are 18-16-20-20 outermost sts of circle. Start again from beginning over all sts. – read Knitting tip 2 below. Knitting tip 1: When turning piece slip the first st as if to knit and tighten yarn before continuing knitting. This is done to avoid holes when turning. This does not applies to innermost 20-20-24-24 sts of circle – when piece is turned knit all sts as normal. Knitting tip 2: On row where all sts are knit, P 20-20-24-24 innermost sts in circle (seen from RS). Then continue as before with chart M.1. Measuring tip: All measurements on circle are done with piece lying flat. Do not measure across! Measurements follow curve to 63rd - 69th -73rd - 81st sts. Circle: Knit piece back and forth on needle to make room for all sts. Cast on 102-112-124-140 sts on circular needle size 4.5 mm with Silke Alpaca or Air. Insert 1 marking thread or stitch marker after 63-69-73-81 sts, make all measurements from this point. Knit chart M.1 (see diagram for your size) from right to left (i.e. from outside towards inside on circle) 1st row = RS. At the same time as chart M.1 knit Short rows – see explanation above – to make circular shape. When piece measures 37-40-49-57 cm from marking thread or stitch marker – read measuring tip – knit armholes. Armhole: Slip outermost 63-69-73-81 sts onto an extra needle size 4.5 mm (circular needle to make room for all sts). Continuing, cast off next 2 sts (= armhole). Insert 1 marking thread or stitch marker between 2 cast off sts. Leave remaining sts on needle. Continuing, knit 2 parts (sts before and after armhole) separately, but knit them at the same time on separate needles with separate balls of yarn. This is done so the short rows are correct on both sides of armhole. Continue with pattern and short rows as earlier. When armhole measures 18-21-23-25 cm cast on 2 new sts over armhole(i.e. between the 2 parts). Continuing, slip all sts onto one needle again = 102-112-124-140 sts. Insert 1 marking thread or stitch marker after 63-69-73-81 sts. Continuing, measure piece from this point. Now knit chart M.1 and short rows on all sts. Continue like this until piece measures approx 15-17-19-21 cm, this should be a ½ circle. Continue until piece measures approx 30-34-38-42 cm from marking thread – read measuring tip. Now make armholes in same way. When all sts are back on one needle again insert 1 marking thread or stitch marker after 63-69-73-81 sts. Continue measuring from here. Continue with M.1 and short rows until piece measures approx 37-40-49-57 cm from marking thread or stitch markers (adjust to 1 whole pattern repeat with short rows). Cast off loosely. Sleeve: Knit piece back and forth on circular needles. Cast on 56-59-65-68 sts (incl 1 front edge sts on each side) on needles size 4.5 mm with Silke Alpaca or Air. P1 row from WS. Continue with Rib K2/P1 and 1 edge sts on each side. When Rib measures 13-13-14-14 cm K 1 row from WS at the same time dec 10-11-13-14 sts evenly = 46-48-52-54 sts. Continue in stocking sts with WS out until complete measurement. When piece measures 16 cm inc 1 sts on each side on every 9 -4.5 -3.5 -3 cm 5-9-11-13 times in total = 56-66-74-80 sts. When piece measures 56 cm cast off top shape sleeve top on each side on every other row: 4 sts 1-2-2-2 times. Continuing, cast off 2 sts on each side until piece measures approx 61-62-62-63 cm. Then cast off 4 sts 1 time on each side. Piece measures approx 62-63-63-64 cm. Cast off remaining sts. Assembly: Sew circle tog in outermost edge of cast on sts and cast off edge. Sew in sleeves so seams under sleeve meet at middle of marking thread or stitch marker placed at bottom of armhole and middle of sleeve top meet marking thread or stitch marker placed on top of armhole. Sew sleeve seams. |
||||||||||||||||
Diagram explanations |
||||||||||||||||
|
||||||||||||||||
 |
||||||||||||||||
 |
||||||||||||||||
Have you finished this pattern?Tag your pictures with #dropspattern or submit them to the #dropsfan gallery. Do you need help with this pattern?You'll find 15 tutorial videos, a Comments/Questions area and more by visiting the pattern on garnstudio.com. © 1982-2026 DROPS Design A/S. We reserve all rights. This document, including all its sub-sections, has copyrights. Read more about what you can do with our patterns at the bottom of each pattern on our site. |
||||||||||||||||


With over 40 years in knitting and crochet design, DROPS Design offers one of the most extensive collections of free patterns on the internet - translated to 17 languages. As of today we count 324 catalogues and 12245 patterns translated into English (UK/cm). 12245
We work hard to bring you the best knitting and crochet have to offer, inspiration and advice as well as great quality yarns at incredible prices! Would you like to use our patterns for other than personal use? You can read what you are allowed to do in the Copyright text at the bottom of all our patterns. Happy crafting!
Post a comment to pattern DROPS 102-6
We would love to hear what you have to say about this pattern!
If you want to leave a question, please make sure you select the correct category in the form below, to speed up the answering process. Required fields are marked *.