
Popular categories
Looking for a yarn?


Comments / Questions (53)
![]() Engla Haldisdotter Roos wrote:
Engla Haldisdotter Roos wrote:
Framstycken. När arbetet mäter 40 cm virka endast över 18 maskor, Är det 18 från mitten eller 18 från sidan?
15.04.2025 - 22:41DROPS Design answered:
Hei Engla. Virka vidare över endast 18 m mot sidan (dvs 11 m mot mitt fram virkas inte). mvh DROPS Design
28.04.2025 - 11:18
![]() Silvia wrote:
Silvia wrote:
Liebes DROPS Team, wahrscheinlich sitz das Problem wieder vor dem Bilschirm ;-) aber ich finde bei Ihren tollen Anleitung leider nicht die Angabe wie viel Knäuel Wolle benötigt werden, beziehungsweise wie viel die Gesamtgrammzahl Wolle pro Größe ist. Danke für einen Hinweis. Viele Grüße aus Niedersachsen Silvia
27.12.2023 - 13:26DROPS Design answered:
Liebe Silvia, die benötige Garnmenge wird je nach Größe unter dem Kopfteil beschrieben, hier braucht man z.B. in S: 800 g DROPS Ice, aber da Ice ausgelaufen ist, benutzen Sie den Garnumrechner, um Alternative bzw die neue Garnmenge zu finden. Viel Spaß beim stricken!
02.01.2024 - 08:44
![]() Pamela wrote:
Pamela wrote:
Hola, saludos En los patrones que entregan siempre he tenido dudas sobre, por ejemplo: *1 p.b. en cada uno de los sig 3 p.de cad., saltar 1 p.de cad.*, repetir de * a * y finalizar con 1 p.b. en cada uno de los últimos 2-1-0-2-1 p.de cad. = 80-85-90-101-106 p.b. Que significa, cuando dice 2-1-0-2-1 p. de cad. = 80-85 etc. Que son esos número, en todos los patrones aparecen los número que no sé a qué se refieren. Gracias!!
23.12.2022 - 00:43DROPS Design answered:
Hola Pamela, estos patrones se utilizan para varias tallas a la vez. Cada número en las series de números se corresponde a una talla concreta: El primer número (P.e 2 p.de cad ... = 80 p.b) es para la talla más pequeña (S), el segundo número (1 p.decad... = 85 p.b) es para la talla M y así. Cuando no hay secuencias de números entonces las instrucciones se aplican de la misma manera a todas las tallas.
25.12.2022 - 23:39
![]() Isabel wrote:
Isabel wrote:
OK, so I thought I got this pattern right ... but no. Not even close.
20.03.2021 - 01:13
![]() Bettina Fuchs wrote:
Bettina Fuchs wrote:
Hallo, ich habe eine Frage zum Muster M.1. Laut Erklärung/Legende sollte immer eine Reihe LM und eine Reihe Doppelstäbchen sich abwechseln. Muss das eigentlich nicht heißen: Eine Reihe fM wechselt sich mit den Doppelstäbchen ab? Viele Grüße
15.01.2021 - 18:05DROPS Design answered:
Liebe Frau Fuchs, ja genau, danke für den Hinweis, Legende für dieses Symbol wird verändert. Viel Spaß beim häkeln!
18.01.2021 - 07:55
![]() Patricia Mostert wrote:
Patricia Mostert wrote:
Can you give me the full instructions because I find it confusing using a diagram?
09.11.2019 - 12:26DROPS Design answered:
Dear Patricia, unfortunately we do not have this pattern in written out form. Please try to make sense of the charts, with the help of our lesson about reading charts here. In the long run it is well worth the effort, as these charts not only show how to do the very next stitch, but also how the stitches relate to each other in the rows above each other etc. Happy Crafting!
10.11.2019 - 11:22
![]() Lorraine Edwards wrote:
Lorraine Edwards wrote:
I love this pattern, if I could get a good start! I am so confused on the instructions at the beginning after the first row of single crochet and the finish off. Do I triple crochet the next row ending with 101 (XL) triple crochet. When do I decrease to get the 99 single crochet? I hope I am making sense. Thank you in advance for an answer.
10.07.2018 - 20:02DROPS Design answered:
Dear Mrs Edwards, after you have worked first row with 101 dc, work 1 row with double treble crochets. Then start working M.1 while on first row in M.1 decrease evenly 2 sc = 99 sc. Then work next row in M.1 with treble groups - see diagram key. Happy crocheting!
11.07.2018 - 07:41
![]() Corinne Van Balen wrote:
Corinne Van Balen wrote:
Hartelijk dank voor uw reactie! Ik bedoel dat 11 boogjes met 2 cm ertussen in mijn geval te weinig is...ik kom eerder aan het dubbele. Heb mijn werkstuk nagemeten en dat klopt en als ik op de tekening met formaten kijk, staat daar ook 19 cm. maar plat gemeten aan voorkant... dus voor het hele armsgat moet dat toch ook 2 keer19 zijn? Mijn vraag: die 11 boogjes is dus voor 1 pand?
19.06.2018 - 11:01DROPS Design answered:
Dag Corinne, Inderdaad, ik denk dat je gelijk hebt. Volgens mij moet het het dubbele zijn en staat er een foutje in. Ik zal het even doorgeven aan designafdeling om te controleren en hopelijk komt er spoedig een antwoord in de vorm van een correctie.
19.06.2018 - 14:32
![]() Corinne Van Balen wrote:
Corinne Van Balen wrote:
Ik ontvang geen reactie op mijn vraag.... is dit omdat het patroon oud is, of is mijn vraag onduidelijk?
18.06.2018 - 17:07DROPS Design answered:
Dag Corine, Ik heb je vraag over het hoofd gezien, hij is nu beantwoord.
18.06.2018 - 18:59
![]() Corinne wrote:
Corinne wrote:
Prachtig vest.... Maar de 11 boogjes met 2 cm er tussen voor de mouwen...? Mouwen met een kop van ongeveer 22-25 cm, wat doe (lees) ik fout?
11.06.2018 - 08:22DROPS Design answered:
Dag Corine, Je haakt 11 lossenboogjes in het armsgat van de panden nadat je de schoudernaden hebt gesloten en je haakt de mouw van boven naar beneden. Er is geen mouwkop; het is een rechte mouw. Ik begrijp je vraag dus niet goed, kun je verduidelijken waar je precies tegenaan loopt?
18.06.2018 - 18:58
|
||||||||||||||||
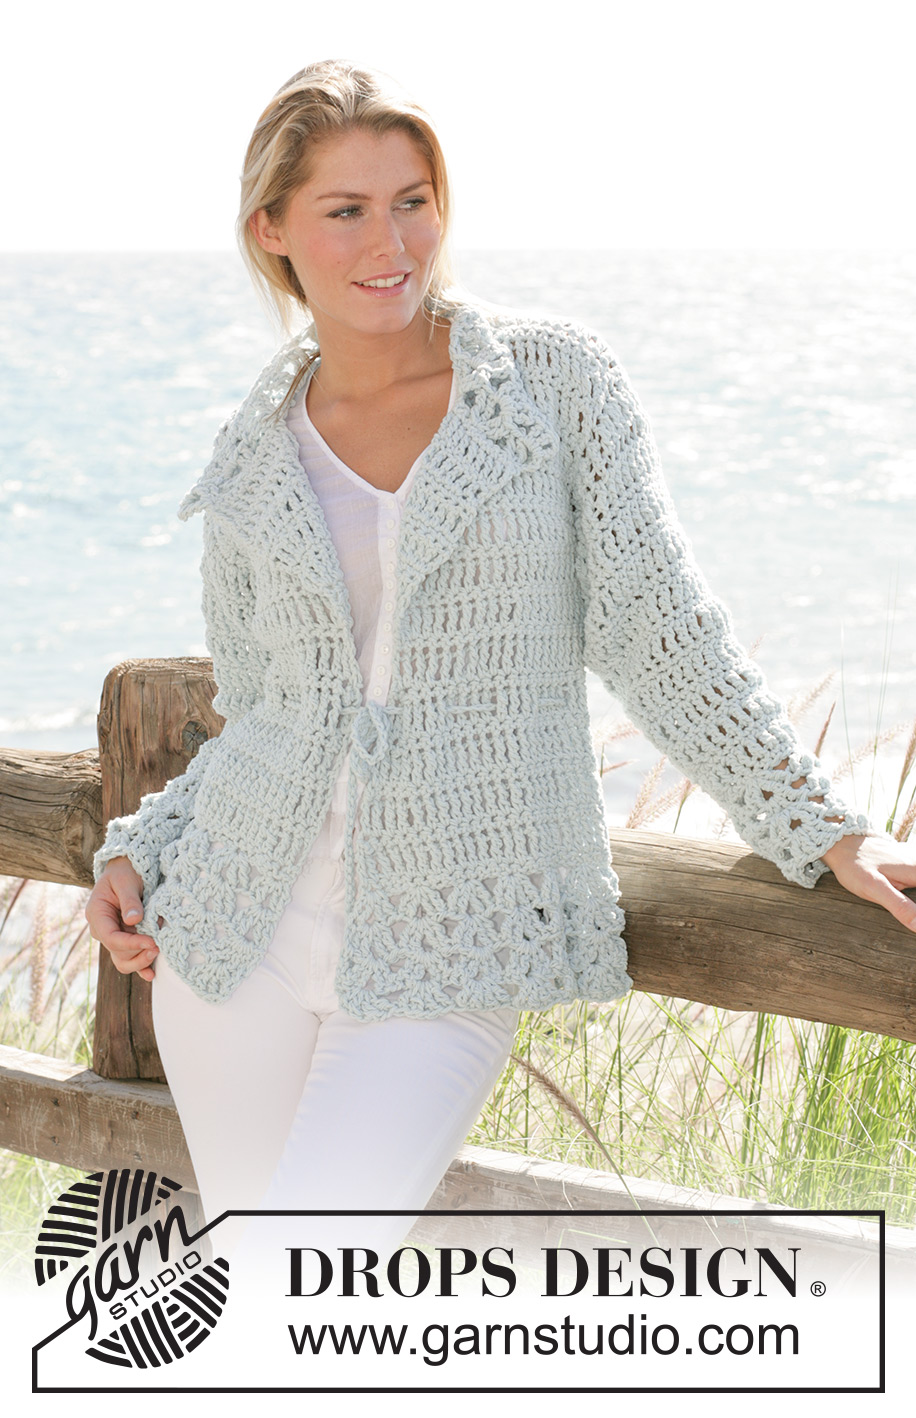
Britt Cardigan#brittcardigan |
||||||||||||||||
|
|
||||||||||||||||
Drops crochet jacket in ”Ice” with tr group pattern and stay in waist size S - XXL
DROPS 99-19 |
||||||||||||||||
|
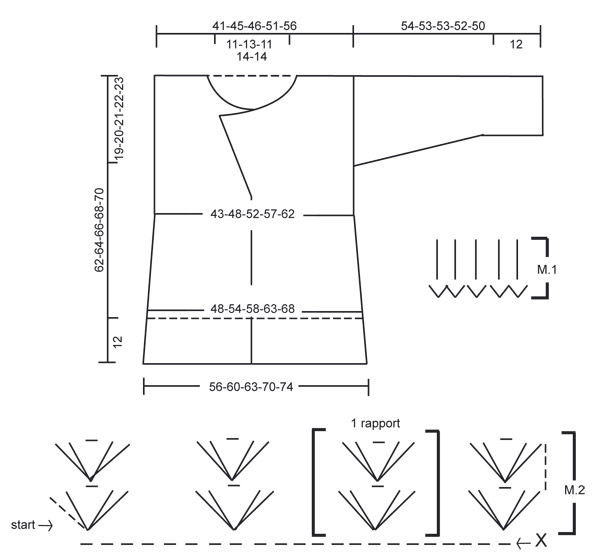
Crochet tension: 8 dtr/dc in width on 10 cm and 2 pattern repeats M.1 in height on 8 cm. 1 pattern repeat M.2 measures approx 7 cm in width and 3 cm in height. Pattern: See diagram M.1 and M.2. Diagrams are seen from RS. Crochet info: Substitute first dtr on each row with 4 ch. Increasing tip 1: Increase 1 dc by crocheting 2 dc in 1 dtr. Increasing tip 2: Inc 2 dtr by crocheting 1 extra dtr in 2nd last dc mid front. Decreasing tip: Only dec on rows of dc. Dec 1 dc as follows: Insert hook in first sts, pick up thread, insert hook in next sts, pick up thread, yo and pull thread through all 3 sts on hook. Back and front pieces: Crochet piece back and forth from mid front. Crochet 107-114-121-135-142 ch (incl 1 ch to turn with) on crochet hook size 8 mm with DROPS Ice. Crochet next round as follows: 1 dc in 2nd ch from hook, 1 dc in each of next 2 ch, skip 1 ch, * 1 dc in each of next 3 ch, skip 1 ch * repeat from *-* and finish off with 1 dc in each of last 2-1-0-2-1 ch = 80-85-90-101-106 dc. Crochet 1 row of 1 dtr in each dc – read Crochet info. Continuing crochet M.1 until piece is completed. NOTE: First row of M.1 adjust sts number to 77-84-91-99-107 dc (size S, M and XL: Read Decreasing tip, Size L and XXL: Read Increasing tip 1). Insert 1 marking thread (MT) after 19-21-23-25-27 sts from each side (marking mid sides) = 39-42-45-49-53 dc on back piece. At the same time when piece measures 7 cm dec 1 dc on each side of both MT – read Decreasing tip. Repeat dec when piece measures 15 cm = 69-76-83-91-99 dc/dtr. When piece measures 18-16-18-16-18 cm inc 2 dtr on each side mid front on every 4 rows (= every 2nd row of dtr) 3 times in total –read Increasing tip 2. At the same time when piece measures approx 31-32-33-34-35 cm split piece at marking threads on sides. Complete front and back pieces separately. Back piece: = 35-38-41-45-49 dc/dtr. Begin by crocheting left side 1-1-2-2-2 sts after marking thread. Crochet M.1 until 1-1-2-2-2 sts are left before marking threads on other side = 33-36-37-41-45 dc/dtr. Turn piece. Crochet back and forth until piece measures approx 46-48-50-52-54 cm. Now crochet 2 rows (1 row dtr and 1 row dc) but only over 12-13-14-15-17 sts on each side, middle 9-10-9-11-11 sts = neck. Cut yarn, piece now measures approx 50-52-54-56-58 cm. Left front piece: Continue crocheting in M.1 from mid front to marking thread on side. Turn piece and crochet back. Remember inc at mid front. Continue as follows until piece measures 38-40-42-40-42 cm, now there are 23-25-27-29-31 dc/dtr on row. Continue crocheting but only over 14-15-16-18-20 sts at side (i.e. do not crochet 9-10-11-11-11 sts at mid front). Continuing dec 1 dc mid front – read Decreasing tip – on every other row (= each row with dc) 2-2-2-3-3 times in total = 12-13-14-15-17 dc/dtr left on shoulder. Crochet until piece measures 50-52-54-56-58 cm. Cut yarn. Right front piece: Crochet like left reversed. Edge on back and front pieces: Crochet an edge with tr group pattern on bottom edge of back and front pieces. Crochet in ch row that was crochet at beginning of piece. Start mid front at bottom of left front piece. Crochet M.2 around entire back and front piece. When M.2 has been crochet 2 times in height (i.e. 4 rows) cut yarn. Assembly: Sew shoulder seams in outermost edge. Sleeve: Crochet sleeve from top down back and forth from mid under arm. Crochet 11-12-12-13-14 ch loops round armhole as follows: 1 dc in first dtr mid under arm (where piece is split), * 2 ch, skip approx 2 cm, 1 dc in next st *, repeat from *-*. Crochet next round as follows: 1 dc in first dc, * 2 dc around ch loop, 1 dc in next dc *, repeat from *-* = 34-37-37-40-43 dc. Continuing crochet 1 row dtr crochet 1 dtr in each dc. Continue with M.1. At the same time when piece measures 7 cm dec 1 st on each side – read Decreasing tip – on every other row (= each row in dc) 7 times in total = 20-23-23-26-29 dc/dtr. Continue with M.1 until piece measures 42-41-41-40-38 cm. NB: On last dc row before finished measurement adjust st number to 20-25-25-25-30 dc. Cut yarn. Assembly: Sew arm seams in outermost edge. Edge around sleeves: Crochet an edge in tr group pattern around sleeves in same way as back and front pieces, but skip 4 sts between each tr group in stead of 6 sts. Start mid under sleeve. Crochet tr groups around sleeve (= 4-5-5-5-6 pattern repeats). When 4 rounds of tr group pattern are completed cut yarn. Neck edge: Crochet an edge of tr group pattern round neck in same ways as sleeves. Start mid front on top of right front piece. Crochet tr groups around neckline to top of left front piece (adjust to 1 tr group is placed mid front on each side). When 2 rows of tr group pattern are completed cut yarn. Stays: Crochet a row of ch approx 1.5 to 2 meters long. Tie a knot on each end. Pull stay up and down in dtr row on middle of jacket waist. |
||||||||||||||||
Diagram explanations |
||||||||||||||||
|
||||||||||||||||
 |
||||||||||||||||
Have you finished this pattern?Tag your pictures with #dropspattern #brittcardigan or submit them to the #dropsfan gallery. Do you need help with this pattern?You'll find 8 tutorial videos, a Comments/Questions area and more by visiting the pattern on garnstudio.com. © 1982-2026 DROPS Design A/S. We reserve all rights. This document, including all its sub-sections, has copyrights. Read more about what you can do with our patterns at the bottom of each pattern on our site. |
||||||||||||||||


With over 40 years in knitting and crochet design, DROPS Design offers one of the most extensive collections of free patterns on the internet - translated to 17 languages. As of today we count 324 catalogues and 12290 patterns translated into English (UK/cm). 12290
We work hard to bring you the best knitting and crochet have to offer, inspiration and advice as well as great quality yarns at incredible prices! Would you like to use our patterns for other than personal use? You can read what you are allowed to do in the Copyright text at the bottom of all our patterns. Happy crafting!
Post a comment to pattern DROPS 99-19
We would love to hear what you have to say about this pattern!
If you want to leave a question, please make sure you select the correct category in the form below, to speed up the answering process. Required fields are marked *.