
Popular categories
Looking for a yarn?


Comments / Questions (14)
![]() Julieta Garcia wrote:
Julieta Garcia wrote:
Hola tengo una duda: dice que son 8 aumentos cada vuelta , pero solo hago 4 ya que en las instrucciones dice: "entre" los sig 2 p.a. trabajar 2 p.a. (= hombro derecho) , y usted menciona ( en alguna respuesta) que que se aumentos a los lado del MP cosa se serian dos aumentos, estoy en en un error?
12.03.2022 - 14:47DROPS Design answered:
Hola Julieta, en la 5ª fila, aumentas 1 punto a cada lado del marcapuntos. Entonces, como hay 4 marcapuntos, trabajas 2 p.a a cada lado del marcapuntos (= 8 aumentos en la vuelta).
13.03.2022 - 22:28
![]() Nicole wrote:
Nicole wrote:
In row 6, it says to continue to increase at the front, back, left and right. If I increase in all four areas the total increase per row would be 4. The pattern says that each row will have an increase of 2. Also, Do we increase in EACH increase from the previous row? If so, each row would increase 4 more that the row before. If there were a graph pattern it would help answer this question, but I don't see one anywhere. Thanks
27.06.2021 - 05:34DROPS Design answered:
Dear Nicole, since you increase with 2 dc in one (with marker in the middle of both) you will increase 2 stitches between each marker (= 1 stitch is increased after the marker, 1 stitch is increased before next marker = 2 sts and 4 markers = 8 sts are increased on every round. Hope this will help. Happy crocheting!
28.06.2021 - 07:40
![]() Marja wrote:
Marja wrote:
Dank je voor de reactie, maar volgens het patroon wordt er na de dertiende toer niet meer gemeerderd voor de schouders. Ik sluit me ook aan bij een eerdere reactie dat door het werk steeds te keren de stokjes steeds een stokje verspringen. Ik vind het een superleuke poncho, maar het patroon niet helemaal duidelijk en je moet bij elke toer goed tellen of er 2 stokjes gemeerderd zijn tussen de meerderingen. Voor een ongeduldige haakster zoals ik bijna een straf 😉
15.05.2019 - 13:25
![]() Marja wrote:
Marja wrote:
Bij de meerderingen voor de schouders wordt aangegeven in toer 5 “haak 30 stokjes en haak tussen de volgende 2 stokjes 2 stokjes”, moet je die 2 stokjes waar je tussen moet haken niet haken dan? Dan meerder je toch ook niets?
11.05.2019 - 23:39DROPS Design answered:
Dag Marja,
Klopt, vanaf de vijfde toer wordt er niet meer gemeerderd op de schouder, allen voor en achter.
15.05.2019 - 09:03
![]() Estrella wrote:
Estrella wrote:
Buenos días. Me encantan vuestros patrones, ideas y lanas!! Solo deciros que este patrón está mal clasificado: aparece en la categoría de 2 agujas cuando está realizado a ganchillo. Muchas Gracias. Un saludo cordial
14.10.2018 - 11:45
![]() Kristine Poulsen wrote:
Kristine Poulsen wrote:
Spørgsmål til 88-11. Jeg kan ikke få begyndelse og slut af omgangene til at fungere. Det ser forkert ud. Kan I evt skrive om forskel på lige/ulige rækker eller andet, jeg kan bruge som rettesnor. Mvh Kristine
09.01.2018 - 16:00DROPS Design answered:
Hej Kristine, jo du slutter hver omgang med en kædemaske i 3.luftmaske (den som erstatter 1.stangmaske når du starter omgangen) God fornøjelse!
30.01.2018 - 09:53
![]() Katarina Jerrstedt wrote:
Katarina Jerrstedt wrote:
Vill veta hur markörerna ska sitta på 4:de varvet. På ena axeln är det 3 stolpar emellan och för den andra axeln och framsidan 6 stolpar?
26.03.2017 - 20:18DROPS Design answered:
Hej Katarina. Nej, du har 4 markörer i arbejdet. 1: i förste st paa omg, nummer 2: i 31.-34.-37. st, nummer 3: i 61.-67.-73. st og nummer 4: 91.-100.-109. st. Du har i alt 120-132-144 st paa omgangen, sa der kommer ikke 3 eller 6 stolper i mellem.
27.03.2017 - 13:20
![]() Diana wrote:
Diana wrote:
Hallo! Erstmal DANKE für die tollen Anleitungen. Oft verstehe ich sie auch ;O). Jetzt stehe ich aber auf dem Schlauch... ich soll die Arbeit "wenden" und dann weiter häkeln. Wenn ich (ab Rd. 5) nach dem Stb, 3 LM, Stb die Arbeit drehe; wie soll ich dann weiter häkeln? Rückwärts??? Oder wieder Stb = 3 LM, 3 LM, Stb? Vielen Dank und VlG! Diana
28.05.2015 - 07:50DROPS Design answered:
Am besten orientieren Sie sich einfach an den Markierern, d.h. an den Stellen, an denen Sie zugenommen haben - dort nehmen Sie weiter zu, also an der vorderen Mitte, der hinteren Mitte und an beiden Schultern. D.h. Sie häkeln 1 Stb in jedes Stb (am Rd-Anfang 3 Ersatz-Lm) und dann an den Markierern die entsprechenden Zunahmen. Die Zunahme an der vorderen und hinteren Mitte erfolgt ja immer um die Lm-Bögen der vorherigen Zunahme. Gutes Gelingen!
28.05.2015 - 10:32
![]() Lotte Hummelshøj wrote:
Lotte Hummelshøj wrote:
Hejsa. Kan i ikke lige forklare hvordan man starter med rk 5 -6 osv.Jeg kan ikke få det til at passe med at starte med 30st. Kh Lotte
16.02.2015 - 20:10DROPS Design answered:
Hej Lotte. Saa maa der vaere gaaet noget galt da du placerede maerketraadene. Du startede med 6 lm (= 1 st + 3 lm) + 1 st i 1.st (= midt bagpå), 1 st i hver af de 29 st i den forrige omg, saa skulle din naeste omgang (5) vaere 3 lm + 30 st frem til maerketraaden.
18.02.2015 - 13:26
![]() Rose-Marie wrote:
Rose-Marie wrote:
Virkade denna till mitt barnbarn. Hon blev jättenöjda och var så fin i den. Hon kommer säkert lägga ut den på Facebook.
31.03.2014 - 17:28
|
|
DROPS 88-11 |
|
|
|
|
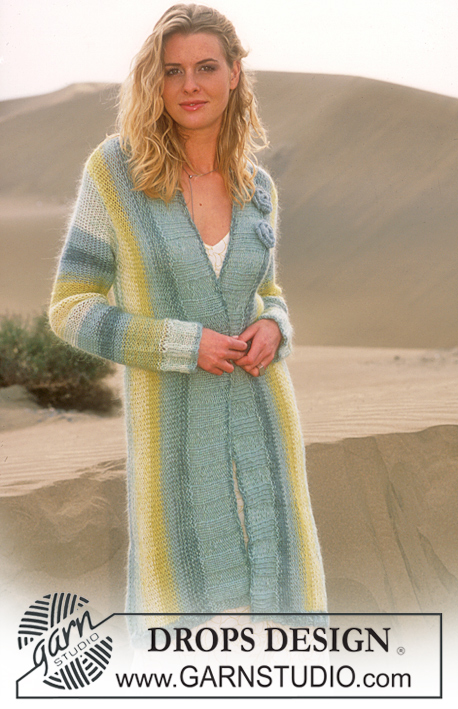
Crochet poncho in "Alpaca" with twisted cords and crochet edge in "Snow"
DROPS 88-11 |
|
|
Crochet tension: Remember hook size is only a guide. 19 treble crochets x approx. 10 rows with hook size 4 mm and Alpaca = 10 x 10 cm. NOTE: Due to differences in crochet techniques, the crochet tension varies from person to person. Increase or decrease the hook size as necessary to achieve the right tension. Crochet tip: At the beginning of each round, replace the first treble crochet with 3 chain stitches. At the end of each round finish with 1 slip stitch in 3rd chain stitch at beginning of round. Crochet info: Work in each treble crochet (not between treble crochets). -------------------------------------------------------- Poncho: The piece is worked in the round from the neck down. To avoid the piece becoming twisted, work alternately from the right and wrong side, i.e. turn the piece at the end of each round. Work 240-264-288 chain stitches with hook size 4 mm and Alpaca and form them into a ring with 1 slip stitch. Round 1: 1 chain stitch, * skip 1 chain stitch, 1 double crochet in next chain stitch *, repeat from *-* and finish with 1 slip stitch in first chain stitch at beginning of round = 120-132-144 double crochets. Round 2: 3 chain stitches, * 2 chain stitches, skip 2 stitches, 1 treble crochet in the next stitch *, repeat from *-* and finish with 2 chain stitches and 1 slip stitch in 3rd chain stitch at beginning of round = 40-44-48 chain-spaces. Round 3: 3 chain stitches, 2 treble crochets around first chain-space, then work 3 treble crochets around each chain-space to end of round, finish with 1 slip stitch in the 3rd chain stitch at beginning of round = 120-132-144 treble crochets. Round 4: Read Crochet info! Insert 4 marker threads in piece as follows: Insert 1 marker thread in the first treble crochet (= mid back), in the 31st-34th-37th treble crochet (= left shoulder), in the 61st-67th-73rd treble crochet (= mid front) and in the 91st-100th-109th treble crochet (= right shoulder) on the round (= 4 marker threads). Work as follows: 6 chain stitches (= 1 treble crochet + 3 chain stitches) + 1 treble crochet in first treble crochet (= mid back), 1 treble crochet in each of the next 29-32-35 treble crochets, in next treble crochet (= with marker thread) work 2 treble crochets, then 1 treble crochet in each of the next 29-32-35 treble crochets, in next treble crochet (= with marker thread) work 1 treble crochet + 3 chain stitches + 1 treble crochet (= mid front), 1 treble crochet in each of the next 29-32-35 treble crochets, in next treble crochet (= with marker thread) work 2 treble crochets, then work 1 treble crochet in each of the last 29-32-35 treble crochets, finish with 1 slip stitch in 3rd chain stitch at beginning of round. Round 5: 3 chain stitches, 1 treble crochet in each of the next 30-33-36 treble crochets, between the next 2 treble crochets work 2 treble crochets (= left shoulder - marker thread should sit in the middle of these 2 treble crochets), 1 treble crochet in each of the next 31-34-37 treble crochets, in chain-space (= mid front) work 1 treble crochet + 3 chain stitches + 1 treble crochet, 1 treble crochet in each of the next 31-34-37 treble crochets, between the next 2 treble crochets work 2 treble crochets (= right shoulder), 1 treble crochet in each of the next 31-34-37 treble crochets, in chain-space (= mid back) work 1 treble crochet + 3 chain stitches + 1 treble crochet, finish with 1 slip stitch in 3rd chain stitch at beginning of round. Continue to work in this way at the same time as you increase mid front, mid back and on each shoulder, as on round 5 (i.e. there are 2 treble crochets more between each increase every round). When you have worked a total of 13 rounds (i.e. you have increased to shoulder on the last 10 rounds) finish the increases on each shoulder. Then work 1 treble crochet in each treble crochet with increases mid front and back as before. When piece measures 37-39-42 cm from the row of holes in the neck and down mid front (the piece measures approx. 33-35-38 cm from the row of holes and down the shoulder) or to desired length, cut the strand. Crochet edge: Work 1 round of chain-spaces with hook size 7 mm and Snow as follows (start in chain-space mid back): 1 double crochet around chain-space, * 4 chain stitches, skip 4 treble crochets (= approx. 2 cm), 1 double crochet in the next treble crochet *, repeat from *-* around the whole poncho, but mid front work 1 double crochet around chain-space. Finish with 4 chain stitches and 1 slip stitch in the first double crochet at beginning of round. Twisted cord: Cut 1 strand Snow of approx. 3 metres. Twist the strand until it begins to resist, fold it double and it will continue to twist. Tie a knot in each end. The cord is approx. 1.3 metres. Thread the cord up and down through each hole at top of neck - start mid front. Flower tassels: Work 4 chain stitches with hook size 7 mm and Snow and form them into a ring with 1 slip stitch. Round 1: * 8 chain stitches, 1 double crochet around ring *, repeat from *-* a total of 4 times and finish with 8 chain stitches and 1 slip stitch in first double crochet at beginning of round = 5 chain-spaces. Work 1 more flower. Thread a flower onto each end of the cord and tie an extra knot on the cord so that the flowers stay put. |
|
Have you finished this pattern?Tag your pictures with #dropspattern or submit them to the #dropsfan gallery. Do you need help with this pattern?You'll find 7 tutorial videos, a Comments/Questions area and more by visiting the pattern on garnstudio.com. © 1982-2026 DROPS Design A/S. We reserve all rights. This document, including all its sub-sections, has copyrights. Read more about what you can do with our patterns at the bottom of each pattern on our site. |


With over 40 years in knitting and crochet design, DROPS Design offers one of the most extensive collections of free patterns on the internet - translated to 17 languages. As of today we count 324 catalogues and 12290 patterns translated into English (UK/cm). 12290
We work hard to bring you the best knitting and crochet have to offer, inspiration and advice as well as great quality yarns at incredible prices! Would you like to use our patterns for other than personal use? You can read what you are allowed to do in the Copyright text at the bottom of all our patterns. Happy crafting!
Post a comment to pattern DROPS 88-11
We would love to hear what you have to say about this pattern!
If you want to leave a question, please make sure you select the correct category in the form below, to speed up the answering process. Required fields are marked *.