
Popular categories
Looking for a yarn?


Comments / Questions (14)
![]() JJ wrote:
JJ wrote:
\"ensimmäiset 2 lisättyä silmukkaa neulotaan oikein, seuraavat 2 lisättyä silmukkaa neulotaan nurin jne\" - tämä kohta ei aukea mulle. Tarkoittaako samassa kerroksessa vai eri kerroksill
19.05.2025 - 20:13
![]() Re wrote:
Re wrote:
Why does it not knit 2 together at the end of the row instead of before the end of the row for Decrease Tip 2? Won\\\'t 1 side look more slanted than the other? thanks
08.05.2025 - 04:19DROPS Design answered:
Dear Re, at the beg of row decreasing with Slip 1, K1, psso, will lean to the right, to get a mirorred decrease you will decrease at the end of the row with K2 tog so that the decrease will lean to the left. Happy knitting!
08.05.2025 - 13:33
![]() Joey wrote:
Joey wrote:
I am so confused on how to bind off for the armhole. There are 14 garter stitches but we only bind off 8 stitches for armholes? Pattern said bind off before the markers, which markers are these?
07.10.2024 - 09:27DROPS Design answered:
Dear Joey, correct, that way you will keep the 3 sts on each side in garter stitch, these 3 sts will be the edge along armhole when working front and back piece separately. Happy knitting!
07.10.2024 - 15:44
![]() Helle Vejre wrote:
Helle Vejre wrote:
Hej. Er det rigtigt at mønsteret er 1 r og 2 vr? På billedet ser det ud til for mig at det er 2 r og 1 v. Hilsen Helle
29.05.2024 - 11:53DROPS Design answered:
Hei Helle. I oppskriften står det at mønster er strikket: * 1 ret, 2 vrang, 1 ret *. Så gjentas det som står mellom stjernene og da blir det jo 2 rett og 2 vrang, bortsett fra første og siste gang det mellom stjernene strikkes. mvh DROPS Design
03.06.2024 - 08:41
![]() Hanneke Geervliet wrote:
Hanneke Geervliet wrote:
Goedendag, Ik ben gestart met een boord te breien van 1 recht, 1 averecht. Vervolgens staat er in de beschrijving: Ga verder met rondbreinaald 3.5 mm en brei boordsteek als volgt: * 1 recht, 2 averecht, 1 recht *, herhaal van *-* over de hele naald. Maar kijk ik goed naar de plaatjes dan zie ik: * 2 recht, 1 averecht, 2 recht. Is het de bedoeling dat ik het topje binnenste buiten brei? Of lees ik het patroon niet goed? Met groet, Hanneke
21.05.2024 - 22:22DROPS Design answered:
Dag Hanneke,
Het werk wordt in zijn geheel in boordsteek gebreid met 2 recht en 2 averecht (of 1 recht, 2 averecht, 1 recht). Het lijkt inderdaad wel een beetje alsof er 1 averecht tussen de 2 recht zit, maar het zijn er echt 2. De boordsteek trekt het werk wat samen en daardoor lijkt dat dus zo.
30.05.2024 - 18:57
![]() Anne wrote:
Anne wrote:
Bonjour, Merci pour votre réponse à mon message en dessous. Pour être sûr - lorsqu'on tricoté spécifiquement les mailles diminuées le rang suivant, si la diminution a supprimé une des mailles endroit dans les côtes, est-ce que je dois tricoter cette diminution endroit où envers le rang suivant ? Et si la diminution a supprimé maille endroit et envers (le bord des côtes. ) Merci de votre aide
18.05.2024 - 15:51DROPS Design answered:
Bonjour Anne, je ne suis pas bien sûre de comprendre votre question, vous devez continuer à tricoter les mailles en côtes comme avant, autrement dit, tricotez les mailles endroit à l'endroit et les mailles envers à l'envers, en fonction du rang/tour concerné, les côtes ne tomberont pas tout le temps juste à cause des diminutions, mais en tricotant les mailles comme elles se présentent, elles continueront comme avant (et formeront le décalage grâce aux augmentations). Bon tricot!
21.05.2024 - 12:25
![]() Anne wrote:
Anne wrote:
Comment doit-on tricoter les diminutions et les augmentations le rang suivant, pour que cela rentre dans les côtes? Par exemple, après la diminution d\'une maille, est-ce que je dois la tricoter envers ou endroit le rang suivant ? Si je la tricoterai envers, il y aura deux mails envers et une maille endroit et vice versa. Merci par avance de votre réponse.
15.05.2024 - 12:27DROPS Design answered:
Bonjour Anne, les augmentations doivent être tricotées soit à l'endroit soit à l'envers pour que les côtes continuent simplement sur les nouvelles mailles, autrement dit, incorporez les augmentations aux côtes - quand aux diminutions, vous réduisez simplement le nombre de mailles, les autres se tricotent comme avant pour continuer les côtes. Bon tricot!
15.05.2024 - 12:45
![]() Alma Charpenay wrote:
Alma Charpenay wrote:
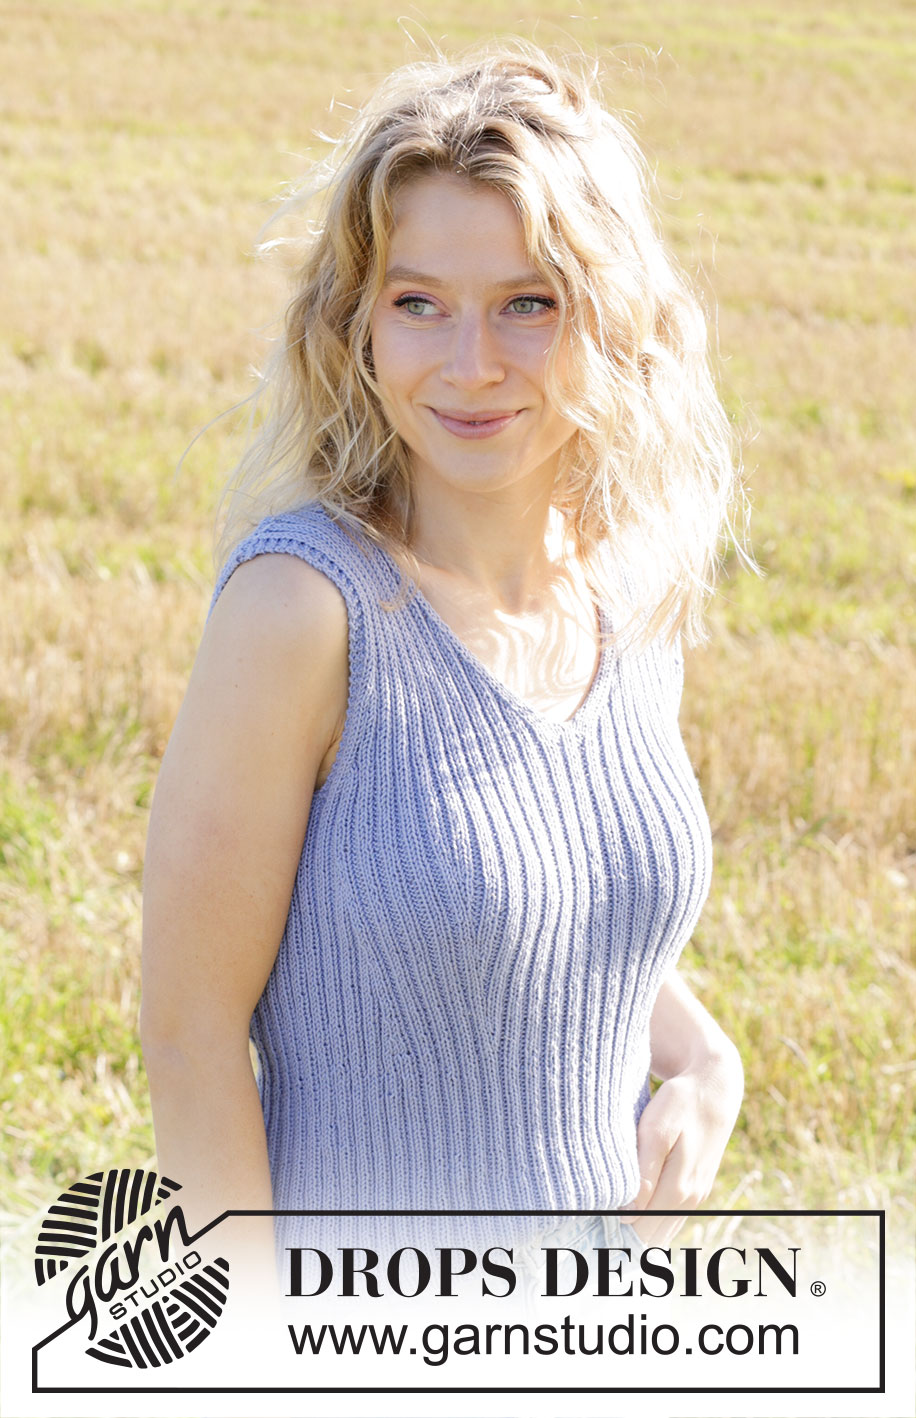
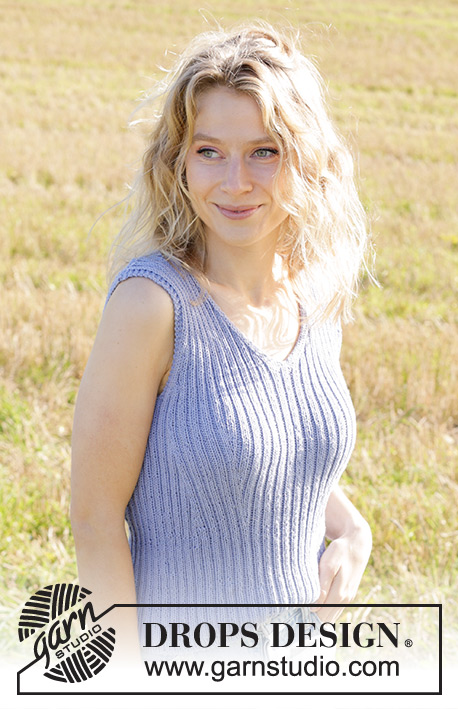
Au début de l'ouvrage, on commence avec des côtes 1/1 sur 2cm, puis on continue en côtes 2/2. Y a t-il une erreur? On ne voit pas ce changement sur la photo. Merci pour votre réponse. Alma
07.05.2024 - 17:44DROPS Design answered:
Bonjour Alma, c'est bien juste ainsi, si vous regardez la dernière photos vous verrez que les côtes du bas sont légèrement différentes à la suite du motif/des côtes. Bon tricot!
08.05.2024 - 07:29
![]() Dorota wrote:
Dorota wrote:
W opisie wzoru są błędy ; W rozmiarze M liczba oczek (112 ) nie jest podzielna przez 3( 2o.lewe i 1 o. prawe) Bluzka wyglada jakby wzór był 2o prawe 1 o.lewe ,albo modelka założyła na lewą stronę 😄🤷🏼♀️ Bluzeczka bardzo mi się podoba i robię dalej modyfikując nieco wzór😅
18.04.2024 - 11:00DROPS Design answered:
Witaj Doroto, wszystko jest ok. Ściągacz wykonywany po przerobieniu 2 cm jest następujący: * 1 oczko prawe, 2 oczka lewe, 1 oczko prawe* > czyli mamy dalej ściągacz 2 oczka prawe, 2 oczka lewe. Pozdrawiamy i miłej pracy!
18.04.2024 - 11:51
![]() Carol McMillan wrote:
Carol McMillan wrote:
I read somewhere that there was a way to highlight a size in a pattern and when printed that size is highlighted to make knitting much easier. Is this true - if so I do I use this function?
16.04.2024 - 19:01DROPS Design answered:
Dear Carol, yes, it is true, you can highlight the relevant numbers for the size you are knitting at the newer patterns for now. To do this see the line just above the title that says "pattern instructions" and click on the size you want to knit. You should see the relevant numbers circled in the pattern. Happy Crafting!
16.04.2024 - 21:44
|
||||
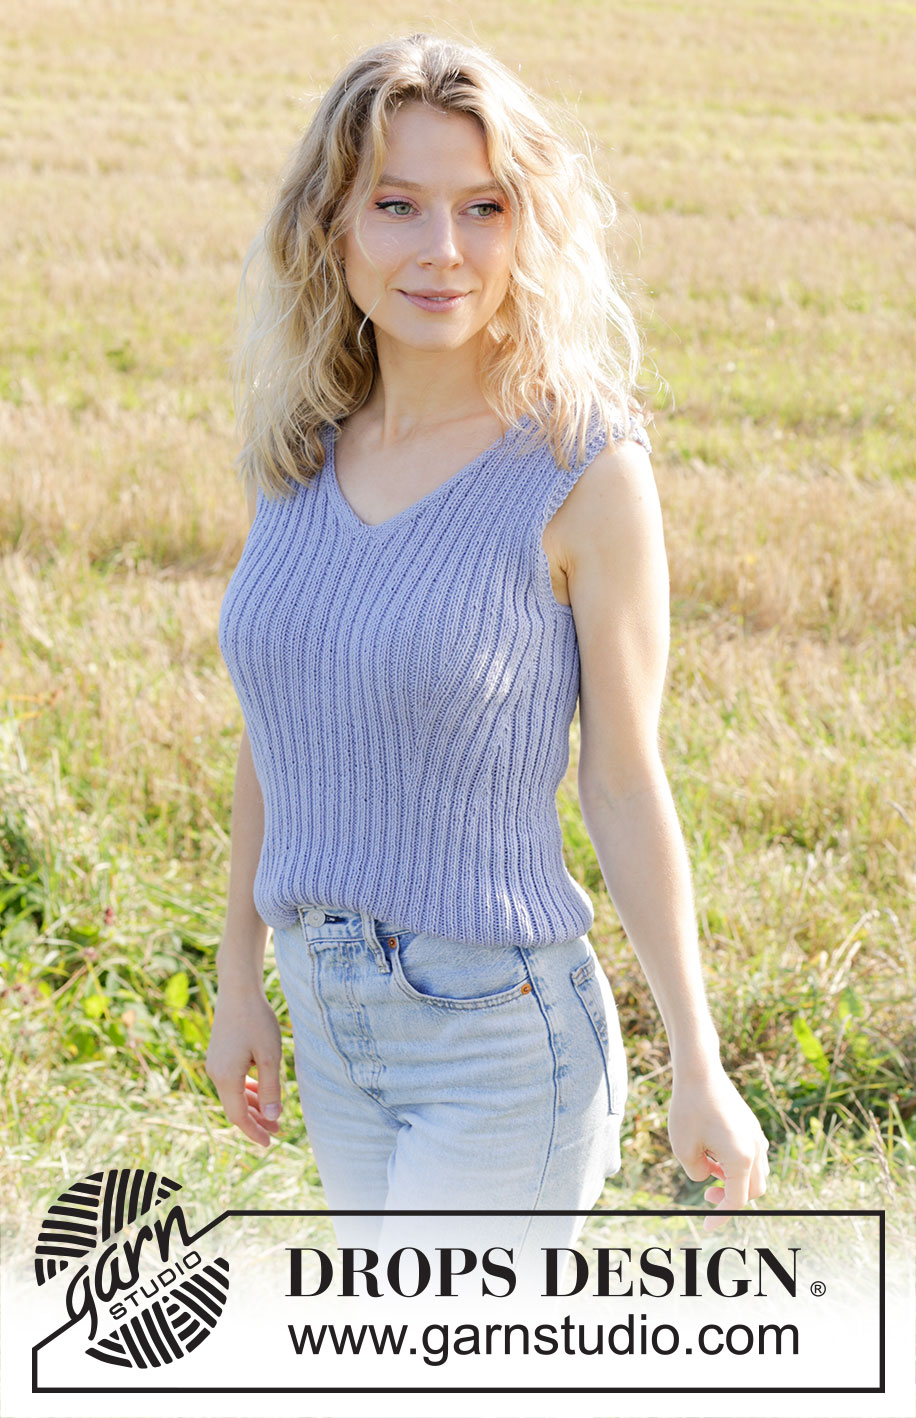
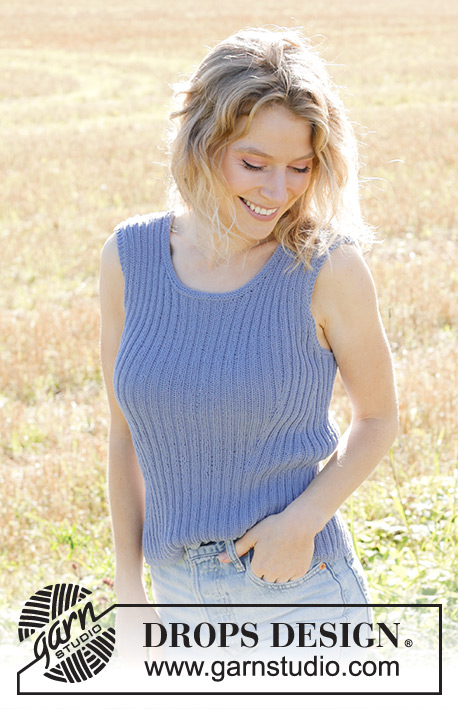
River Trail Top#rivertrailtop |
||||
 |
 |
|||
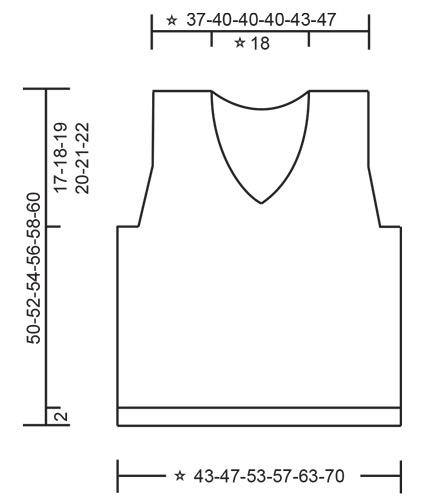
Knitted top in DROPS Safran. Piece is knitted bottom up in rib with displacements and V-neck with I-cord at the back of neck. Size: S - XXXL
DROPS 250-28 |
||||
|
---------------------------------------------------------- EXPLANATION FOR THE PATTERN: ---------------------------------------------------------- GARTER STITCH (when working in the round): Alternately knit 1 round and purl 1 round. 1 ridge vertically = 2 rounds. GARTER STITCH (when working back and forth): Knit on all rows, i.e. knit from right side and knit from wrong side. 1 ridge vertically = knit 2 rows. MEASURING TIP: The rib will contract because of the rib. Lightly pull the garment in width when doing length measurements to avoid the garment being too short when worn. INCREASE TIP: Increase 1 stitch by making 1 yarn over. On next round work yarn over twisted to avoid hole. Work the increased stitches in rib. DECREASE TIP-1 (applies to decrease in rib): DECREASE TOWARDS THE RIGHT AS FOLLOWS: Work until 3 stitches remain before 1st/5th marker thread, knit 2 together, knit 1. DECREASE TOWARDS THE LEFT AS FOLLOWS: Work until 4th/8th marker thread, knit 1, slip 1 stitch knitwise, knit 1, pass slipped stitch over stitch worked. DECREASE TIP-2 (applies to decrease for armholes and V-neck): All decreases are done from the right side! DECREASE AFTER 4 STITCHES AS FOLLOWS: Slip 1 stitch knitwise, knit 1, pass slipped stitch over stitch worked (1 stitch decreased). DECREASE BEFORE 4 STITCHES AS FOLLOWS: Work until 6 stitches remain on row, knit 2 together, finish with 4 stitches as explained in pattern. I-CORD CAST-OFF (neck edge at the back): Cast on 4 stitches on right needle from right side. Slip the 4 new stitches from right needle on to left needle so that working yarn is 4 stitches in on left needle (the working yarn tightens the piece when working to form a little tube). ROW 1 (= right side): Knit 3, knit the next 2 stitches twisted together. ROW 2 (= right side): Slip the 4 stitches from right needle back on left needle, knit 3, knit the next 2 stitches twisted together. Repeat ROW 2 until 4 stitches remain on right needle. Slip the 4 stitches from right needle back on left needle. Cast off. Sew a little stitch that binds beginning/end of I-cord to the 4 stitches from front piece. ---------------------------------------------------------- START THE PIECE HERE: ---------------------------------------------------------- TOP - SHORT OVERVIEW OF THE PIECE: Piece is worked in the round on circular needle, from the bottom and up to armholes. Divide the piece for front piece and back piece and finish each part separately back and forth. Sew the shoulder seams. Finish by picking up stitches at the back of neck and work an I-cord. BODY: Cast on 208-224-256-272-304-336 stitches on circular needle size 3.5 mm with DROPS Safran. Switch to circular needle size 3 mm (cast on on a larger needle to get an elastic cast-on edge). Work rib (= knit 1/purl 1) for 2 cm. Insert 1 marker at beginning of round and 1 marker after 104-112-128-136-152-168 stitches. These markers mark the sides of body, move the marker upwards when working. Switch to circular needle size 3.5 mm and work rib as follows: * Knit 1, purl 2, knit 1 *, repeat from *-* the entire round. Continue rib like this. REMEMBER THE KNITTING TENSION! When piece measures 14-14-15-15-15-15 cm - read MEASURING TIP, insert 8 marker threads in piece as explained below. Insert marker threads in piece without working the stitches. Move the marker threads upwards when working - marker threads should be used for decrease and increase in rib to displace the stitches. Count 21-21-29-33-33-41 stitches, insert 1st marker thread before next stitch, count 16-16-16-16-20-20 stitches, insert 2nd marker thread before next stitch, count 30-38-38-38-46-46 stitches, insert 3rd marker thread before next stitch, count 16-16-16-16-20-20 stitches, insert 4th marker thread before next stitch, count 42-42-58-66-66-82 stitches, insert 5th marker thread before next stitch, count 16-16-16-16-20-20 stitches, insert 6th marker thread before next stitch, count 30-38-38-38-46-46 stitches, insert 7th marker thread before next stitch, count 16-16-16-16-20-20 stitches, insert 8th marker thread before next stitch. 21-21-29-33-33-41 stitches remain on round after last marker thread. Read INCREASE TIP and DECREASE TIP-1, continue rib while at the same time decreasing and increasing as follows at the marker threads: Decrease TOWARDS THE RIGHT before 1st and 5th marker thread. Increase after 2nd and 6th marker thread (knit the increased stitches the first 2 times, purl the stitches the next 2 times etc.). Increase before 3rd and 7th marker thread (knit the increase stitches the first 2 times, purl the stitches the next 2 times etc.). Decrease TOWARDS THE LEFT after 4th and 8th marker thread. Increase and decrease like this every 4th round 12-12-12-16-16-16 times in total vertically. When displacement has been done, continue with rib as before with knit over knit and purl over purl. When piece measures 32-33-34-35-36-37 cm - remember MEASURING TIP, work 2 ridges in GARTER STITCH - read explanation above, over the middle 14-14-14-22-22-22 stitches in each side (7-7-7-11-11-11 stitches in garter stitch on each side of markers in the sides). On round after the 2 ridges, cast off for armholes in each side, i.e. work next round as follows: Cast off 4-4-4-8-8-8 stitches for armhole, continue rib as before until 4-4-4-8-8-8 stitches remain before marker in the other side, cast off 8-8-8-16-16-16 stitches for armhole, continue rib as before until 4-4-4-8-8-8 stitches remain on round, cast off 4-4-4-8-8-8 stitches for armhole. Fasten off. Finish front piece and back piece back and forth separately. Remove all the marker threads/markers. FRONT PIECE: = 96-104-120-120-136-152 stitches. Insert 1 marker thread mid front (between 2 knit stitches seen from right side). Continue rib forth and back as before but work the outermost 3 stitches in each side in GARTER STITCH - READ explanation above. Now decrease for armholes as explained below, decrease for V-neck at the same time as decreasing for armholes, so read all of the following section before continuing. On next row from right side, decrease 1 stitch in each side for armholes - read DECREASE TIP-2! Decrease for armhole on every 4th-4th-2nd-2nd-2nd-2nd row 4-4-12-12-16-20 times in total in each side. When piece measures 33-34-35-36-37-39 cm and next row is worked from right side, work 2 rows as before but work in stocking stitch over the middle 10 stitches (5 stitches in stocking stitch on each side of the marker thread mid front). After these 2 rows divide the piece for V-neck at the marker thread, and finish each part separately. PART 1: Continue as before with 3 stitches in garter stitch towards the armhole and 4 stitches in stocking stitch towards the V-neck. Continue decrease for armhole as explained above. In addition decrease 1 stitch for V-neck inside 4 stitches in stocking stitch as follows - remember DECREASE TIP-2: Decrease like this on every other row 16 times in total and then every 4th row 4 times in total. After all decreases for armholes and V-neck, 24-28-28-28-32-36 stitches remain on shoulder. Work until piece measures 50-52-54-56-58-60 cm from cast-on edge. Knit 1 row from wrong side. Cast off knitting from right side. PART 2: Work as 1st part. BACK PIECE: = 96-104-120-120-136-152 stitches. Begin from wrong side and continue rib as before with 3 stitches in garter stitch in each side, AT THE SAME TIME on next row from right side decrease for armholes in each side the same way as front piece = 88-96-96-96-104-112 stitches. When piece measures 47-49-51-53-55-57 cm, cast off the middle 36 stitches for neck and finish each shoulder separately. Continue rib as before with 3 stitches in garter stitch towards armhole. In addition cast off for neck at the beginning of every row from the neck: Cast off 3 stitches 2 times = 20-24-24-24-28-32 stitches remain on shoulder. NOTE! There are 4 stitches less on shoulder on the pack piece because an I-cord edge is worked over the stitches along the back of neck later, which is fastened to the 4 stitches on front piece. Work until piece measures 50-52-54-56-58-60 cm. Knit 1 row from wrong side. Cast off knitting from right side. Work the other shoulder the same way. ASSEMBLY: Sew shoulder seams inside cast-off edge - begin seam at the edge on shoulder and sew stitch against stitch until 4 stitches remain on front piece. NECK EDGE AT THE BACK OF NECK: Use circular needle size 3 mm, begin from right side at one shoulder seam, and pick up approx. 50 to 60 stitches inside 1 edge stitch along the neck at the back of neck until the other shoulder seam. Then cast off with I-CORD - read explanation above. |
||||
Diagram explanations |
||||
|
||||
 |
||||
Have you finished this pattern?Tag your pictures with #dropspattern #rivertrailtop or submit them to the #dropsfan gallery. Do you need help with this pattern?You'll find 26 tutorial videos, a Comments/Questions area and more by visiting the pattern on garnstudio.com. © 1982-2026 DROPS Design A/S. We reserve all rights. This document, including all its sub-sections, has copyrights. Read more about what you can do with our patterns at the bottom of each pattern on our site. |
||||


With over 40 years in knitting and crochet design, DROPS Design offers one of the most extensive collections of free patterns on the internet - translated to 17 languages. As of today we count 324 catalogues and 12290 patterns translated into English (UK/cm). 12290
We work hard to bring you the best knitting and crochet have to offer, inspiration and advice as well as great quality yarns at incredible prices! Would you like to use our patterns for other than personal use? You can read what you are allowed to do in the Copyright text at the bottom of all our patterns. Happy crafting!
Post a comment to pattern DROPS 250-28
We would love to hear what you have to say about this pattern!
If you want to leave a question, please make sure you select the correct category in the form below, to speed up the answering process. Required fields are marked *.