
Popular categories
Looking for a yarn?


Comments / Questions (42)
![]() Teresa wrote:
Teresa wrote:
Thank you so much for your prompt response. It has really helped me proceed with the next 2 rows. Can you also please clarify that on the 3rd round where working the 3 dtr tog that when you get to the armhole that you are working 7 of these along the 21 chain created on the previous round? Then continue working this square until it measures 76 cms? If this is correct are the front pieces worked back on forth on the sides of the sleeves?
28.07.2025 - 16:29DROPS Design answered:
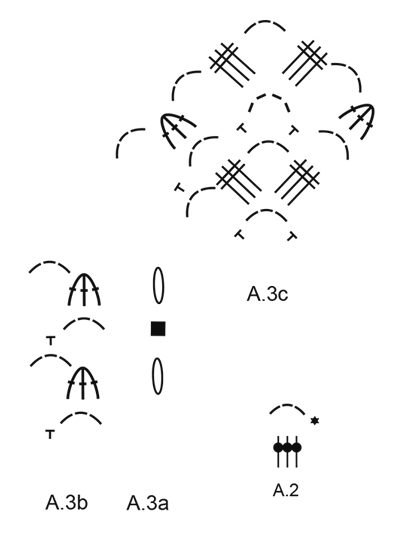
Dear Teresa, when working A.3b over the 21 chain stitches (2nd size) worked for the armhole, you repeat A.3b a total of 7 times in width. Then you repeat last 2 rows in diagrams A.3a-A.3c until square measures 76 cm (= 48 cm from mid of A.1) - square is done (see total height in chart, 2nd size = 76 cm in height). You now work each front piece separately back and forth. Happy crocheting!
29.07.2025 - 09:12
![]() Teresa wrote:
Teresa wrote:
I have purchased Drops Air to do Stony Ridge cardigan. Love the yarn and love this pattern but I really am struggling with how to follow the A.2 to A.3c diagrams. Can you help me please....
27.07.2025 - 20:38DROPS Design answered:
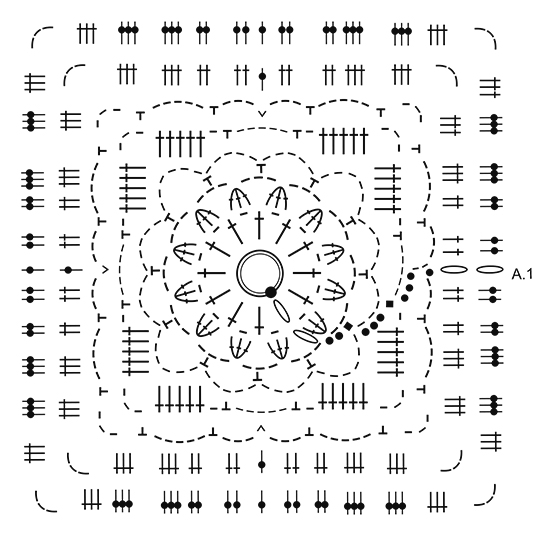
Dear Teresa, A.2 is a (1dc, 3 ch) pattern, where you form chain-3-spaces, separated by 1dc in between each chain space. Then you start with the 2nd row of charts A.3a/A.3b/ A.3c. For chart A.3a you begin the round with 1 ch, then work A.3b ( 3 dtr tog around ch-space, 3 ch over the dc in the previous round) up to the corner chain space. In the corner chain space you work [3 dtr, 3 ch, 3 dtr] + 3 chain stitches over the dc in the previous round. Continue working A.3b in all chain spaces on the sides (and armhole stitches) and A.3c in the corners and finish with A.3a again, with 1 sl st in 1st ch at beg of round, then work sl sts until first ch-space. Happy crochetting!
27.07.2025 - 20:56
![]() Kristen wrote:
Kristen wrote:
You can ask and ask. You won't get an answer!
12.05.2022 - 01:17
![]() Marta wrote:
Marta wrote:
Hola! Con el gráfico perfecto pero estoy teniendo algún problema con las explicaciones. Existe el gráfico completo de la chaqueta? Muchas gracias.
17.04.2022 - 18:11DROPS Design answered:
Hola Marta, la única versión disponible de este patrón es la que está colgada. Si tienes problemas con alguna sección concreta de la chaqueta, puedes preguntar aquí en comentarios o consultar en tu tienda DROPS más cercana.
18.04.2022 - 20:26
![]() Malin Ljungné wrote:
Malin Ljungné wrote:
Hej! I tidigare frågor hänvisas till bilder rörande diagram A2 som även jag har problem med. Länken fungerar inte längre. Går den att uppdatera? Jag undrar också vad som menas med att virka en fastmaska mellan två maskor/stolpar? MVH//Malin
28.03.2022 - 21:20DROPS Design answered:
Hei Malin. Hjelpvideoer til denne oppskriften finner du over alle kommentarer, klikk inn på: Se 11 relevanta videor här. Om du klikker på en link på et tidligere svar, husk å velge ditt språk når du kommer til 404: Page not found, mulig det vil hjelpe. Om du har 2 eller flere staver og skal hekle 1 fastmaske mellom 2 staver, skal det ikke hekles i selve masken, men midt mellom 2 masker. mvh DROPS Design
04.04.2022 - 11:58
![]() Heike Zieten wrote:
Heike Zieten wrote:
Danke, brauch keine hilfe mehr, der knoten ist geplatzt :) mein denkfehler waren die luftmaschenbögen an den ecken. Vielen lieben dank
16.04.2021 - 15:06
![]() Heike Zieten wrote:
Heike Zieten wrote:
Danke erstmal für die schnelle antwort. der witz ist, DAS habe ich alles gemacht :), trotzdem wurde das schräg. andere frage. ab welchen luftmaschenbogen muss ich beginnen. ecken ist klar aber da ja noch ein gesamter luftmaschenbogen gehäkelt werden sollte. ist die frage: ab dem luftmaschenbogen über die letzten dreier dopplestäbchen oder der eckluftmaschenbogen? vllt liegt auch da mein denkfehler
16.04.2021 - 14:37DROPS Design answered:
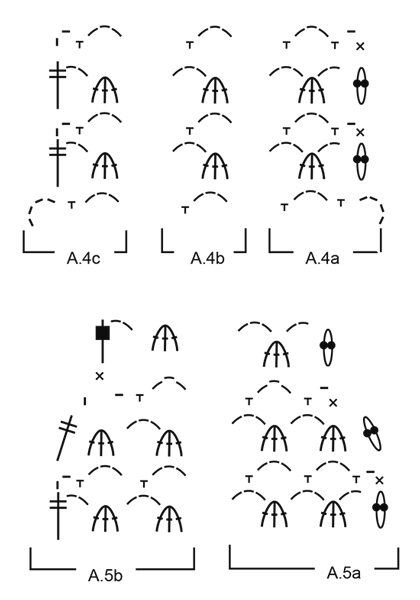
Liebe Frau Zieten, in der 1. Ecke häkeln Sie die 4 Lm, dann in dem nächsten LmBogen (2 Lm, 3 D-Stb zusammen, 3 Lm) , dann A.4b bis 2 LmBogen übrig sind (inkl. die nächste Ecke), 3 D-Stb in den nächsten lm-Bogen, 1 D-Stb um die Ecke - hilft es Ihnen weiter so?
16.04.2021 - 15:27
![]() Heike Zieten wrote:
Heike Zieten wrote:
Hallo, ich habe probleme mit den zwei vorderteilen, bei mir werden beide schräg nach unten und zwar oben, am "kragen", sprich, ich überspringe immer ein dreier doppelstäbchen. ist das richtig oder kann ich die anleitung nicht lesen?? laut den zeichnungen 4a - 4c , mache ich nichts falsch. häng da jetzt fest und bekomme anfälle :) ein weiteres video wäre passend .
15.04.2021 - 21:37DROPS Design answered:
Liebe Frau Zieten, die Vorteile werden separat gehäkelt, in Reihen, an den Seiten mit 1 Sternchen in der Maßskizze. In der erste Ecke (mit dem Stern) fangen Sie mit A.4a (über den Luftmaschenbogen in der Ecke + in den nächsten Luftmaschenbogen), A.4b wiederholen bis 2 Luftmaschenbogen vor der nächsten Ecke übrig sind, dann A.4c über diese 2 Luftmaschenbogen häkeln. A.4a und A.4c müssen "gerade" sein und folgen die Seite beim Hals oben und die unten der Jacke. Hoffentlich kann es Ihnen helfen! Viel Spaß beim häkeln!
16.04.2021 - 14:17
![]() María wrote:
María wrote:
Hola!! Me gustaría realizar este modelo con Big Delight....cuántos ovillos necesitaría para la talla S. Muchas gracias y un saludo!!
27.10.2020 - 17:47DROPS Design answered:
Hola Maria. Este modelo hay que trabajarlo con doble hilo de Big Delight, si quieres seguir las explicaciones. Para la talla S necesitarías aprox. 9 ovillos de Big Delight (para trabajar con doble hilo).
01.11.2020 - 17:01
![]() María wrote:
María wrote:
Hola!! Me gustaría realizar este modelo con Big Delight....cuántos ovillos necesitaría para la talla S. Muchas gracias y un saludo!!
27.10.2020 - 17:46
|
|||||||||||||||||||||||||||||||||||||||||||||||||
Stony Ridge#stonyridgecardigan |
|||||||||||||||||||||||||||||||||||||||||||||||||
 |
 |
||||||||||||||||||||||||||||||||||||||||||||||||
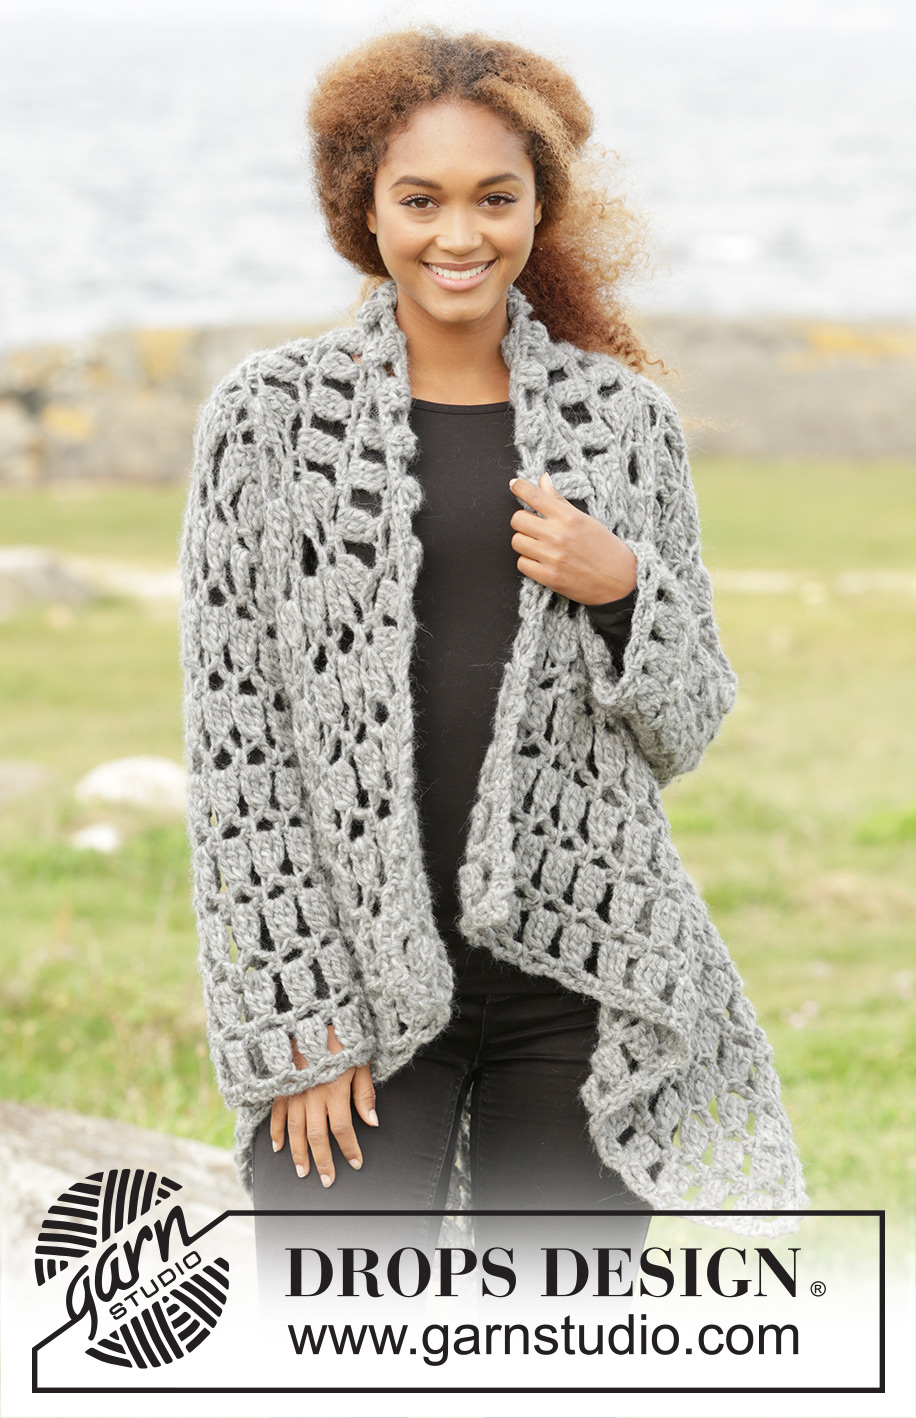
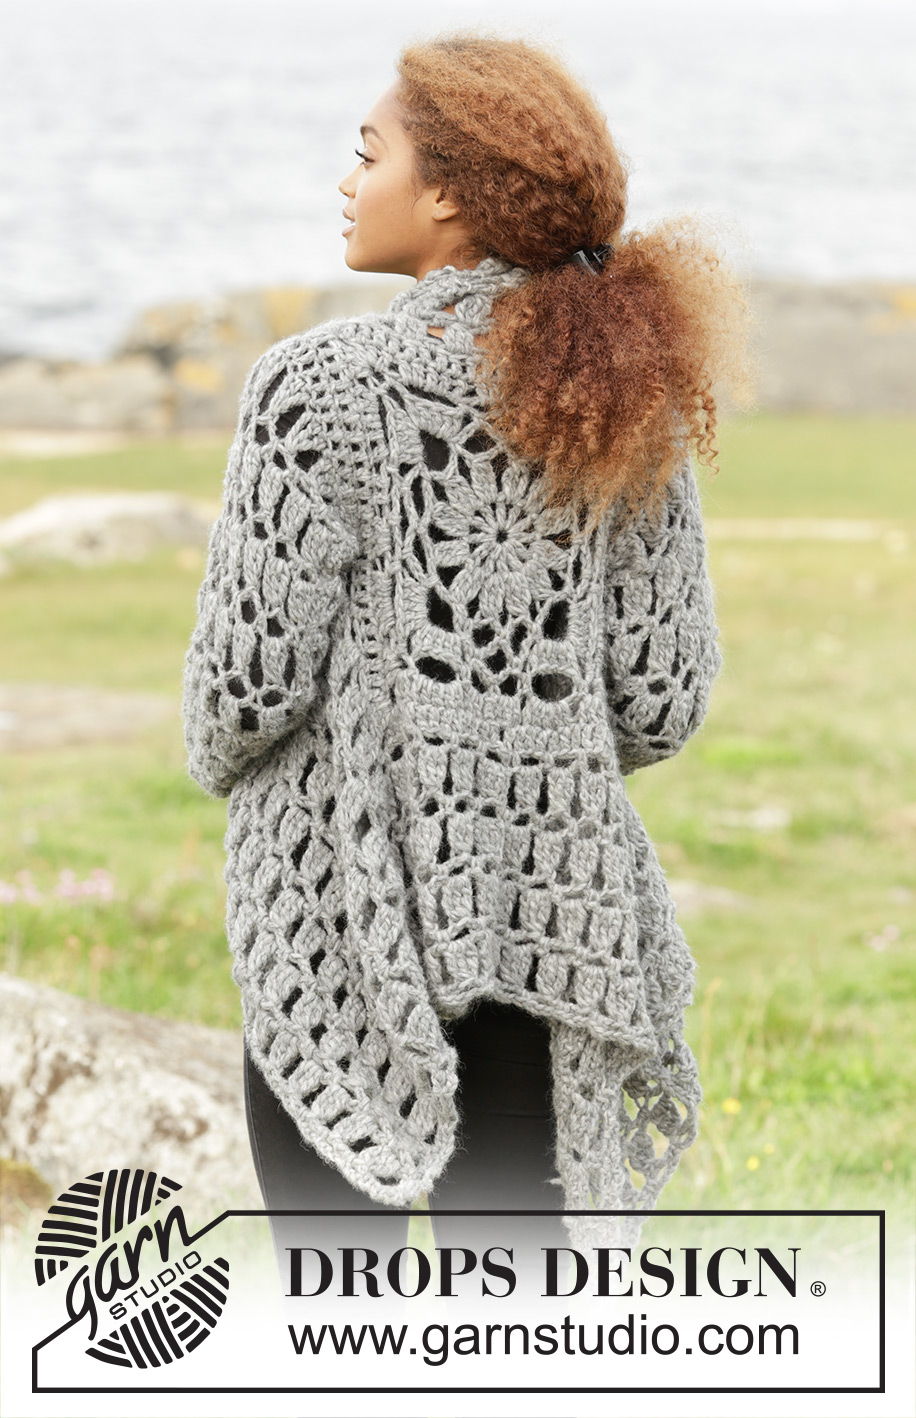
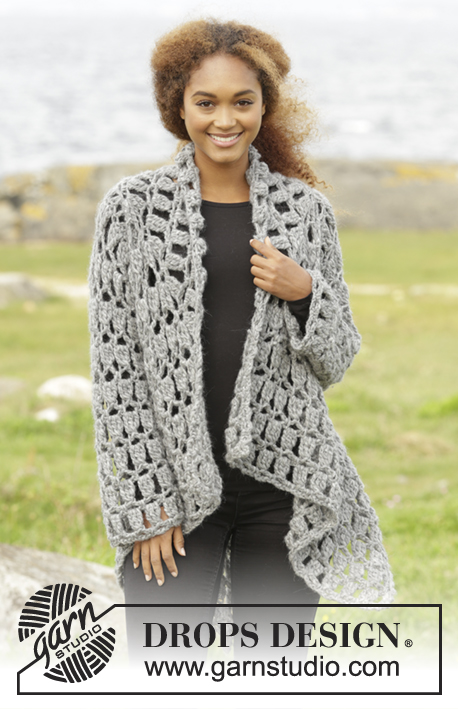
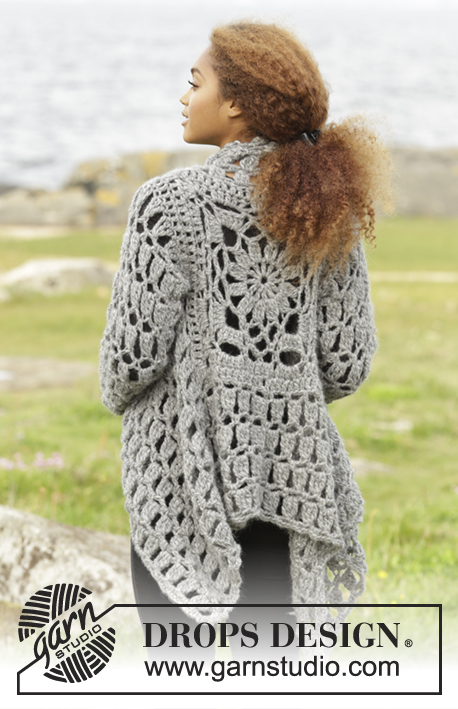
Crochet DROPS jacket worked in a square in 1 thread Cloud or 2 threads Air. Size S-XXXL.
DROPS 173-31 |
|||||||||||||||||||||||||||||||||||||||||||||||||
|
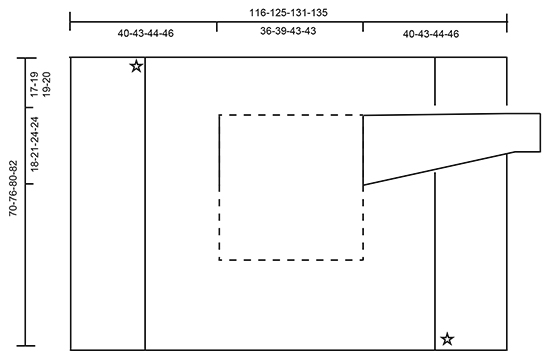
INC TR-GROUP: Work (3 tr, 3 ch, 3 tr) around ch-space in the corner. PATTERN: See diagrams A.1 to A.5. ---------------------------------------------------------- JACKET: Work piece from mid back and outwards as a square. Beg with 1 thread Cloud or 2 threads Air on hook size 7 mm and work pattern according to diagram A.1. REMEMBER THE CROCHET TENSION! When entire diagram A.1 has been worked, piece measures 36 x 36 cm. Size S/M is now finished. Continue the remaining sizes in the round as follows: Size L/XL, XXL and XXXL: Continue with 1-2-2 rounds in total with 1 tr in every tr and work 1 INC TR-GROUP – see explanation above, in each corner. NOTE: Beg round with 3 ch, and finish round with 1 sl st in 3rd ch at beg of round Now continue in all sizes as follows (work 2nd round in diagram A.2): Work 1 ch and 1 sl st in first tr on round, work A.2 over the next 12-15-18-18 tr (= 4-5-6-6 repetitions), work (1 dc, 3 ch, 1 dc) around ch-space in the corner, work 3 ch, skip 3 tr, A.2 over the next 6-9-12-12 tr (= 2-3-4-4 repetitions), 1 dc in space between the next 2 tr, insert a marker in piece and work 18-21-24-24 loose ch for armhole, skip 18-21-24-24 tr, work (1 dc, 3 ch, 1 dc) around ch-space in next corner, work 3 ch, skip 3 tr, work A.2 over the next 27-33-39-39 tr (= 9-11-13-13 repetitions), work (1 dc, 3 ch, 1 dc) around ch-space in the corner, work 18-21-24-24 loose ch for armhole, skip 18-21-24-24 tr, insert a new marker in piece and work A.2 over the next 9-12-15-15 tr (= 3-4-5-5 repetitions), work (1 dc, 3 ch 1 dc) around ch-space in the corner, work 3 ch, skip 3 tr, work A.2 over the next 12-15-18-18 tr (= 4-5-6-6 repetitions), and finish with 1 sl st in first dc on round. Now work pattern in the round as follows (work from 2nd round in diagram A.3a-A.3c): Work A.3a (show how round beg and end), work A.3b around every ch-space until first corner, work A.3c (= 3 dtr, 3 ch, 3 dtr) around ch-space in the corner, continue with A.3b around every ch-space until ch for armhole, work A.3b 6-7-8-8 times around the 18-21-24-24 ch, work A.3c around ch-space in the corner, work A.3b around every ch-space until next corner, work A.3c around ch-space in the corner, work A.3b 6-7-8-8 times around the 18-21-24-24 ch for armhole, work A.3b around every ch-space until next corner, work A.3c around ch-space in the corner, work A.3b around the remaining ch-spaces on round. When A.3a-A.3c have been worked vertically, repeat the last 2 round in diagram until piece measures approx. 70-76-80-82 cm in total (= 35-38-40-41 cm from the middle of A.1 and out in one side) - adjust so that last round worked is a round with ch-spaces and dc. Cut the yarn. FRONT PIECE: Work front pieces back and forth without inc. Insert a marker on last round worked. NOW MEASURE THE PIECE FROM HERE. Beg at star in one corner – see chart, and work from 2nd row in diagram as follows: A.4a, then work A.4b until 1 ch-space remain before the ch-space in the corner, work A.4c. Continue like this back and forth. When A.4a, A.4b and A.4c have been worked vertically, repeat the last 2 rows until front piece measures approx. 23-25-26-27 cm from marker – adjust so that last row is worked as next to last row in A.4a-A.4c. Fasten off. Repeat in opposite side of piece – see star on chart. SLEEVES: Work sleeve back and forth. Beg at marker mid under sleeve and work from WS 18-21-24-24 tr evenly up to shoulder, then work 18-21-24-24 tr around ch-row = 36-42-48-48 tr. Insert a marker here. NOW MEASURE THE PIECE FROM HERE. Then work pattern back and forth from 2nd row (= RS) in diagram A.4 as follows: NOTE: On first row work every dtr in dtr-groups into one tr on previous row. Work A.4a, then work A.4b over the next 30-36-42-42 tr, work A.4c = 12-14-16-16 dtr-groups. When entire diagram A.4a-A.4c has been worked vertically, repeat the last 2 rows in pattern, AT THE SAME TIME dec 1 dtr-group in each side of sleeve by working as shown on the last 4 rows in diagram A.5a at beg of row and A.5b at the end of row = 10-12-14-14 dtr-group. Repeat this dec in each side 0-1-1-1 more time = 10-10-12-12 dtr-groups. When piece measures approx. 50 cm in all sizes, the sleeve is done - adjust to finish after a row that is last row in A.4a-A.4c. Fasten off. Work the other sleeve the same way. ASSEMBLY: Sew underarm seams in outer loops of edge sts. Work an edge around the entire jacket as follows: Beg in one corner on one of the front pieces and work * (1 dc, 3 ch, 1 dc, 3 ch, 1 dc, 3 ch) around ch-space in the corner, work (3 ch, skip approx. 1 cm, 1 dc) until next corner, work 3 ch, *, repeat from *-* around the entire jacket. Finish with 1 sl st in first dc on round. Fasten off. |
|||||||||||||||||||||||||||||||||||||||||||||||||
Diagram explanations |
|||||||||||||||||||||||||||||||||||||||||||||||||
|
|||||||||||||||||||||||||||||||||||||||||||||||||
 |
|||||||||||||||||||||||||||||||||||||||||||||||||
 |
|||||||||||||||||||||||||||||||||||||||||||||||||
 |
|||||||||||||||||||||||||||||||||||||||||||||||||
 |
|||||||||||||||||||||||||||||||||||||||||||||||||
Have you finished this pattern?Tag your pictures with #dropspattern #stonyridgecardigan or submit them to the #dropsfan gallery. Do you need help with this pattern?You'll find 11 tutorial videos, a Comments/Questions area and more by visiting the pattern on garnstudio.com. © 1982-2026 DROPS Design A/S. We reserve all rights. This document, including all its sub-sections, has copyrights. Read more about what you can do with our patterns at the bottom of each pattern on our site. |
|||||||||||||||||||||||||||||||||||||||||||||||||


With over 40 years in knitting and crochet design, DROPS Design offers one of the most extensive collections of free patterns on the internet - translated to 17 languages. As of today we count 324 catalogues and 12290 patterns translated into English (UK/cm). 12290
We work hard to bring you the best knitting and crochet have to offer, inspiration and advice as well as great quality yarns at incredible prices! Would you like to use our patterns for other than personal use? You can read what you are allowed to do in the Copyright text at the bottom of all our patterns. Happy crafting!
Post a comment to pattern DROPS 173-31
We would love to hear what you have to say about this pattern!
If you want to leave a question, please make sure you select the correct category in the form below, to speed up the answering process. Required fields are marked *.