
Popular categories
Looking for a yarn?


Comments / Questions (101)
![]() Carine POTELLE wrote:
Carine POTELLE wrote:
Je suis en train de terminer ce charmant petit sac, mais l\'avant-dernier rang me pose problème: est-ce que je comprends bien: il faut bien commencer par 3 brides dans chacune des 3 premières brides du rang précédent puis une maille en l\'air, sauter une bride puis refaire une bride dans chacune des 3 brides suivantes, une maille en l\'air, sauter une bride et ainsi de suite? Merci de votre aide.
04.07.2018 - 09:22DROPS Design answered:
Bonjour Mme Potelle, tout à fait, c'est bien ainsi que l'on fait ce tour, on aura ainsi un rang ajouré (= 1 ml au-dessus de la bride sautée toutes les 3 brides) où on pourra y glisser les anses du sac de chaque côté. Bon crochet!
04.07.2018 - 10:04
![]() Carmen Alvarez wrote:
Carmen Alvarez wrote:
Me gustaria hacer el bolso santa fe en algodon pero cual me aconseja para tejer con aguja del 3 o 3.5
09.05.2018 - 17:53DROPS Design answered:
Hola Carmen, para trabajar con esos números de agujas deberías trabajar con algodones del grupo B como Muskat, para darle cuerpo al bolso. Si quieres trabajar con algodones del grupo A tendrías que usar ganchillo de 2.5/ 3.00.
13.05.2018 - 12:41
![]() Elisenda Bachs Marés wrote:
Elisenda Bachs Marés wrote:
Hola! Podríais buscarme una alternativa para trabajar el bolso Santa Fe con un algodón en lugar de lana? Me gustaría llevarlo en verano. Gracias!
08.05.2018 - 13:04DROPS Design answered:
Hola Elisenda, este bolso está hecho con Nepal, que pertenece al grupo C. En este mismo grupo tienes 2 algodones: Paris y Bomull-Lin. También puedes trabajar a doble hilo con algodones del grupo A.
13.05.2018 - 12:39
![]() Valerie wrote:
Valerie wrote:
Bonjour, Au rang 8 (motif A1) je dois faire: 6B, puis 2B dans la même... jusque là ça va ... mais en suivant ça, je n'ai pas le bon dessin, c'est à dire que je devrais avoir 3B en gris et 4B en beige.... c'est ça?
03.05.2018 - 19:05DROPS Design answered:
Bonjour Valérie, au rang 8 vous devez avoir: 1 bride en beige clair, 3 brides en gris foncé et 4 brides en beige clair (= 8 brides au total), les augmentations se font à la fin du diagramme, vous allez donc crocheter: 1 b en beige clair, 3 b en gris foncé, 2 brides en beige clair et dans la dernière b du motif 2 brides en beige clair. Bon crochet!
04.05.2018 - 08:35
![]() Kelly wrote:
Kelly wrote:
This pattern would be 100 times easier if there were more than two photos to look at or if in the description it would say something like double crochet 4 in tan chain 2 in grey and so on. It's coming along for me but my goodness I am struggling after round 10 with matching up the colors to the design.
03.04.2018 - 22:16
![]() Cathleen Wilbourn wrote:
Cathleen Wilbourn wrote:
The pattern calls for 2 strands, do I still use 2 if I'm using worsted weight
26.03.2018 - 08:36DROPS Design answered:
Dear Mrs Willbourn, this bag is worked with 1 strand of yarn Nepal and a tension of 18 dc x 10.5 rows = 4"x4". Happy crocheting!
26.03.2018 - 13:12Bonneval wrote:
Bonjour, peut on faire ce modèle en maille serrée, car je n'aime pas le rendu en bride. Merci
06.03.2018 - 12:27DROPS Design answered:
Bonjour Mme Bonneval, vous pouvez tout à fait vous inspirer de ce modèle pour faire le vôtre, n'oubliez pas toutefois que les mailles serrées étant moins hautes que les brides, le sac sera plus petit (en circonférence et en hauteur), il vous faudra donc l'ajuster en conséquence si besoin. Bon crochet!
06.03.2018 - 14:19
![]() Eleonora wrote:
Eleonora wrote:
Een mooi patroon die heel makkelijk in 1 dag te haken is. Binnenkort haak ik er eentje in een andere kleurencombinatie
26.02.2018 - 21:44
![]() Miranda Tinnevelt wrote:
Miranda Tinnevelt wrote:
Zojuist dit patroon uitgeprint. Nu begonnen met het begin. Maar moet ik nu eerst patroon A1 12x herhalen, en dan mwt TOER 1 beginnen? Ik kan dan toch geen 12 stk in de ring maken?
13.02.2018 - 20:50DROPS Design answered:
Hoi Miranda,. Ja, je haakt 12 stokjes in de de ring op de eerste toer. De eerste toer zijn die 12 stokjes en tegelijkertijd het de eerste rij in het telpatroon. In het telpatroon kun je zien met welke kleur je moet haken.
15.02.2018 - 22:00
![]() Wendy wrote:
Wendy wrote:
Ik ben bij toer 5 tm 10 aangeland en alles klopt tot nu toe. Heb 48 stk erop staan en nu moet ik toer 5 tm 10 doen zoals hiervoor maar als ik dat doe kom ik op meer dan 120 skt uit. Heeeeelp......
09.02.2018 - 09:26DROPS Design answered:
Hallo Wendy, Je hebt 12 patroonherhalingen van A.1 Op elke herhaling heb je 1 meerdering van A.1, dus op elke toer 12 meerderingen. Op toer 4 heb je 48 steken en daarna moet je nog 6 toeren haken. Dan kom je precies op 120 steken uit. Tel alles nog even goed na en kijk of het aantal meerderingen die je op de toer maakt kloppen.
26.02.2018 - 12:49
|
|||||||
Santa Fe#santafebag |
|||||||
|
|
|||||||
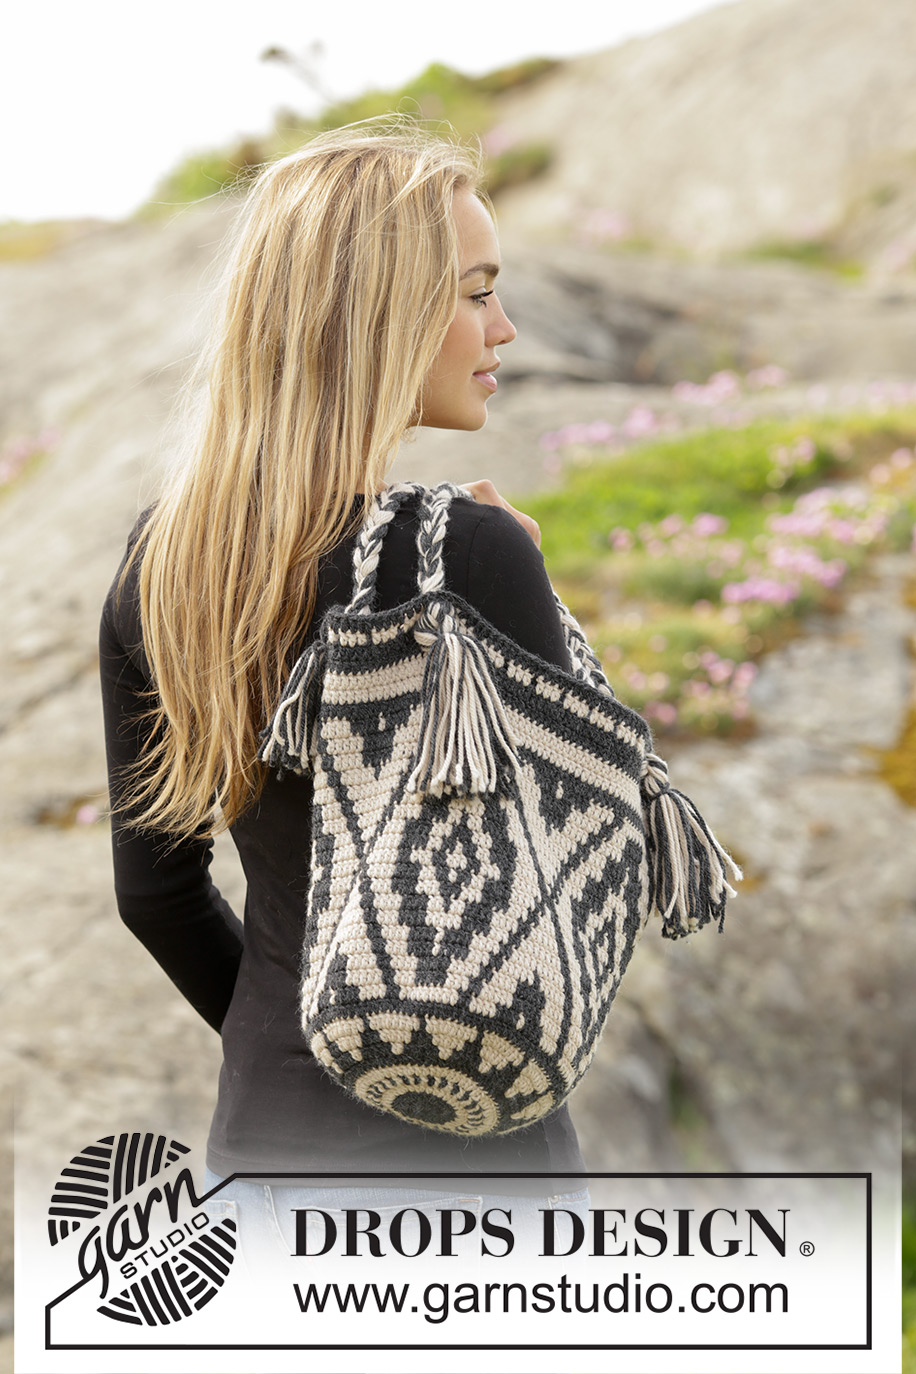
Crochet DROPS bag with colour pattern in ”Nepal”.
DROPS 173-1 |
|||||||
|
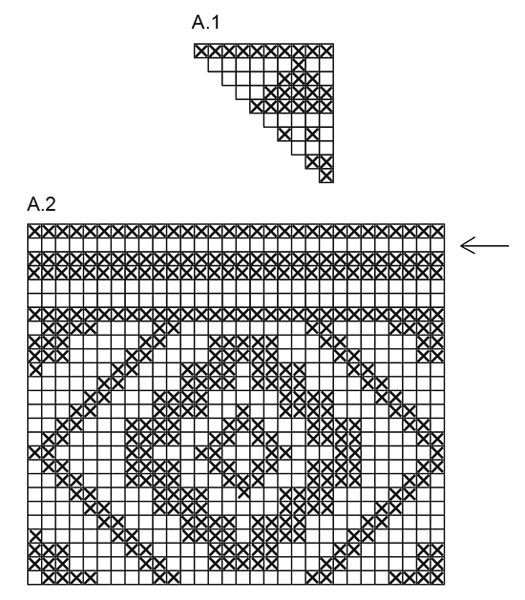
PATTERN: See diagrams A.1 and A.2. Diagrams show colours in pattern. 1 square = 1 tr. COLOUR PATTERN (worked in the round): When changing colour work as follows: Work last tr with first colour but wait with last pull through, switch to next colour and work last pull through, then work next tr. When working with two colours place strands for the colour not worked over sts from previous round, work around the strands so that they is hidden and follows in the round. CROCHET INFO: Replace first tr at beg of every round with 3 ch, finish round with 1 sl st in third ch. --------------------------------------------------------- BAG: Worked in the round. Work 5 ch with dark grey on hook size 3.5 mm and form a ring with 1 sl st in first ch. Then work in the round and according to A.1 (work 12 repetitions of A.1 in width) - READ COLOUR PATTERN. ROUND 1: Work 12 tr in ring – read CROCHET INFO. ROUND 2: Work 2 tr in every tr = 24 tr. ROUND 3: Work * 1 tr in first tr, 2 tr in next tr *, repeat from *-* the entire round = 36 tr. ROUND 4: Work * 1 tr in each of the first 2 tr, 2 tr in next tr *, repeat from *-* the entire round = 48 tr. REMEMBER THE CROCHET TENSION! ROUNDS 5-10: Continue with inc and pattern as before, i.e. on every round work 1 more tr between inc = 120 tr. ROUND 11: Continue to work in the round but without inc and work according to A.2 (= 4 repetitions in width). On round with arrow work as follows: * 1 tr in each of the first/next 3 tr, 1 ch, skip 1 tr *, repeat from *-*. Continue until A.2 has been worked, fasten off. STRAPS: Cut 18 lengths of each colour of 120 cm = 36 strands. Place the strands tog and tie a loose knot, leave approx. 12 cm after knot. Distribute strands in 3 piles with 12 strands in each pile. Plait the three piles tog until plait measures approx. 68 cm. Divide strands into 2 piles. Thread the 2 halves through bag, 3 tr apart, in round with holes. Tie the tog into a knot on the front of bag. Take the knot at beg of plait and fasten the end to bag the same way but in the opposite side. Make another plait the same way - see photo. |
|||||||
Diagram explanations |
|||||||
|
|||||||
 |
|||||||
Have you finished this pattern?Tag your pictures with #dropspattern #santafebag or submit them to the #dropsfan gallery. Do you need help with this pattern?You'll find 7 tutorial videos, a Comments/Questions area and more by visiting the pattern on garnstudio.com. © 1982-2026 DROPS Design A/S. We reserve all rights. This document, including all its sub-sections, has copyrights. Read more about what you can do with our patterns at the bottom of each pattern on our site. |
|||||||


With over 40 years in knitting and crochet design, DROPS Design offers one of the most extensive collections of free patterns on the internet - translated to 17 languages. As of today we count 324 catalogues and 12290 patterns translated into English (UK/cm). 12290
We work hard to bring you the best knitting and crochet have to offer, inspiration and advice as well as great quality yarns at incredible prices! Would you like to use our patterns for other than personal use? You can read what you are allowed to do in the Copyright text at the bottom of all our patterns. Happy crafting!
Post a comment to pattern DROPS 173-1
We would love to hear what you have to say about this pattern!
If you want to leave a question, please make sure you select the correct category in the form below, to speed up the answering process. Required fields are marked *.