
Popular categories
Looking for a yarn?


Comments / Questions (33)
![]() Balbo Micha wrote:
Balbo Micha wrote:
Je suis arrivée à l’empiècement, j’ai incorporé les manches et mis 4 marqueurs. J’ai compris les explications du raglan et comme on laisse 4 m end au milieu, les dim se font à la 3ème m avant ou après le marqueur, est-ce que c’est ça ? Par ailleurs, je tricote la taille M et pour le raglan du dos et devant vous indiquez 0 fois tous les 4 rgs, 15 fois tous les 2 rgs et 0 fois tous les rgs : en clair, combien de dim tous les ? rgs ? Merci pour votre réponse
11.11.2020 - 01:25DROPS Design answered:
Bonjour Mme Balbo, comme vous ne diminuez ni tous les 4 rangs ni tous les rangs en taille M, vous diminuez simplement et seulement 15 fois tous les 2 rangs sur le dos et le devant - en même temps, vous diminuerez pour les manches 12 x tous les 2 rangs et 5 x tous les rangs, autrement dit, vous diminuerez d'abord 8 m par tour (= dos/devant et manches) puis alternativement 4 m (= manches tous les tours) et 8 m (de nouveau dos/devant et manches = tous les 2 tours). Bon tricot!
11.11.2020 - 09:01
![]() Balbo Micha wrote:
Balbo Micha wrote:
Bonjour, je ne comprends pas ce que veut dire diminuer 3+9 fois 4m pour le dos et le devant et 11+6 fois 4m pour les manches Merci pour votre reponse
06.10.2020 - 00:41DROPS Design answered:
Bonjour Mme Balbo, pouvez-vous nous indiquer la taille que vous tricotez et à quel niveau vous avez relevé ces informations? Je ne suis pas sûre de bien comprendre la question, merci pour votre compréhension.
06.10.2020 - 11:14
![]() Natalia wrote:
Natalia wrote:
Me pueden explicar el remate de los puntos del "cuerpo" del patrón drops 89 17? A mi me quedaron 7 puntos rematados en casa extremo del tejido pero eso no me coincide a la hora de tejer la pechera con las mangas. Debería hacer el remate ee 7 puntos en la mitad del tejido del "cuerpo "?
22.07.2020 - 17:05
![]() Kerstin S Bruce wrote:
Kerstin S Bruce wrote:
Efter avmaskning för arm, därefter stickas ok. Jag stickar stickar L, får då 2 räta maskor som kantmaskor till raglanavmaskning, i mönstret står 4 maskor följas åt upp över raglanavmaskning. Kontrollerat avmaskning, antal msk osv, kan inte upptäcka var felaktigheten finns. Synpunkter? Tacksam för hjälp.
28.06.2020 - 15:42DROPS Design answered:
Hej Kerstin, Ja det stemmer, du skal få 2 retmasker fra ærmet og 2 retmasker fra bolen, når du sætter stykkerne sammen til oket. God fornøjelse!
02.07.2020 - 11:41
![]() Janny Van Gent wrote:
Janny Van Gent wrote:
Hoe kan ik patroon printen
27.11.2019 - 14:13
![]() Nathalie wrote:
Nathalie wrote:
Bonjour , la couleur Perverche #21 en cotton viscose serait plus proche de quelle couleur dans le safran , merci
10.11.2019 - 14:55DROPS Design answered:
Bonjour Nathalie, pour toute assistance dans le choix d'une couleur, merci de bien vouloir contacter votre magasin DROPS, même par mail ou téléphone. Bon tricot!
11.11.2019 - 10:49
![]() Jana wrote:
Jana wrote:
Guten Tag, ich verstehe die Technik zum Abketten fürs Raglan, nicht aber den Tipp. Was heisst „es wird innerhalb 1 M Glattstr. gegen die Markierung abgekettet?“ Und warum „Nach 1 M“ und „Vor 1 M“? Können sie bitte ein Beispiel in der richtigen Reihenfolge angeben? In der Anleitung steht zudem, dass auf beiden Seiten der Markierungen abgekettet wird. Jedoch am Vor- / Rückenteil und an den Ärmeln soll z.T. in unterschieglichen Reihen abgekettet werden. Wie ist es zu verstehen?
11.05.2019 - 22:37DROPS Design answered:
Liebe Jana, stricken Sie bis 3 Maschen vor der Markierung übrig sind, dann stricken Sie vor der Markierung: 2 M re zusammen, 1 Masche re, (Markierung), und wenn Sie nach der Markierung abnehmen sollen stricken Sie: (Markierung) 1 Masche re, 1 M. re. abheben, 1 re., die abgehobene über die gestrickte ziehen. Je nach der Größen werden Sie an einem unterschiedlichen Rythmus für Raglan abnehmen, dh es wird manchmal 4 M manchmal 8 M abgenommen. Viel Spaß beim stricken!
13.05.2019 - 10:44
![]() Carina wrote:
Carina wrote:
Kan jag byta ut garnet 4 st trådar i detta mönster till 2 trådar DROPS BRUSHED ALPACA Silk? Har samma masktäthet 11m x15v på st 7-8.Tittade på mönstret raspberry där det stickas med DROPS BRUSHED ALPACA Silk. Mvh Carina
14.04.2019 - 17:53DROPS Design answered:
Hej. Ja det bör gå fint. Så länge du får samma stickfasthet så ska det inte vara några problem. Läs mer om att byta ett garn mot ett annat här. Lycka till!
23.04.2019 - 10:51
![]() Birgit wrote:
Birgit wrote:
Wird dieser Pullover in Runden gestrickt?
08.04.2019 - 10:43DROPS Design answered:
Liebe Birgit, ja genau, Rumpfteil wird zuerst bis zum Armloch in Runden gestrickt, dann werden die Ärmel separat in Runden gestrickt, und die Passen wird dann in Runden bis zum Hals gestrickt. Viel Spaß beim stricken!
08.04.2019 - 10:46
![]() Madeleine wrote:
Madeleine wrote:
Bonjour, je comprend pas comment finir avec les diminution pour dos , devant je vousdrais savoir si je fait les manches en meme temps ? Merci
13.12.2018 - 19:02DROPS Design answered:
Bonjour Madeleine, quand vous avez tricoté le dos et le devant jusqu'aux emmanchures, mettez en attente, tricotez les 2 manches séparément puis reprenez les mailles des manches et celles du dos et du devant pour tricoter l'empiècement en rond en diminuant aux marqueurs (transition entre les manches et le dos/le devant). Cette vidéo montre comment placer les manches sur la même aiguille circulaire que le dos et le devant pour tricoter le raglan. Bon tricot!
14.12.2018 - 09:08
|
|
Trish |
|
|
|
|
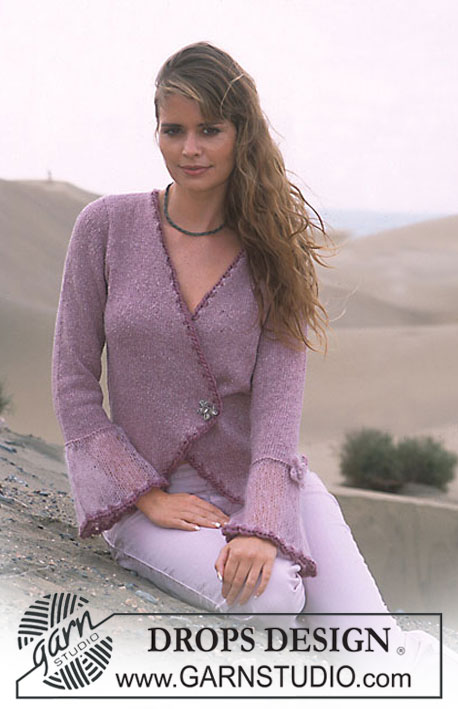
DROPS Pullover in Alpaca and Cotton Viscose
DROPS 89-17 |
|
|
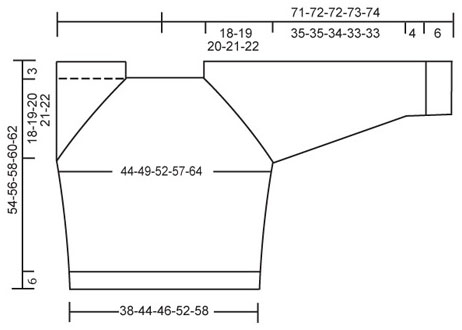
Gauge: 11 sts x 15 rows with 4 strands of yarn in stockinette st = 10 x 10 cm. Rib-1: * K 3, P 3 *, repeat * - *. Rib-2: * K 3, P 4 *, repeat * - *. Knitting tips (for raglan): Dec inside 1 st in stockinette st before or after the marker. After 1 st: slip 1 st as if to knit, K 1, psso. Before 1 st: K 2 tog Body: Loosely cast on 84-96-105-112-126 sts on smaller circular needles with 1 strand of each color (= 4 strands); join and place a marker at the join. Knit 2 rows stockinette st, and then: Sizes S + M: Rib-1 Sizes L + XL + XXL: Rib-2. When the rib measures 6 cm change to larger circular needles and continue in stockinette st adjusting (inc/dec as needed) to 84-96-100-114-128 sts on the 1st row. Put a marker at each side as follows: Size S: Put 1 marker in 1st st, knit 41 sts, put 1 marker in the next st, knit 41 sts. Size M: Put 1 marker in 1st st, knit 47 sts, put 1 marker in the next st, knit 47 sts. Size L: Put 1 marker (between first and last sts on row), knit 50 sts, put 1 marker, knit 50 sts. Size XL: Put 1 marker (between first and last sts on row), knit 57 sts, put 1 marker, knit 57 sts. Size XXL: Put 1 marker (between first and last sts on row), knit 64 sts, put 1 marker, knit 64 sts. When the piece measures 10 cm inc 1 st at each side of both markers every 8 cm a total of 3 times = 96-108-112-126-140 sts. When the piece measures 31-32-33-34-35 cm knit the next row as follows: Sizes S + M: P 2 (the marker sits in the first st), * K 3, P 3 *, repeat * - * and finish with K 3 and P 1 (the marker at the other side sits in the center of a P 3). Sizes L + XL + XXL: P 2 (the marker is in front of these sts), * K 3, P 4 *, repeat * - * and finish with K 3 and P 2 (the marker at the other side sits between 2 P sts). Continue in rib as established. When the piece measures 33-34-35-36-37 cm bind off 7-7-8-8-8 sts at each side for armhole (for sizes S + M: bind off st with marker + 3 sts at each side of that st and for sizes L + XL + XXL: bind off 4 sts at each side of each marker) = 41-47-48-55-62 sts remain on Body. Lay piece aside and knit the sleeve. Sleeve: Loosely cast on 24-24-28-35-35 sts on smaller double-pointed needles with 1 strand of each color (= 4 strands); join and place a marker at the join. Knit 2 rows stockinette st, then: Sizes S + M: Rib-1 Sizes L + XL + XXL: Rib-2. When the rib measures 6 cm change to larger double-pointed needles and stockinette st, adjusting (inc/dec as needed) to 24-26-29-34-36 sts on the 1st rows. When the piece measures 9-12-10-10-13 cm inc 1 st each side of marker every 3-3-3.5-3-3 cm a total of 12-11-10-11-10 times = 48-48-49-56-56 sts. When the piece measures 43-43-42-41-41 cm knit rib as follows: Sizes S + M: P 2 (put the marker in the first of these sts), * K 3, P 3 *, repeat * - * and finish with K 3 and P 1. Sizes L + XL + XXL: P 2, * K 3, P 4 *, repeat * - * and finish with K 3 and P 2. When sleeve measures 45-45-44-43-43 cm bind off 7-7-8-8-8 sts (for Sizes S + M: the st with the marker and 3 sts each side of it; for the other sizes: 4 sts each side of marker) = 41-41-41-48-48 sts remain on needles. Lay piece aside and knit 2nd sleeve. Yoke: Put the sleeves in on the same circular needles as front and back where you bound off for armholes = 164-176-178-206-220 sts. Put a marker in each transition between front, back and the sleeve = 4 markers. Continue in rib as before over back, front and sleeve, and shape raglan – see instructions below. Keep the K 2 at each side of marker as K 4 at all times during raglan shaping, even when no decs are made. Raglan shaping: Dec 1 st each side of each marker – see knitting tips above. Dec at each side on front and back every 4 rows 3-0-0-0-0 times, every other row 9-15-15-14-13 times and then every row 0-0-0-4-8 times. Dec at each side on the sleeve every other row 11-12-14-12-14 times and then every row 6-5-3-8-6 times. After last dec 48-48-50-54-56 sts remain on needles. Knit 3 rows stockinette st, then bind off loosely. Assembly: Sew opening under the sleeve. |
|
 |
|
Have you finished this pattern?Tag your pictures with #dropspattern or submit them to the #dropsfan gallery. Do you need help with this pattern?You'll find 20 tutorial videos, a Comments/Questions area and more by visiting the pattern on garnstudio.com. © 1982-2026 DROPS Design A/S. We reserve all rights. This document, including all its sub-sections, has copyrights. Read more about what you can do with our patterns at the bottom of each pattern on our site. |


With over 40 years in knitting and crochet design, DROPS Design offers one of the most extensive collections of free patterns on the internet - translated to 17 languages. As of today we count 324 catalogues and 12290 patterns translated into English (UK/cm). 12290
We work hard to bring you the best knitting and crochet have to offer, inspiration and advice as well as great quality yarns at incredible prices! Would you like to use our patterns for other than personal use? You can read what you are allowed to do in the Copyright text at the bottom of all our patterns. Happy crafting!
Post a comment to pattern DROPS 89-17
We would love to hear what you have to say about this pattern!
If you want to leave a question, please make sure you select the correct category in the form below, to speed up the answering process. Required fields are marked *.