
Popular categories
Looking for a yarn?


Comments / Questions (22)
![]() JaN wrote:
JaN wrote:
Die 2. Art der Abnahme soll ohne Löcher sein. Es soll aber ein Umschlag gearbeitet werden - dann entsteht doch wieder ein Loch. Ist das so gedacht? Wenn ich dort eine Abnahme mache UND einen Umschlag stricke, sind es wieder gleich viele Maschen. Eine abgenommen; eine durch U zugenommen.
23.02.2026 - 14:15DROPS Design answered:
Hallo JaN, der Umschlag bei der 2. Abnahme war ein Fehler, das wurde nun korrigiert. Sie nehmen also ab und haben kein Loch, so ist es dann richtig. Viel Spaß beim Weiterstricken!
23.02.2026 - 19:58
![]() Sari wrote:
Sari wrote:
Neulotaanko hihat todellakin Belle-langalla?
04.01.2026 - 11:24
![]() Sari wrote:
Sari wrote:
Can I use only Belle to knit this?
03.01.2026 - 16:40DROPS Design answered:
Hei, tämä malli neulotaan kahdella eri paksuisella langalla. Voit neuloa puseron Belle-langalla, joka kuuluu lankaryhmään B + toisella langalla, joka kuuluu lankaryhmään C.
06.01.2026 - 17:34
![]() Berit S Larsen wrote:
Berit S Larsen wrote:
Igjen tusen takk for god service og forklaringer. Nå har jeg lært noe nytt også :) Hilsen Berit
21.08.2025 - 18:14
![]() Berit Synnøve wrote:
Berit Synnøve wrote:
Tusen takk... tror det blir mer vanskelig når det står dette :-) Bedre hvis det hadde stått f.eks. 1 vrang fra vrangen, nå betyr det vel at 1 vrang skal strikkes rett fra vrangen...så det blir vrang på retten...? Ikke lett å forstå...jeg har strikket i mange år, men dette var komplisert. Men tusen takk for at dere svarer så fort :-)
21.08.2025 - 11:57DROPS Design answered:
Ja precis, när det står 1 vrang (set fra retten), så betyder det att den maskan stickas ret fra vrangen :)
21.08.2025 - 12:59
![]() Berit S Larsen wrote:
Berit S Larsen wrote:
Tusen takk for raskt svar, forstår det blir omvendt på vrangen, men hvorfor står det i forklaringen til diagrammet på annenhver linje: (sett fra retten) når alle linjene i diagrammet viser retten? Og hva betyr det når det ikke står (sett fra retten)? Tusen takk så mye igjen.
20.08.2025 - 16:45DROPS Design answered:
Hej Berit. Det är kun för det ska bli extra tydligt vid vrang-maskorna, men det borde stå "sett fra retten" på alla forklaringar. Mvh DROPS Design
21.08.2025 - 11:26
![]() Berit S Larsen wrote:
Berit S Larsen wrote:
- og nå ser jeg jo at mitt spørsmål ikke kom fram. Det gjelder altså hvordan strikke på vrangen M1 på Drops 68-1. Er det som vanlig at når første rad er rett, så blir det vrang på vrangen og omvendt hele veien oppover? (Rett blir vrang på baksiden og omvendt). Tusen takk.
20.08.2025 - 12:19DROPS Design answered:
Hej Berit. Ja, mønsteret i diagrammet sees fra retten. Så når du strikker på vrangen blir det motsatt av det som står i symbolbeskrivningen (rett blir vrang på vrangsiden og omvendt). Mvh DROPS Design
20.08.2025 - 13:57
![]() Berit wrote:
Berit wrote:
Hei, jeg skrev et spørsmål igår ang. 68-1, hvordan strikke på vrangen, jeg tror jeg kanskje glemte å skrive min e-post, men her er den. Takk
20.08.2025 - 12:14
![]() Karin Bettinger wrote:
Karin Bettinger wrote:
Bei der Beschreibung der Abnahmetipps ist meiner Meinung nach ein Fehler. Bei der Beschreibung der Abnahme für den Armauschnitt OHNE Loch am Anfang der Reihe soll zum Schluss ein Umschlag gestrickt werden. Dadurch entsteht aber erstens wieder ein Loch und zweitens bleibt die Maschenzahl unverändert. Oder irre ich mich da?
17.05.2025 - 19:12DROPS Design answered:
Liebe Frau Bettinger, die Löcher werden nur in jeder 4. Reihe bearbeitet, dh mit 1. Abnahmen, wenn man 2 Maschen abnimmt + 1 Umschlag strickt, bei der 2. Abnahmen wird man nur abnehmen - ohne Löcher. Viel Spaß beim Stricken!
19.05.2025 - 10:13
![]() Rica Lohr wrote:
Rica Lohr wrote:
Ich habe Probleme bei den Abnahmen für die Ärmel. Wenn ich die so stricke, wie in der Anleitung beschrieben, habe ich nur an einem Armausschnitt Löcher? Was mache ich falsch? Abnahmen nur in den rechten Reihen, zuerst 1. Methode, dann 1 Reihe links stricken und in der nächsten rechten Reihe die Abnahmen nach der 2. Methode. So habe ich es gemacht. Was mache ich falsch? Danke im Voraus für die Antwort. Liebe Grüße
29.09.2024 - 19:28DROPS Design answered:
Liebe Frau Loch, für die Armlöcher sollen Sie am Anfang (nach den ersten 4 Maschen) + am Ende einer Hin-Reihe (vor den letezten 4 Maschen) abnehmen (Abnahmen mit oder ohne Löcher), am Anfang der Reihe stricken Sie: 4 M glatt re bzw. kraus re, 1 M abheben, 2 M re zusammenstricken, die abgehobene M darüber ziehen, 1 Umschlag, dann wie zuvor bis 7 M noch übrig sind, dann: 1 Umschlag, 3 M re zusammenstricken, dann 4 M glatt re bzw. kraus re. Kann das Ihnen helfen?
30.09.2024 - 09:44
|
|||||||||||||||||||
Seasons in the Sand |
|||||||||||||||||||
|
|
|||||||||||||||||||
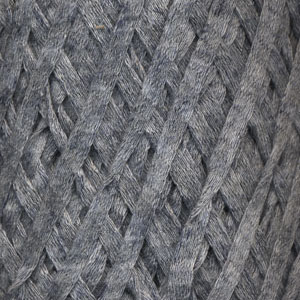
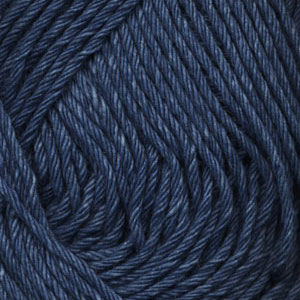
DROPS Sweater in "Ribbon" and "Den-M-nit" or "Bomull-Lin " and "Belle" with wood beads
DROPS 68-1 |
|||||||||||||||||||
|
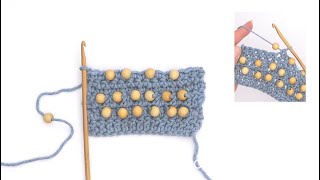
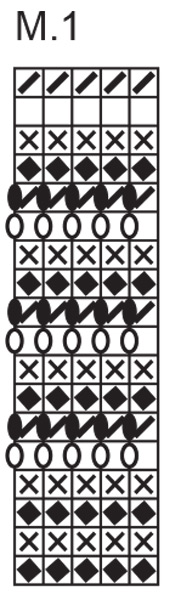
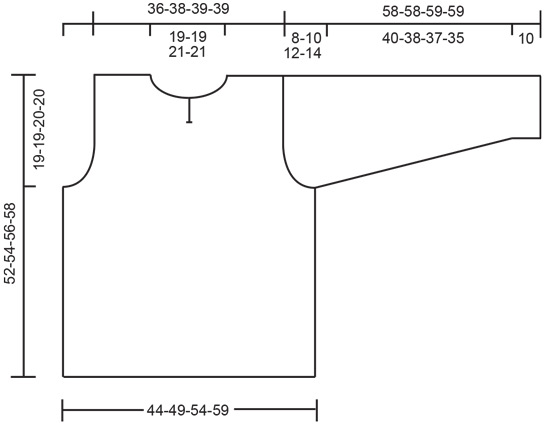
Knitting tip: The ribbon yarn may twist while working, therefore unwind it continually to make the result look as good as possible. Ridge (back and forth on needle): 1 ridge = 2 needles. 1st row: K, 2nd row: K. Pattern: See diagram - M.1. NOTE: The pattern in diagram is seen from RS. Decrease tip (applies to neck + armhole): All dec are made from RS inside 4 sts in stockinette sts at the armhole and in garter sts at the neck. There are 2 different dec, 1 with a hole and 1 without hole. 1st dec = dec with hole.Dec like this before 4 edge sts (7 sts remain on row): 1 YO, K 3 tog. Dec like this after 4 edge sts: Slip 1 st, K 2 tog, lift the slipped st over, 1 YO. 2nd dec = dec without hole: Dec like this before 4 edge sts: K 2 tog. Dec like this after 4 edge sts: Slip 1 st, K 1, lift the slipped st over. Repeat 1st and 2nd dec every other time upwards. Front piece: Read knitting tip! Cast on 66-74-82-90 sts (inkl 1 edge st in each side) on needle size 5,5 mm with Den-M-nit or Belle and work M.1. Continue with stockinette st and Ribbon or Bomull-Lin – At the same time on 2nd row inc 7 sts evenly distributed on row = 73-81-89-97 sts. Remember the tension! When piece measures 33-35-36-38 cm cast off 3-3-4-4 sts in each side for armhole. Then decrease for armhole in each side on every 2nd row - see decrease: 1 st in total 5-7-9-13 times (i.e. 3-4-5-7 holes along armhole). At the same time when piece measures 34-36-38-40 cm work 2 ridges over the 5 sts in the middle, then cast off the mid st for slit. Work each part separately. Continue with stockinette sts with 2 garter sts towards slit. When piece measures 43-45-47-49 cm work 2 ridges over 12-12-13-13 sts towards mid front, then cast off 8-8-9-9 sts towards mid front for neck. Then dec for neck on every 2nd row inside 4 garter sts - see decrease tip: 1 st in total 7 times (i.e. 4 holes along neckline) = 13-15-15-15 sts back on each shoulder. Cast off when piece measures 52-54-56-58 cm. Back piece: Cast on and work like front piece. Cast off for armhole as in front piece and continue until piece measures 49-51-53-55 cm. Work 2 ridges over 37-37-39-39 sts in mid back. Then cast off the mid 29-29-31-31 sts for neck. Then dec inside 4 garter sts: 1 st on next row towards neck = 13-15-15-15 sts back on each shoulder. Cast off when piece measures 52-54-56-58 cm. Sleeve: Cast on 38-38-40-40 sts (inkl 1 edge st in each side) on needle size 5,5 mm with Den-M-nit or Belle and work M.1. Continue with stockinette sts and Ribbon or Bomull-Lin. At the same time when piece measures 10 cm inc in each side: 1 st in total 9-9-10-10 times on every 4,5.-4.-3,5.-3,5 cm = 56-56-60-60 sts. When sleeve measures 50-48-47-45 cm cast off for sleeve cap in each side on every 2nd row: 3 sts 1-1-1-1 time, 2 sts in total 3-3-3-2 times, 1 st in total 1-3-5-8 times, then cast off 2 sts until work measures 58-58-59-59 cm. Cast off. Assembly: Sew shoulder seams. Sew the sleeves into the armhole. Sew sleeve and side seams in one inside 1 edge st. Beads: Thread 32-36-40-44 beads on a strand of Den-M-nit or Bomull-Lin. Work with hook size 3 mm around bottom edges of body as follows: * 3 dc (1 in every st), work next st as follows: Pull 1 bead toward hook, work 1 dc but let your thumb rest on the pearl so that the yarn goes past the thumb – this leaves the yarn that holds the bead approx. 2 cm long *, repeat from *-*. Cord for neck: Cut 1 strand of Den-M-nit or Bomull-Lin of aprrox. 50 cm long. Thread 3 beads onto center of strand, fold yarn double below the bottom bead and thread yarn back through the other two beads. Fasten this strand one side of neck split. Repeat on the other side. |
|||||||||||||||||||
Diagram explanations |
|||||||||||||||||||
|
|||||||||||||||||||
 |
|||||||||||||||||||
 |
|||||||||||||||||||
Have you finished this pattern?Tag your pictures with #dropspattern or submit them to the #dropsfan gallery. Do you need help with this pattern?You'll find 21 tutorial videos, a Comments/Questions area and more by visiting the pattern on garnstudio.com. © 1982-2026 DROPS Design A/S. We reserve all rights. This document, including all its sub-sections, has copyrights. Read more about what you can do with our patterns at the bottom of each pattern on our site. |
|||||||||||||||||||


With over 40 years in knitting and crochet design, DROPS Design offers one of the most extensive collections of free patterns on the internet - translated to 17 languages. As of today we count 324 catalogues and 12290 patterns translated into English (UK/cm). 12290
We work hard to bring you the best knitting and crochet have to offer, inspiration and advice as well as great quality yarns at incredible prices! Would you like to use our patterns for other than personal use? You can read what you are allowed to do in the Copyright text at the bottom of all our patterns. Happy crafting!
Post a comment to pattern DROPS 68-1
We would love to hear what you have to say about this pattern!
If you want to leave a question, please make sure you select the correct category in the form below, to speed up the answering process. Required fields are marked *.