Comments / Questions (27)
![]() Sieglinde Beckmann wrote:
Sieglinde Beckmann wrote:
Hallo an das Team, ich bin jetzt beim linken Vorderteil oben im Bereich in dem die Maschen aufgeteilt werden. Größe S. 22 Maschen werden stillgelegt und zum Kragen weitergestrickt. 68 Maschen gehen in die Seite. Was ist mit den 29 Maschen aus dem Raglanbereich? In der Anleitung steht: str. Sollen die abgekettet werden?
07.02.2025 - 19:00DROPS Design answered:
Liebe Frau Beckmann, ja genau diese 29 Maschen soll man abketten, eine Korrektur erfolgt, danke für den Hinweis. Viel Spaß beim Stricken!
10.02.2025 - 08:58
![]() Renate Kopmann wrote:
Renate Kopmann wrote:
Li. Vordert - Ges.M 139, dann 30 M stilllegen, die nächsten 45 M stricken u über die übrigen 64 M 3 Krausr str, dann abketten. Nach meinem Verständnis sind die 64 M die Seitennaht. Anschließend sollen die 45 + die 30 stillgelegten M wieder auf die Nadel u. abwechselnd sollen über 75 M 2 R stricken/ 2kurze Reihen stricken. Die Reihen gehen über den Raglanärmel?? ich verstehe es nicht. Gibt es eine Zeichnung von dem Vorderteil?
29.01.2019 - 20:25DROPS Design answered:
Liebe Frau Kopmann, welche Grösse stricken Sie und wie weit haben Sie jetzt gestrickt?
05.03.2019 - 12:30
![]() Melanie wrote:
Melanie wrote:
Guten Tag, verstehe ich das richtig, dass bei den Zunahmen am Rückenteil so vorgegangen wird: die Maschen die zwischen den Umschlägen liegen werden immer um 2 Maschen erweitert: also 1. Zunahme: 1 U, 1 re, 1 U, 2 re, ..., dann 2. Zunahme: 1 U, 3 re, 1 U, 2 re, ..., dann 3. Zunahme 1 U 5 re, 1 U, 2 re, ..., dann 4. Zunahme 1 U, 7 re, 1 U, 2 re, 1 U, 7 re,. ... usw. aus den 7 werden dann 9, dann 11 .... usw Herzlichen Dank
13.09.2018 - 15:12DROPS Design answered:
Liebe Melanie, ja genau, wie dieses Video zeigt - es muß auch immer 2 Maschen in der Mitte sein. Viel Spaß beim stricken!
13.09.2018 - 15:29
![]() Brigitte Beutler wrote:
Brigitte Beutler wrote:
Wo finde ich bitte den Hinweis auf den Farbwechsel - wie im gezeigten Modell - und ob er mit 2fädigem Kid Silk gestrickt wird?
30.04.2018 - 15:08DROPS Design answered:
Liebe Frau Beutler, die Jacke wird mit 1 Faden von jeder Garnqualität (= 1 Faden Delight + 1 Faden Kid-Silk) gestrickt. Delight und Kid-Silk gehören beide zur Garngruppe A, damit können Sie Delight durch 1 Faden Kid-Silk ersezten (und dann mit 2 Fäden Kid-Silk stricken). Gerne wird Ihnen Ihr DROPS Laden damit helfen, eine neue Farbe herauszufinden. Viel Spaß beim stricken!
30.04.2018 - 15:43
![]() Karen Payne wrote:
Karen Payne wrote:
This pattern has got me absolutely stumped and I am an experienced knitter. I am having problems with the eyelet pattern. I am working on the back piece, and am doing the first full eyelet row. Up the side is OK, but the instructions for the eyelet pattern over the top part where there already are increasing eyelets from a previous row is very unclear and I just don\\\\\\\'t understand it.
09.03.2018 - 23:21
![]() GRIMAL wrote:
GRIMAL wrote:
Bonjour, j'ai réalisé ce gilet, aussi joli à porter qu'agréable à tricoter ! cependant, les quantités préconisées sont trop importantes : pour une taille M, j'ai utilisé moins de 6 pelotes de delight (au lieu de 7) et 3 pelotes de kid silk (au lieu de 6 ! ). Mais bravo pour le modèle :)
10.01.2017 - 16:54
![]() Fabienne wrote:
Fabienne wrote:
Avant toute chose j'ai regardé la vidéo "comment commencer le dos", mais la vidéo est réalisée avec une petite cinquantaine de mailles, hors avec 130 mailles sur l'aiguille circulaire les choses sont bien différente !!!!!! Je n'arrive pas a tricoter un rangs complet, arrive un moment ça coince au point de ne plus pouvoir avancer.... Je ne vois vraiement pas comment faire....
08.01.2017 - 21:35DROPS Design answered:
Bonjour Fabienne, la vidéo montre simplement la technique, la façon dont on va procéder dès le début, quelque soit la taille et le nombre de mailles. Suivez bien les indications pour votre taille et suivez en même temps les augmentations (jetés) tout en suivant la vidéo. Bon tricot!
09.01.2017 - 09:27Alexandra wrote:
On sleeves pattern: After the mid 6 sts are cast off, we have to work right and back rows, not cirlular! And we have to make dec on the each side of the piece. Correct?
21.04.2016 - 20:18DROPS Design answered:
Dear Alexandra, that's right, after you have cast off the 6 sts mid under arm continue back and forth dec 1 st on each side ie at the beg and at the end of row every 4th row/ every other row / every row - see size. Happy knitting!
22.04.2016 - 09:08Darlene Sinclair wrote:
I don't see the pattern for the collar?? Please advise and thank you.
29.03.2016 - 04:10DROPS Design answered:
Dear Mrs Sinclair, the collar is worked over the 22-32 sts you slipped on a st holder - see at the end of "left front piece", the last 3 lines. Happy knitting!
29.03.2016 - 11:02
![]() Susanne wrote:
Susanne wrote:
Vielen lieben Dank für die Antwort. Ich habe allerdings noch eine andere Frage: Nach allen Zunahmen im Rückenteil werden die ersten 68M stillgelegt, die nächsten 91M gestrickt, dann bleiben die letzten 68 übrig. Über diese werden dann nach meinem Verständnis die 3 Krausrippen gestrickt.Ebenso die stillgelegten 68M . Was ist mit den Maschen für den Halsausschnitt und der Raglanschrägung??? Jetzt schon mal vielen Dank für eine hilfreiche Antwort.
01.12.2015 - 17:07DROPS Design answered:
Hier hat sich leider ein Fehler in der Anleitung eingeschlichen, der gleich behoben wird - die 91 M werden nicht gestrickt, sondern abgekettet. Damit müsste verständlich sein, wie Sie weiter vorgehen müssen.
09.12.2015 - 21:16
Blue Danube#bluedanubecardigan |
||||||||||||||||
 |
 |
|||||||||||||||
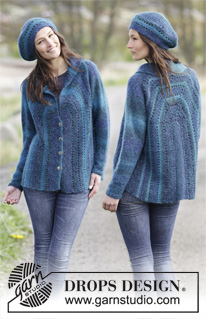
Set consists of: Knitted DROPS jacket and hat in garter st with eyelet rows in ”Delight” and ”Kid-Silk”. Size: S - XXXL.
DROPS 166-34 |
||||||||||||||||
|
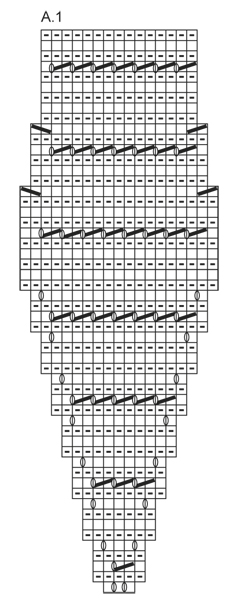
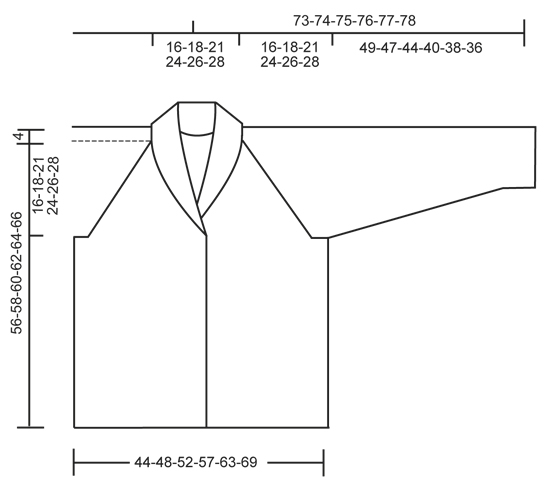
GARTER ST (back and forth): K all rows. 1 ridge = 2 rows K. EYELET PATTERN: Work 1 row from RS as follows: * K 2 tog, 1 YO *, repeat from *-*. K 1 row from WS. Work 5 ridges. Repeat these 12 rows. ---------------------------------------------------------- BACK PIECE: Worked back and forth on circular needle from the middle and outwards. Work in GARTER ST and EYELET PATTERN- see explanation above. Cast on 68-68-66-64-64-64 sts on circular needle size 5 mm with 1 strand Delight and 1 strand Kid-Silk (= 2 strands). Work 7 ridges. Work next row as follows - from RS: Work 68-68-66-64-64-64 sts, pick up 1 st in every ridge along short side, and pick up 1 st in every st from cast-on edge = 143-143-139-135-135-135 sts. K 1 row from WS. Work next row as follows - from RS. Work 68-68-66-64-64-64 sts, 1 YO, K 1, 1 YO, K 2, 1 YO, K 1, 1 YO, K 2, 1 YO, K 1, 1 YO, K 68-68-66-64-64-64. K 3 rows over all sts (K YOs to make holes). Work next row as follows - from RS: Work 68-68-66-64-64-64 sts, 1 YO, K 3, 1 YO, K 2, 1 YO, K 3, 1 YO, K 2, 1 YO, K 3, 1 YO, K 68-68-66-64-64-64. K 1 row over all sts (K YOs to make holes). Then work EYLET PATTERN - see explanation above. NOTE: Do not work eyelet pattern over the 2 sts worked K between YOs - these are always worked in garter st and if you have an odd number of stitches to work the eyelet pattern on, work the last stitch as K 1. Work the first 2 rows in eyelet pattern, then inc as before, there are now 5 sts between YOs – this number of sts increases as the inc continue, inc on every 4th row 11-13-15-17-19-21 more times (= 6 inc per time). K YOs to make holes. Continue with eylet pattern and inc. REMEMBER THE KNITTING TENSION After all inc are done there are 227-239-247-255-267-279 sts on needle. Now work as follows from RS. Slip the first 68-68-66-64-64-64 sts on a stitch holder (work them first), cast off the next 91-103-115-127-139-151 sts = 68-68-66-64-64-64 sts remain on row. Work 3 ridges over these sts. Cast off. Slip the 68-68-66-64-64-64 sts from stitch holder back on needle, work 3 ridges over these sts. Cast off. LEFT FRONT PIECE: Cast on 68-68-66-64-64-64 sts on circular needle size 5 mm with 1 strand Delight and 1 strand Kid-Silk (= 2 strands). Work 9 ridges. Work next row as follows - from RS: Work 68-68-66-64-64-64 sts, pick up 1 st in every ridge along short side = 77-77-75-73-73-73 sts. K 1 row from WS. Work next row as follows - from RS: Work 68-68-66-64-64-64 sts, 1 YO, K 1, 1 YO, K 2, 1 YO, K 1, K 5 (= band). K 3 rows over all sts (K YOs to make holes). Work next row as follows - from RS: Work 68-68-66-64-64-64 sts, 1 YO, K 3, 1 YO, K 2, 1 YO, K 2, K 5. K 1 row over all sts (K YOs to make holes). Then work EYELET PATTERN - see explanation above. NOTE: Do not work eyelet pattern over the 2 sts worked K between YOs or the last 5 sts on needle - these are always worked in garter st and if you have an odd number of stitches to work the eyelet pattern on, work the last stitch as K 1. Work the first 2 rows in eyelet pattern, then inc as before, there are now 5 sts between the first 2 YOs and 3 sts between the last YO and band – this no inc as inc continue, inc on every 4th row 11-13-15-17-19-21 more times (= 3 inc per time). K YOs to make holes. Continue with eyelet pattern and inc. After all inc are done there are 119-125-129-133-139-145 sts on needle. Now work as follows from WS. Slip the first 22-24-26-28-30-32 sts on a stitch holder, cast off the next 29-33-37-41-45-49 sts = 68-68-66-64-64-64 sts remain on row. Work 3 ridges over these sts. Cast off. Slip the 22-24-26-28-30-32 sts from stitch holder on needle. Continue in garter st and short rows over collar as follows: * 1 ridge over all sts, 1 ridge over the outermost 11-12-13-14-15-16 sts towards mid front *, repeat from *-* until collar measures 12-14-15-16-17-18 cm on the shorter side. Loosely cast off. RIGHT FRONT PIECE: Cast on 68-68-66-64-64-64 sts on circular needle size 5 with 1 strand Delight and 1 strand Kid-Silk (= 2 strands). Work 3 ridges. On next row from RS cast off for button holes as follows: K 6 sts, * K 2 tog, 1 YO, K 10 *, repeat from *-* 3 times, K 2 tog, 1 YO, K 24-24-22-20-20-20. Continue in garter st until 9 ridges have been worked. K 1 row from RS, thereafter K next row from WS as follows: K 68-68-66-64-64-64, knit up 1 st in each ridge along the shortside = 77-77-75-73-73-73 sts. Work next row as follows from RS: 5 sts in garter st (= band), K 1, 1 YO, K 2, 1 YO, K 1, 1 YO, K the last 68-68-66-64-64-64 sts. Continue from here as on left front piece but reversed. SLEEVES: Worked in the round on double pointed needles. Cast on 36-38-40-42-44-46 sts on double pointed needles size 5 mm with 1 strand Delight and 1 strand Kid-Silk (= 2 strands). Work 4 ridges in GARTER ST – see explanation above, then work stocking st. Insert 1 marker at beg of round = mid under sleeve. When piece measures 8 cm, inc 1 st on each side of marker, repeat inc every 3-3-2½-2-2-1½ cm 11-11-12-13-14-14 more times = 60-62-66-70-74-76 sts. When piece measures 49-47-44-40-38-36 cm, cast off 6 sts mid under sleeve (= cast off 3 sts on each side of marker) = 54-56-60-64-68-70 sts. Now dec 1 st in each side as follows: Dec every 4th row 0-0-0-2-3-4 times, every other row 16-19-23-23-24-24 times, then every row 4-2-0-0-0-0 times = 14 sts. Cast off. ASSEMBLY: Sew side seams. Sew in sleeves, they should be sewn as a raglan against the diagonal sides on front and back piece. Sew the openings under the sleeves. Sew the collar tog mid back and sew it to the neckline. Sew the buttons on to the left band. ---------------------------------------------------------- HAT: GARTER ST (worked in the round): * K 1 round and P 1 round *, repeat from *-*. 1 ridge = 2 rounds. PATTERN: See diagram A.1. ---------------------------------------------------------- HAT: Worked in the round, top down. Work first double pointed needles, then on circular needle. Cast on 18 sts on double pointed needles size 5 mm with 1 strand Delight and 1 strand Kid-Silk (= 2 strands). Work according to diagram A.1 (= 6 repetitions in width). Switch to circular needle when needed. REMEMBER THE KNITTING TENSION When A.1 has been worked 1 time vertically, there are 90 sts on needle. Switch to circular needle size 4 mm. Work in GARTER ST – see explanation above – over all sts until piece measures 21 cm. Cast off. Use a needle and thread, baste the hole at the top of the hat. Tighten and fasten. To shape the hat place it in water when finished and thread it over a plate. Leave to dry on plate. Repeat the process when it has been washed. |
||||||||||||||||
Diagram explanations |
||||||||||||||||
|
||||||||||||||||
 |
||||||||||||||||
 |
||||||||||||||||
Have you finished this pattern?Tag your pictures with #dropspattern #bluedanubecardigan or submit them to the #dropsfan gallery. Do you need help with this pattern?You'll find 23 tutorial videos, a Comments/Questions area and more by visiting the pattern on garnstudio.com. © 1982-2026 DROPS Design A/S. We reserve all rights. This document, including all its sub-sections, has copyrights. Read more about what you can do with our patterns at the bottom of each pattern on our site. |
||||||||||||||||


Post a comment to pattern DROPS 166-34
We would love to hear what you have to say about this pattern!
If you want to leave a question, please make sure you select the correct category in the form below, to speed up the answering process. Required fields are marked *.