
Popular categories
Looking for a yarn?


Comments / Questions (37)
![]() Vibe wrote:
Vibe wrote:
Hej, Hvis man gerne vil strikke den i str. xs - hvor mange masker vil I så foreslå, at man går med? Med venlig hilsen, Vibe
04.11.2019 - 14:11
![]() Christina Holden Rønning wrote:
Christina Holden Rønning wrote:
Hei 😊 hva menes med kantmaskerille? 🤔
12.09.2019 - 20:11DROPS Design answered:
Hei Christina, Dette betyr at du strikker rillestrikk på kantmaskene. God fornøyelse!
13.09.2019 - 07:33
![]() Hanna wrote:
Hanna wrote:
For the front piece: After you cast off the 9 stitches in the middle, it says Cast off 2 sts 1 time, then 1 st 2-2-2-3-3-3 times = 15-16-18-20-23-26 sts.\" Does this mean cast off a total of 4 (or 5) stitches each row? Is there a special name for casting off two stitches at a time, that makes it different from casting off 1 stitch twice? And should I be starting at the start of the next row, or immediately after casting off the nine stitches for the head? Thank you
09.04.2018 - 15:43DROPS Design answered:
Dear Hanna, after you have bound off the middle 9 sts for neck, continue each side separately casting off at the beg of each row from neck (= towards armhole): 2 sts 1 time and 2-3 sts 1 time = 15-16-18-20-23-26 sts remain for each shoulder. Happy knitting!
09.04.2018 - 16:17
![]() Kirsty wrote:
Kirsty wrote:
I have just started following this pattern and I'm nearly 3/4 of the way through the back section and I am about to start my 3rd ball of wool. I only have five 100g balls as I'm doing a size small. I'm afraid I don't have enough wool to complete this project. The pattern says I need 500g which is what I got. What have I done wrong? Or is there a problem with the calculation for how much wool this pattern uses?
13.02.2017 - 17:41DROPS Design answered:
Dear Kirsty, you need 500 g DROPS Cloud in size S, if you used another yarn, you have to recalculate total meterage, you may need more/less grams to get the whole meterage. Happy knitting!
14.02.2017 - 09:11
![]() Irene wrote:
Irene wrote:
Der findes ikke garn Dropc Cloud i butikken. Hvilken garn bliver den bedste til den opskrift? Der er så mange i den anbefalede grupper....
27.01.2017 - 17:17DROPS Design answered:
Hej Irene, Med 2 tråde Air vil du opnå samme strikkefasthed og resultat som 1 tråd Cloud. Cloud kan også erstattes med 1 tråd Eskimo, den vil dog blive lidt mere tung end hvis du bruger Air. God fornøjelse!
30.01.2017 - 08:34
![]() Marcella Bioccoli wrote:
Marcella Bioccoli wrote:
Allora sono io che sbaglio!!! Grazie comunque per l'assistenza tempestiva e grazie per i vostri modelli che sono davvero unici! Buon lavoro a tutti! :-)
12.01.2017 - 17:57
![]() Marcella Bioccoli wrote:
Marcella Bioccoli wrote:
Allora alle maniche dice di aumentare fino a 44, 46 a seconda della taglia, ma seguendo le istruzioni per lo scalfo alla fine tra dietro e davanti viene un'apertura di circa 51 cm mentre le maniche risultano 31 cm. quindi non riesco ad attaccarle. Grazie, forse sono io che non capisco
10.01.2017 - 17:23DROPS Design answered:
Buonasera Marcella. Guardando il grafico delle misure, p.es per la taglia S, lo scalfo sul davanti dovrebbe misurare 17 cm (quindi complessivamente 34 cm tra davanti e dietro). Il numero finale delle maglie per la maniche (sempre taglia S) è 36 e se la sua tensione è corretta, dovrebbero corrispondere a 36 cm. In questo modo riesce ad attaccare la parte finale della manica allo scalfo. Buon lavoro!
10.01.2017 - 22:03
![]() Marcella Bioccoli wrote:
Marcella Bioccoli wrote:
A me sembra che le maniche siano sbagliate
10.01.2017 - 15:07DROPS Design answered:
Buonasera Marcella. Il testo per le maniche corrisponde al testo inglese e non ci sono state altre segnalazioni di errore. Se ci indica che cosa le sembra sbagliato, possiamo provare ad aiutarla. Buon lavoro!
10.01.2017 - 16:48
![]() Jette Pedersen wrote:
Jette Pedersen wrote:
Hejsa ER der fejl i opskriften iflg opskriften skal ærmegabet være rimelig lang, men ærmerne meget smalle kan ikke se hvordan det skal passe sammen. Venlig hilsen Jette
07.04.2016 - 19:37DROPS Design answered:
Hej Jette, Hvis du overholder strikkefastheden så passer ærmerne også i ærmegabet. Se målene (på ærmegabet) i måleskitsen nederst under opskriften. God fornøjelse!
08.04.2016 - 09:24
![]() Maria Rita Pilo wrote:
Maria Rita Pilo wrote:
Buongiorno, avrei bisogno di aiuto, per favore, perchè non riesco a comprendere il diagramma: dopo aver fatto le due coste a punto legaccio devo fare il primo ferro a rovescio? la spiegazione sembrerebbe indicare così, ma allora sul secondo ferro mi troverei solo punti diritti da lavorare, quindi come posso fare un dritto sul rovescio? Probabilmente sono in errore, ma non riesco a venirne a capo, grazie mille. Saluti Maria Rita
18.02.2016 - 08:40DROPS Design answered:
Buongiorno Maria Rita. Il primo ferro del diagramma viene lavorato sul diritto del lavoro e quindi lavora le m a dir; il secondo ferro, lavorato sul rovescio del lavoro, viene lavorato alternando una m a dir con una m a rov. Buon lavoro!
18.02.2016 - 09:01
|
|||||||
Winter Greeting#wintergreetingsweater |
|||||||
|
|
|||||||
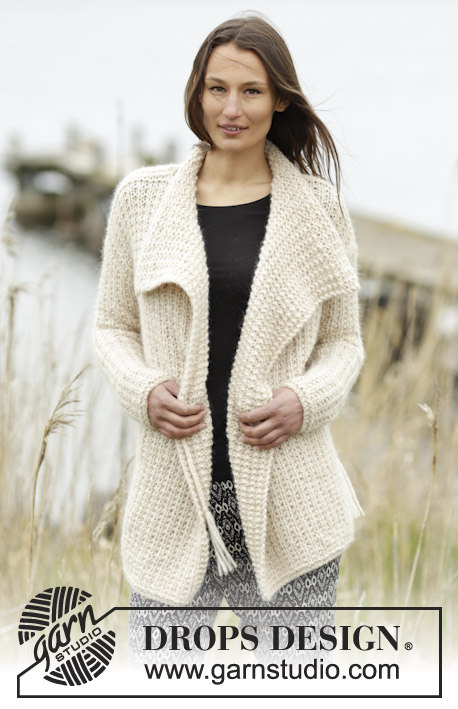
Knitted DROPS jumper and detachable collar with textured pattern in 1 thread Cloud or 2 threads Air. Size: S - XXXL.
DROPS 166-4 |
|||||||
|
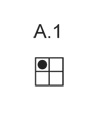
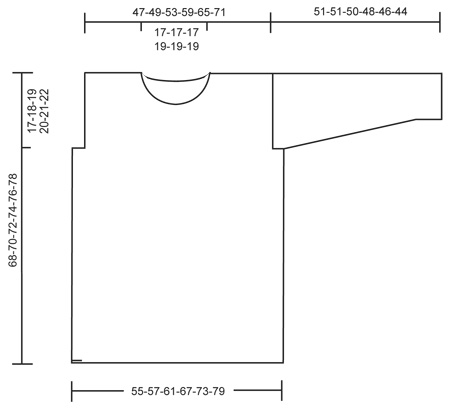
GARTER ST (back and forth): K all rows. 1 ridge = 2 rows K. PATTERN: See diagram A.1. The diagram shows all rows in pattern seen from RS. MEASURING TIP: All measurements must be done when holding the piece up on needle. INCREASE TIP: Inc with 1 YO, work YO twisted on next row to avoid holes. Work the inc sts in to pattern. ---------------------------------------------------------- BACK PIECE: Worked back and forth on circular needle. Cast on 57-59-63-69-75-81 sts (incl 1 edge st in each side) on circular needle size 8 mm with 1 thread Cloud or 2 threads Air. Work 2 ridges in GARTER ST - see explanation above. Switch to circular needle size 9 mm. Then work as follows from RS: 1 edge sts in garter st, A.1 (= 2 sts) until 2 sts remain, K 1, 1 edge sts in garter st. REMEMBER THE KNITTING TENSION When piece measures 51-52-53-54-55-56 cm – READ MEASURING TIP – cast off 5 sts for armholes at beg of the next 2 rows = 47-49-53-59-65-71 sts. Work A.1 as before until piece measures 66-68-70-72-74-76 cm. Then cast off the middle 15-15-15-17-17-17 sts for neck and finish each shoulder separately. On next row from the neck, cast off 1 st = 15-16-18-20-23-26 sts. When piece measures 67-69-71-73-75-77 cm, work 1 ridge over all sts. Cast off. Work the other shoulder the same way. FRONT PIECE: Cast on and work as back piece but work pattern as follows from RS: 1 edge st in garter st, 1 st in garter st, A.1 until 1 st remains, 1 edge st in garter st. When piece measures 58-60-62-64-66-68 cm, cast off the middle 9 sts for neck and finish each shoulder separately. Then cast off on every row from neck as follows: Cast off 2 sts 1 time, then 1 st 2-2-2-3-3-3 times = 15-16-18-20-23-26 sts. When piece measures 67-69-71-73-75-77 cm, work 1 ridge over all sts. Cast off. Work the other shoulder the same way. SLEEVE: Worked back and forth on needle. Cast on 26-26-28-28-30-30 sts (incl 1 edge st in each side) on circular needle size 8 mm with 1 thread Cloud or 2 threads Air. Work 2 ridges. Switch to circular needle size 9 mm. Work A.1 with 1 edge st in garter st in each side of piece. Continue like this. When piece measures 8 cm, inc 1 st inside 2 sts in each side of piece - READ INCREASE TIP! Repeat inc every 9½-8-8-6-6-4½ cm 4-5-5-6-6-7 more times = 36-38-40-42-44-46 sts. Cast off when piece measures 51-51-50-48-46-44 cm (shorter measurements in the larger sizes because of longer sleeve cap and wider shoulders). Knit another sleeve the same way. ASSEMBLY: Sew right shoulder seam. NECK EDGE: Work back and forth on circular needle. Pick up from RS approx. 46 - 54 sts along the neck on circular needle size 8 mm with 1 thread Cloud or 2 threads Air. Work 2 ridges. Cast off with K from WS. ASSEMBLY: Sew left shoulder seam and neck edge. Sew in sleeves. Sew the sleeve and side seams inside 1 edge st. DETACHABLE COLLAR: Work back and forth on circular needle. Cast on 64-64-64-68-68-68 sts on circular needle size 8 mm with 1 thread Cloud or 2 threads Air. Work 2 ridges. Switch to circular needle size 9 mm. Work A.1 with 1 edge st in garter st in each side of piece. When piece measures 18 cm (adjust so that next row is from RS), switch to circular needle size 8 mm and work 2 ridges. Cast off with K from RS. Sew the side seam inside 1 edge st. |
|||||||
Diagram explanations |
|||||||
|
|||||||
 |
|||||||
 |
|||||||
Have you finished this pattern?Tag your pictures with #dropspattern #wintergreetingsweater or submit them to the #dropsfan gallery. Do you need help with this pattern?You'll find 18 tutorial videos, a Comments/Questions area and more by visiting the pattern on garnstudio.com. © 1982-2026 DROPS Design A/S. We reserve all rights. This document, including all its sub-sections, has copyrights. Read more about what you can do with our patterns at the bottom of each pattern on our site. |
|||||||


With over 40 years in knitting and crochet design, DROPS Design offers one of the most extensive collections of free patterns on the internet - translated to 17 languages. As of today we count 324 catalogues and 12290 patterns translated into English (UK/cm). 12290
We work hard to bring you the best knitting and crochet have to offer, inspiration and advice as well as great quality yarns at incredible prices! Would you like to use our patterns for other than personal use? You can read what you are allowed to do in the Copyright text at the bottom of all our patterns. Happy crafting!
Post a comment to pattern DROPS 166-4
We would love to hear what you have to say about this pattern!
If you want to leave a question, please make sure you select the correct category in the form below, to speed up the answering process. Required fields are marked *.