
Popular categories
Looking for a yarn?


Comments / Questions (47)
![]() Sabrina wrote:
Sabrina wrote:
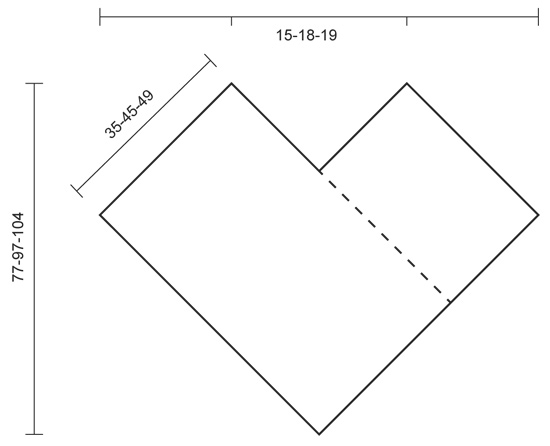
Bonjour, Pouvez vous me dire si les pointillés représentent une couture ? Je ne comprends pas : le poncho est de 2 parties ou d'une seule partie ? Vous remerciant Sabrina
29.10.2014 - 22:21DROPS Design answered:
Bonjour Sabrina, le poncho se compose d'une seule pièce, quand il est terminé, on le plie comme sur la photo (on a une pointe au milieu devant et dans le dos une partie "droite" dans le dos. Les pointillés représentent la couture des mailles montées de la fin de la pièce contre les derniers rangs de la longue bande tricotée. Bon tricot!
30.10.2014 - 10:15
![]() Eva Linnea Jahr wrote:
Eva Linnea Jahr wrote:
Mönstret för ponchon stämmer inte. De måste fattas ett avmasknings- eller uppläggningsvarv för att få stycket att bli som på bilden. Enligt beskrivningen blir det bara ett enda långt rektangulärt stycke. Med vänlig hälsning Eva Linnea
24.10.2014 - 10:25
![]() Birgit Reetz wrote:
Birgit Reetz wrote:
Wenn ich mir die Anleitung ansehe, erhalte ich lediglich ein Rechteck, aber nicht den Poncho-Schnitt, der aufgezeichnet ist. Es müssten doch an einer Stelle eine ganze Menge Maschen neu aufgenommen werden, damit sich das 2. Rechteck ergibt, oder?
19.10.2014 - 14:32DROPS Design answered:
Es ist richtig, dass Sie lediglich ein einziges Rechteck stricken brauchen. Die Schnittzeichnung ist in dem Fall vielleicht etwas irritierend, aber sie soll in erster Linie verdeutlichen, wie die Enden des Rechtecks aneinandergenäht werden (gestrichelte Linie), die rechte und linke Schmalseite auf der Skizze sind eigentlich miteinander verbunden, es ist sozusagen nur die Vorderseite des Ponchos gezeichnet. Die gestrichelte Linie ist eigentlich das eine Ende des Rechtecks.
19.10.2014 - 21:53
![]() Jannette wrote:
Jannette wrote:
Simpel, maar erg mooi door de wol.
19.09.2014 - 07:07Noirin Coakley wrote:
I love that hat too, can't wait to get my hands on that pattern :)
02.07.2014 - 19:44
![]() Inês wrote:
Inês wrote:
Gostaria de fazer este para um pessoa especial :)
08.06.2014 - 23:36Allinson Sherratt wrote:
Particularly love the hat-hope its easy to knit.
04.06.2014 - 00:35
|
|
Tender Moments#tendermomentsset |
|
 |
 |
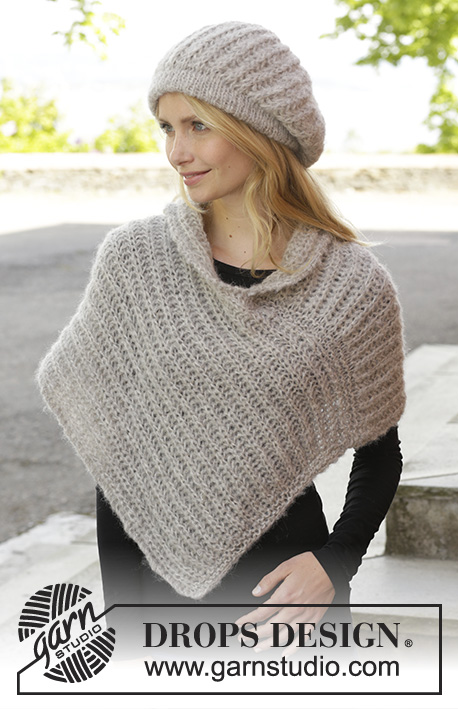
Knitted DROPS hat and poncho with English rib in 2 strands ”Brushed Alpaca Silk”. Size: S - XXXL.
DROPS 157-14 |
|
|
GARTER ST (back and forth on needle): K all rows. 1 ridge = 2 rows K. ENGLISH RIB in the round on circular needle: ROUND 1: * 1 YO, slip 1 st as if to P, K 1 *, repeat from *-*. ROUND 2: * P tog YO and slipped st, 1 YO, slip 1 st as if to P *, repeat from *-*. ROUND 3: * 1 YO, slip 1 st as if to P, K tog YO and slipped st *, repeat from *-*. Repeat 2nd and 3rd round upwards. ENGLISH RIB back and forth on needle + 1 edge st in each side: Row 1: 1 st in garter st, * K 1, 1 YO, slip 1 st as if to P *, repeat from *-* until 2 sts remain, finish with K 1 and 1 st in garter st. Row 2: 1 st in garter st, * 1 YO, slip 1 st as if to P, K tog YO and slipped st *, repeat from *-* until 2 sts remain, finish with 1 YO, slip 1 st as if to P, 1 st in garter st. Row 3: 1 st in garter st, * K tog YO and slipped st, 1 YO, slip 1 st as if to P *, repeat from *-* until 3 sts remain, K tog YO and slipped st, 1 st in garter st. Repeat 2nd and 3rd row upwards. ---------------------------------------------------------- HAT: Worked in the round. Cast on 60-62-64 sts on circular needle size 7 mm with 2 strands Brushed Alpaca Silk. Work in stocking st until piece measures 8 cm. Switch to circular needle size 9 mm while at the same time working ENGLISH RIB in the round on circular needle - see explanation above - REMEMBER KNITTING TENSION. When piece measures 26-26-27 cm - adjust after 3rd round in English rib - work next round as follows: * P tog YO and slipped st, K 1 *, repeat from *-* the entire round. Now work rib = P 1, K 1. When piece measures 30½-30½-31½ cm, K 1 round AT THE SAME TIME K sts tog 2 by 2. Cut the yarns and pull them through the remaining sts, tighten tog and fasten. ASSEMBLY: Fold the edge in stocking st double towards WS and fasten with small stitches - make sure to avoid a tight seam. The hat measures approx. 27-27-28 cm vertically. ---------------------------------------------------------- PONCHO: Worked back and forth on circular needle. LOOSELY cast on 38-49-54 sts on needle size 9 mm with 2 strands Brushed Alpaca Silk. Work 2 ridges in GARTER ST - see explanation above - AT THE SAME TIME on last row dec 3-4-5 sts evenly = 35-45-49 sts. Then work ENGLISH RIB back and forth - see explanation above. REMEMBER THE KNITTING TENSION! When piece measures 110-136-144 cm - adjust after 2nd row in English rib pattern - work next row from RS as follows: 1 st in garter st, * K YO and slipped st tog, K 1 *, repeat from *-* until 1 st remains, finish with 1 st in garter st. K 1 row while AT THE SAME TIME inc 3-4-5 sts evenly = 38-49-54 sts. K 2 rows and LOOSELY cast off. ASSEMBLY: Sew cast-on edge, edge to edge with one long side to avoid a chunky seam (opposite long side and cast-off edge now forms a tip towards mid front). |
|
 |
|
Have you finished this pattern?Tag your pictures with #dropspattern #tendermomentsset or submit them to the #dropsfan gallery. Do you need help with this pattern?You'll find 12 tutorial videos, a Comments/Questions area and more by visiting the pattern on garnstudio.com. © 1982-2026 DROPS Design A/S. We reserve all rights. This document, including all its sub-sections, has copyrights. Read more about what you can do with our patterns at the bottom of each pattern on our site. |
|


With over 40 years in knitting and crochet design, DROPS Design offers one of the most extensive collections of free patterns on the internet - translated to 17 languages. As of today we count 325 catalogues and 12291 patterns translated into English (UK/cm). 12291
We work hard to bring you the best knitting and crochet have to offer, inspiration and advice as well as great quality yarns at incredible prices! Would you like to use our patterns for other than personal use? You can read what you are allowed to do in the Copyright text at the bottom of all our patterns. Happy crafting!
Post a comment to pattern DROPS 157-14
We would love to hear what you have to say about this pattern!
If you want to leave a question, please make sure you select the correct category in the form below, to speed up the answering process. Required fields are marked *.