
Popular categories
Looking for a yarn?


Comments / Questions (37)
![]() Lena wrote:
Lena wrote:
Härlig sommarkofta!
27.12.2011 - 19:32
![]() Vera Friis wrote:
Vera Friis wrote:
Jeg har et eller andet med orange-----
27.12.2011 - 15:44Jutta wrote:
Lovely, pattern and colour choice
15.12.2011 - 06:34Janet Milne wrote:
I like this one except for the sloppy wide cuff. I'd make it a bit slimmer.
09.12.2011 - 00:30
![]() Sylvia wrote:
Sylvia wrote:
Wouw, een must voor de lente!
08.12.2011 - 23:34
![]() Merja Kokko wrote:
Merja Kokko wrote:
Ihana väri
08.12.2011 - 19:09
![]() Mariella Musmeci wrote:
Mariella Musmeci wrote:
Troppo carino questo cardigan
08.12.2011 - 14:26
|
|||||||||||||||||||||||||
Sunbeam#sunbeamcardigan |
|||||||||||||||||||||||||
 |
 |
||||||||||||||||||||||||
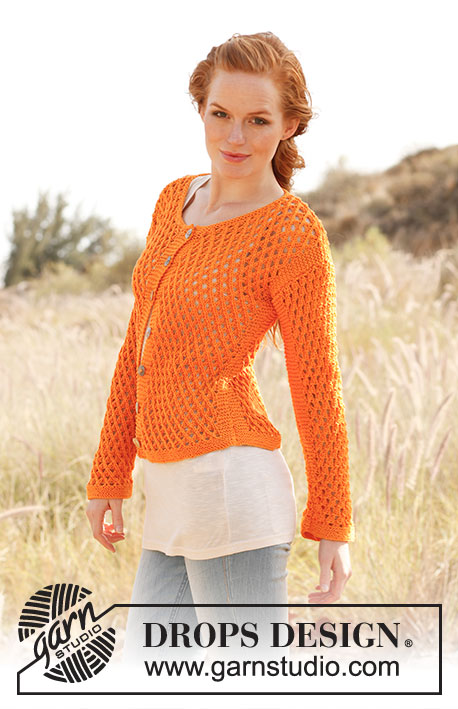
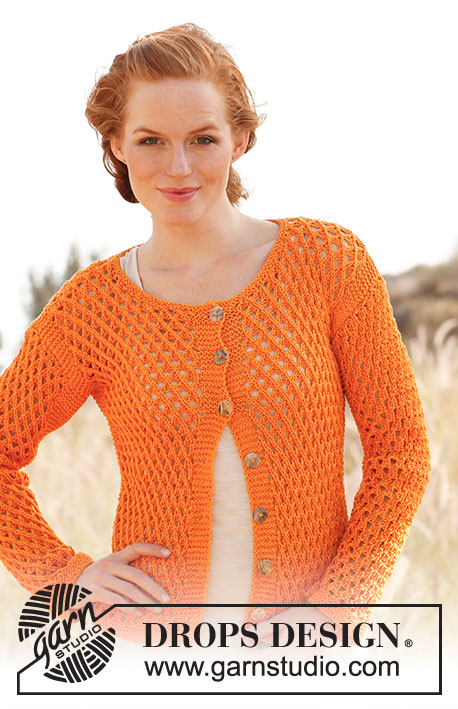
Knitted DROPS jacket with lace pattern in ”Muskat”. Size: S - XXXL
DROPS 139-12 |
|||||||||||||||||||||||||
|
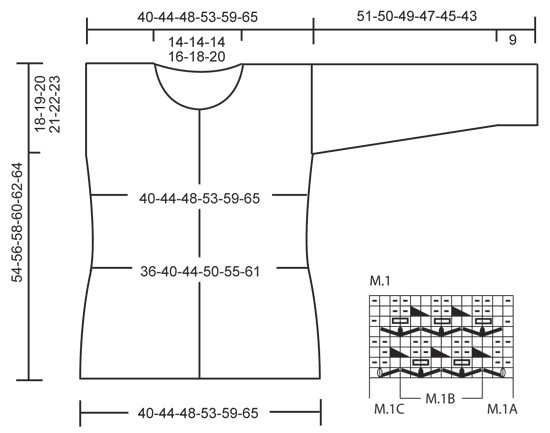
GARTER ST (back and forth on needle): K all rows. PATTERN: See diagram M.1. 1st row = RS. BUTTON HOLES: Cast off for button holes on right band from RS. 1 button hole = K tog 3rd and 4th st from mid front, then make 1 YO. Cast off for button holes when piece measures: SIZE S: 3, 10, 16, 23, 30, 37 and 43 cm SIZE M: 3, 10, 17, 24, 31, 38 and 44 cm SIZE L: 3, 10, 17, 24, 31, 38 and 45 cm SIZE XL: 3, 11, 18, 25, 32, 39 and 46 cm SIZE XXL: 3, 11, 18, 25, 32, 40 and 47 cm SIZE XXXL: 3, 11, 18, 26, 33, 41 and 48 cm (NOTE: Cast off for last button hole when only 2 rows remain before neck dec.) -------------------------------------------------------- BACK PIECE: Worked back and forth on needle. Cast on 86-94-102-114-126-138 sts (incl 1 edge st in each side) on needle size 3 mm with Muskat. Work 10 rows in GARTER ST - see explanation above. Switch to needle size 4 mm and work as follows (seen from RS): 6 sts in garter st, diagram M.1A (= 3 sts), diagram M.1B until 9 sts remain, diagram M.1C and 6 sts in garter st. When piece measures 4 cm, dec 1 st in each side by K tog the next to last 2 sts in garter st in each side. Repeat dec every 4 cm 3 more times = 78-86-94-106-118-130 sts (there are now only 2 sts in garter st in each side). When piece measures 20 cm, inc 1 st in each side by working 2 sts in next to last st in garter st in each side. Repeat inc every 4 cm 3 more times (work the inc sts in garter st) = 86-94-102-114-126-138 sts (there are now 6 sts in garter st in each side again). When piece measures 36-37-38-39-40-41 cm, cast off 1 st in each side for armholes = 84-92-100-112-124-136 sts. Then work diagram M.1 with 5 sts in garter st in each side. When piece measures 52-54-56-58-60-62 cm, cast off the middle 30-30-30-34-38-42 sts for neck on next row from WS. Finish each shoulder (= 27-31-35-39-43-47 sts) separately - continue pattern as follows: LEFT SHOULDER (seen from RS): Diagram M.1A (towards neck), diagram M.1B until 8 sts remain, diagram M.1C and 5 sts in garter st towards armhole. When piece measures approx. 54-56-58-60-62-64 cm, cast off all sts from WS. RIGHT SHOULDER: Work as follows (seen from RS): 5 sts in garter st towards armhole, diagram M.1A, diagram M.1B until 3 sts remain, diagram M.1C (towards neck). Cast off when at the same length as left shoulder. RIGHT FRONT PIECE: Cast on 50-54-58-62-70-78 sts (incl 1 edge st in the side and 6 band sts towards mid front) on needle size 3 mm with Muskat. Work 10 rows in garter st. Switch to needle size 4 mm and work as follows (seen from RS): 6 band sts in garter st, diagram M.1A, diagram M.1B until 9 sts remain, diagram M.1C and 6 sts in garter st. Continue like this - AT THE SAME TIME when piece measures 3 cm, beg to cast off for BUTTON HOLES – see explanation above! When piece measures 4 cm, beg dec in the side as on back piece and when piece measures 20 cm, beg inc in the side as on back piece. After all dec and inc there are 50-54-58-62-70-78 sts on the needle. When piece measures 36-37-38-39-40-41 cm, cast off 1 st in the side for armhole = 49-53-57-61-69-77 sts. Continue diagram M.1 with 5 sts in garter st towards the side and 6 sts in garter st towards mid front. When piece measures 44-45-46-47-48-49 cm, slip the 12-12-12-12-16-20 sts towards mid front on a stitch holder for neck (work them first). Then cast off at beg of every row from neck: 4 sts 1 time, 2 sts 2 times and 1 st 2 times = 27-31-35-39-43-47 sts remain on shoulder. Continue pattern as follows (seen from RS): Diagram M.1A (towards neck), diagram M.1B until 8 sts remain, diagram M.1C and 5 sts in garter st (towards armhole). Cast off all sts from WS when piece measures approx. 54-56-58-60-62-64 cm. LEFT FRONT PIECE: Cast on and work as right piece but reversed. Work the shoulder as follows (seen from RS): 5 sts in garter st (towards armhole), diagram M.1A, diagram M.1B until 3 sts remain, diagram M.1C (towards neck). SLEEVE: Cast on 56-56-56-60-60-64 sts (incl 1 edge st in each side) on needle size 3 mm with Muskat. Work 10 rows in garter st. Switch to needle size 4 mm and work as follows (seen from RS): 1 st in garter st, diagram M.1A, diagram M.1B until 4 sts remain, diagram M.1C and 1 st in garter st. Continue like this. When piece measures 9 cm, inc 1 st in each side which is worked in garter st. Repeat inc every 4-3-2½-2½-2-2 cm a total of 11-13-15-15-17-17 times (work the inc sts in garter st) = 78-82-86-90-94-98 sts. When piece measures 51-50-49-47-45-43 cm (shorter measurements in the larger sizes because of broader shoulder width), cast off all sts. ASSEMBLY: Sew the shoulder seams. NECK EDGE: Knit up approx. 90 to 120 sts around the neck on needle size 3 mm with Muskat (incl sts on stitch holders at the front). K 3 rows back and forth, cast off with K. ASSEMBLY: Sew in sleeves and sew under arm and side seams in one inside 1 edge st. Sew on buttons. |
|||||||||||||||||||||||||
Diagram explanations |
|||||||||||||||||||||||||
|
|||||||||||||||||||||||||
 |
|||||||||||||||||||||||||
Have you finished this pattern?Tag your pictures with #dropspattern #sunbeamcardigan or submit them to the #dropsfan gallery. Do you need help with this pattern?You'll find 10 tutorial videos, a Comments/Questions area and more by visiting the pattern on garnstudio.com. © 1982-2026 DROPS Design A/S. We reserve all rights. This document, including all its sub-sections, has copyrights. Read more about what you can do with our patterns at the bottom of each pattern on our site. |
|||||||||||||||||||||||||


With over 40 years in knitting and crochet design, DROPS Design offers one of the most extensive collections of free patterns on the internet - translated to 17 languages. As of today we count 324 catalogues and 12290 patterns translated into English (UK/cm). 12290
We work hard to bring you the best knitting and crochet have to offer, inspiration and advice as well as great quality yarns at incredible prices! Would you like to use our patterns for other than personal use? You can read what you are allowed to do in the Copyright text at the bottom of all our patterns. Happy crafting!
Post a comment to pattern DROPS 139-12
We would love to hear what you have to say about this pattern!
If you want to leave a question, please make sure you select the correct category in the form below, to speed up the answering process. Required fields are marked *.