
Popular categories
Looking for a yarn?


Comments / Questions (51)
![]() Kody Doisy wrote:
Kody Doisy wrote:
Bonjour . J'aimerai tricoter ce modele de jupe mais je ne vois pas pour quelle raison commander une pelote ecru n° 100 . J'ai lu les explications mais je ne vois pas la raison . Merci de votre reponse et bon week end
15.04.2016 - 16:21DROPS Design answered:
Bonjour Kody Doisy, on tricote des rayures de 2 rangs écru sur toutes les mailles à intervalles réguliers entre les rangs raccourcis - cf explications. Bon tricot!
15.04.2016 - 18:05Pauline Polko wrote:
With the shown pattern the skirt becomes terrible wide. To make something that looks like the picture you have to use much less markers ( 9 instead of 14) and more rows between the shortend rows ( 34 instead of 24).
12.04.2016 - 14:09
![]() Michaela Rasmussen wrote:
Michaela Rasmussen wrote:
Hej igen. Jeg har fundet min fejl. Jeg har byttet rundt på mærkerne så jeg har strikket den første kile til mærke 14, mærke 13 osv. i stedet for mærke 1, mærke 2 osv. Umiddelbart tror jeg ikke at det vil være tydeligt at se på den færdige nederdel. Vil I anbefale at jeg starter forfra eller kan jeg fortsætte med at følge opskriften herfra? Hilsen Michaela
26.01.2016 - 19:15DROPS Design answered:
Hej Michaela, du kan jo prøve at fortsætte, hovedsagen er jo at du selv bliver tilfreds med resultatet! Held og lykke!
27.01.2016 - 09:18
![]() Michaela Rasmussen wrote:
Michaela Rasmussen wrote:
Hej. Jeg er lige begyndt på nederdelen og har et spørgsmål: Jeg er nået til "strik frem til mærke - 14, vend og strik tilbage over de resterende 6m". Når jeg har strikket frem til mærke 14 og vender for at strikke tilbage, så er der 119 m og ikke 6 m, da jeg så skal strikke tilbage hele vejen fra starten af pinden til mærke nr 14. Hvad har jeg gjort galt? Hilsen Michaela
25.01.2016 - 20:17
![]() Patricia wrote:
Patricia wrote:
Hallo! Da ich zumindest für das Stricken mit mehreren Farben eher Anfängerin bin: Stricke ich immer die äußere Masche mit "Ocean View" und "Natur"? oder setze ich jedes Mal neu an (und muss den Faden verstechen), wenn ich die beiden Reihen "Natur" dazwischensetze? Wahrscheinlich eine doofe Frage, ich weiß es aber wirklich nicht... Danke!!
15.05.2014 - 14:49DROPS Design answered:
Liebe Patricia, die Frage ist nicht "doof". :-) An sich können Sie den Faden am Rand mitführen (so locker, dass das Gestrick nicht zusammengezogen wird), um sich das viele Vernähen am Ende zu sparen. Allerdings scheint bei der Anleitung etwas nicht ganz zu stimmen, da der Fadenwechsel unten wäre, aber eigentlich am oberen Rand sein müsste, damit er hinterher von dem Taillenbund verdeckt wird. Ich habe eine Anfrage an die Designer geschickt, die Antwort kann aber leider etwas dauern.
16.05.2014 - 12:42
![]() Vaike wrote:
Vaike wrote:
Viide: Jätka kudumist lühendatud ridadega järgmiselt (NB! Pinguta igal töö pööramisel enne jätkamist lõnga, nii väldid auke): * koo 2 rida edasi-tagasi kõigi silmustega naturaalvalge lõngaga Minu meelest on siin üks rida puudu: peale silmusemärkide panekut peaks ju järgmise rea üles tagasi kuduma?
07.04.2013 - 13:24DROPS Design answered:
Ei pea. Sest edasisi kudumisi arvestatakse just alt üles kududes (st. vöökoha poole), et alläärele tuleks rohkem ridu ja laiust.
12.04.2013 - 15:57
![]() Samaisa wrote:
Samaisa wrote:
¿se notan los remates de tantas hebras en el bajo ?
18.02.2013 - 11:40
![]() Samaisa wrote:
Samaisa wrote:
Demasiadas hebras en el bajo por el cambio de color, se notan despues de rematarlas al final del trabajo?
16.02.2013 - 09:36DROPS Design wrote:
Hola Lía, nos alegra mucho que sea de tu agrado. Tu comentario es de gran motivación para nosotros!
01.05.2011 - 08:42LÍA ANA ALONSO wrote:
Mi profundo agradecimiento por lo que me brindan en ésta completa página. Muchas gracias.
01.05.2011 - 05:32
|
||||
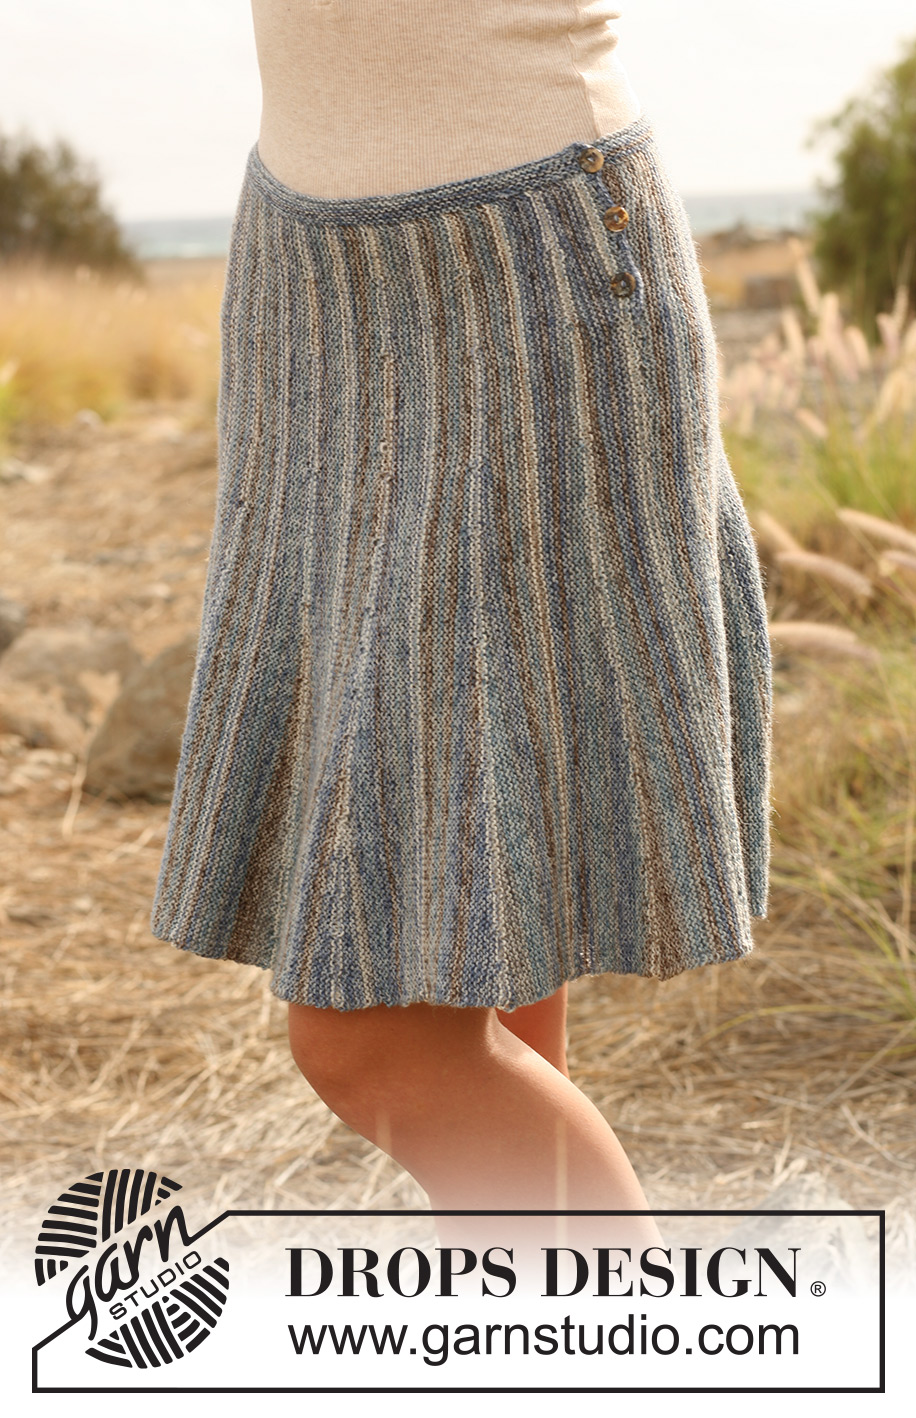
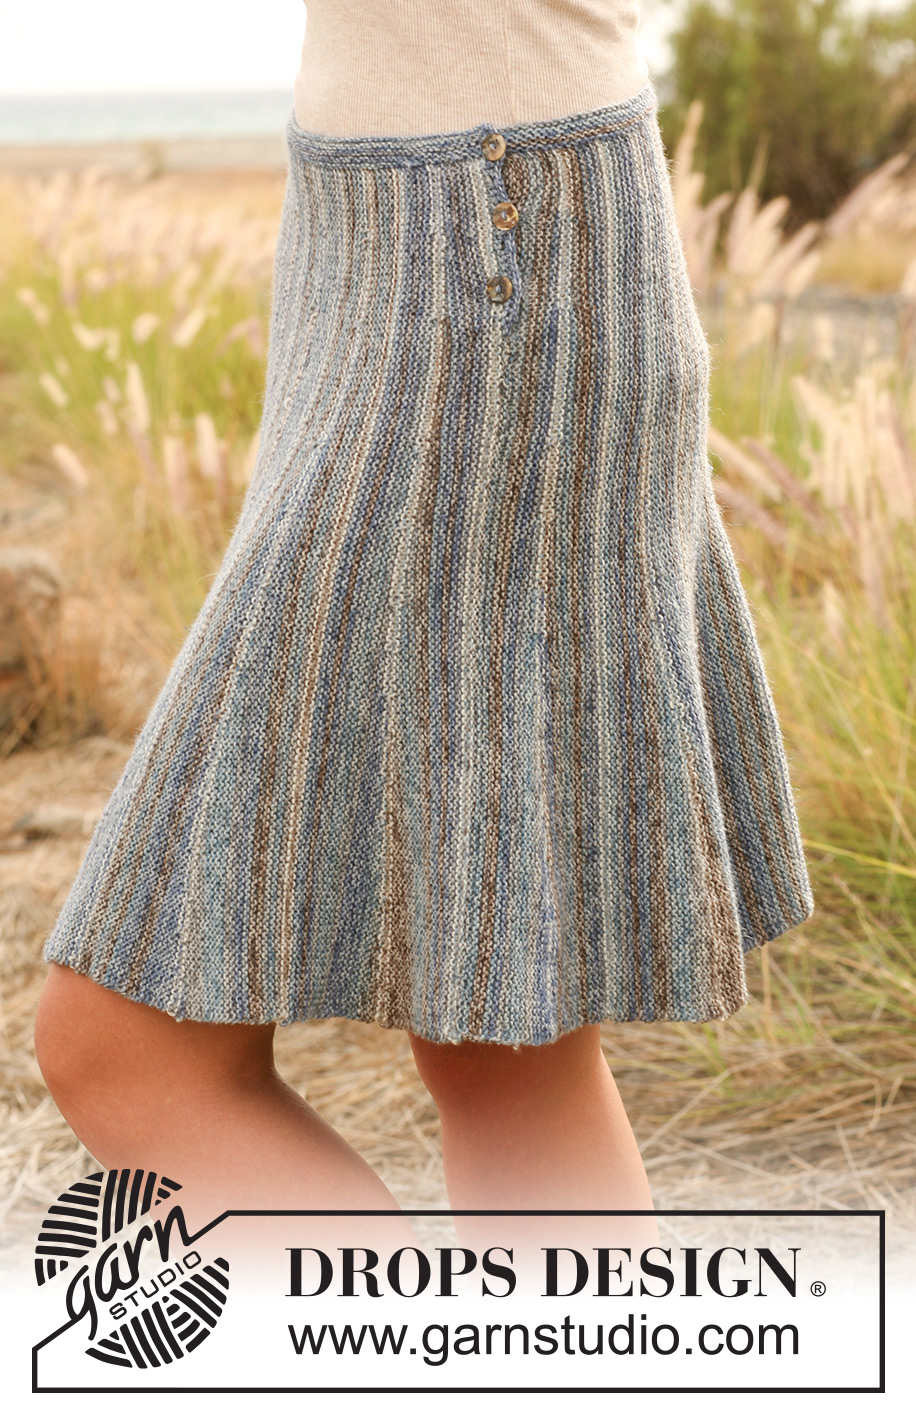
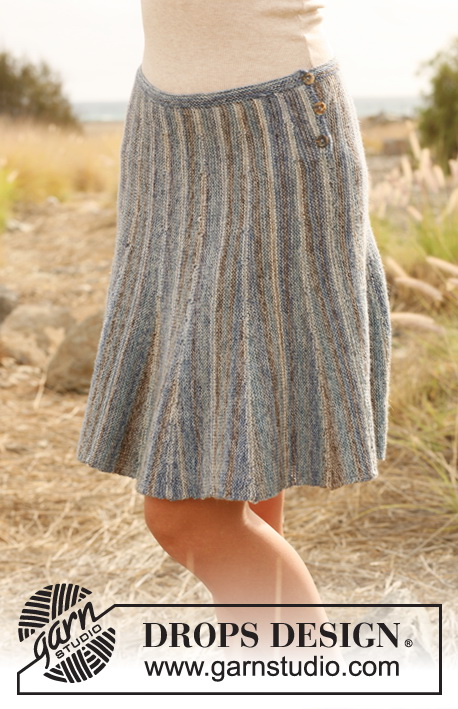
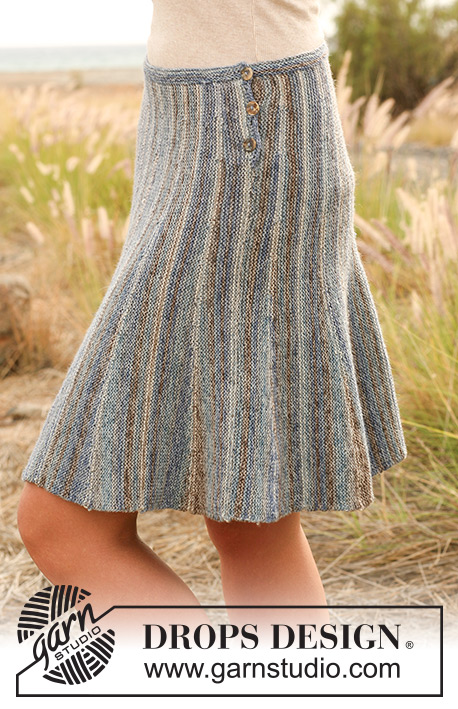
Rays in the Fog#raysinthefogskirt |
||||
 |
 |
|||
Knitted DROPS skirt with stripes worked from side to side with short rows in "Fabel". Size: S - XXXL.
DROPS 128-17 |
||||
|
SKIRT: Worked back and forth on circular needle from side to side. To give the skirt width at the bottom work with short rows. The piece is worked in garter st, i.e. K all rows. Cast on 115-120-125-130-135-140 sts on 2 circular needles size 3 mm (this is done to avoid a tight cast on edge) with ocean view. Pull out one of the needles and then work as explained below . Work first row as follows (from waist down): Work 9-10-11-12-13-14 sts, insert MARKER 1, work 11-12-13-14-15-16 sts, insert MARKER 2, work 17-18-19-20-21-22 sts, insert MARKER 3, work 9-10-11-12-13-14 sts, insert MARKER 4, work 9-10-11-12-13-14 sts, insert MARKER 5, work 6 sts, insert MARKER 6, work 6 sts, insert MARKER 7, work 6 sts, insert MARKER 8, work 6 sts, insert MARKER 9, work 6 sts, insert MARKER 10, work 6 sts, insert MARKER 11, work 6 sts, insert MARKER 12, work 6 sts, insert MARKER 13, work 6 sts, insert MARKER 14, work the remaining 6 sts. Move the markers upwards when working. Continue to work with short rows as follows (NOTE! Tighten the thread on every turn in mid of piece before continuing, to avoid holes): * Work 2 rows with off white back and forth over all sts (1st row = WS), work 10-10-10-10-12-12 rows with ocean view back and forth over all sts (= 12-12-12-12-14-14 rows in garter st over all sts). Then work until MARKER 1, turn and work back. Work until MARKER 2, turn and work back. Work until MARKER 3, turn and work back. Work until MARKER 4, turn and work back. Work until MARKER 5, turn and work back. Work until MARKER 6, turn and work back. Work until MARKER 7, turn and work back. Work until MARKER 8, turn and work back. Work until MARKER 9, turn and work back. Work until MARKER 10, turn and work back. Work until MARKER 11, turn and work back. Work until MARKER 12, turn and work back. Work until MARKER 13, turn and work back. Work until MARKER 14, turn and work back. Switch to off white and work 2 rows back and forth over all sts. Switch back to ocean view and work until MARKER 14, turn piece and work back. Then work until MARKER 13, turn and work back. Work until MARKER 12, turn and work back. Work until MARKER 11, turn and work back. Work until MARKER 10, turn and work back. Work until MARKER 9, turn and work back. Work until MARKER 8, turn and work back. Work until MARKER 7, turn and work back. Work until MARKER 6, turn and work back. Work until MARKER 5, turn and work back. Work until MARKER 4, turn and work back. Work until MARKER 3, turn and work back. Work until MARKER 2, turn and work back. Work until MARKER 1, turn and work back. Work 10-10-10-10-12-12 rows back and forth over all sts with ocean view *. Repeat from *-* until piece measures approx. 64-72-78-86-100-108 cm at the top, finish with 1 whole repetition so that the pattern fits when the skirt is sewn tog in the side. Then cast off VERY loosely from the bottom edge (= from WS), cast off until 27-27-27-35-35-35 sts remain at the top towards the waist. Work 10 rows back and forth over these sts with ocean view for button folding edge, then cast off. ASSEMBLY: Knit up from RS 1 st in every ridge (2 rows in garter st) along the entire top edge of the skirt on circular needle size 3 mm with ocean view. Work waistband back and forth as follows: K 1 row from WS while AT THE SAME TIME adjusting the no of sts to 154-174-188-208-240-260. Then K 10 rows back and forth over all sts before casting off LOOSELY. Sew the skirt tog edge to edge up to button folding edge. Crochet 3-3-3-4-4-4 button hole loops along the side without folding edge, on hook size 3 mm as follows: Beg at the top with 1 dc in each of the first 3 sts, * 3 ch, skip 2 sts, work 1 dc in each of the next 6 sts *, repeat from *-* a total of 3-3-3-4-4-4 times, turn and work back with 1 dc in each dc and 2 dc in every ch-loop. Sew the buttons on to the button folding edge. |
||||
Diagram explanations |
||||
|
||||
 |
||||
Have you finished this pattern?Tag your pictures with #dropspattern #raysinthefogskirt or submit them to the #dropsfan gallery. Do you need help with this pattern?You'll find 12 tutorial videos, a Comments/Questions area and more by visiting the pattern on garnstudio.com. © 1982-2026 DROPS Design A/S. We reserve all rights. This document, including all its sub-sections, has copyrights. Read more about what you can do with our patterns at the bottom of each pattern on our site. |
||||


With over 40 years in knitting and crochet design, DROPS Design offers one of the most extensive collections of free patterns on the internet - translated to 17 languages. As of today we count 324 catalogues and 12290 patterns translated into English (UK/cm). 12290
We work hard to bring you the best knitting and crochet have to offer, inspiration and advice as well as great quality yarns at incredible prices! Would you like to use our patterns for other than personal use? You can read what you are allowed to do in the Copyright text at the bottom of all our patterns. Happy crafting!
Post a comment to pattern DROPS 128-17
We would love to hear what you have to say about this pattern!
If you want to leave a question, please make sure you select the correct category in the form below, to speed up the answering process. Required fields are marked *.