
Popular categories
Looking for a yarn?


Comments / Questions (47)
![]() Gail wrote:
Gail wrote:
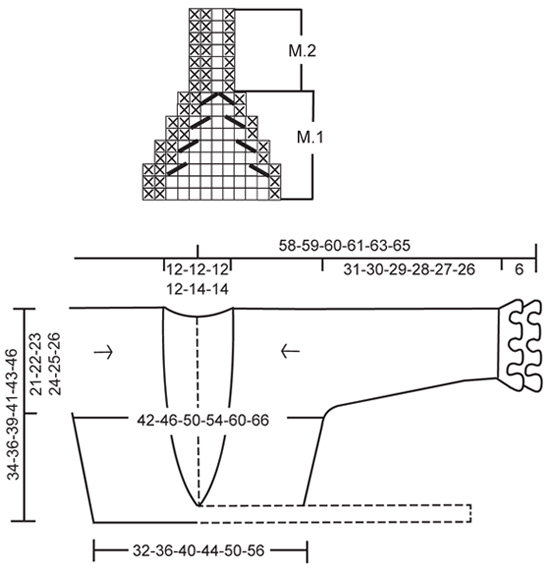
I don't understand what M.1 and M.2 mean. Do they refer to the diagrams on p.4? If yes, what are you supposed to do? Flounce 1 and 2
29.07.2025 - 21:10DROPS Design answered:
Dear Gail, M.1 and M.2 refer to the diagram at the bottom of the page; M.1 = 9 rows at the bottom of diagram and M.2 = 7 rows - just as shown on the right side of diagram. Read more about diagrams here. Happy knitting!
30.07.2025 - 09:03
![]() Gail wrote:
Gail wrote:
How many yards of yarn for each size?
15.07.2025 - 23:38DROPS Design answered:
Hi Gail, DROPS Safran 1 Ball (50g) = 160 m/174 yd. For sizes S – M – L- XL – XXL – XXXL you will need 250-300-300-350-400-450 g > it means 870-1044-1044-1218-1392-1566 yd of yarn. Happy knitting!
16.07.2025 - 14:33
![]() Carole wrote:
Carole wrote:
Remember me body piece: 125 sts - cast on new sts for body piece at the end of every row each side as follows: 5 sts 7 times, then 9 sts 1 time = 213. Does this mean cast on 5 sts at the beginning and end of the row on the rs and ws for the next 7 rows and then 9 sts at the beginning and end of next row or cast on 5 sts at the end of next 14 rows and 9 sts at the end of next 2 rows please?
04.03.2023 - 12:34DROPS Design answered:
Dear Carole, you cast on at the end of the row, but both on rows from the right side and from the wrong side. Each time accounts for 2 rows: 1 from the right side and 1 from the wrong side. So, you would work as the second option you indicated: cast on 5 sts at the end of next 14 rows and 9 sts at the end of next 2 rows. Happy knitting!
05.03.2023 - 20:59
![]() Carole wrote:
Carole wrote:
Remember me sleeve: 79 sts - inc 1 st each side by K2 in st inside edge st, and repeat the inc on every 4th row a total of 14 times and then on every other row 9 times = 125 sts? Does this mean increase 1 st at the beginning of next 2 rows then beginning of ever 4th and 5th row 14 times or increase 1 st either end of next and every 4th row then at the beginning of every other row 9 times? I end up with 127 sts instead of 125 sts if I do this? Thanks for your help.
28.02.2023 - 12:29DROPS Design answered:
Dear Carole, you will increase by knitting 2 stitches in the 2nd stitch + in the next-to last stitch on a row from RS, then work 3 rows without increasing, repeat these 4 rows a total of 14 times; then increase the same way on every other row (= on every row from the right side) a total of 9 times. You have then: 79 sts + 28 sts + 18 sts = 125 sts. In total. Happy knitting!
28.02.2023 - 13:34
![]() Lena wrote:
Lena wrote:
Jeg vil gerne strikke boleroen ca. 15 cm længere, så den når til livet. Pandebåndet skal stadig sidde det samme sted. Hvordan gør jeg dette?
23.06.2020 - 02:12DROPS Design answered:
Hej Lena, tror det letteste vil være at samle masker op under bindebåndet. Vi hardesværre ikke mulighed for at ændre i opskriften. God fornøjelse!
25.06.2020 - 09:34
![]() Ria Abee wrote:
Ria Abee wrote:
Maat xxl: 243 st. is 1 steek te weinig voor telpatroon. Moet daarna 20 schulpen hebben, zijn er 22 en het stekenaantal klopt ook niet. Volgens patroon 83, het zijn er maar 68. WAT DOE IK FOUT???
31.07.2016 - 08:30DROPS Design answered:
Het klopt precies: Ga verder als volgt (eerste nld = goede kant): 1 kant st in RIBBELST – zie boven, 1 st av, M.1 16-17-18-19-20-21 keer over de nld en 1 kant st in ribbelst. == > dus u hebt aan elke kant een kantsteek en aan het begin 1 st av, dus 240 st over, dat is 20 keer 12 st. Aan het eind van het telpatroon is elk groepje van 12 st nog maar 4 st, dus dan heb u 3 st (2 kanst + 1 av) = 20 x 4 = 83 st. Veel breiplezier.
05.08.2016 - 10:37
![]() Lelletta wrote:
Lelletta wrote:
Grazie mille!!
12.05.2015 - 21:01
![]() Lelletta wrote:
Lelletta wrote:
Buonasera! Avrei bisogno di un chiarimento:ho avviato le nuove maglie per il corpo(taglia S) x 7 volte ed ora devo aumentare le altre 6+6 all'interno di M2. Vanno inserite sempre ai lati o lungo tutto il ferro?Vi ringrazio per la cortese e sempre rapida risposta! saluti!!!!!!!!!!
12.05.2015 - 19:07DROPS Design answered:
Buonasera Lelletta. Le 6 m vanno aumentate ai lati. Mano mano che aumenta, lavora le nuove m come indicato nel diagramma M.2. Buona lavoro!
12.05.2015 - 20:08
![]() Nina wrote:
Nina wrote:
Jeg forstår ikke hvor i oppskriften arm og volang nr. 2 lages? Er i ferd med å avslutte på bolen, str. L, ved å strikke til arbeidet måler 54 cm.
15.09.2013 - 22:34DROPS Design answered:
Hej Nina. Du strikker först höyre side. Du starter med 2 volanger og strikker ermet til midt bak (BAKSTK) og midt foran (FORSTK). Derefter starter du forfra og strikker VENSTRE SIDE paa samme maade (men spejlvendt - se opskrift). Du slutter af med at montere de to dele midt bak.
17.09.2013 - 17:28
![]() Nicole wrote:
Nicole wrote:
Ich verstehe nicht ganz, weshalb ich die Maschen vom Rückenteil zum Schluss auf einen Hilfsfaden legen soll, da ich doch beide Teile im Rücken zusammen"nähe". Und: wie näht man mit Maschenstich etwas zusammen? Ich kenne das nur als Zierstich, und das Video von Drops erklärt nur dieses.
02.07.2013 - 22:31DROPS Design answered:
Liebe Nidole, Sie haben Recht, es wurde das falsche Video verlinkt, wir werden dies gleich beheben. Das richtige Video heisst "Unsichtbare Naht". Dort sehen Sie auch, warum das Teil nicht abgekettet wird, sondern die Maschen nur stillgelegt werden.
03.07.2013 - 09:34
|
|||||||||||||||||||
Remember Me#remembermebolero |
|||||||||||||||||||
 |
 |
||||||||||||||||||
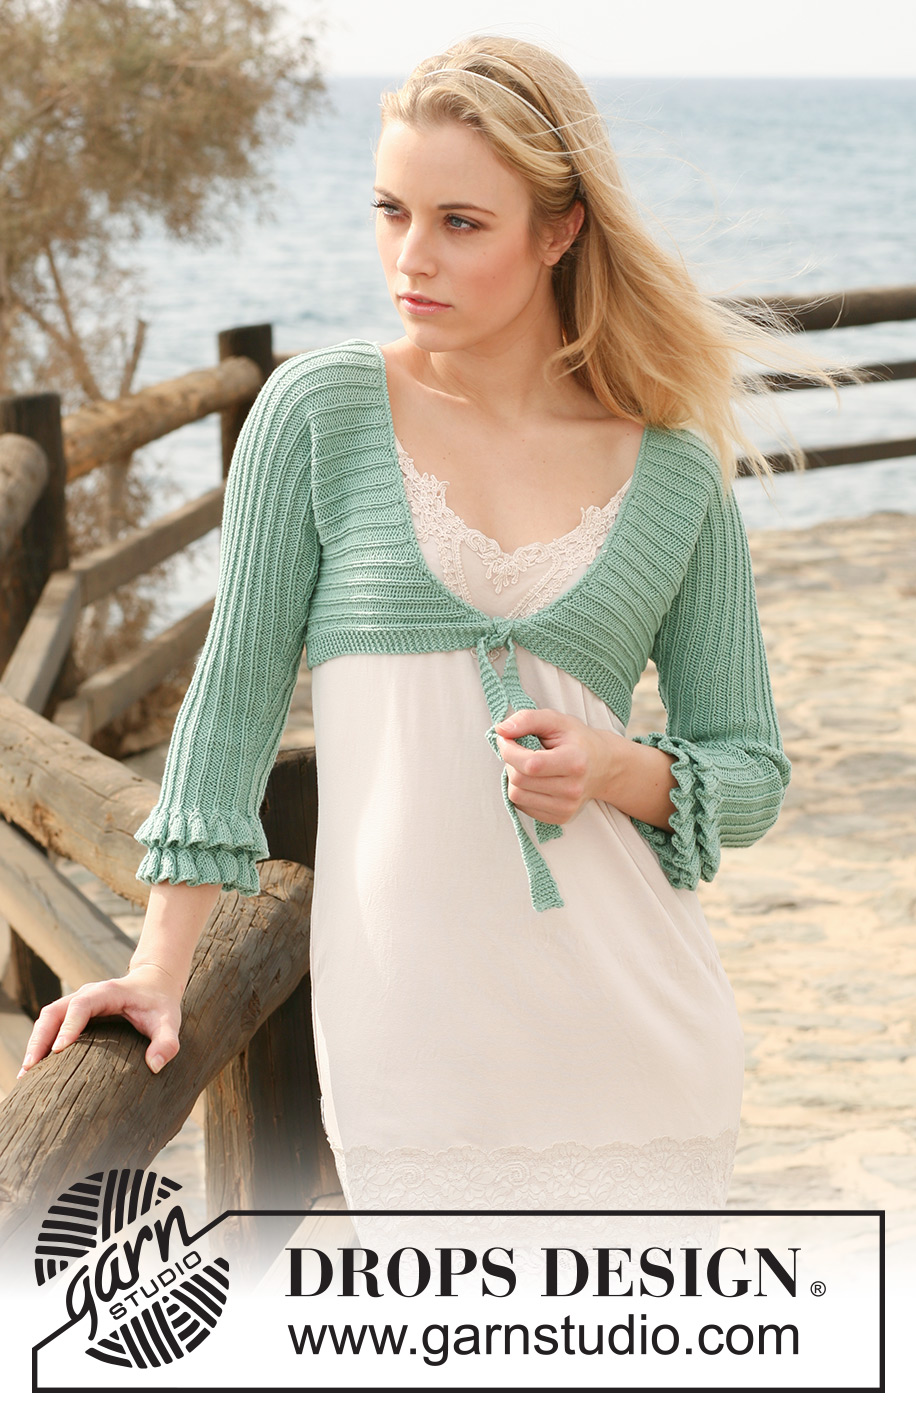
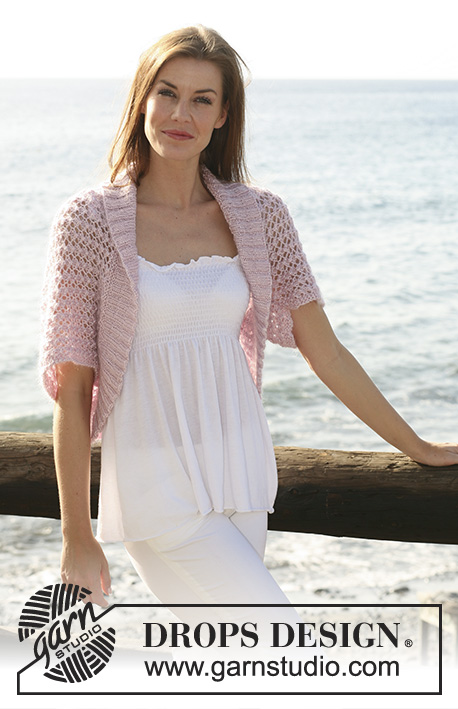
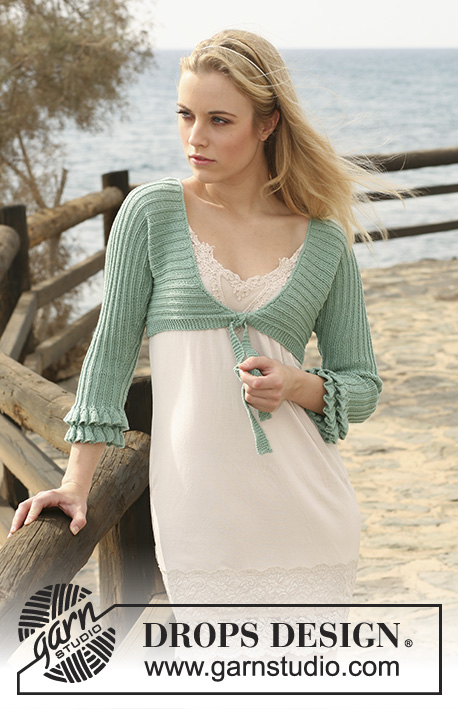
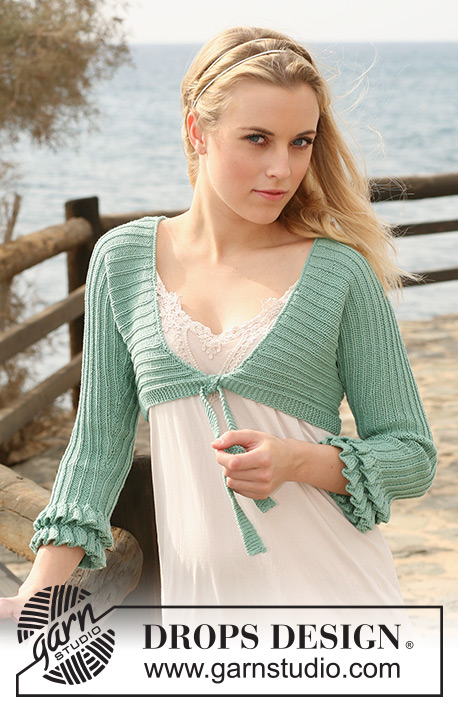
DROPS bolero in ”Safran” knitted from side to side with flounces along sleeve edges. Size: S to XXXL.
DROPS 119-29 |
|||||||||||||||||||
|
GARTER ST (back and forth on needle): K all rows. PATTERN: See diagram M.1 and M.2 - Diagram shows the pattern from RS! -------------------------------------------------------- -------------------------------------------------------- RIGHT SIDE: Worked from bottom of sleeve to mid back/mid front. To fit in all sts work piece back and forth on circular needle. FLOUNCE-1: Cast on 195-207-219-231-243-255 sts (includes 1 edge st each side) on circular needle size 3 mm with Safran. Continue as follows (first row = RS): 1 edge st in GARTER ST – see above, P1, M.1 16-17-18-19-20-21 times across the row and 1 edge st in garter st. After M.1 there are 67-71-75-79-83-87 sts on needle. Continue as follows: 1 edge st in garter st, P1, M.2 over M.1 and 1 edge st in garter st until piece measures a total of 6 cm - finish with 1 row from WS, put piece aside. FLOUNCE-2: Cast on and work like flounce-1 until the end of M.1, work 1 row from WS with K over K and P over P. Work the 2 flounces tog for sleeve as follows from RS: SLEEVE: Place flounce-2 on top of flounce-1 and K or P (as per M.2) tog 1 st from each flounce across the row = 67-71-75-79-83-87 sts. Continue in M.2 as before. REMEMBER THE KNITTING TENSION – important to reach the right measurements. When piece measures a total of 12 cm inc 1 st each side by K2 in st inside edge st, and repeat the inc on every 4th row a total of 21-18-17-14-13-10 times and then on every other row 0-4-5-9-10-14 times (incorporate inc sts in M.2 as you go along) = 109-115-119-125-129-135 sts. Piece now measures approx 37-36-35-34-33-32 cm (shorter for the larger sizes because of wider body piece measurements). BODY PIECE: Now cast on new sts for body piece at the end of every row each side as follows: 4-4-4-5-5-5 sts 7 times, then 6-9-13-9-13-16 sts 1 time (incorporate inc sts in M.2 as you go along, but work 1 edge st each side in garter st) = 177-189-201-213-225-237 sts. Continue as follows (from RS): 6 garter sts, K1, P2, M.2 until 8 sts remain, P1, K1 and 6 garter sts. When piece measures a total of 52-53-54-55-56-57 cm work next rows as follows (from RS): 48-52-57-61-66-71 sts in pattern as before (= front piece), cast off 41-43-44-46-47-48 sts, work 88-94-100-106-112-118 sts in pattern as before (= back piece). Now complete front and back pieces separately. BACK PIECE: = 88-94-100-106-112-118 sts. Continue in pattern and garter st as before, AT THE SAME TIME cast off 2 sts on next row from neck = 86-92-98-104-110-116 sts. Continue until piece measures a total of 57.5-58.5-59.5-60.5-62.5-63.5 cm (5.5-5.5-5.5-5.5-6.5-6.5 cm from where piece was divided), now K 2 rows on all sts and slip sts on a stitch holder. FRONT PIECE: = 48-52-57-61-66-71 sts. Continue in pattern and garter st as before, AT THE SAME TIME cast off at the beg of every row from shoulder: 14 sts 1-1-1-2-2-2 times, 10 sts 1-1-2-1-1-1 times, 6 sts 1-1-1-1-1-2 times, 4 sts 1-2-1-1-2-2 times, 2 sts 2-3-2-2-3-3 times and 1 st 4-2-3-3-2-1 times = 6 garter sts left on needle. Continue in garter st on these sts for tie ribbon for approx 25 cm, cast off. LEFT SIDE: Cast on and work like right side until piece measures 52-53-54-55-56-57 cm. Now work next rows as follows from RS: Work 88-94-100-106-112-118 sts in pattern as before (= back piece), cast off 41-43-44-46-47-48 sts and work 48-52-57-61-66-71 sts in pattern as before (= front piece). Now continue on front and back pieces separately as described for right side. ASSEMBLY: Graft the 2 sides tog (sts from stitch holders) mid back. Sew sleeve and side seams inside 1 edge st. Pick up sts along neckline on circular needle size 3 mm with Safran as follows: beg at bottom of right side (just above the 6 garter sts for tie ribbon), continue along neckline on back piece and down along left side to above the tie ribbon. Pick up approx 190 to 250 sts (= approx 24 sts on 10 cm). K 3 rows back and forth on needle and cast off. Fasten the border each side by tie ribbon. |
|||||||||||||||||||
Diagram explanations |
|||||||||||||||||||
|
|||||||||||||||||||
 |
|||||||||||||||||||
Have you finished this pattern?Tag your pictures with #dropspattern #remembermebolero or submit them to the #dropsfan gallery. Do you need help with this pattern?You'll find 19 tutorial videos, a Comments/Questions area and more by visiting the pattern on garnstudio.com. © 1982-2026 DROPS Design A/S. We reserve all rights. This document, including all its sub-sections, has copyrights. Read more about what you can do with our patterns at the bottom of each pattern on our site. |
|||||||||||||||||||


With over 40 years in knitting and crochet design, DROPS Design offers one of the most extensive collections of free patterns on the internet - translated to 17 languages. As of today we count 324 catalogues and 12290 patterns translated into English (UK/cm). 12290
We work hard to bring you the best knitting and crochet have to offer, inspiration and advice as well as great quality yarns at incredible prices! Would you like to use our patterns for other than personal use? You can read what you are allowed to do in the Copyright text at the bottom of all our patterns. Happy crafting!
Post a comment to pattern DROPS 119-29
We would love to hear what you have to say about this pattern!
If you want to leave a question, please make sure you select the correct category in the form below, to speed up the answering process. Required fields are marked *.