
Popular categories
Looking for a yarn?


Comments / Questions (26)
![]() Sigrun wrote:
Sigrun wrote:
Hei. Finnes denne oppskriften for barn også?
20.08.2019 - 23:09DROPS Design answered:
Hej. Nej den finns dessvärre inte till barn. Om du söker på kortärmad kofta barn så får du några andra alternativ. Mvh DROPS Design
21.08.2019 - 11:24
![]() Alice wrote:
Alice wrote:
Hello, I am enjoying working with this pattern so far. However I am struggling to insert the puff sleeves into the arm hole as the shape of the sleeve piece is not quite the same as the arm hole. Do you have any advice for this? Thank you
05.03.2019 - 14:19DROPS Design answered:
Dear Alice, the top of sleeve cap should match the shoulder (the middle of sleeve cap = seam on shoulder), insert the sleeve with pins if necessary and then you will just have to sew the sleeve around armhole. Happy knitting!
05.03.2019 - 14:49
![]() Petra wrote:
Petra wrote:
Hallo, kann ich auch Merino Extra Fine mit Super Kid Silk stricken, also doppelter Faden? Die Maschenprobe ist dann natürlich nicht mehr passend wegen des doppelten Fadens. Wie komme ich zu der richtigen Größe bzw. Machenprobe für dieses Modell hier? Danke im Voraus!
15.01.2019 - 00:52DROPS Design answered:
Liebe Petra, Kid-Silk gehört zur Garngrupupe A und steht hier nicht als Alternativ für Merino = Garngruppe B. Hier lesen Sie mehr über die Alternative und so können Sie wissen, im welchen Fälle Sie Kid-Silk stricken können. Viel Spaß beim stricken!
15.01.2019 - 09:53
![]() Elise wrote:
Elise wrote:
Bonjour, pour le devant : comment augmenter d'une maille tous les 2 et 3 rangs tout en faisant l'augmentation toujours côté milieu? Il y a quelque chose que je ne dois pas comprendre. Pouvez- vous m'aider? Merci
14.11.2016 - 20:48DROPS Design answered:
Bonjour Élise, l'augmentation se fera toujours du même côté (= milieu devant/bordure devant), c'est-à-dire soit en début, soit en fin de rang pour bien conserver le rythme tous les 2/3 rangs. Bon tricot!
15.11.2016 - 09:08
![]() Kristine Jonassen wrote:
Kristine Jonassen wrote:
Hvordan kan jeg øke 24 ganger på forstykket og ende opp med å øke 12 masker? I oppskriften står det øk 24 ganger, her i kommentarene skriver Gry at man bare skal øke 12 ganger og det skriver også drops design under. Skal jeg øke 12 eller 24 masker mot midten på hvert forstykke? På forhånd tusen takk for svar Viser til samtalen lenger ned på siden mellom Gry og drops design
22.03.2014 - 18:04DROPS Design answered:
Hej igen Kristine Du ökar 1 m 24 ggr på forstk mot framkant. Samtidigt feller du först masker i sidan för att sedan öka masker i sidan igen. Efter att du er ferdig med de 24 ökningarna fram så starter fellingene fram till hals.
27.03.2014 - 22:06
![]() Kristine Jonassen wrote:
Kristine Jonassen wrote:
Til spörsmålet lenger ned på siden: Hvordan kan man öke 24 ganger på forstykket og bare få 12 masker ekstra? På forhånd tusen takk for svar
17.03.2014 - 11:48DROPS Design answered:
Hej Christina. Jeg ved ikke lige hvor du ser det, men du öker först til forstykket, men du skal ogsaa felle baade i siden til aermegab og til hals. Naar du er helt faerdig med det, skulle du have 25 m paa p i alle str.
17.03.2014 - 14:32
![]() Stine S wrote:
Stine S wrote:
Nydelig jakke! Har strikket hele tre stk. Passer perfekt til ALT!
04.06.2013 - 00:12
![]() Britt wrote:
Britt wrote:
Får ikke fellingen på armen til å gå opp med 22 masker igjen tilslutt.
03.07.2012 - 11:03DROPS Design answered:
Mönstret stemmer. Du strikker 2 m r sm 6 ganger, 3 m r sm 8 ganger og 2 m r sm 6 ganger = 50-6-16-6 m = 22 m igjen
14.11.2012 - 18:49
![]() Marie Danneels wrote:
Marie Danneels wrote:
Sorry, sorry, sorry, absoluut gelijk. Ik had over het hoofd gezien dat je alles in één en dezelfde naald verwerkt. Klopt dus wel 100 % ! Hartelijk dank om mij te helpen ! Was op reis dus excuses voor de late reactie.
26.02.2012 - 17:18
![]() DROPS Design NL wrote:
DROPS Design NL wrote:
Het patroon klopt. In de laatste nld moet u samen breien. Voor maat S begint u hier meteen mee (0 st r breien), dan breit u 6 keer 2 st r samen (= 6 st), 8 keer 3 st r samen (= 8 st) en 6 keer 2 st r samen (= 6 st). Op deze manier wordt 48 st 20 st.
13.02.2012 - 14:18
|
|
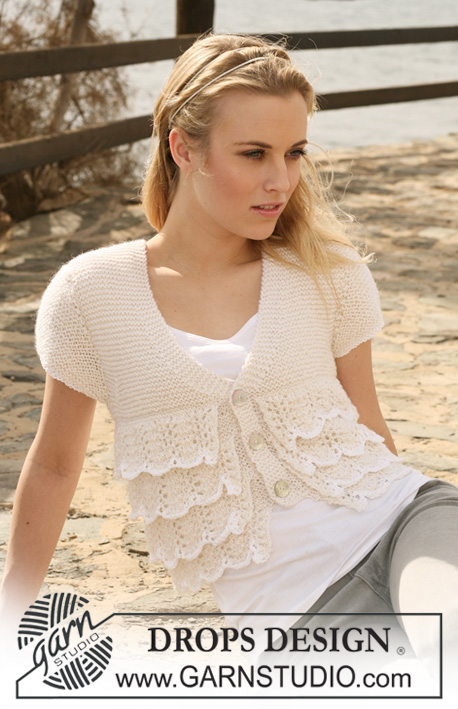
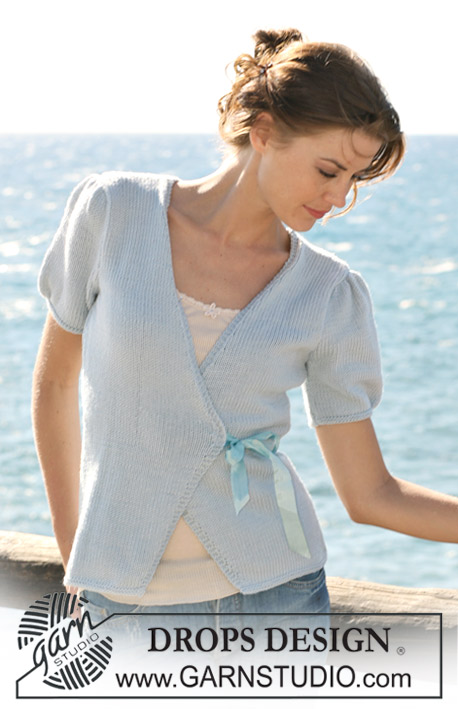
Seashell Wrap#seashellwrapcardigan |
|
 |
 |
DROPS wrap round jacket in stocking st in ”Merino Extra Fine”. Size S-XXXL.
DROPS 119-15 |
|
|
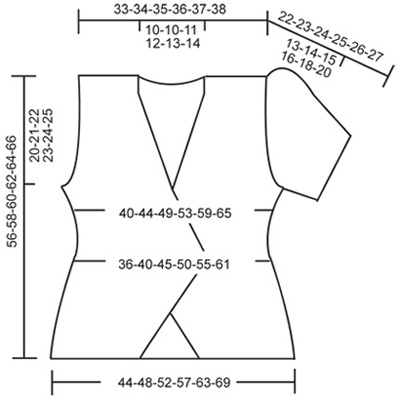
GARTER ST (back and forth on needle): K all rows. DECREASING TIP: Left front piece: Dec inside 3 garter sts by K2 tog. Right front piece: Dec inside 3 garter sts by slip 1 st as if to K, K1, psso. INCREASING TIP: Inc 1 st by making 1 YO inside 3 garter sts. Work YO into back of loop on return row to avoid a hole. -------------------------------------------------------- -------------------------------------------------------- BACK PIECE: Worked back and forth on circular needle. Cast on 94-102-112-122-134-146 sts (includes 1 edge st each side) on circular needle size 3 mm with Merino Extra Fine. Work 4 rows GARTER ST – see above! Change to circular needle size 4 mm and continue in stocking st. REMEMBER THE KNITTING TENSION! When piece measures 6 cm dec 1 st each side and repeat the dec on every 1.5 cm a total of 8 times = 78-86-96-106-118-130 sts. When piece measures 22 cm inc 1 st each side and repeat the inc on every 3-3.5-4-4-4.5-5 cm a total of 4 times = 86-94-104-114-126-138 sts. When piece measures 36-37-38-39-40-41 cm cast off for armhole each side at beg of every row: 3 sts 1 time, 2 sts 2-3-4-6-8-10 times and 1 st 1-2-4-4-5-6 times = 70-72-74-76-78-80 sts. When piece measures 53-55-57-59-61-63 cm work 4 rows garter st on the middle 26-28-30-32-34-36 sts, with remaining sts in stocking st. Now cast off the middle 18-20-22-24-26-28 sts for neck and complete each shoulder separately. On next row K2 tog on neckline = 25 sts left on shoulder for all sizes. Cast off when piece measures 56-58-60-62-64-66 cm. LEFT FRONT PIECE: Worked back and forth on circular needle. Cast on 34-38-42-48-54-60 sts (includes 1 edge st at the side) on circular needle size 3 mm with Merino Extra Fine. Work 4 rows garter st. Change to circular needle size 4 mm. READ ALL OF THE FOLLOWING SECTION BEFORE CONTINUING: Continue in stocking st with 3 garter sts towards mid front (= front band, worked in garter st throughout). AT THE SAME TIME inc 1 st towards mid front on first row from RS – see INCREASING TIP – and repeat the inc towards mid front on every other and 3rd row alternately a total of 24 times (piece measures approx 22 cm when inc are complete). AT THE SAME TIME when piece measures 6 cm dec at the side as described for back piece. When piece measures 22 cm inc at the side as described for back piece. AT THE SAME TIME when piece measures 23 cm dec 1 st towards mid front for neck on next row from RS – see DECREASING TIP! Repeat the dec towards mid front on every 4th row a total of 21-22-22-24-25-26 times. When piece measures 36-37-38-39-40-41 cm cast off for armhole at the side as described for back piece. When all dec are complete there are 25 sts on needle for all sizes. Cast off when piece measures 56-58-60-62-64-66 cm. RIGHT FRONT PIECE: Like left front piece, but mirrored. SLEEVE: Worked back and forth on circular needle. Cast on 56-58-60-64-66-68 sts (includes 1 edge st each side) on circular needle size 3 mm with Merino Extra Fine. Work 4 rows garter st. Change to circular needle size 4 mm and work next row as follows from RS: stocking st on the first 25-26-27-28-29-30 sts, * 1 YO, work 2 sts in next st as follows: K1, K1 in back of loop *, repeat from *-* a total of 6-6-6-8-8-8 times, work stocking st on the remaining 25-26-27-28-29-30 sts = 68-70-72-80-82-84 sts. P YO into back of loop on return row. Continue in stocking st on all sts. When piece measures 9-9-9-9-8-7 cm cast off 4 sts for sleeve cap at beg of the next 2 rows. When piece measures 12 cm dec 2 sts each side by K3 tog each side from RS. Repeat the dec on every 3-3-4-4-5-5 cm a total of 3 times = 48-50-52-60-62-64 sts. When piece measures 21-22-23-24-25-26 cm dec on next row from RS as follows: K 0-1-0-1-0-1 sts, K2 tog a total of 6-6-7-7-8-8 times, K3 tog a total of 8-8-8-10-10-10 times, K2 tog a total of 6-6-7-7-8-8 times, finish with K 0-1-0-1-0-1 sts = 20-22-22-26-26-28 sts. Cast off. ASSEMBLY: Sew shoulder seams. Set in sleeves. Sew sleeve and side seams inside 1 edge st on the right side. Sew a 50 cm long silk ribbon on the inside of the widest part of right front piece. Sew a 50 cm long silk ribbon at the same height on the inside of right front piece (in side seam). Sew a 50 cm long silk ribbon on the inside of the widest part of left front piece. Sew a 50 cm long silk ribbon at the same height on the inside of left front piece (in edge st). Sew sleeve and side seams inside 1 edge st on the left side, with silk ribbon on the outside of front piece. |
|
 |
|
Have you finished this pattern?Tag your pictures with #dropspattern #seashellwrapcardigan or submit them to the #dropsfan gallery. Do you need help with this pattern?You'll find 17 tutorial videos, a Comments/Questions area and more by visiting the pattern on garnstudio.com. © 1982-2026 DROPS Design A/S. We reserve all rights. This document, including all its sub-sections, has copyrights. Read more about what you can do with our patterns at the bottom of each pattern on our site. |
|


With over 40 years in knitting and crochet design, DROPS Design offers one of the most extensive collections of free patterns on the internet - translated to 17 languages. As of today we count 324 catalogues and 12290 patterns translated into English (UK/cm). 12290
We work hard to bring you the best knitting and crochet have to offer, inspiration and advice as well as great quality yarns at incredible prices! Would you like to use our patterns for other than personal use? You can read what you are allowed to do in the Copyright text at the bottom of all our patterns. Happy crafting!
Post a comment to pattern DROPS 119-15
We would love to hear what you have to say about this pattern!
If you want to leave a question, please make sure you select the correct category in the form below, to speed up the answering process. Required fields are marked *.