
Popular categories
Looking for a yarn?


Comments / Questions (26)
![]() Karla wrote:
Karla wrote:
Pletenie kabelky ma veľmi bavilo, celý proces bol pre mňa novinkou, nevedela som sa dočkať konečného výsledku. Spokojná som, určite to nie je posledný plstený návod:)
27.01.2026 - 19:41
![]() Guével wrote:
Guével wrote:
Peut on laver 2 couleurs ensemble pour le feutrage? Merci
15.07.2023 - 21:02DROPS Design answered:
Bonjour Mme Guével. Bien sur, vous pouvez le faire. Bon travail!
15.07.2023 - 21:07
![]() Cynthia R Watson wrote:
Cynthia R Watson wrote:
I’m being lazy, and I don’t want to sew the straps to make a tube. Is there a reason I can’t do an I-cord? I did a sample and it looks like the one I already knitted, but did not sew up the sides.
29.12.2019 - 03:12DROPS Design answered:
Dear Cynthia, the strap on the modell was knitted on 8 stitches, and it is kind of difficult to keep the stitches even on this many stitches (especially where you push the piece to the other end of the needle), but not impossible. You can, of course try it, but make sure to pull the yarn thight. Felting usually hides many inconsistencies in knitting. Happy Crafting!
29.12.2019 - 08:24
![]() Claudi wrote:
Claudi wrote:
Ich hab`s geschafft - vielen Dank für diese tolle Anleitung. Sieht super süss aus!
15.04.2018 - 17:26
![]() Claudi wrote:
Claudi wrote:
Hallo liebes Drops-Team Ich frage mich bei der Schmalseite/Boden: Nach 25 cm einen Markierungsfaden einziehen. Nach 40 cm einen weiteren Markierungsfaden einziehen (hier beginnt die 2. Schmalseite). 40 cm ab dem 1. Markierungsfaden vermutlich, oder? Lieben Dank für eure Antwort im Voraus! LG Claudi
04.04.2018 - 21:45
![]() Melanie Altmann wrote:
Melanie Altmann wrote:
Hallo liebes Drops Team, ich habe die Tasche jetzt fertig gestrickt. Meine Frage zum zusammen nähen. Werden die an der Schmalseite weniger werdenden Maschen (22)(14)(6) mit an das Seitenteil angenäht? Oder hört man bei 22 Maschen auf mit dem Zusammennähen? Noch ist die Tasche rechteckig,möchte sie auch gerne oval, abgerundet haben. Vielen Dank für die Antwort. Melanie
05.11.2014 - 07:55DROPS Design answered:
Sie müssen die schmaler werdenden Stücke auch mit an die Seiten nähen - die Seitenteile sollten ja so hoch sein wie die schmalste Stelle des Schmalseiten-/Bodenteils. Die Abkettkanten der Seitenteile und die Anschlagkante bzw. Abkettkante (= je 6 M) des Schmalseitenteils bilden dann den oberen Rand. So erhalten Sie dann auch die Rundung.
07.11.2014 - 22:06
![]() Benedetta wrote:
Benedetta wrote:
Buongiorno,avrei bisogno di un aiuto.Dopo aver ripreso le 40 m tra i due segni,lavorare per 30 cm ,questa parte però' deve combaciare con la stessa altezza dei lati della borsa che è' invece 25 cm.Grazie x l'aiuto.
29.10.2014 - 15:06DROPS Design answered:
Buongiorno Benedetta. Il davanti e il dietro della borsa devono essere un po’ più lunghi dei lati perché i lati sono leggermente arrotondati nella parte superiore. Se preferisce, per essere sicura della correttezza della misura, prima di chiudere le maglie del davanti, può provare ad imbastire il davanti ai lati. Buon lavoro!
30.10.2014 - 12:11
![]() Benedetta wrote:
Benedetta wrote:
Buongiorno,avrei bisogno di un aiuto .Ho ripreso 40 m tra i due segni e dovrei lavorare x 30 cm.pero' questo pezzo deve avere la stessa altezza dei lati della borsa e cioè' 25 cm .non riesco a capire,potete aiutarmi ? Grazie!
29.10.2014 - 14:44DROPS Design answered:
Buongiorno Benedetta. Il davanti e il dietro della borsa devono essere un po’ più lunghi dei lati perché i lati sono leggermente arrotondati nella parte superiore. Se preferisce, per essere sicura della correttezza della misura, prima di chiudere le maglie del davanti, può provare ad imbastire il davanti ai lati. Buon lavoro!
30.10.2014 - 12:11
![]() Melania wrote:
Melania wrote:
Mi piace molto! É una borsa coccola per l'inverno!
24.09.2013 - 07:47
![]() Jenny wrote:
Jenny wrote:
This bag was so quick & fun to make & felted beautifully. Love it!
06.07.2011 - 08:47
|
|
Kiwi#kiwibag |
|
|
|
|
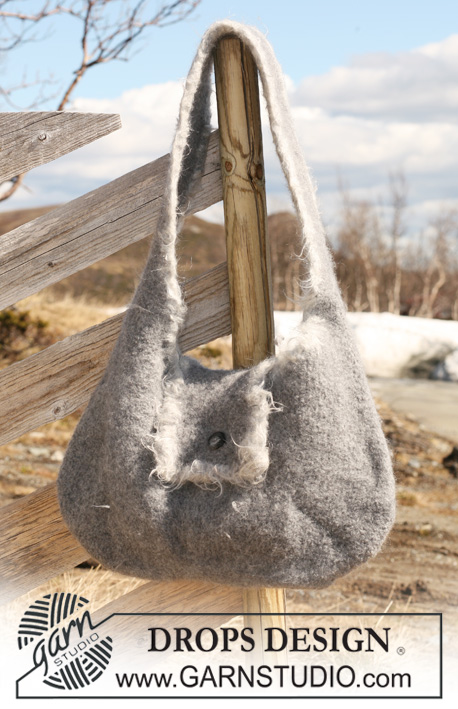
Felted DROPS bag in ”Snow”.
DROPS 117-7 |
|
|
BAG: Work end piece of bag first, then the bottom piece and then the other end piece. Now pick up sts along one side of bottom and knit front piece. Pick up sts the other side of bottom piece and knit back piece. Then knit flap and straps. END PIECE AND BOTTOM: Cast on 6 sts on needle size 9 mm with khaki and work stocking st, AT THE SAME TIME on row 2 cast on 4 new sts at the end of row, at the end of next row cast on 4 new sts the other side. Repeat the inc each side 1 more time = 22 sts. Continue in stocking st until piece measures 25 cm. Insert a marker (end piece is now finished). REMEMBER THE KNITTING TENSION! Continue in stocking st until piece measures 40 cm from marker, insert a new marker (piece between the 2 markers = the bottom). Continue until piece measures 21 cm from the last marker. Now cast off at the beg of every row: 4 sts 2 times each side = 6 sts left on needle. Cast off. FRONT AND BACK PIECES: Front piece: Pick up 40 sts between the 2 markers along one side of bottom on needle size 9 mm with khaki – pick up in outer loops of sts. Work stocking st for approx 30 cm (piece should measure the same as end pieces), and cast off. Back piece: Repeat along the other side of bottom, but when piece measures approx 30 cm (adjust to end pieces) only cast off 13 sts each side = 14 sts left on needle for flap. Continue in stocking st on these 14 sts for 18 cm. On next row cast off the 4 middle sts for buttonhole, and cast on 4 new sts over cast off sts on next row. Work 4 rows on all sts, and cast off. STRAP: Cast on 8 sts on needle size 9 mm with dark brown. Work stocking st back and forth on needle for approx 80 cm (1 ball of yarn) cast off. Sew strap tog, edge to edge, to a tube, but leave 5 cm each end. Knit 1 more strap. ASSEMBLY: Sew front and back pieces to end pieces, edge to edge. Do not sew on straps before felting! FELTING: The piece can be felted either in the washing machine or the tumble dryer – read description below. Remember: Subsequent washes are as for a normal wool garment. IN WASHING MACHINE: Washing machines will vary when felting. If the piece is not felted enough, it can be felted again. If it is felted too much, it can be stretched to the correct size while still wet. DO THE FOLLOWING: Lay the piece in the washing machine, using a programme of approx. 40 minutes (not a wool programme). Wash at 40 degrees without pre-wash, detergent is optional. After washing, shape the piece while it is still wet. IN TUMBLE DRYER: Felting in a tumble dryer gives good control over the degree of felting. The tumble dryer can be opened during drying to check the size of the piece. If it is not felted enough it can be thoroughly wetted and felted again. If it is felted too much it can be stretched to the correct size while still wet. DO THE FOLLOWING: Lay the piece in water so it becomes completely wet, then place it in the tumble dryer and begin the drying process. Dry to the desired size, checking regularly. FURTHER ASSEMBLY: Sew a strap to the outside of bag on front and back piece – let the seam on strap face the bag. Sew on button to fit buttonhole on flap. |
|
Have you finished this pattern?Tag your pictures with #dropspattern #kiwibag or submit them to the #dropsfan gallery. Do you need help with this pattern?You'll find 12 tutorial videos, a Comments/Questions area and more by visiting the pattern on garnstudio.com. © 1982-2026 DROPS Design A/S. We reserve all rights. This document, including all its sub-sections, has copyrights. Read more about what you can do with our patterns at the bottom of each pattern on our site. |


With over 40 years in knitting and crochet design, DROPS Design offers one of the most extensive collections of free patterns on the internet - translated to 17 languages. As of today we count 324 catalogues and 12290 patterns translated into English (UK/cm). 12290
We work hard to bring you the best knitting and crochet have to offer, inspiration and advice as well as great quality yarns at incredible prices! Would you like to use our patterns for other than personal use? You can read what you are allowed to do in the Copyright text at the bottom of all our patterns. Happy crafting!
Post a comment to pattern DROPS 117-7
We would love to hear what you have to say about this pattern!
If you want to leave a question, please make sure you select the correct category in the form below, to speed up the answering process. Required fields are marked *.