
Popular categories
Looking for a yarn?


Comments / Questions (32)
![]() Helle Alring wrote:
Helle Alring wrote:
Jeg kan ikke finde forstå hvordan jeg skal tage ud. Har brug for at følge beskrivelsen slavisk evt efter diagram. Kan godt se at jeg skal strikke på skrå i siderne, forstår ikke hvordan. Har strikket meget og aldrig før fundet en opskrift så svær. Har lavet 5-6 forsøg og hyllet op. Kan i hjælpe? Mvh Helle alring
20.12.2024 - 22:01DROPS Design answered:
Hei Helle. Oppskriften er oversendt til Design avd. slik at de kan dobbeltsjekke den. mvh DROPS Design
08.01.2025 - 10:30
![]() Christiane wrote:
Christiane wrote:
Merci pour votre prompte réponse. Mais comment faire pour qu'à l'intérieur ou au-dessus des jetés de M1A + M1C il y ait d'abord 1 m et ensuite 3 m. etc.jusqu'a ce que les 2 diagrammes côte àcôte atteignent 21 m ? J'ai compris les 4 augmentations mais pas les augmentations de M1A et M1C. Merci encore de votre réponse.
06.08.2024 - 14:42DROPS Design answered:
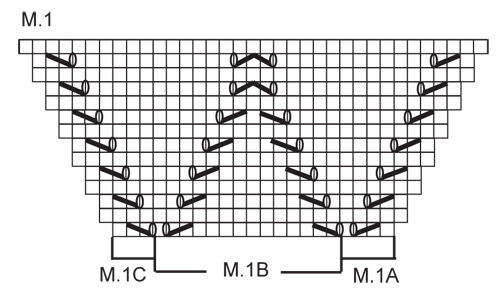
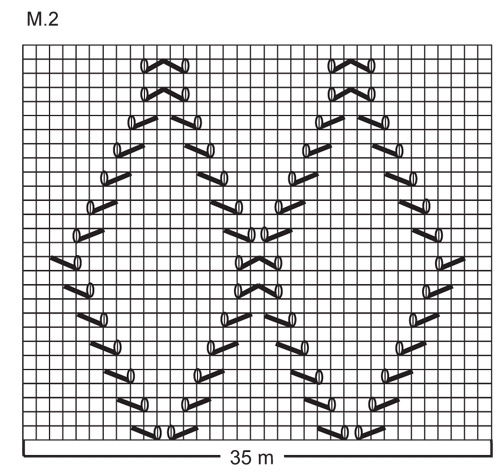
Bonjour Christiane, vous tricotez ainsi: : 3 m point mousse, augmenter 1 m , 1 m point mousse, tricotez M1A (= 4 m) puis M1C (= 3 m) (sautez M.1B ici), 1 m end, augmenter 1 m , 1 m end, tricotez les 35 m de M2, 1 m end, augmenter 1 m , 1 m end, tricotez M1A et M1C (sautez M.1B ici) et terminer par 1 m point mousse, augmenter 1 m , 3 m point mousse. Quand vous aurez terminé M.1 A et C en hauteur (= 14rangs), vous pourrez tricoter M.1B entre M.1A et M.1C. Bon tricot!
06.08.2024 - 15:52
![]() Christiane wrote:
Christiane wrote:
Bonjour. Pour Drops 111-17: je ne comprends pas comment augmenter M1A et M1C, car les jetés sont compensés par les mailles ensemble. Merci de votre réponse.
05.08.2024 - 22:24DROPS Design answered:
Bonjour Christiane, augmentez comme indiqué sous AUGMENTATIONS au tout début des explications - autrement dit, on n'augmente pas dans les diagrammes, on augmente avant M.1A, de part et d'autre d'1 m endroit après M.1C et avant M.2, de part et d'autre d'1 m endroit après M.2 et avant M.1A et avant les 3 m point mousse à la fin du rang. Bon tricot!
06.08.2024 - 09:26
![]() Rita wrote:
Rita wrote:
Het is mij niet helemaal duidelijk hoe ik de vierkantjes met de gaatjes aan de rand van de omslagdoek brei, kunnen jullie dat in een telschema uitleggen? Ik wil graag een truitje met dat patroon breien. Alvast dank, Rita
29.01.2024 - 23:46DROPS Design answered:
Dag Rita,
Het ruitjespatroon wordt gecreëerd met telpatroon M.1, waarbij de steken diagonaal lopen. Als je goed kijkt kun je dit zien in de tweede foto.
31.01.2024 - 20:05
![]() Lorene Frischknecht wrote:
Lorene Frischknecht wrote:
Would you kindly translate this pattern into English? I would really appreciate it! Thank you very much!
05.06.2023 - 05:44DROPS Design answered:
Hi Lorene, All our patterns are translated into English, both UK and US . Click on the box below the photograph (endre språk) and choose your language. Happy crafting!
05.06.2023 - 07:44
![]() Carla Tjon wrote:
Carla Tjon wrote:
Is het mogelijk om de combinatie DROPS Brushed Alpaca Silk en DROPS Baby Merino te gebruiken voor het patroon 'Just Jade/ DROPS 111-17?
28.10.2021 - 16:09DROPS Design answered:
Dag Carla,
Nee, want brushed Alpaca Silk valt in garencategorie C en Baby Merino in categorie A, je krijgt dan een dikker breiwerk een een andere stekenverhouding. Het beste kun je 2 draden uit categorie A kiezen of 1 draad uit categorie C.
29.10.2021 - 12:51
![]() Maureen wrote:
Maureen wrote:
Love it
31.07.2020 - 22:16
![]() Szymanek wrote:
Szymanek wrote:
Bonjour Je souhaite réaliser ce modèle de châle en coton, quel fil puis-je utiliser pour que cela concorde ? Merci Christelle
26.04.2020 - 15:46DROPS Design answered:
Bonjour Mme Szymanek, vous pouvez tout à fait le réaliser soit avec 2 fils de coton du groupe A, soit avec 1 fil de coton du groupe C (= 2 fils A = 1 fil C). Vous trouverez ici plus d'informations sur les alternatives. Bon tricot!
27.04.2020 - 09:59
![]() Flomain wrote:
Flomain wrote:
Merci pour votre réponse rapide Par contre si on augmente pour former un triangle on commence par le bas (moins large qu'un haut) donc on tricotte de bas en haut !!!
17.10.2019 - 11:16DROPS Design answered:
Bonjour Mme Flomain, on tricote bien de haut en bas, on peut voir sur la photo le rang ajouré le long des 3 m point mousse du bord = ce sont les augmentations faites en début/fin de rang sur l'endroit à 3 m du bord. En même temps, on va augmenter de part et d'autre des 37 mailles centrales. Cette vidéo montre comment réaliser un autre modèle de châle, de haut en bas, en augmentant de chaque côté + de chaque côté des mailles centrales, cela vous aidera peut-être à visualiser comment on doit faire. Bon tricot!
17.10.2019 - 11:37
![]() Flomain wrote:
Flomain wrote:
Bonjour Par où commencez ? Car avec 45 mailles on ne peut commencer par le haut du châle comme j'ai pu lire !!!
16.10.2019 - 00:35DROPS Design answered:
Bonjour Mme Flomain, ce châle se tricote de haut en bas, on monte 45 mailles et on va augmenter de chaque côté + avant/après les 37 m centrales. Le nombre de mailles entre la maille lisière et les 37 m centrales va ainsi augmenter de chaque côté pour créer un triangle. Bon tricot!
17.10.2019 - 08:55
|
||||||||||||||||
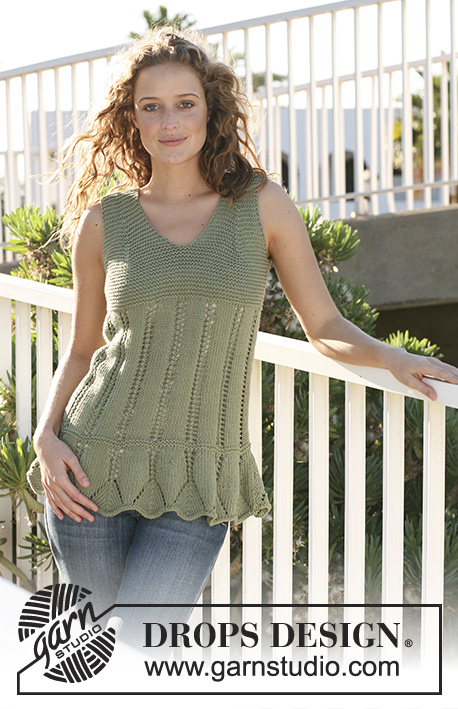
Just Jade#justjadeshawl |
||||||||||||||||
|
|
||||||||||||||||
DROPS shawl in garter st with lace pattern in ”Alpaca” and “Kid-Silk”.
DROPS 111-17 |
||||||||||||||||
|
PATTERN: See diagram M.1 and M.2. The diagrams show the pattern from the RS. GARTER ST (back and forth on needle): K all rows. INCREASING TIP: Make all inc from RS. Inc 4 sts on every other row (= the RS) throughout as follows: Inc 1 st at beg of row: work 3 garter sts, 1 double YO. On return row K all sts (K the first YO and slip the other off needle – to make the hole larger). Inc 2 sts mid back: beg 1 st before marker, K1, 1 double YO, marker, 1 garter st, M.2 (= 35 sts), 1 garter st, marker, 1 double YO, K1. On return row K all sts (K the first YO and slip the other off needle). Inc 1 st at the end of row: beg 3 sts before end of row, 1 double YO, 3 garter sts. On return row K all sts (K the first YO and slip the other off needle). Incorporate inc sts in pattern as you go along. MEASUREMENT TIP: Because of the weight of the yarn all measurements should be made while the shawl is hanging. -------------------------------------------------------- SHAWL: Worked back and forth on circular needle in order to fit in all sts, from mid back on neckline and down, in garter st. NOTE! Make sure to start a new ball of yarn at the side and not mid piece. Cast on 45 sts on circular needle size 3.5 mm with 1 thread of each quality. Work 5 rows garter st and now insert 2 markers in piece 4 sts in from each side = 37 sts between markers (= middle section). Now inc on every other row (= the RS) at both sides and on each side of the middle section until finished measurements – SEE INCREASING TIP! Work garter st until there are 61 sts on row. K 1 row from WS and continue as follows: 3 garter sts, inc 1 st as before, 1 garter st, M.1 A (= 4 sts), M.1 C (= 3 sts), K1, inc 1 st as before, K1, M.2 (= 35 sts), K1, inc 1 st as before, K1, M.1 A, M.1 C and finish with 1 garter st, inc 1 st as before, 3 garter sts. After 1 vertical repeat of M.1 (= 89 sts) continue as follows: 3 garter sts, inc 1 st as before, 1 garter st, M.1 A, M.1 B on the next 14 sts, M.1 C, K1, inc 1 st as before, K1, M.2 (= 35 sts), K1, inc 1 st as before, K1, M.1 A, M.1 B on the next 14 sts, M.1 C, 1 garter st, inc 1 st as before, 3 garter sts. Continue in pattern like this, but for each vertical repeat of M.1 work 1 extra repeat of M.1 B on each side of middle section. When piece measures approx 80 cm or desired length – SEE MEASUREMENT TIP – adjust to a full repeat of M.2, work 4 rows garter st on all sts. Work next row as follows: K4 * K2 tog, 1 double YO *, repeat from *-*, until 4 sts remain, K4. K 1 row (K the first YO and slip the other off needle). Work 6 rows garter st on all sts and cast off loosely. |
||||||||||||||||
Diagram explanations |
||||||||||||||||
|
||||||||||||||||
 |
||||||||||||||||
 |
||||||||||||||||
Have you finished this pattern?Tag your pictures with #dropspattern #justjadeshawl or submit them to the #dropsfan gallery. Do you need help with this pattern?You'll find 12 tutorial videos, a Comments/Questions area and more by visiting the pattern on garnstudio.com. © 1982-2026 DROPS Design A/S. We reserve all rights. This document, including all its sub-sections, has copyrights. Read more about what you can do with our patterns at the bottom of each pattern on our site. |
||||||||||||||||


With over 40 years in knitting and crochet design, DROPS Design offers one of the most extensive collections of free patterns on the internet - translated to 17 languages. As of today we count 324 catalogues and 12290 patterns translated into English (UK/cm). 12290
We work hard to bring you the best knitting and crochet have to offer, inspiration and advice as well as great quality yarns at incredible prices! Would you like to use our patterns for other than personal use? You can read what you are allowed to do in the Copyright text at the bottom of all our patterns. Happy crafting!
Post a comment to pattern DROPS 111-17
We would love to hear what you have to say about this pattern!
If you want to leave a question, please make sure you select the correct category in the form below, to speed up the answering process. Required fields are marked *.