
Popular categories
Looking for a yarn?


Comments / Questions (90)
![]() Myrthe Van Den Boer wrote:
Myrthe Van Den Boer wrote:
Dag, Dus als ik het goed begrijp zet ik vanaf middenvoor steken op een hulpdraad en dan brei ik over al de overige steken verder? Dus middenin het werk of aan de zijkant?
27.04.2025 - 10:48DROPS Design answered:
Dag Myrthe,
Ja dat klopt, aan de kant waar midden voor komt (dus niet midden in het werk) zet je de steken op een hulpdraad.
04.05.2025 - 10:39
![]() Myrthe Van Den Boer wrote:
Myrthe Van Den Boer wrote:
Dag. Ik ben bezig met het linker voorpand en achterpand. Hoe wordt precies bedoeld ' Zet nu 19-20-22-23-24-25st vanaf middenvoor op een hulpdraad'? Alvast bedankt
26.04.2025 - 18:51DROPS Design answered:
Dag Myrthe,
Aan de kant van midden voor zet je steken op een hulpnaald, dit zijn de steken van de hals. Op het einde van deze paragraaf (laatste zin) brei je een aantal cm ribbelsteek over deze steken en deze kraag/hals wordt aan de achterkant bevestigd.
27.04.2025 - 10:06
![]() Karin wrote:
Karin wrote:
Bitte nochmal wie ist das gemeint gegen das Rückenteil 18 Maschen zunehmen?
15.02.2025 - 17:14DROPS Design answered:
Siehe unten :)
17.02.2025 - 08:22
![]() Karin wrote:
Karin wrote:
In welcher Richtung wird zugenommen, zum Hals hin oder am unteren Ende des Rückenteils? Gegen das Rückenteil 18 Maschen zunehmen. Besten Dank für schnelle Antwort
15.02.2025 - 17:08DROPS Design answered:
Liebe Karin, die 18 M am Ende rechtes Vorderteil/Rückenteil schlagen Sie am Ende einer Hinreihe (oder am Anfang einer Rückreihe je nach Ihrer Arbeit, damit die Krausrippen weitergestrickt wird), diese Maschen werden dann am Halsausschnit/ Rückenteil genäht.Viel Spaß beim Stricken!
17.02.2025 - 08:21
![]() Andrea Andres wrote:
Andrea Andres wrote:
Ich soll nach 19 cm, in jeder 4. reihe auf beiden Seiten 6 mal zunehmen. Dann stimmen bei mir die Maschenzahlen nicht mehr. Was mache ich falsch? ich habe dann 122 Maschen.
16.07.2024 - 21:53DROPS Design answered:
Liebe Andrea, Sie haben 100 Maschen angeschlagen. Dann nehmen Sie nach 19 cm an jeder Seite je 1 Masche zu, also pro Zunahmenreihe sind es 2 zugenommene Maschen, wenn Sie das dann insgesamt 6 x machen, kommen Sie auf 12 zugenommene Maschen. Damit haben Sie danach dann 112 Maschen. Viel Spaß beim Weiterstricken!
22.07.2024 - 09:30
![]() Roswitha Grassl wrote:
Roswitha Grassl wrote:
Ich habe die Größe L gestrickt und mit der längsgestreiften Seite angefangen und ich verstehe das nicht, das mein Vorderteil breiter ist als das Rückenteil. Was könnte ich verkehrt gemacht haben. Oder gehört das so 🤔
28.04.2024 - 21:28DROPS Design answered:
Liebe Frau Grassl, das Vorderteil wird 4 cm länger als das Rückenteil, weil man das Vorderteil mit der Blende endet. Viel Spaß beim Stricken!
29.04.2024 - 10:00
![]() Monika Brand wrote:
Monika Brand wrote:
Ich finde die Jacke und die Idee der verschiedenen Strickrichtungen super. Werde mich mit meinen Wollresten austoben. Danke für die kostenl. Anleitung.
27.03.2024 - 17:20
![]() Carmel Hogan wrote:
Carmel Hogan wrote:
Is there a gauge for this pattern?
25.03.2024 - 11:00DROPS Design answered:
Hi Carmel, The guage is with needle size 3.5 mm and 23 sts x 45 rows of garter stitch = 10 x 10 cm. Happy Easter!
25.03.2024 - 11:13
![]() Maaike Joustra wrote:
Maaike Joustra wrote:
Goeiemorgen! Ik zie in een zweeds commentaar dat de trui na het wassen er met één hangende kant uit gekomen is, zo’n 10 cm verschil?! Er is niet op gereageerd. Ik heb ook eens een trui gebreid met Fabel verknoeid door hem in de machine te doen. De trui kwam er uit als een jurk. Wat zegt het nederlandse team hier van?
31.12.2022 - 08:05DROPS Design answered:
Dag Maaike,
Fabel zou je op een wolwasprogramma, zonder wasverzachter moeten kunnen wassen. Let er op dat je het kledingstuk na het wassen plat laat drogen, zeker bij dit model waarbij de panden in verschillende richtingen zijn gereid.
01.01.2023 - 10:53
![]() Wendy wrote:
Wendy wrote:
Working the left front and back once the piece has reached the desired length. You are to now cast on 2 stitches at the end of every row from the WS (=at the side) a total of (x) times, is this worked every row or only on the wrong side.
11.12.2022 - 14:57DROPS Design answered:
Dear Wendy, only cast on in rows from the wrong side (which end at the side). Happy knitting!
12.12.2022 - 00:02
|
|||||||
Ocean Shore#oceanshorecardigan |
|||||||
 |
 |
||||||
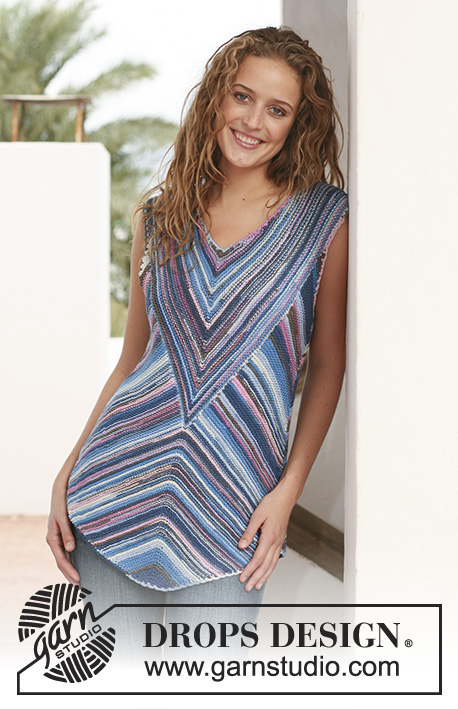
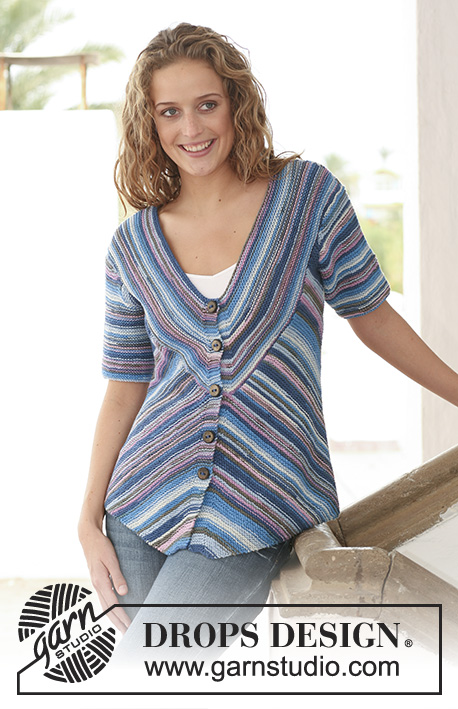
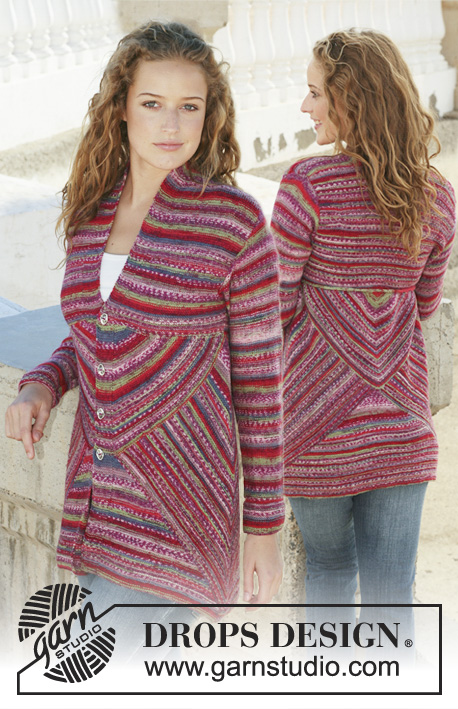
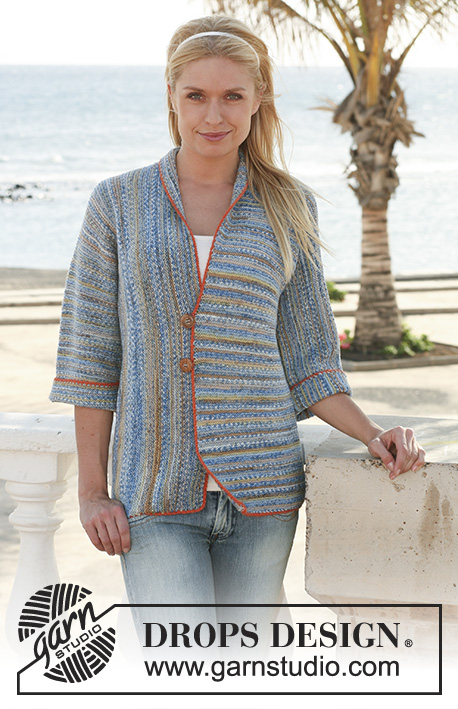
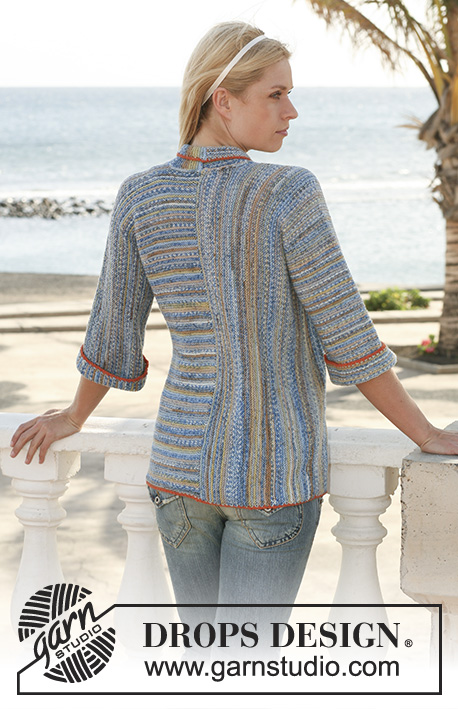
DROPS jacket in garter st in ”Fabel”. Knitted in 2 pieces with different knitting directions. Size S - XXXL.
DROPS 112-36 |
|||||||
|
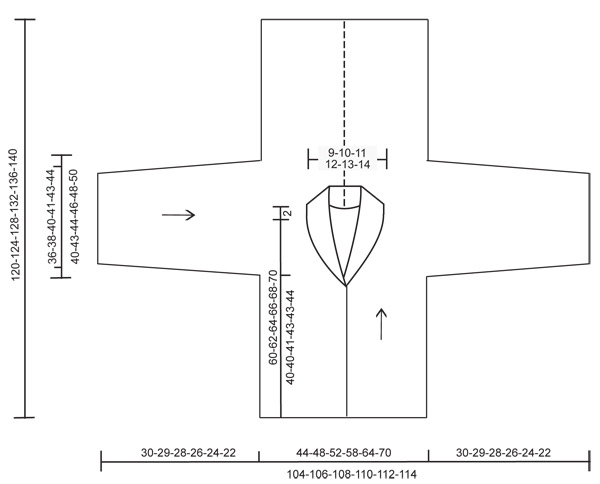
RIGHT FRONT AND BACK PIECE: Right front and back piece is worked from sleeve edge with inc sts for front and back pieces. Worked in garter st throughout, i.e. K all rows. Cast on 84-90-94-96-100-104 sts (includes 1 edge st each side) on circular needle size 3.5 mm with Fabel. Work garter st back and forth on needle until piece measures 26-25-24-21-19-16 cm (less for the larger sizes because of wider shoulder). Now inc 1 st each side on every 4 row a total of 5-5-5-6-6-7 times = 94-100-104-108-112-118 sts. Continue back and forth on needle until piece measures 30-29-28-26-24-22 cm. Now cast on 91-93-95-98-100-102 new sts each side = 276-286-294-304-312-322 sts. Insert a marker after 138-143-147-152-156-161 sts = middle of shoulder. Continue back and forth on needle on all sts until piece measures 17.5-19-20.5-23-25.5-28 cm from where the new sts were cast on. On next row from RS slip the first 138-143-147-152-156-161 sts on a stitch holder (= front piece). Cast off the next 5 sts (= neckline) = 133-138-142-147-151-156 sts left on needle (= back piece). Continue back and forth on needle on these sts for 4.5-5-5.5-6-6.5-7 cm. Cast off. Slip sts from stitch holder back on needle. Cast on 14-16-16-18-18-20 new sts at the end of row (= towards back piece) = 152-159-163-170-174-181 sts on needle. Continue back and forth on needle on these sts until piece measures 8.5-9-9.5-10-10.5-11 cm from where piece was divided. Cast off all sts. LEFT FRONT AND BACK PIECE: Left front and back piece is worked from bottom of front piece, with inc sts for sleeve, dec sts on sleeve, and then completed by working the back piece. Worked in garter st throughout, i.e. K all rows. Cast on 60-64-68-76-82-88 sts (includes 1 edge st at the side) on circular needle size 3.5 mm with Fabel. Work garter st back and forth on needle until piece measures approx 40-40-41-43-43-44 cm (adjust to fit the length of the new sts cast on each side on right front and back piece). Now cast on 2 sts at the end of every row from the WS (= at the side) a total of 5-5-5-6-6-7 times = 70-74-78-88-94-102 sts. Piece now measures approx 42-43-44-45-47-48 cm. At the end of next row from WS cast on 60-58-56-48-44-38 new sts (= sleeve) = 130-132-134-136-138-140 sts on needle. Insert a marker in piece. Continue in garter st back and forth on all sts until piece measures 18-19-20-21-21-22 cm from marker. Now slip 19-20-22-23-24-25 sts towards mid front on a stitch holder = 111-112-112-113-114-115 sts left on needle. Continue back and forth on needle until piece measures 20-21-22-23-23-24 cm from marker. Now cast on 10-11-13-14-15-16 new sts towards mid front (= neckline on back piece) = 121-123-125-127-129-131 sts. Continue back and forth on needle until piece measures 36-38-40-41-43-44 cm from marker. Now cast off 60-58-56-48-44-38 sts at the side (= sleeve) = 61-65-69-79-85-93 sts left on needle. Insert a new marker in piece, and now measure piece from here. Continue back and forth on needle, AT THE SAME TIME dec 2 sts at the side on every other row a total of 5-5-5-6-6-7 times = 51-55-59-67-73-79 sts. Continue back and forth on needle until piece measures approx 42-43-44-45-47-48 cm from marker (adjust to front piece). Cast off. Slip sts from stitch holder back on needle. Work 6-7-7-8-8-9 cm garter st back and forth on needle, cast off. ASSEMBLY: Sew the 2 pieces tog, edge to edge mid back. Sew under arm and side seams inside 1 edge st. Sew collar tog mid back and sew to neckline. CROCHET BORDER: Crochet a border round the whole jacket with 2 threads Alpaca and crochet hook size 4 mm as follows – beg mid back: 1 dc, * 1 ch, skip approx 0.5 to 1 cm, 1 dc *, repeat from *-* round neckline, down along front piece, along bottom edge, up along the other front piece and round neckline to mid back. Finish with 1 sl st in dc from beg of round. NOTE! On right front piece, work 2 buttonhole loops with approx 8 cm between them. Place the bottom one approx 16–18 cm from bottom edge. 1 buttonhole loop = work 8 ch instead of 1 ch. Sew buttons on left front piece, approx 4 cm from front edge. Crochet a similar border round both sleeve edges. Fold sleeve edges double towards RS – see picture. |
|||||||
Diagram explanations |
|||||||
|
|||||||
 |
|||||||
Have you finished this pattern?Tag your pictures with #dropspattern #oceanshorecardigan or submit them to the #dropsfan gallery. Do you need help with this pattern?You'll find 15 tutorial videos, a Comments/Questions area and more by visiting the pattern on garnstudio.com. © 1982-2026 DROPS Design A/S. We reserve all rights. This document, including all its sub-sections, has copyrights. Read more about what you can do with our patterns at the bottom of each pattern on our site. |
|||||||


With over 40 years in knitting and crochet design, DROPS Design offers one of the most extensive collections of free patterns on the internet - translated to 17 languages. As of today we count 324 catalogues and 12291 patterns translated into English (UK/cm). 12291
We work hard to bring you the best knitting and crochet have to offer, inspiration and advice as well as great quality yarns at incredible prices! Would you like to use our patterns for other than personal use? You can read what you are allowed to do in the Copyright text at the bottom of all our patterns. Happy crafting!
Post a comment to pattern DROPS 112-36
We would love to hear what you have to say about this pattern!
If you want to leave a question, please make sure you select the correct category in the form below, to speed up the answering process. Required fields are marked *.