
Popular categories
Looking for a yarn?


Comments / Questions (14)
![]() Marie-Christine wrote:
Marie-Christine wrote:
Dag, waarom moet de muts heen en weer gebreid worden? Kan het niet makkelijker met de rondbreinaald in 1 stuk? Groetjes,
03.12.2025 - 20:21DROPS Design answered:
Dag Marie-Christine,
Je zou hem inderdaad ook in de rondte kunnen breien.
05.12.2025 - 19:48
![]() Sylvie Boucher wrote:
Sylvie Boucher wrote:
DROPS 86-40 Bonnet tricoté en DROPS Snow, il demande de tricoter les oreillettes en 9mm,avec 2 fils, et par la suite il faut seulement tricoter avec un fils pour le bonnet, donc je dois changer de grosseur d'aiguille , quel grosseur dois je prendre...
16.10.2024 - 03:24DROPS Design answered:
Bonjour Mme Boucher, ne changez pas la taille des aiguilles, si votre échantillon est juste, vous devez juste tricoter ainsi: les 2 cache-oreilles et les 6 rangs point mousse du bonnet avec 2 fils puis le reste du bonnet avec 1 seul fiL. Bon tricot!
16.10.2024 - 08:07
![]() Maya wrote:
Maya wrote:
Bonjour, Je veux tricoter le modèle 244-9, il s'agit d'un pull qui se tricote en partie avec des aiguilles No 4 et en partie avec des aiguilles No 5, Pour l'échantillon il n'est pas indiqué s'il s'agit de le faire avec les aiguilles 4 ou les 5, mais ça change tout....
10.12.2023 - 18:48DROPS Design answered:
Bonjour Maya, l'échantillon se tricote en jersey avec les aiguilles 5 (ou celles qui vous seront nécessaire pour avoir les bonnes mesures). Bon tricot!
11.12.2023 - 09:29
![]() Kathy Hollman wrote:
Kathy Hollman wrote:
I am a little confuse, after the 2nd earflap start from the back does that mean I am putting the back sts on the needle? If so how do I cast on the next 14sts between the ear flap? I am not understanding that part of the pattern. And I wantedtoseeif it covers my ear and with the 50 stitches doesn’t the ear flap are not over my ear the flap are ahead of ears. What am I missing please advise.thank you
26.11.2022 - 05:58DROPS Design answered:
Dear Kathy, both earflaps are worked in the same way. You have 8 back sts, 13 sts for the earflap, 16 sts (14 cast-on stitches +1 increased stitch for each earflap) for the front, 13 sts for the other earflap, which are joined to the back sts. So you have 50 sts. If the earflaps don't cover the ears correctly or the space between earflaps is too small you can check if the gauge is correct and adapt it to the necessary size. Happy knitting!
27.11.2022 - 16:48
![]() ISABELLE wrote:
ISABELLE wrote:
Bonjour, J'aimerais faire le tour de cou de ce modèle, ou trouver le patron? Merci!
27.02.2018 - 22:14DROPS Design answered:
Bonjour Isabelle, c'est le col de pull que l'on voit sur la photo avec le bonnet. Bon tricot!
28.02.2018 - 10:06
![]() Esther Bois wrote:
Esther Bois wrote:
Comment reprendre les mailles des oreillettes sur la même aiguille, en commençant par le dos et monter 14 mailles entre les 2 oreillettes?
10.02.2018 - 15:16DROPS Design answered:
Bonjour Mme Bois, tricotez les mailles du 1er cache oreille, montez 14 mailles (cette vidéo montre comment monter les mailles), et tricotez les mailles du 2ème cache-oreille = vous avez maintenant 50 mailles sur l'aiguille, tricotez 6 rangs au point mousse et continuez en jersey comme indiqué. Bon tricot!
12.02.2018 - 09:49
![]() Therese Globensky wrote:
Therese Globensky wrote:
Hello! a beautiful hat. it has no name as you stated. here is my suggestion "Pagoda"
21.01.2018 - 22:52Liz Hardwick wrote:
Made this a couple of times now. I have short hair, wear glasses and hearing aids so I want something to cover my ears but it can't be tight. To help it fit I run a length of clear elastic, the same as I use in stabilizing jersey tops, above the garter stitch band. Moving logs means lots of bending and stretching and don't need to be pushing hats around.
05.02.2017 - 19:42Elsa wrote:
Hola .soy de PERU me gusta muchísimo tu pagina,apesar de que no se tejer muy bien con dos palitos pero allí sigo intentando pero no entiendo cuando dice aumentar los 4 puntos de un lado y un aumento mas antes del ultimo punto por favor quiero una explicación mas fácil ya que recién estoy aprendiendo .
29.07.2013 - 22:50DROPS Design answered:
Hola Elsa! Para formar el borde inferior del gorro tenemos que montar pts nuevos a ambos lados de las orejeras (4 pts a un lado y 1 pt al otro lado de la orejera). Tu pregunta estaba en comentarios generales y la he encontrado ahora por casualidad. Debes marcarla como pregunta para que me aparezca como tal.
25.09.2013 - 18:38
![]() Solvej Jüngling wrote:
Solvej Jüngling wrote:
Super hue. Spekulerer på, om modellen har en halsedisse på om halsen, eller? Findes en opskrift tildenne?
15.01.2013 - 22:48DROPS Design answered:
Hej Solvej. De er ikke en halsedisse du kan se paa billedet, men kraven af tröjen som hun har paa som er model 83-3. Men vi har mange halsedisser i databasen. Pröv og sög og se hvad du kan finde. God fornöjelse.
16.01.2013 - 16:17
|
|
DROPS 86-40 |
|
|
|
|
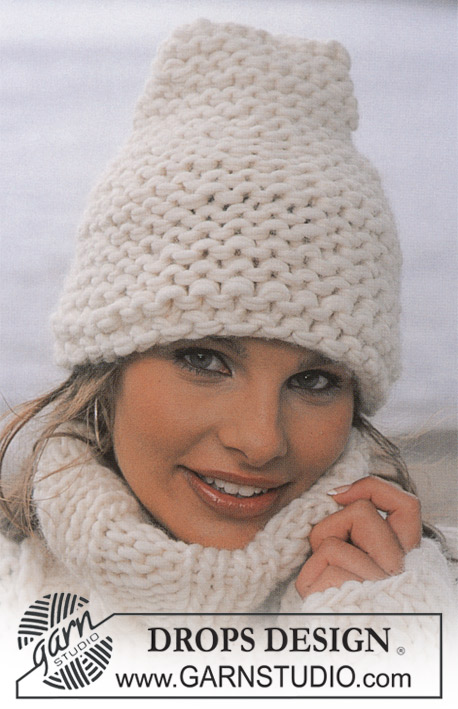
Hat in Snow
DROPS 86-40 |
|
|
Gauge: 10 sts x 14 rows in stockinette st with 1 strand = 10 x 10 cm. Double strand - tips: When changing to a new ball of yarn, do not change both balls at the same time, to avoid having to tuck in both ends at the same place. Increasing tips: Make incs with a yo, on the row back, twist and knit the yo so that there will not be a hole. Hat: Earflaps and the first 6 garter st rows on hat are knit with 2 strands, then knit the rest with 1 strand. Earflap: Cast on 3 sts with 2 strands. Knit garter st – after 1st row inc 1 st at each side every other row a total of 5 times – see Increasing tips = 13 sts. On the next row cast on 4 sts at side which will be at back = 17 sts. K 1 row, when 1 st remains (front edge) inc 1 st = 18 sts, K 1 row back. Lay piece aside. Knit a second earflap, reversing shaping. Hat: Put earflaps on same needles (start from back) and cast on 14 new sts between earflaps (= front) = 50 sts. Knit 6 rows garter st. Then knit the rest with 1 strand in stockinette st to finished measurements. When the piece measures 11 cm, measured at center front, knit the next row as follows (right side): * K 2 tog, K 8 *, repeat * - * across row. Purl back. Knit the next row as follows: * K 2 tog, K 7 *, repeat * - * across row. Continue to dec every other row with 1 st less between each dec until 10 sts remain. Hat measures approx. 22 cm from center front. Cut yarn and pull through remaining sts, pull tight and fasten. Sew hat at center back. |
|
Have you finished this pattern?Tag your pictures with #dropspattern or submit them to the #dropsfan gallery. Do you need help with this pattern?You'll find 14 tutorial videos, a Comments/Questions area and more by visiting the pattern on garnstudio.com. © 1982-2026 DROPS Design A/S. We reserve all rights. This document, including all its sub-sections, has copyrights. Read more about what you can do with our patterns at the bottom of each pattern on our site. |


With over 40 years in knitting and crochet design, DROPS Design offers one of the most extensive collections of free patterns on the internet - translated to 17 languages. As of today we count 324 catalogues and 12290 patterns translated into English (UK/cm). 12290
We work hard to bring you the best knitting and crochet have to offer, inspiration and advice as well as great quality yarns at incredible prices! Would you like to use our patterns for other than personal use? You can read what you are allowed to do in the Copyright text at the bottom of all our patterns. Happy crafting!
Post a comment to pattern DROPS 86-40
We would love to hear what you have to say about this pattern!
If you want to leave a question, please make sure you select the correct category in the form below, to speed up the answering process. Required fields are marked *.