
Popular categories
Looking for a yarn?


Comments / Questions (6)
![]() Marianna wrote:
Marianna wrote:
Ciao, è possibile creare questo modello con ferri al posto che con uncinetto? Grazie mille
28.05.2026 - 14:08DROPS Design answered:
Buonasera Marianna, purtroppo non è possibile convertire il modello alla lavorazione a maglia, ma sul nostro sito può trovare altri modelli di vestiti a maglia. Buon lavoro!
30.05.2026 - 20:31
![]() Ulla wrote:
Ulla wrote:
Onko mallikerrat luettava pystyyn vai vaakaan. A1-A3
22.05.2026 - 20:10DROPS Design answered:
Hei, lue piirrokset vaakasuoraan.
25.05.2026 - 16:14
![]() Marika wrote:
Marika wrote:
Olisiko mahdollista saada video mallivirkkauksesta?
08.05.2026 - 13:02DROPS Design answered:
Hei, välitän pyyntösi eteenpäin.
08.05.2026 - 16:17
![]() Hellevi wrote:
Hellevi wrote:
Olen lyhyt (162 cm) ja haluan tehdä lyhyemmän mekon. Virkkaan kokoa L ja olen aloittamassa takakappaleen alaosan silmukoiden lisäyksiä. 1) Tarkoittaako "sisäpuolella" että virkkaan lisäyksen täsmälleen 19. silmukkaan reunasta lukien? 2) Onnistuukohan lyhentäminen siten, että teen lisäykset tiheämmin, esim. jokainen lisäys 1/2 cm aiemmin? Tämä lyhentää kai mekkoa noin 9 cm?
20.04.2026 - 09:32DROPS Design answered:
Kyllä, lisäykset tehdään aina 19 silmukan päähän reunasta. Voit tehdä lisäykset tiheämmin, tai voit tehdä vähemmän lisäyksiä kuin ohjeessa mainitaan.
20.04.2026 - 15:47
![]() Maria wrote:
Maria wrote:
Bom dia! É possível fazer este modelo com Drops Bomull-lin? Obrigada
13.04.2026 - 13:55DROPS Design answered:
Bom dia, Não aconselhamos, uma vez que o Bomull-Lin é um fio mais grosso e mais rijo, por ter uma composição e espessuras diferentes do DROPS Belle. Bons crochés! A equipa DROPS
14.04.2026 - 08:21
![]() Manuela wrote:
Manuela wrote:
Wie kann ich das Modell mit kurzen Ärmeln arbeiten und wieviel Garn muss ich hierfür mehr einplanen?
03.03.2026 - 21:16DROPS Design answered:
Liebe Manuela, je nach der Größe und die Ärmel kann diese Menge unterschiedlich sein. Lassen Sie sich von einer ähnlichen Modellen mit den gewünschten Ärmel inspirieren, Ihr DROPS Händler kann Ihnen auch mit der Wollemenge gerne weiterhelfen. Viel Spaß beim Häkeln!
04.03.2026 - 07:48
|
|||||||||||||||||||||||||||||||
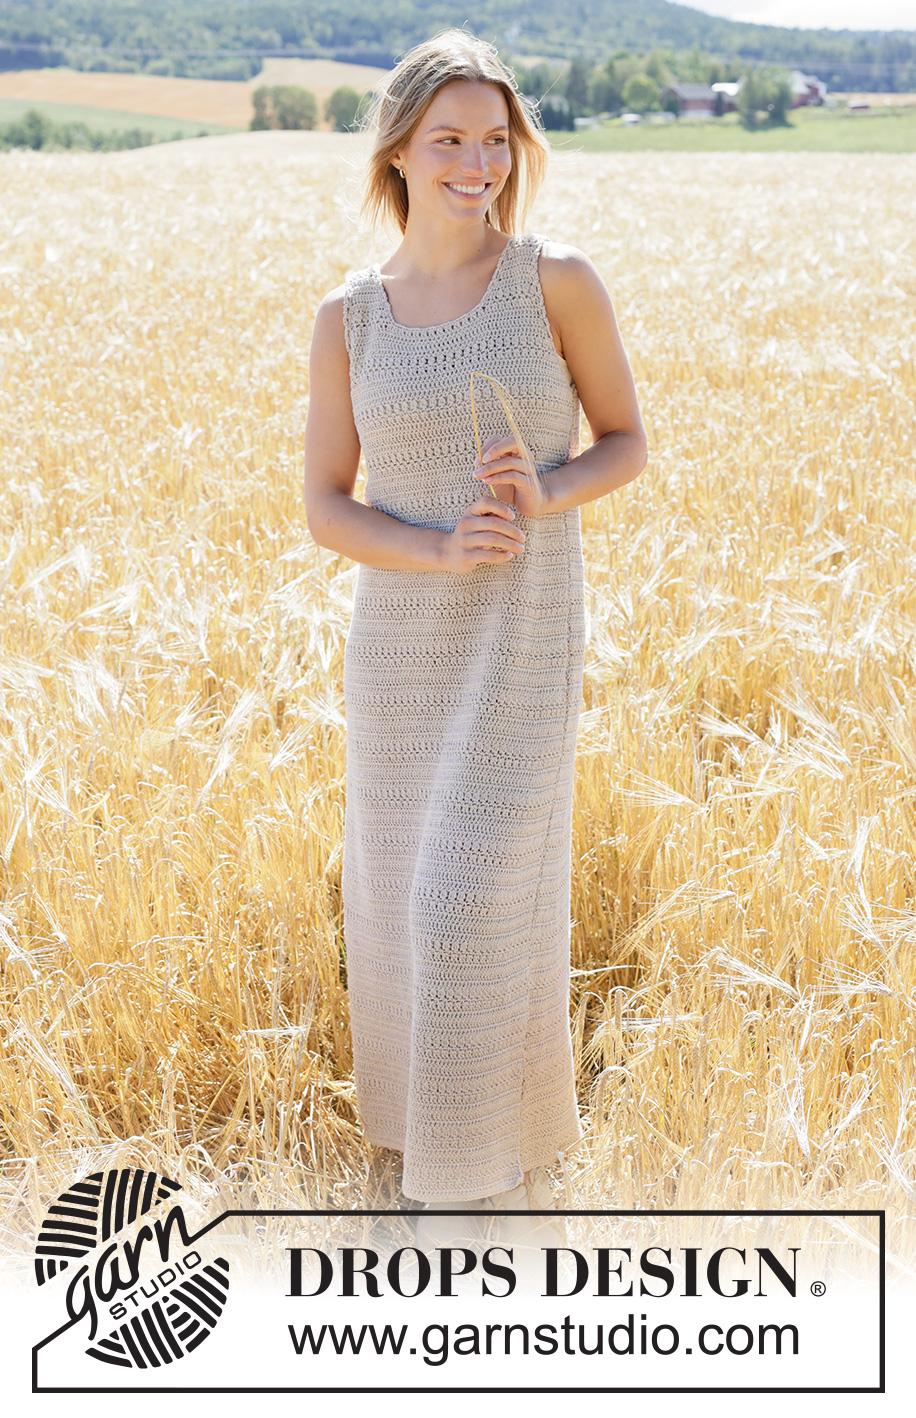
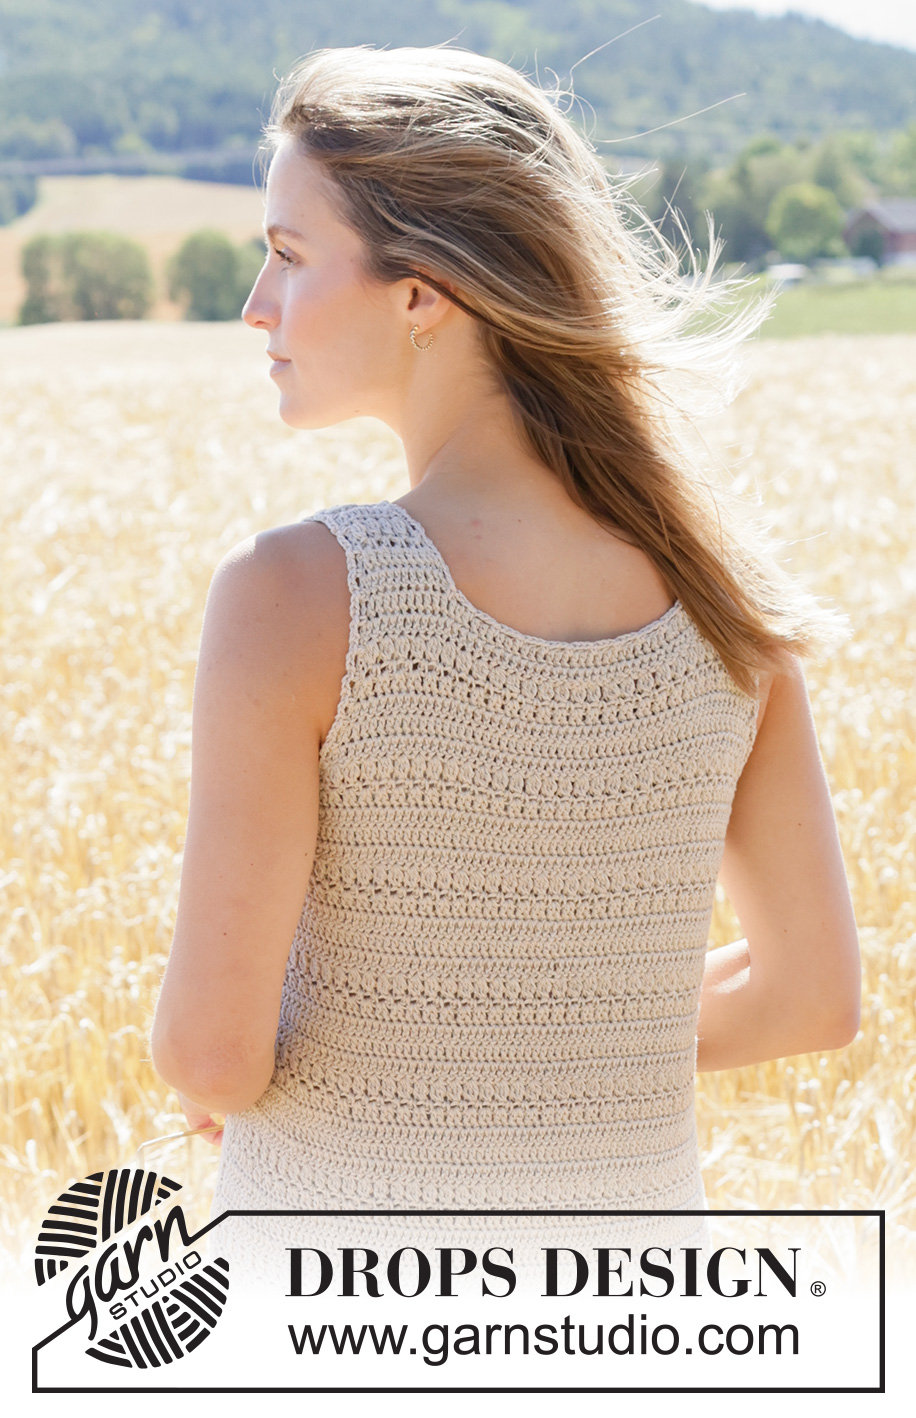
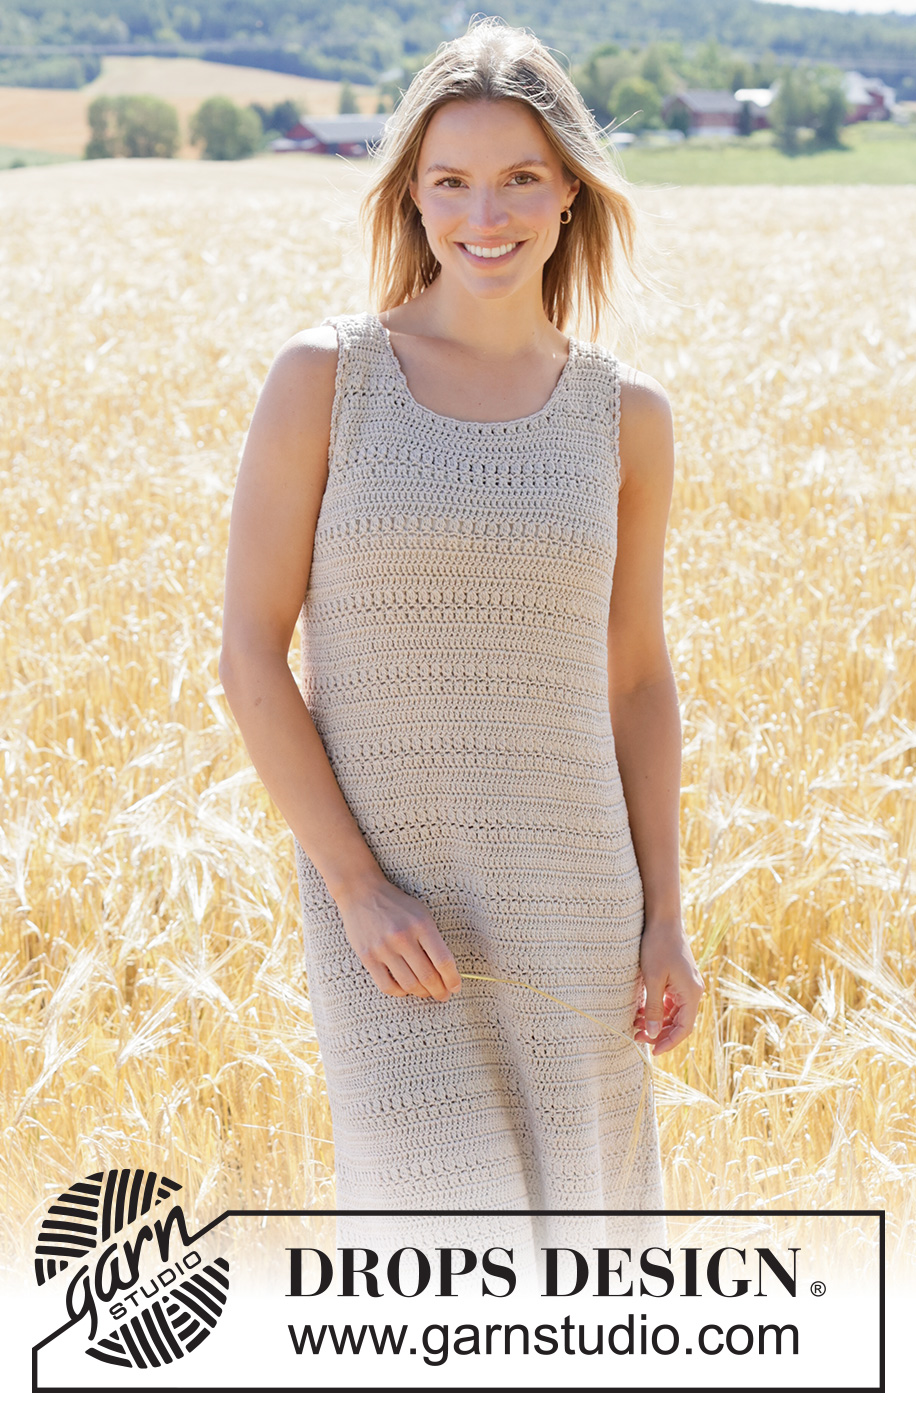
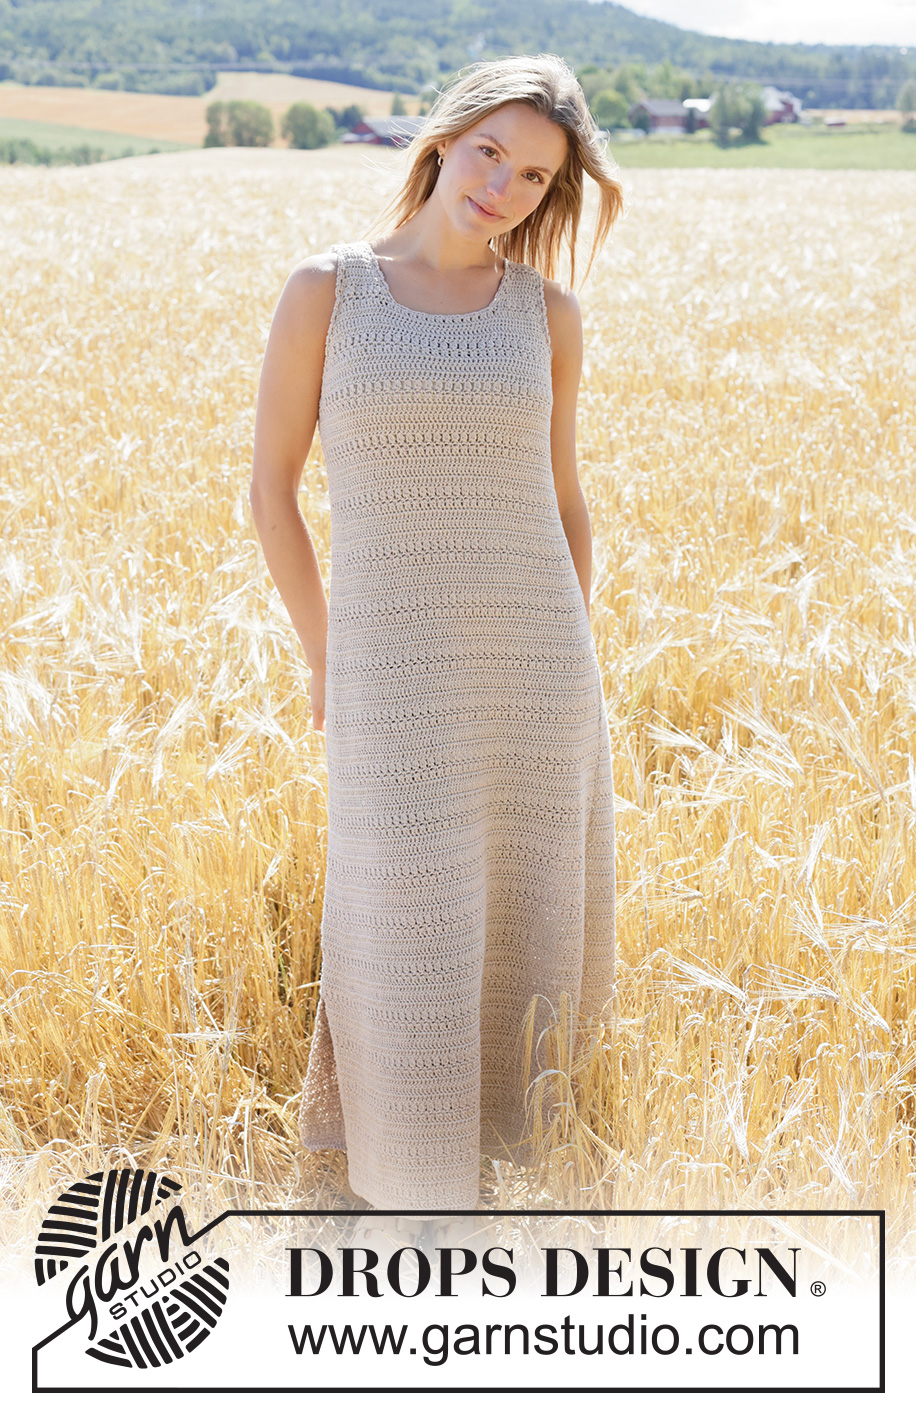
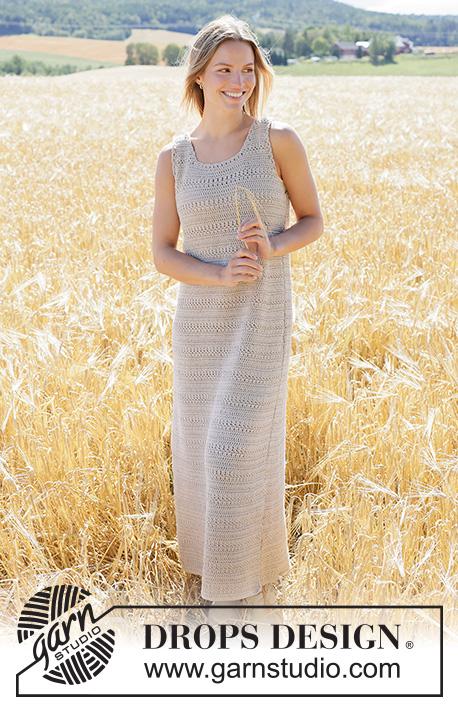
Harvest Dress#harvestdress |
|||||||||||||||||||||||||||||||
 |
 |
||||||||||||||||||||||||||||||
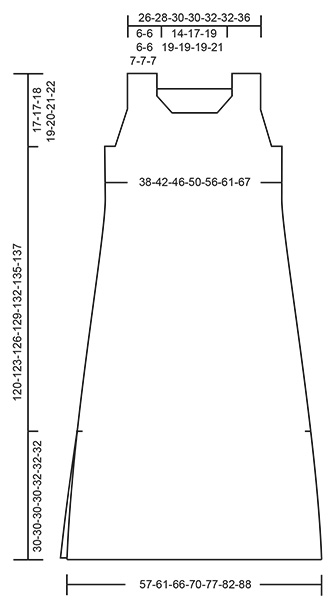
Crocheted long dress in DROPS Belle. Work top down. Size XS – XXXL.
DROPS 268-2 |
|||||||||||||||||||||||||||||||
|
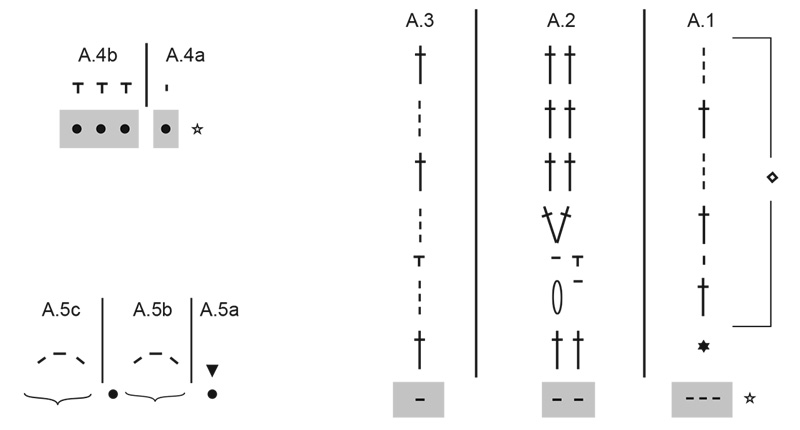
---------------------------------------------------------- EXPLANATION FOR THE PATTERN: ---------------------------------------------------------- CHAIN STITCH: If you work at the back of the crochet hook the chain stitch will often be too tight. 1 chain stitch should be just as long as 1 treble crochet/double crochet is wide. CROCHET INFORMATION: At the beginning of every row with treble crochets work 3 chain stitches These chain stitches replace first treble crochet on row. Work last treble crochet on row in 3rd chain stitch / chain stitch from the beginning of previous row. At the beginning of every row with double crochets work 1 chain stitch. This chain stitch replaces first double crochet on row. Work last double crochet on row in 3rd chain stitch / chain stitch from the beginning of previous row. PATTERN: See diagrams A.1 to A.5. Read the diagrams from right to left when working from the right side and from left to right when working from the wrong side. A.1 and A.3 show how row begins and ends. MEASURING TIP: Because of the weight all measurements must be done by holding the piece up otherwise the garment will be too long when worn. INCREASE TIP: Increase 1 stitch by working 2 stitches in the same stitch, i.e. work 2 double crochets or 2 treble crochets in same stitch (depending on which row in diagram increase is done). Work the increase stitches as 1 double crochet or 1 treble crochet until the increased stitch fit one whole repetition of A.2 in width. ------------------------------------------------------- START THE PIECE HERE: ---------------------------------------------------------- DRESS - SHORT OVERVIEW OF THE PIECE: Work front and back piece back and forth separately and work top down. Sew the piece together on the shoulders and in the sides - there should be a vent in each side. Work an edge with chain spaces around the neck and around both armholes. If 0 stitches are given for the chosen size, it means that you skip the information and jump to next information. BACK PIECE: RIGHT SHOULDER: Work 12-12-12-12-14-14-14 CHAIN STITCHES - read explanation above, on hook size 4 mm with DROPS Belle. Read CROCHET INFORMATION and PATTERN in explanation above and work as follows: ROW 1 (= right side): Work A.1 (= skip the first 3 chain stitches on row), work A.2 4-4-4-4-5-5 times in total, work A.3 in last stitch = 10-10-10-10-12-12-12 treble crochets. ROW 2 (= wrong side): Work A.3 in first stitch, work A.2 until 1 stitch remains on row, work A.1 in last stitch on row. ROW 3 (= right side): Work A.1 in first stitch, work A.2 4-4-4-4-5-5 times in total, work A.3 in last stitch = 10-10-10-10-12-12-12 treble crochets. ROW 4 (= wrong side): Work A.3 in first stitch, work A.2 until 1 stitch remains on row, work A.1 in last stitch on row. Work 3rd and 4th ROW 1-1-1-1-2-2-2 times in total (i.e. crochet 5th and 6th row in the diagrams in sizes XL, XXL and XXXL). 4-4-4-4-6-6-6 row have been worked from cast-on edge in total. Then increase for neck as follows: ROW 1 (= right side): Work A.1 in first stitch and increase at the same time 1 stitch in this stitch – read INCREASE TIP, work A.2 until 1 stitch remains on row, work A.3 in last stitch = 11-11-11-11-13-13-13 stitches. ROW 2 (= wrong side): Work A.3 in first stitch, work A.2 as before until 2 stitches remain on row, work next stitch as 1 treble crochet, work A.1 in last stitch and increase at the same time 1 stitch in this stitch = 12-12-12-12-14-14-14 stitches. Cut the yarn. Piece measures approx. 7-7-7-7-9-9-9 cm from cast-on edge. BACK PIECE: LEFT SHOULDER: Work 12-12-12-12-14-14-14 chain stitches on hook size 4 mm with DROPS Belle. Remember CROCHET INFORMATION and work as follows: ROW 1 (= right side): Work A.1 (= skip the first 3 chain stitches on row), work A.2 4-4-4-4-5-5 times in total, work A.3 in last stitch = 10-10-10-10-12-12-12 treble crochets. ROW 2 (= wrong side): Work A.3 in first stitch, work A.2 until 1 stitch remains on row, work A.1 in last stitch on row. ROW 3 (= right side): Work A.1 in first stitch, work A.2 4-4-4-4-5-5 times in total, work A.3 in last stitch = 10-10-10-10-12-12-12 treble crochets. ROW 4 (= wrong side): Work A.3 in first stitch, work A.2 until 1 stitch remains on row, work A.1 in last stitch on row. Work 3rd and 4th ROW 1-1-1-1-2-2-2 times in total total (i.e. crochet 5th and 6th row in the diagrams in sizes XL, XXL and XXXL). 4-4-4-4-6-6-6 rows have been worked from cast-on edge in total. Then increase for neck as follows: ROW 1 (= right side): Work A.1 in first stitch, work A.2 until 1 stitch remains on row, work A.3 in last stitch and increase at the same time 1 stitch in this stitch – remember INCREASE TIP= 11-11-11-11-13-13-13 stitches. ROW 2 (= wrong side): Work A.3 in first stitch and increase at the same time 1 stitch in this stitch, work next stitch as 1 treble crochet, work A.2 until 1 stitch remains on row, work A.1 in last stitch = 12-12-12-12-14-14-14 stitches. Do not cut the yarn. Now work left and right shoulder together for back piece as explained below. BACK PIECE (left and right shoulder together): Now slip left and right shoulder together for back piece, continue from right side over stitches from left shoulder and work as follows: ROW 1 (= right side): Work A.1 in first stitch, work A.2 until 1 stitch remains, work A.3 in last stitch, work 22-26-30-30-30-30-36 chain stitches for neck, work A.1 in first stitch from right side on right shoulder, work A.2 until 1 stitch remains, work A.3 in last stitch = 46-50-54-54-58-58-64 stitches on row. Continue pattern back and forth like this – AT THE SAME TIME when piece measures 11-11-12-11-12-11-12 cm from cast-on edge on shoulder and next row is worked from the wrong side, increase in each side for armholes as explained below – read MEASURING TIP! Remember to follow the crochet tension! INCREASE FOR ARMHOLES: Work first row as follows - from the wrong side: Work A.3 in first stitch and increase at the same time 1-1-1-1-0-0-0 stitches in this stitch, work A.2 until 1 stitch remains, work A.1 in last stitch and increase at the same time 1-1-1-1-0-0-0 stitches in this stitch (= 2-2-2-2-0-0-0 stitches increased). Increase like this on every row 2-1-1-2-0-0-0 times in total. Continue to increase the same way but now increase 2 stitches in each side, i.e. work 2 stitches in each of the 2 outermost stitches. Increase like this every row 3-4-4-5-7-9-9 times in total. After last increase there are 62-68-72-78-86-94-100 stitches on row, last row is worked from the wrong side and piece measures approx. 17-17-18-19-20-21-22 cm from the cast-on edge on the shoulder. Now cast on new stitches in each side for armholes - it is important that the next 2 rows are rows with treble crochets and that next row is worked from the right side - continue to crochet to that next row can begin from the right side: Work 5-6-7-8-9-10-12 chains stitches, turn piece, work A.1 (= skip the first 3 chain stitches), work A.2 until 0-1-0-1-0-1-1 stitch, work 1 treble crochet in last stitch (applies to size S, L, XXL and XXXL), then work 5-6-7-8-9-10-12 chain stitches at the end of row, turn piece, work A.1 (= skip the first 3 chain stitches), work A.2 until 1 stitch remains on row, work A.3 in last stitch = 68-76-82-90-100-110-120 stitches. BACK PIECE (downwards): Work pattern as before - work first row from the wrong side and work as follows: Work A.3 in first stitch, work A.2 until 1 stitch remains, work A.1 in last stitch. When piece measures 29-32-34-36-38-40-42 cm from cast-on edge on the shoulder, begin increase in each side - remember MEASURING TIP. Insert 1 marker thread on the inside of the 17-17-19-19-21-23-25 outermost stitches in each side. Work pattern back and forth as before - AT THE SAME TIME increase 1 stitch inside marker thread in each side – read INCREASE TIP and adjust to increase on 5th, 6th or 7th row in A.2 (work the increased stitches into pattern but work as 1 treble crochet/double crochet until there are enough stitches for one whole repetition of A.2 in width), always increase on the inside of the outermost 17-17-19-19-21-23-25 stitches in each side. Increase like this every 3-3-2½-2½-2-2-2 cm 7-7-8-8-9-9-9 times in total, then increase every 4-4-4-4-4½-4½-4½ cm 10 times in total = 102-110-118-126-138-148-158 stitches. Work until piece measures approx. 120-123-126-129-132-135-137 cm from cast-on edge on the shoulder - remember MEASURING TIP and adjust so that next row is from the right side. Work as follows from the right side: Work A.4a in first stitch, work A.4b the rest of row. Cut and fasten the yarn. FRONT PIECE: LEFT SHOULDER: Work 12-12-12-12-14-14-14 chain stitches, on hook size 4 mm with DROPS Belle. Remember CROCHET INFORMATION and work as follows: ROW 1 (= right side): Work A.1 (= skip the first 3 chain stitches on row), work A.2 4-4-4-4-5-5 times in total, work A.3 in last stitch = 10-10-10-10-12-12-12 treble crochets. ROW 2 (= wrong side): Work A.3 in first stitch, work A.2 until 1 stitch remains on row, work A.1 in last stitch on row. ROW 3 (= right side): Work A.1 in first stitch, work A.2 4-4-4-4-5-5 times in total, work A.3 in last stitch = 10-10-10-10-12-12-12 treble crochets. ROW 4 (= wrong side): Work A.3 in first stitch, work A.2 until 1 stitch remains on row, work A.1 in last stitch on row. Work 3rd and 4th ROW 1-1-1-1-2-2-2 times in total (i.e. crochet 5th and 6th row in the diagrams in sizes XL, XXL and XXXL). 4-4-4-4-6-6-6 rows have been worked from cast-on edge. Then increase for neck as follows: ROW 1 (= right side): Work A.1 in first stitch and increase at the same time 1 stitch in this stitch – read INCREASE TIP, work A.2 until 1 stitch remains on row, work A.3 in last stitch = 11-11-11-11-13-13-13 stitches. ROW 2 (= wrong side): Work A.3 in first stitch, work A.2 as before until 2 stitches remain on row, work next stitch as 1 treble crochet, work A.1 in last stitch and increase at the same time 1 stitch in this stitch = 12-12-12-12-14-14-14 stitches. ROW 3 (= right side): Work pattern as before and increase at the same time 2 stitches at the beginning of row by working 2 stitches in each of the first 2 stitches on row, work as before the rest of row = 14-14-14-14-16-16-16 stitches. ROW 4 (= wrong side): Work as before until 2 stitches remain on row, increase 2 stitches by working 2 stitches in each of the last 2 stitches on row = 16-16-16-16-18-18-18 stitches. Cut the yarn. Piece measures approx. 9-9-9-9-11-11-11 cm from cast-on edge. FRONT PIECE: RIGHT SHOULDER: Work 12-12-12-12-14-14-14 chain stitches, on hook size 4 mm with DROPS Belle. Remember CROCHET INFORMATION and work as follows: ROW 1 (= right side): Work A.1 (= skip the first 3 chain stitches on row), work A.2 4-4-4-4-5-5 times in total, work A.3 in last stitch = 10-10-10-10-12-12-12 treble crochets. ROW 2 (= wrong side): Work A.3 in first stitch, work A.2 until 1 stitch remains on row, work A.1 in last stitch on row. ROW 3 (= right side): Work A.1 in first stitch, work A.2 4-4-4-4-5-5 times in total, work A.3 in last stitch = 10-10-10-10-12-12-12 treble crochets. ROW 4 (= wrong side): Work A.3 in first stitch, work A.2 until 1 stitch remains on row, work A.1 in last stitch on row. Work 3rd and 4th ROW 1-1-1-1-2-2-2 times in total (i.e. crochet 5th and 6th row in the diagrams in sizes XL, XXL and XXXL). 4-4-4-4-6-6-6 rows have been worked from cast-on edge. Then increase for neck as follows: ROW 1 (= right side): Work A.1 in first stitch, work A.2 until 1 stitch remains on row, work A.3 in last stitch and increase at the same time 1 stitch in this stitch – remember INCREASE TIP= 11-11-11-11-13-13-13 stitches. ROW 2 (= wrong side): Work A.3 in first stitch and increase at the same time 1 stitch in this stitch, work next stitch as 1 treble crochet, work A.2 until 1 stitch remains on row, work A.1 in last stitch = 12-12-12-12-14-14-14 stitches. ROW 3 (= right side): Work pattern as before until 2 stitches remain on row, increase 2 stitches by working 2 stitches in each of the last 2 stitches on row = 14-14-14-14-16-16-16 stitches. ROW 4 (= wrong side): Work pattern as before and increase at the same time 2 stitches at the beginning of row by working 2 stitches in each of the first 2 stitches on row, work as before the rest of row = 16-16-16-16-18-18-18 stitches. Do not cut the yarn. Now work right shoulder and left shoulder together for front piece as explained below. FRONT PIECE (right and left shoulder together): Now slip right and left shoulder together for front piece, continue from the right side over stitches from the right shoulder and work as follows: ROW 1 (= right side): Work A.1 in first stitch, work A.2 until 1 stitch remains, work A.3 in last stitch, work 14-18-22-22-22-22-28 chain stitches for neck, work A.1 in first stitch from the right side on left shoulder, work A.2 until 1 stitch remains, work A.3 in last stitch = 46-50-54-54-58-58-64 stitches on row. Continue pattern back and forth like this – AT THE SAME TIME when piece measures 11-11-12-11-12-11-12 cm from cast-on edge on shoulder and next row is worked from the wrong side, increase in each side for armholes as explained below – read MEASURING TIP! INCREASE FOR ARMHOLES: Work first row as follows - from the wrong side: Work A.3 in first stitch and increase at the same time 1-1-1-1-0-0-0 stitches in this stitch, work A.2 until 1 stitch remains, work A.1 in last stitch and increase at the same time 1-1-1-1-0-0-0 stitches in this stitch (= 2-2-2-2-0-0-0 stitches increased). Increase like this on every row 2-1-1-2-0-0-0 times in total. Continue to increase the same way but now increase 2 stitches in each side, i.e. work 2 stitches in each of the 2 outermost stitches. Increase like this every row 3-4-4-5-7-9-9 times in total. After last increase there are 62-68-72-78-86-94-100 stitches on row, last row is worked from the wrong side and piece measures approx. 17-17-18-19-20-21-22 cm from the cast-on edge on the shoulder. Now cast on new stitches in each side for armholes - it is important that the next 2 rows are rows with treble crochets and that next row is worked from the right side - continue to crochet to that next row can begin from the right side: Work 5-6-7-8-9-10-12 chains stitches, turn piece, work A.1 (= skip the first 3 chain stitches), work A.2 until 0-1-0-1-0-1-1 stitch remains on row, work 1 treble crochet in last stitch (applies to size S, L, XXL and XXXL), then work 5-6-7-8-9-10-12 chain stitches at the end of row, turn piece, work A.1 (= skip the first 3 chain stitches), work A.2 until 1 stitch remains on row, work A.3 in last stitch = 68-76-82-90-100-110-120 stitches. FRONT PIECE (downwards): Work pattern as before - work first row from the wrong side and work as follows: Work A.3 in first stitch, work A.2 until 1 stitch remains, work A.1 in last stitch. When piece measures 29-32-34-36-38-40-42 cm from cast-on edge on the shoulder, begin increase in each side - remember MEASURING TIP. Insert 1 marker thread on the inside of the 17-17-19-19-21-23-25 outermost stitches in each side. Work pattern back and forth as before - AT THE SAME TIME increase 1 stitch inside marker thread in each side – read INCREASE TIP and adjust to increase on 5th, 6th or 7th row in A.2 (work the increased stitches into pattern but work as 1 treble crochet/double crochet until there are enough stitches for one whole repetition of A.2 in width), always increase on the inside of the outermost 17-17-19-19-21-23-25 stitches in each side. Increase like this every 3-3-2½-2½-2-2-2 cm 7-7-8-8-9-9-9 times in total, then increase every 4-4-4-4-4½-4½-4½ cm 10 times in total = 102-110-118-126-138-148-158 stitches. Work until piece measures approx. 120-123-126-129-132-135-137 cm from cast-on edge on the shoulder - remember MEASURING TIP and adjust so that next row is from the right side. Work as follows from the right side: Work A.4a in first stitch, work A.4b the rest of row. Cut and fasten the yarn. ASSEMBLY: Sew the shoulder seams – sew edge to edge with neat little stitches. Sew side seams edge to edge - begin at the armhole and sew until approx. 30-30-30-30-32-32-32 cm remain at the bottom in each side (= vents). NECK EDGE: Begin at one shoulder seam, work an edge with chain spaces around the neck on hook size 4 mm as follows: Work A.5a in first stitch, work A.5b until approx. 1 cm remain on round, work A.5c. ARMHOLE EDGES: Begin at the bottom of armhole at the side seam, work an edge with chain spaces around the armhole on hook size 4 mm as follows: Work A.5a in first stitch, work A.5b until approx. 1 cm remain on round, work A.5c. |
|||||||||||||||||||||||||||||||
Diagram explanations |
|||||||||||||||||||||||||||||||
|
|||||||||||||||||||||||||||||||
 |
|||||||||||||||||||||||||||||||
 |
|||||||||||||||||||||||||||||||
Have you finished this pattern?Tag your pictures with #dropspattern #harvestdress or submit them to the #dropsfan gallery. Do you need help with this pattern?You'll find 11 tutorial videos, a Comments/Questions area and more by visiting the pattern on garnstudio.com. © 1982-2026 DROPS Design A/S. We reserve all rights. This document, including all its sub-sections, has copyrights. Read more about what you can do with our patterns at the bottom of each pattern on our site. |
|||||||||||||||||||||||||||||||


With over 40 years in knitting and crochet design, DROPS Design offers one of the most extensive collections of free patterns on the internet - translated to 17 languages. As of today we count 325 catalogues and 12298 patterns translated into English (UK/cm). 12298
We work hard to bring you the best knitting and crochet have to offer, inspiration and advice as well as great quality yarns at incredible prices! Would you like to use our patterns for other than personal use? You can read what you are allowed to do in the Copyright text at the bottom of all our patterns. Happy crafting!
Post a comment to pattern DROPS 268-2
We would love to hear what you have to say about this pattern!
If you want to leave a question, please make sure you select the correct category in the form below, to speed up the answering process. Required fields are marked *.