
Popular categories
Looking for a yarn?


Comments / Questions (9)
![]() Gerlinde wrote:
Gerlinde wrote:
Ik ben bezig met dit patroon en ben bij het linkervoorpand. Ben bezig met het meerderen Er staat dan dat je 12 stokjes per toer meerdert maar klopt het dan dat dat erg scheef gaat? Het zijn er dan zoveel.. of lees ik verkeerd?
26.03.2026 - 08:46DROPS Design answered:
Dag Gerlinde,
Je meerdert op iedere toer en dit doe je in totaal 12 keer. Dus niet 12 stokjes per toer, maar 1 stokje per toer en in totaal dus 12 stokjes over 12 toeren.
05.04.2026 - 10:31
![]() Rachel wrote:
Rachel wrote:
Bonjour, je fais ce pull en L. Sur l'info crochet, il est bien marqué d'effectuer trois mailles en l'air au début de chaque rang de bride, qu'elles ne comptent pas comme des brides, mais se font en plus. J'ai donc 80 brides + trois mailles en l'air ? Est-ce normal que cela fasse des bords ondulés ? Il y a la vidéo explicative "comment avoir des bords droits" mais ils ne font pas du tout cette technique de trois mailles en l'air en plus ? Merci d'avance !
16.04.2025 - 20:46DROPS Design answered:
Bonjour Rachel, effectivement, les 3 mailles en l'air du début des rangs ne comptent pas comme une bride; vous pouvez utiliser l'astuce de la vidéo pour avoir des bords droits, au choix. Bon crochet!
22.04.2025 - 10:36
![]() Sussie Kårlin wrote:
Sussie Kårlin wrote:
Jag når full ökning till V-ringning, 11 ggr, innan arbetet blivit 22 cm (L) och där kan påbörja ökning till ärmhål. Det betyder att det blir ett ”jack” mellan de båda framstyckena innan ihopvirkning. Är det ok? Eller vad gör jag fel?
31.01.2025 - 22:41DROPS Design answered:
Hej Sussie, hækler du i DROPS Air og har du 8,5 varv i højden? Hvis du virkar för tight og bliver færdig for tidlig, så kan du hækle en ekstra varv ind imellem ökningerne :)
12.02.2025 - 07:45
![]() Silvia wrote:
Silvia wrote:
Grazie per la risposta ma probabilmente te mi sono spiegata male. Io conto le 26 maglie della spalla destra (24 iniziali + 1 aumento + 3 cat iniziali) più le 26 della sinistra (idem come spalla destra) più le 16 cat del collo = 68 maglie totali e non 66. Corretto? Grazie mille!
19.01.2025 - 21:00
![]() Silvia wrote:
Silvia wrote:
Buongiorno. Non capisco una parte delle istruzioni. Le due spalle hanno entrambe 3 catenelle all’inizio di ogni riga (che non sostituiscono la MA), quindi un totale di 26 maglie ciascuna. Come possono esserci 66 maglie dopo l’unione delle due spalle? Inoltre se devo iniziare ogni riga di MA con 3 cat, perché viene specificato il riferimento alle “informazioni per il lavoro” solo in alcune righe? Grazie per le spiegazioni
18.01.2025 - 09:41DROPS Design answered:
Buonasera Silvia, nella lavorazione delle spalle si aumenta una maglia e quando si uniscono, dopo aver lavorato la spalla sinistra si avviano a nuovo le maglie del collo prima di lavorare la spalla destra. Buon lavoro!
19.01.2025 - 15:23
![]() Eva Arnström Sundman wrote:
Eva Arnström Sundman wrote:
Det står i mönstret för bakstycket att jag ska virka tills arbetet mäter 22 cm i min storlek (L). Men det står inte om jag ska mäta från axeln eller från halsringningen?
03.12.2024 - 19:38DROPS Design answered:
Hej Eva, det er fra starten du mäter. Du ser også målene i måleskitsen nederst i mønsteret :)
06.12.2024 - 14:26
![]() Veronique Boyer wrote:
Veronique Boyer wrote:
Bonjour, je ne comprends pas comment réunir les 2 epaules PUIS faire le dos. Est-il possible d avoir un schéma détaillé svp ? Je vous en remercie par avance.
10.11.2024 - 11:37DROPS Design answered:
Bonjour Mme Boyer, quand vous avez crocheté les 2 premiers rangs de l'épaule droite du dos, coupez le fil et mettez en attente. Crochetez les 2 premiers rangs de l'épaule gauche du dos, puis au début du rang suivant crochetez: les mailles de l'épaule gauche du dos comme avant, crochetez les mailles en l'air nécessaire pour l'encolure dans votre taille et crochetez les mailles de l'épaule droite. Vous avez réuni les 2 épaules et pouvez continuer à crocheter le dos. Bon crochet!
11.11.2024 - 09:20
![]() Marijke Noorman wrote:
Marijke Noorman wrote:
Ik breien graag zijn daar ook patronen Van dankjewel
26.10.2024 - 18:51DROPS Design answered:
Dag Marijke,
Jazeker, we hebben veel breipatronen op onze site staan. Met onze zoekfunctie kun je op stekenverhouding, soort patroon, kleur ect. patronen vinden.
27.10.2024 - 14:20
![]() Elisabeth wrote:
Elisabeth wrote:
Dank voor het duidelijke patroon.
26.10.2024 - 14:49
|
|
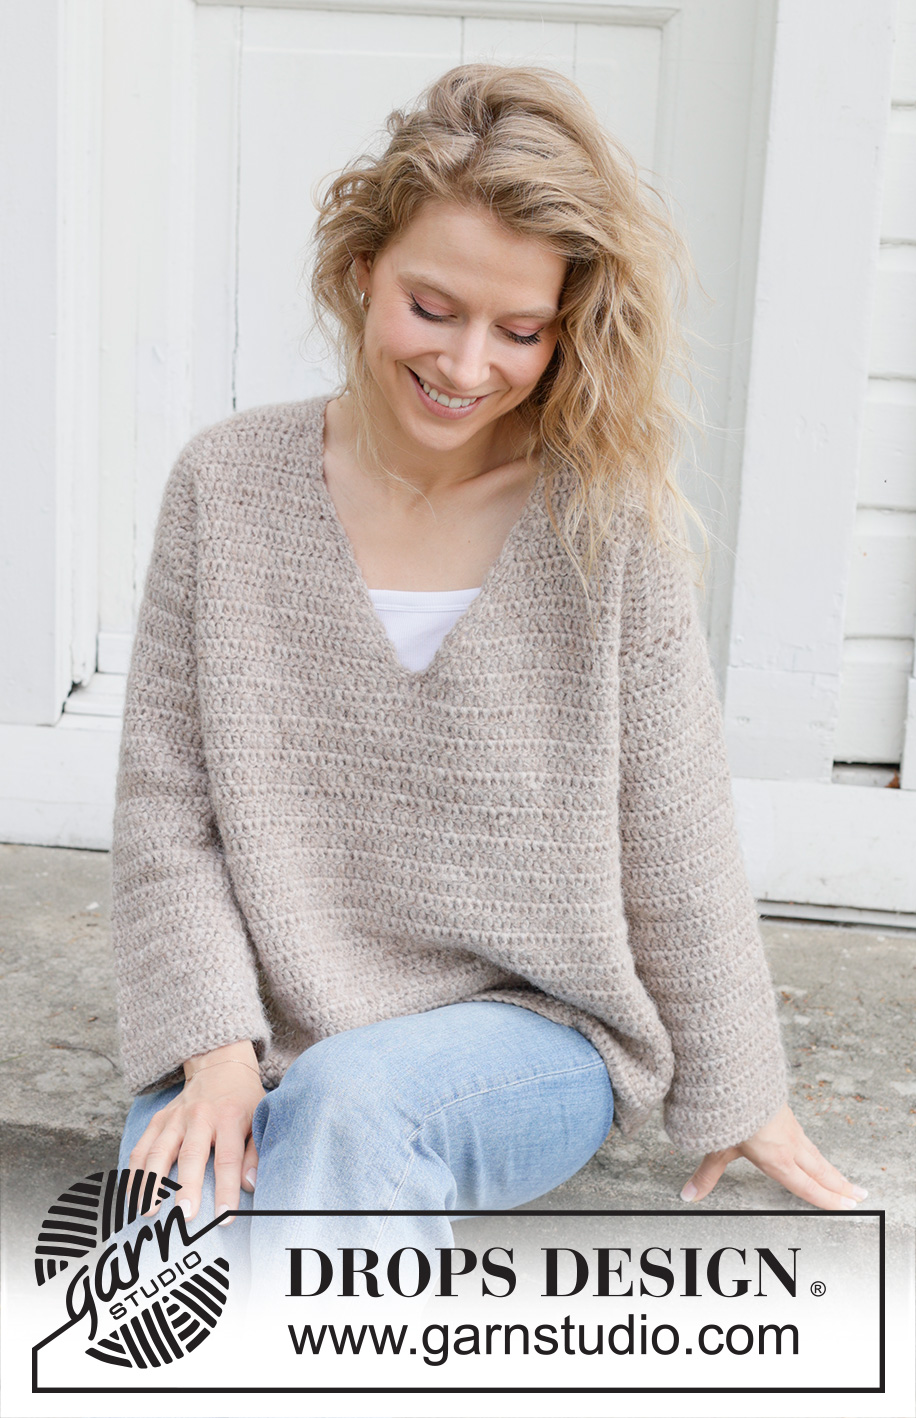
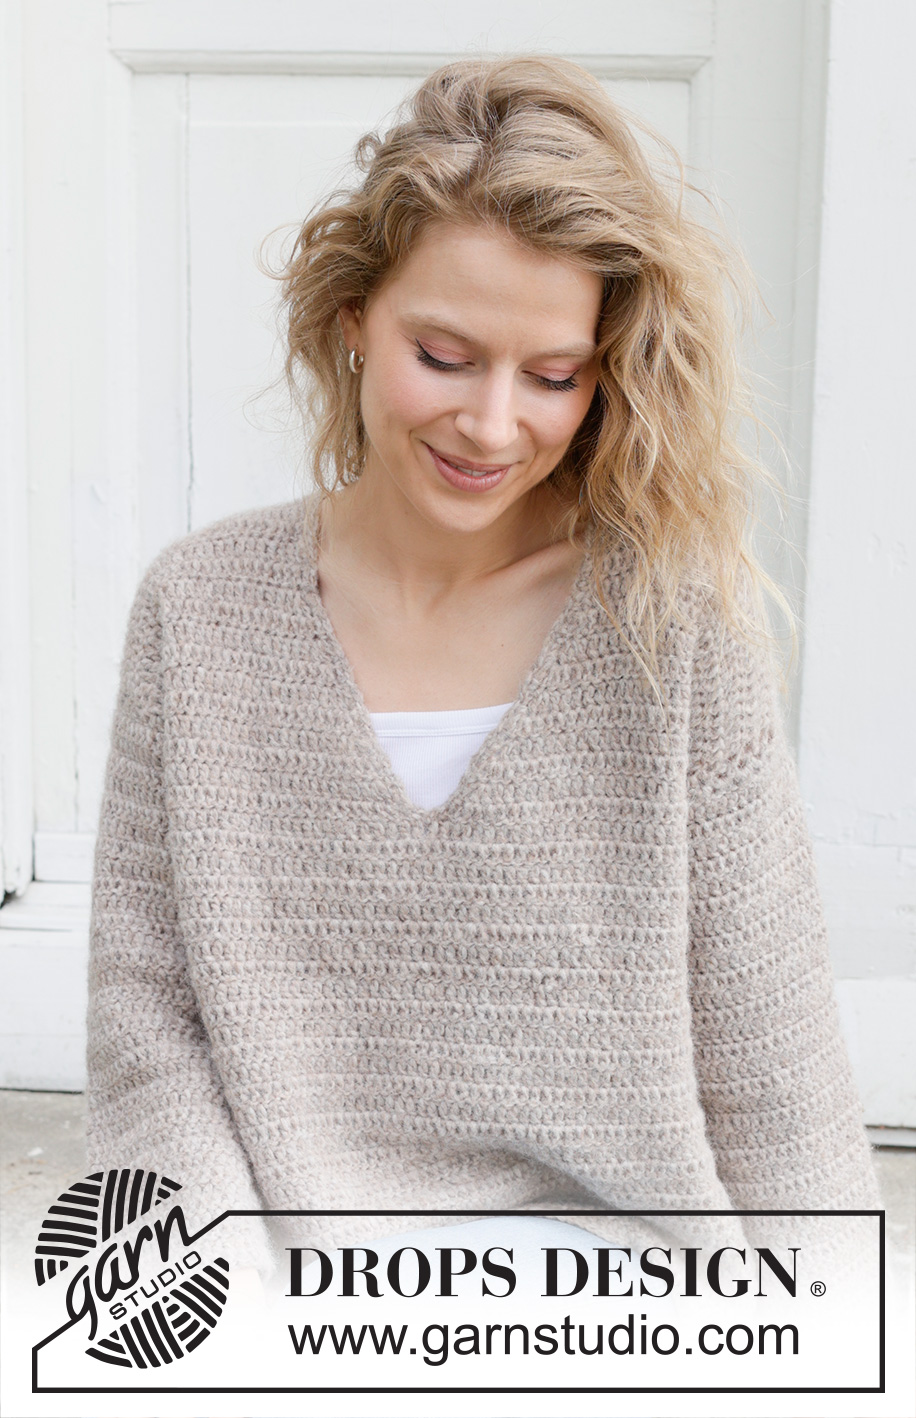
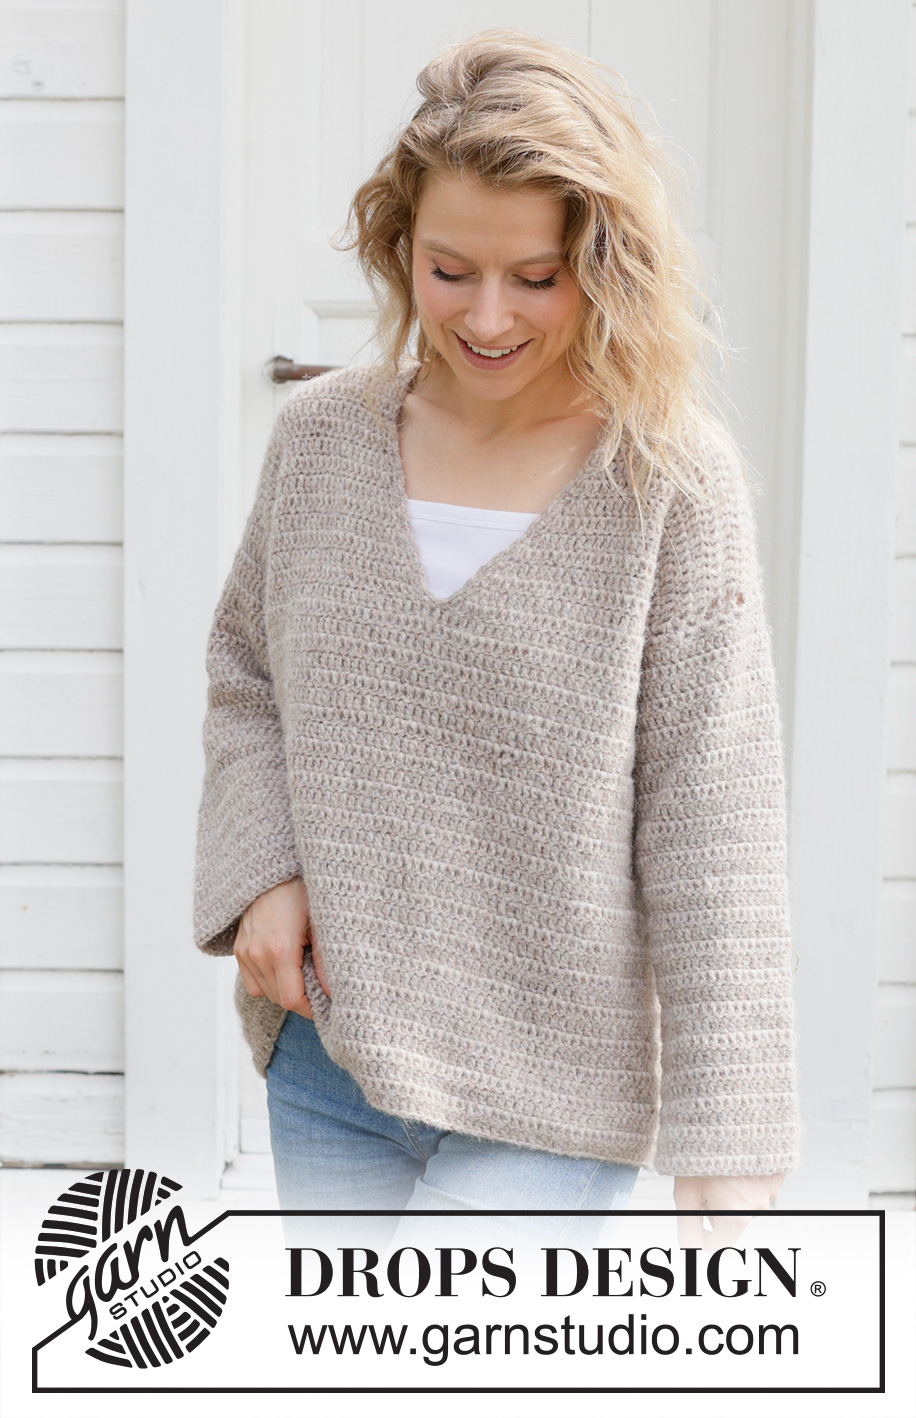
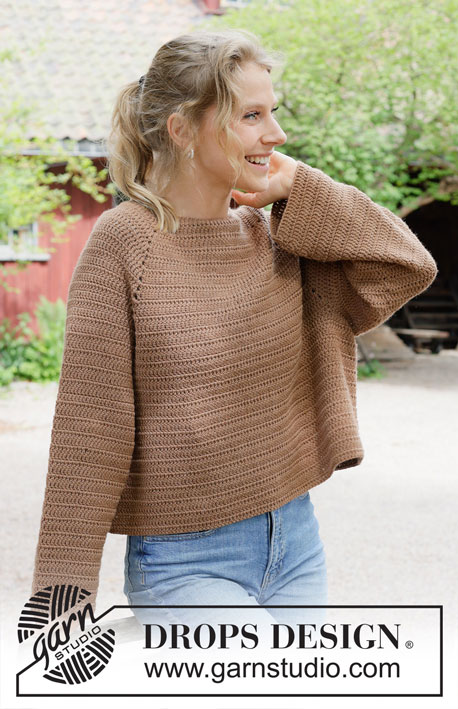
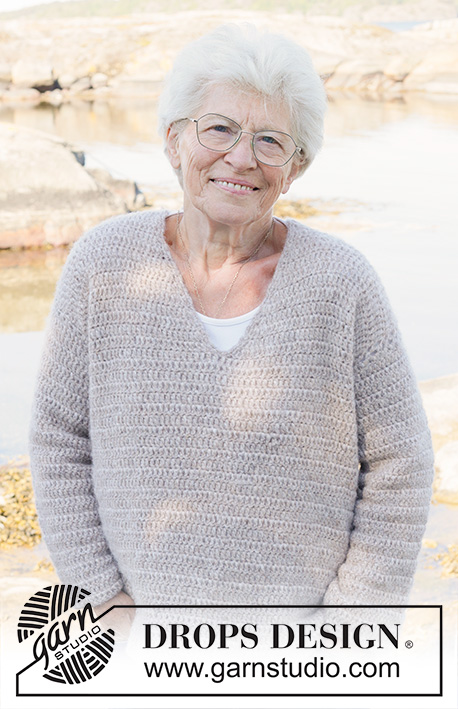
Silver Moon#silvermoonsweater |
|
 |
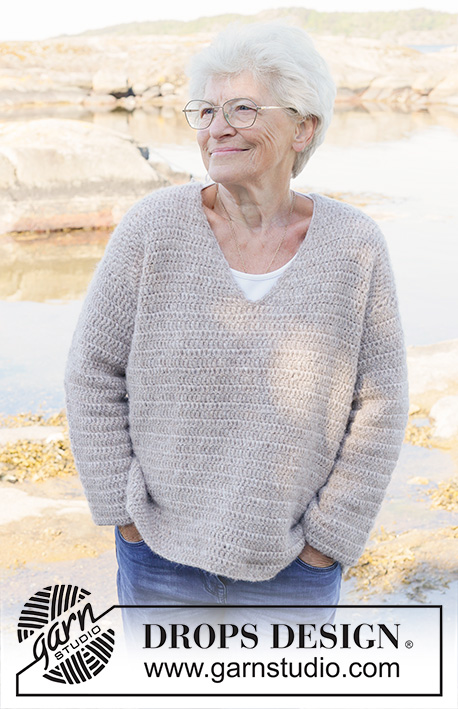 |
Crocheted over-sized jumper in DROPS Air. The piece is worked top down with treble crochets and V-neck. Sizes XS - XXL.
DROPS 252-20 |
|
|
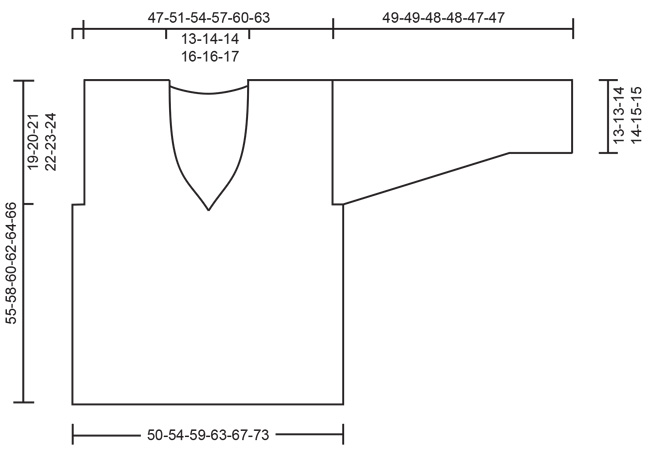
------------------------------------------------------- EXPLANATIONS FOR THE PATTERN: ------------------------------------------------------- CROCHET INFORMATION: At the beginning of each row of treble crochets work 3 chain stitches which do not replace the first treble crochet (are in addition). CHAIN STITCH: If you work outermost on the hook the chain stitch will often be too tight; 1 chain stitch should be as long as 1 treble crochet is wide. DECREASE TIP: Decrease 1 treble crochet by working 2 treble crochets together: * Make 1 yarn over, insert the hook through the next stitch, pick up the strand, make 1 yarn over and pull it through the first 2 loops on the hook *, work from *-* 1 more time, make 1 yarn over and pull it through all 3 loops on the hook (1 stitch decreased). ------------------------------------------------------- START THE PIECE HERE: ------------------------------------------------------- JUMPER - SHORT OVERVIEW OF THE PIECE: The piece is worked back and forth, top down in sections which are sewn together. Stitches are crocheted up around the armholes and the sleeves worked back and forth, top down. An edge is worked around the neck. The sleeve and side seams are sewn to finish. RIGHT SHOULDER: Work 24-26-28-29-31-32 CHAIN STITCHES – read description above, with hook size 5 mm and DROPS Air. ROW 1 (right side): Read CROCHET INFORMATION and work 3 chain stitches (do not replace the first treble crochet), work 1 treble crochet in each chain stitch = 24-26-28-29-31-32 treble crochets. ROW 2 (wrong side): Work 1 treble crochet in each of the first 23-25-27-28-30-31 treble crochets, 2 treble crochets in the next treble crochet = 25-27-29-30-32-33 treble crochets. Lay the piece to one side and work the left shoulder. LEFT SHOULDER: Work 24-26-28-29-31-32 chain stitches. ROW 1 (right side): Remember CROCHET INFORMATION, work 1 treble crochet in each chain stitch = 24-26-28-29-31-32 treble crochets. ROW 2 (wrong side): Work 2 treble crochets in the first treble crochet, 1 treble crochet in each of the next 23-25-27-28-30-31 treble crochets = 25-27-29-30-32-33 treble crochets. Now join the 2 shoulders together. BACK PIECE: Continue the left shoulder from the right side with 1 treble crochet in each treble crochet (= 25-27-29-30-32-33 treble crochets), work 16-18-18-20-20-22 chain stitches, continue the right shoulder from the right side with 1 treble crochet in each treble crochet (= 25-27-29-30-32-33 treble crochets). On the next row work 1 treble crochet in each treble crochet/chain stitch = 66-72-76-80-84-88 treble crochets. Work treble crochets back and forth until the piece measures 19-20-21-22-23-24 cm. Cut the strand. Now work the armholes as follows: Work 2-2-3-4-5-7 chain stitches, 1 treble crochet in each of the 66-72-76-80-84-88 treble crochets on the back piece (making sure you are continuing alternately from the right and wrong side), work 2-2-3-4-5-7 chain stitches. Turn and work 1 treble crochet in each chain stitch/treble crochet = 70-76-82-88-94-102 treble crochets. Continue back and forth until the piece measures 55-58-60-62-64-66 cm. LEFT FRONT PIECE: Work 24-26-28-29-31-32 chain stitches. ROW 1 (right side): Remember CROCHET INFORMATION, work 1 treble crochet in each chain stitch = 24-26-28-29-31-32 treble crochets. Work back and forth with 1 treble crochet in each treble crochet until the piece measures 10-10-11-11-12-12 cm. Now increase 1 treble crochet for the V-neck by working 2 treble crochets in the 2nd treble crochet from the neckline – i.e., in the 2nd treble crochet from the right side and the 2nd-to-last treble crochet from the wrong side. Increase every row 9-10-10-11-11-12 times. AT THE SAME TIME, when the piece measures 19-20-21-22-23-24 cm, increase for the armhole as follows: Work as before from the right side, finish the row by working 2-2-3-4-5-7 chain stitches. Continue with 1 treble crochet in each of the chain stitches/treble crochets. When the increases for V-neck and armhole are finished, the piece measures approx. 21-22-23-24-25-26 cm and there are 35-38-41-44-47-51 treble crochets. Lay the piece to one side and work the right front piece. RIGHT FRONT PIECE: Work 24-26-28-29-31-32 chain stitches. ROW 1 (right side): Remember CROCHET INFORMATION, work 1 treble crochet in each chain stitch = 24-26-28-29-31-32 treble crochets. Work back and forth with 1 treble crochet in each treble crochet until the piece measures 10-10-11-11-12-12 cm. Now increase 1 treble crochet for the V-neck (on the same row as on the left front piece) by working 2 treble crochets in the 2nd treble crochet from the neckline – i.e., in the 2nd-to-last treble crochet from the right side and the 2nd treble crochet from the wrong side. Increase every row 9-10-10-11-11-12 times. AT THE SAME TIME, when the piece measures 19-20-21-22-23-24 cm, increase for the armhole as follows: Work as before from the right side. Cut the strand, work 2-2-3-4-5-7 chain stitches, work 1 treble crochet in each treble crochet across the right front piece from the right side. Continue working 1 treble crochet in each treble crochet/chain stitch. When the increases for V-neck and armhole are finished, the piece measures approx. 21-22-23-24-25-26 cm and there are 35-38-41-44-47-51 treble crochets. Now join the 2 front pieces together mid-front. FRONT PIECE: Note whether the last row was worked from the wrong or right side - the front pieces are joined on the next row with 1 treble crochet in each treble crochet. If the next row is from the right side, work across the right front piece first then the left front piece = 70-76-82-88-94-102 treble crochets. If the next row is from the wrong side, work across the left front piece first then the right front piece = 70-76-82-88-94-102 treble crochets. Work 1 treble crochet in each treble crochet, back and forth until the piece measures 55-58-60-62-64-66 cm – matching the length to the back piece. ASSEMBLY-1: Sew the shoulder seams. SLEEVES: Start by working 1 double crochet around the outermost treble crochet inside the stitches cast on for the armhole. Work around the armhole as follows: * Work 2 chain stitches, 1 double crochet around the outermost treble crochet, approx. 1½ cm from the previous double crochet *, work from *-* 27-28-29-31-32-34 times evenly around the armhole = 27-28-29-31-32-34 chain-spaces. Turn and work 2 treble crochets in each chain-space = 54-56-58-62-64-68 treble crochets. Work back and forth with 1 treble crochet in each treble crochet. When the sleeve measures 4 cm decrease 1 treble crochet in each side as follows: Work 1 treble crochet, work 2 treble crochets together – read DECREASE TIP, work until there are 3 treble crochets left, work 2 treble crochets together, work the last treble crochet. Decrease like this every 4-4-4-3-3-3 cm a total of 9-9-9-11-11-13 times = 36-38-40-40-42-42 treble crochets. Work until the sleeve measures 49-49-48-48-47-47 cm from the shoulder. ASSEMBLY-2: Start by sewing the bottom of the armhole in each side on the front and back pieces, then sew the sleeve seam as far as the last treble crochet. Sew the side seams in the outermost treble crochet. NECK-EDGE: Start with 1 double crochet mid-bottom of the V-neck and work from the right side around the neckline, around each outermost treble crochet as follows: * Work 2 chain stitches, 1 double crochet around the next treble crochet *, work from *-* around the neckline, finish with 2 chain stitches and 1 slip stitch in the first double crochet on the round. |
|
 |
|
Have you finished this pattern?Tag your pictures with #dropspattern #silvermoonsweater or submit them to the #dropsfan gallery. Do you need help with this pattern?You'll find 10 tutorial videos, a Comments/Questions area and more by visiting the pattern on garnstudio.com. © 1982-2026 DROPS Design A/S. We reserve all rights. This document, including all its sub-sections, has copyrights. Read more about what you can do with our patterns at the bottom of each pattern on our site. |
|


With over 40 years in knitting and crochet design, DROPS Design offers one of the most extensive collections of free patterns on the internet - translated to 17 languages. As of today we count 324 catalogues and 12290 patterns translated into English (UK/cm). 12290
We work hard to bring you the best knitting and crochet have to offer, inspiration and advice as well as great quality yarns at incredible prices! Would you like to use our patterns for other than personal use? You can read what you are allowed to do in the Copyright text at the bottom of all our patterns. Happy crafting!
Post a comment to pattern DROPS 252-20
We would love to hear what you have to say about this pattern!
If you want to leave a question, please make sure you select the correct category in the form below, to speed up the answering process. Required fields are marked *.