
Popular categories
Looking for a yarn?


Comments / Questions (49)
![]() Lisette wrote:
Lisette wrote:
Ik denk dat de patroontekening niet klopt met de patroonbeschrijving? Je moet eerst de zijkanten aan het centrale vierkant haken en dan over deze hele breedte de onderkant haken. De tekening suggereert andersom: de onderkant is in de tekening 'ingeklemd' tussen de zijkanten. Is het mogelijk om de tekening aan te passen?
27.04.2026 - 15:47
![]() Catherine wrote:
Catherine wrote:
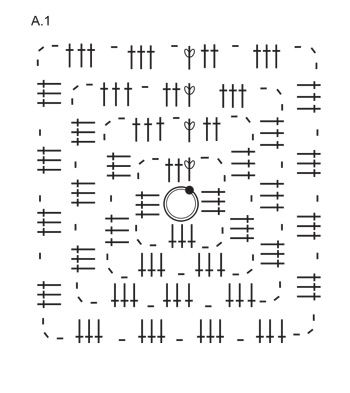
Bonjour vous parlez de point fantaisie « voir diagramme À.1 à À.3 pour les manches mais je ne vois le diagramme A.1 où sont les autres diagrammes . Merci d’avance.
12.04.2026 - 16:05DROPS Design answered:
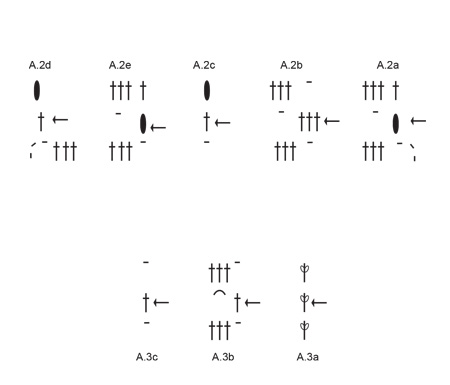
Bonjour Catherine, les diagrammes A.2 (A.2a, A.2b, A.2c, A.2e et a.2d) se trouvent juste sous A.1 et les diagrammes A.3 (A.3a, A.3b et A.3c) juste sous A.2, au-dessus du schéma des mesures. Bon crochet!
13.04.2026 - 10:22
![]() Sandra R wrote:
Sandra R wrote:
Hei, jeg tror datteren min ville elsket denne og skulle gjerne hatt oppskriften i str 8 år. Noen tips? :)
20.02.2026 - 12:28DROPS Design answered:
Hei Sandra. Du kan evnt hekle den store "midtruten / A.1 mindre og så tilpasse sidedelene, skuldrene, halskanten og ermene til midtruten, samt prøve den på din datter underveis :) mvh DROPS Design
23.02.2026 - 07:58
![]() Sabine wrote:
Sabine wrote:
Hallo, gibt es zu diesem schönen Pulli auch eine Version als Jacke?
03.08.2025 - 22:15DROPS Design answered:
Liebe Sabine, dieses Modell haben wir nicht als Jacke, aber hier finden Sie alle unsere Anleitungen für gehäkelten Jacken mit Quadraten. Viel Spaß beim Häkeln!
04.08.2025 - 09:24
![]() Faye wrote:
Faye wrote:
Is there a written pattern for the shoulders I can’t understand that part of the diagram?
08.07.2025 - 21:13DROPS Design answered:
Hi Faye, unfortunately not. How to read crochet diagrams you will find HERE. Happy crocheting!
09.07.2025 - 08:04
![]() Hanne Allesø wrote:
Hanne Allesø wrote:
Hej Jeg har hæklet denne bluse i samme farver i Paris. Den er så lækker men jeg er bekymret for at vaske den - for at farverne flyder ud. Hvad skal jeg gøre? Vh Hanne
08.06.2024 - 09:47DROPS Design answered:
Hej Hanne, følg vaskeanvisningen på banderolen og lad arbejdet ligge til tørre i et rum med god varme og ventilation, så sker der ikke noget. Du finder mere information om vask af Paris inde på farvekortet :)
11.06.2024 - 11:50
![]() Gea Hartog wrote:
Gea Hartog wrote:
Ik ben bezig met de schouders van model 240-18, maar ik kom niet uit de aangeven telpatronen. Kunnen jullie via een omschrijving of filmpje duidelijk maken hoe ik de schouders moet haken? Hartelijk dank alvast! Groet Gea Hartog.
05.06.2024 - 09:24DROPS Design answered:
Dag Gea,
Er is helaas geen video voor de schouder van dit patroon. Je haakt de schouders heen en weer tussen de markeerdraad en de zijkant volgens telpatroon A.2., beginnend met A.2a om de lossenlus in de hoek, dan A.2b en tot slot A.2c aan de kant van de hals.
05.06.2024 - 19:42
![]() Anne D wrote:
Anne D wrote:
Bonjour, Je découvre votre site et j\'aime beaucoup !Comment faites vous la couture des épaules ? Quel point utilisez vous? Je vous remercie.
14.03.2024 - 06:56DROPS Design answered:
Bonjour Anne D et merci; vous pouvez assembler les épaules comme les carrés de cette vidéo ou bien les crocheter ensemble comme dans cette vidéo. Bon crochet!
14.03.2024 - 08:49
![]() Irene wrote:
Irene wrote:
Ik snap niet precies hoe de randen aan de onderkant van het vierkant gemaakt worden. Waarom aan de verkeerde kant beginnen? Klopt het dat het eruit ziet als 4 stokjes aan ieder van de buitenkant (A2a, en A2e) in elke 2e toer? Wat betekent het dat er staat "haak heen en weer voor 4-2 toeren"? 4 voor maat S en 2 voor de andere maten? Of heeft het een andere betekenis? Is het mogelijk om een foto te plaatsen van de zijkant van de onderkant?
10.03.2024 - 17:45DROPS Design answered:
Dag Irene,
Omdat je heen en weer haakt, haak je ook aan de verkeerde kant. Je zou ook aan de goede kant kunnen beginnen, maar ik denk dat het de bedoeling is dat je de laatste toer aan de goede kant haakt, vandaar. Begin op de toer met de pijl. Je begint met 3 lossen in de hoek (lossenlus) van het vierkant en je eindigt met een stokje in de hoek (lossenlus) aan de andere kant. Daartussen haak je steeds 1 losse en 3 stokjes in de lossenlus van de vorige toer.
11.03.2024 - 21:15
![]() Sylvia wrote:
Sylvia wrote:
Bonjour, les deux carrés sont terminés. Mais j'ai un peu de peine à comprendre pour les deux rangs de côté. On commence sur l'envers A2a = 3 mailles en l'air à la fin du rang A2d = 1 bride dans l'arceau. Ensuite sur l'endroit? 3mailles en l'air et et 4 brides dans le dernier arceau? Merci beaucoup et bonne journée. Une photo détaillée des coins serait utile.
12.09.2023 - 14:09DROPS Design answered:
Bonjour Sylvia, tout à fait ou plus exactement, sur l'endroit, commencez par A.2d = 3 mailles en l'air et terminez par A.2a (= 3 brides dans l'arceau + 1 bride dans la 3ème maille en l'air du début du rang précédent). Bon crochet!
12.09.2023 - 17:18
|
||||||||||||||||||||||
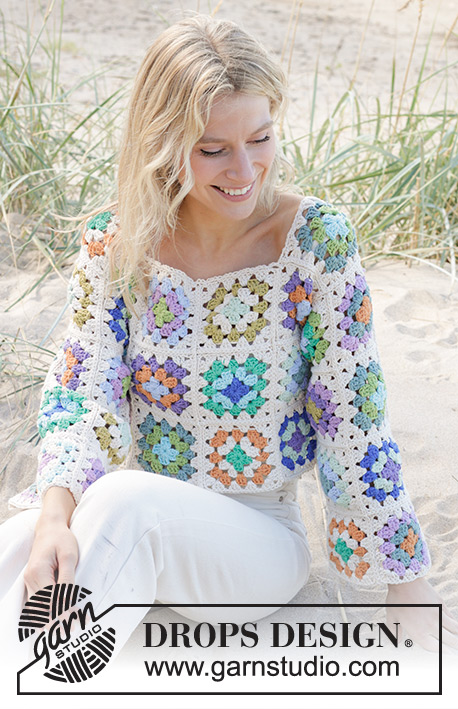
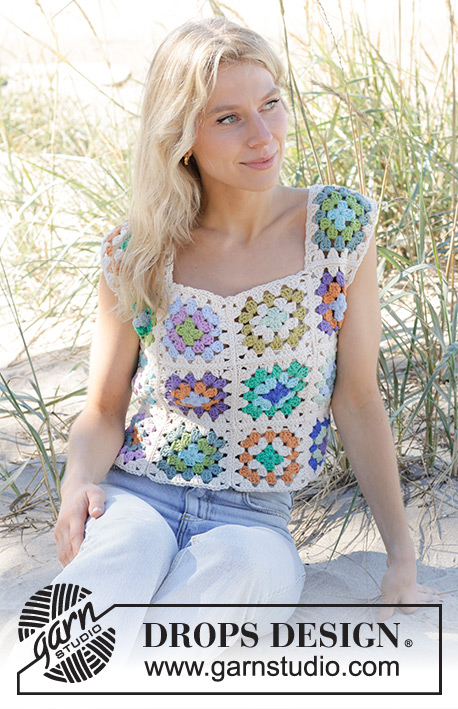
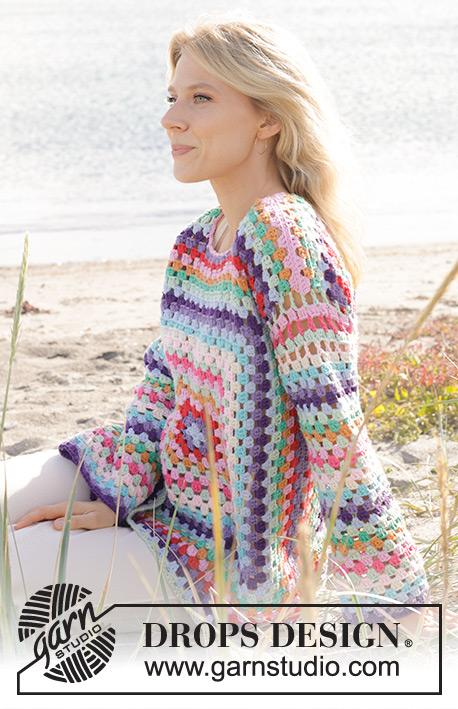
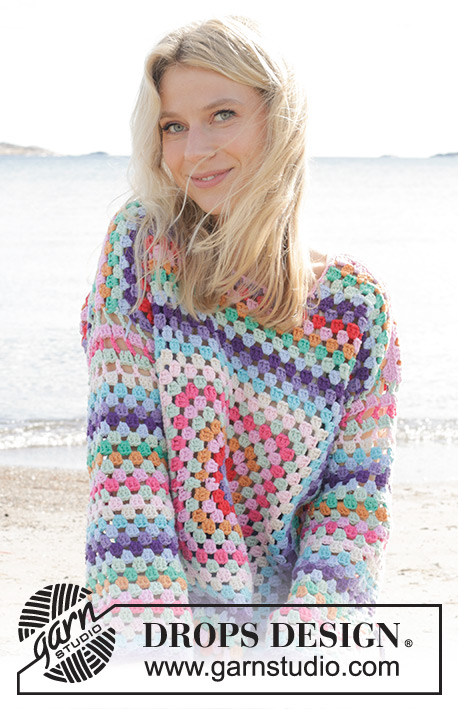
Squared Rainbow#squaredrainbowsweater |
||||||||||||||||||||||
 |
 |
|||||||||||||||||||||
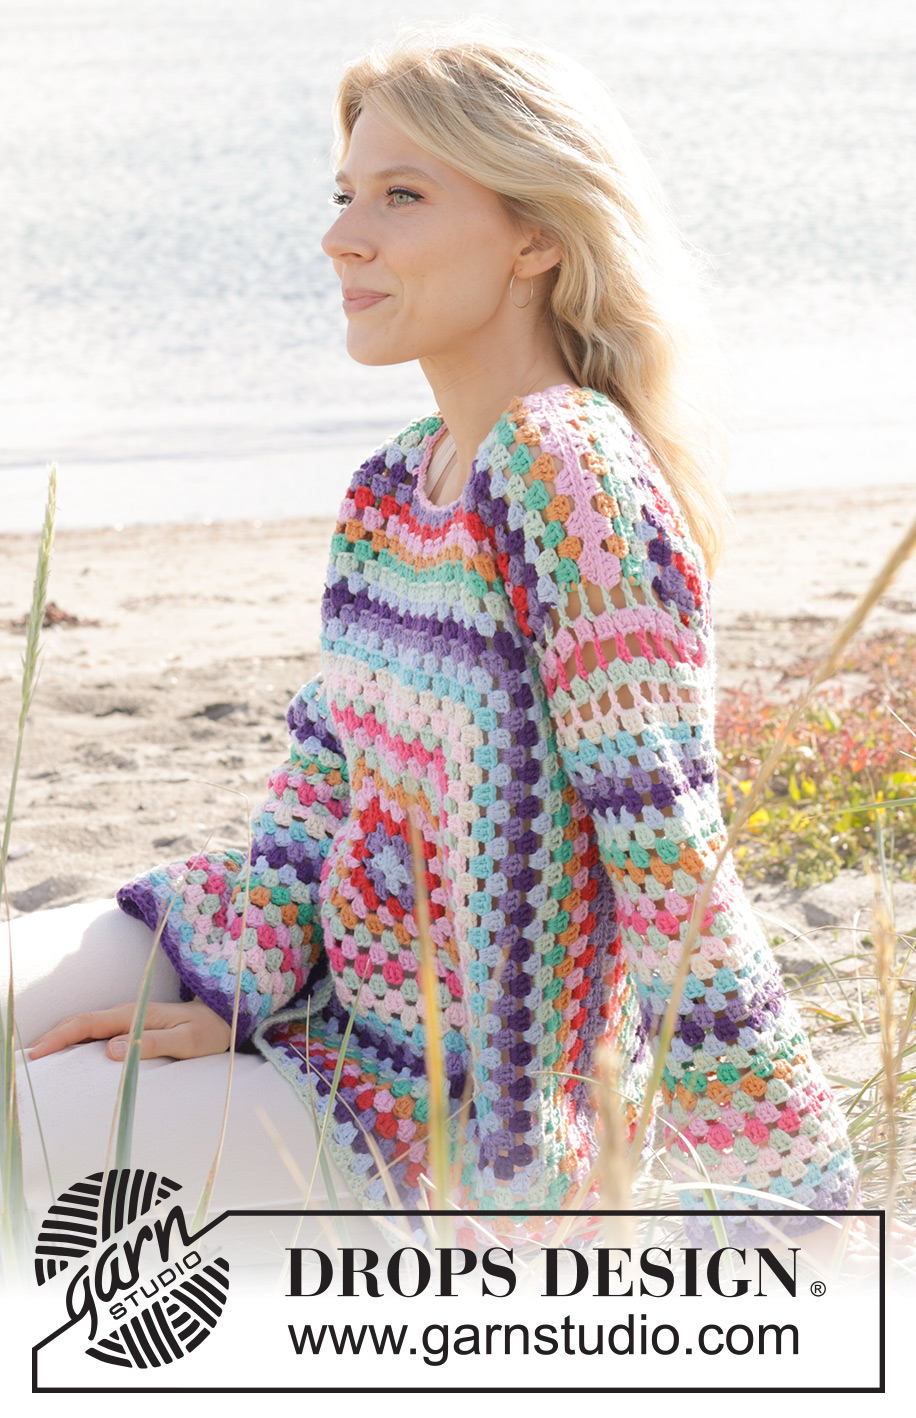
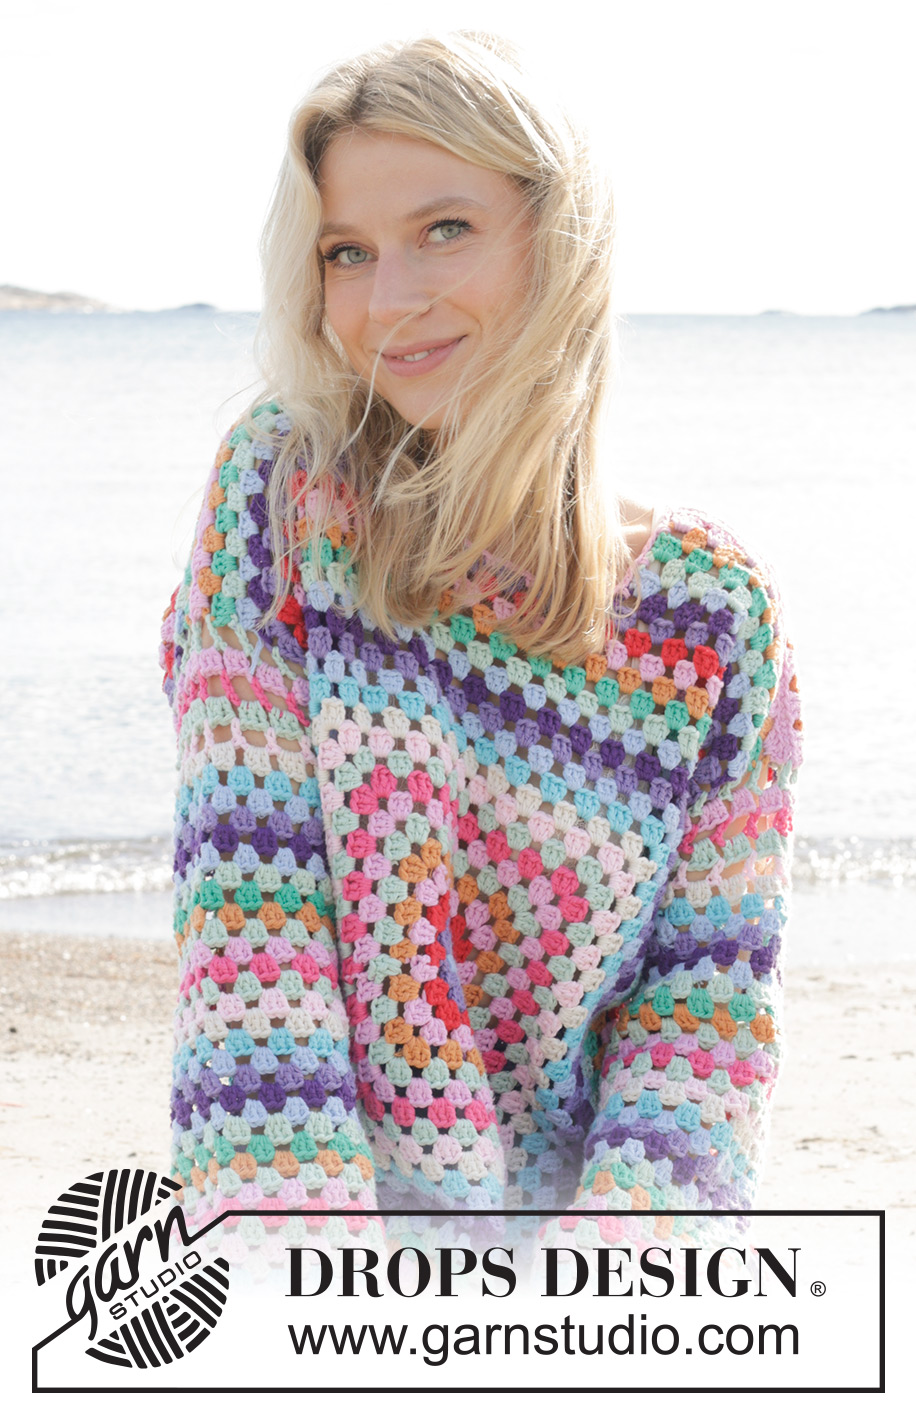
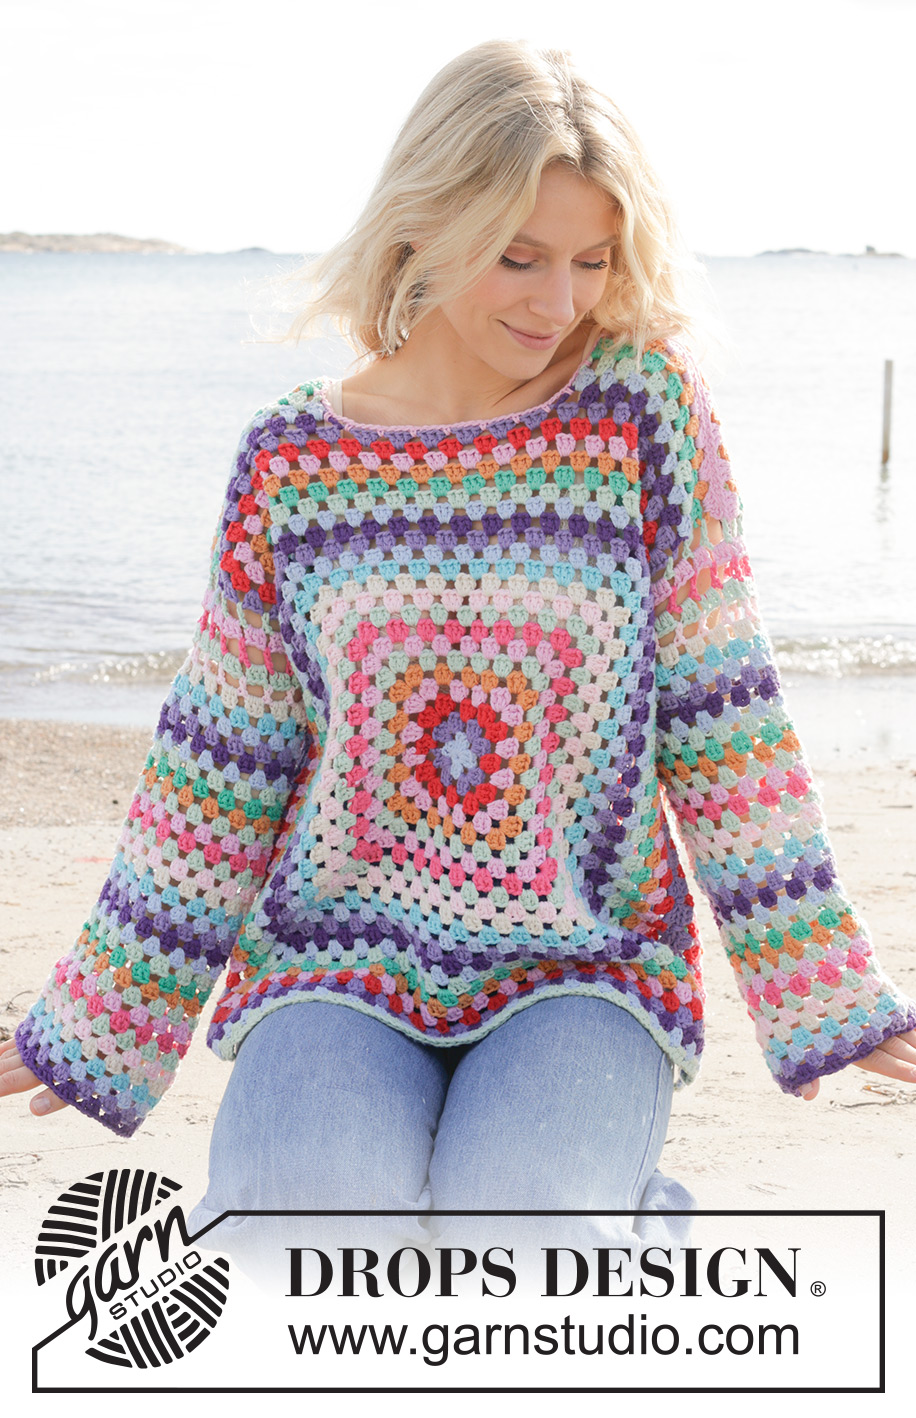
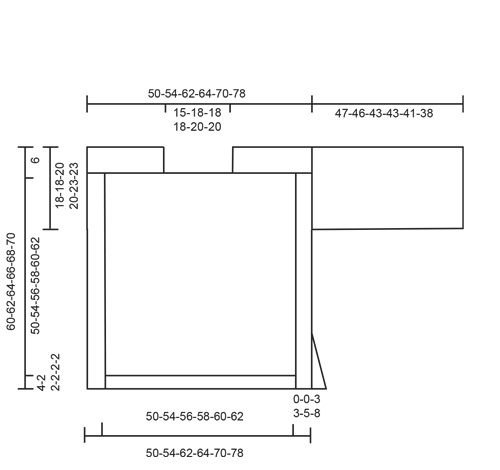
Crocheted jumper in DROPS Paris. The piece is worked from the middle outwards with squares, stripes and split in sides. Sizes S - XXXL.
DROPS 240-18 |
||||||||||||||||||||||
|
------------------------------------------------------- EXPLANATIONS FOR THE PATTERN: ------------------------------------------------------- STRIPES BODY: Work 1 row/round of each colour: Colour 100, light wash Colour 31, purple Colour 12, red Colour 70, cherry blossom Colour 71, tangerine Colour 21, mint green Colour 70, cherry blossom Colour 06, cerise Colour 21, mint green Colour 57, baby pink Colour 17, off white Colour 02, light turquoise Colour 100, light wash Colour 31, purple Colour 08, dark purple Colour 100, light wash Colour 21, mint green Colour 11, opal green Colour 71, tangerine Colour 70, cherry blossom Colour 12, red Colour 31, purple When these stripes are finished work as follows: Colour 08, dark purple Colour 100, light wash Colour 21, mint green Colour 11, opal green Colour 71, tangerine Colour 70, cherry blossom Colour 12, red Colour 31, purple Repeat these stripes to finished length. The stripes will end with a different colour depending on the size. STRIPES SLEEVES: Work 1 round of each colour: Colour 21, mint green Colour 70, cherry blossom Colour 106, cerise Colour 21, mint green Colour 57, baby pink Colour 17, off white Colour 02, light turquoise Colour 100, light wash Colour 31, purple Colour 08, dark purple Colour 100, light wash Colour 21, mint green Colour 11, opal green Colour 71, tangerine Repeat these stripes. PATTERN: See diagrams A.1 to A.3. ------------------------------------------------------- START PIECE HERE: ------------------------------------------------------- JUMPER - SHORT OVERVIEW OF THE PIECE: The front and back pieces are worked separately, in the round from the middle outwards in a square. The shoulders are worked back and forth. The sleeves are worked in the round, top down. The neck is worked to finish. FRONT PIECE: Square: Start with hook size 5 mm and DROPS Paris in colour light wash. Work pattern in the round according to diagram A.1 and STRIPES BODY – read description above. When A.1 is finished, continue working and increasing as shown in A.1 until the square measures 50-54-56-58-60-62 cm x 50-54-56-58-60-62 cm. REMEMBER THE CROCHET TENSION! Now continue as described below - remember STRIPES BODY: Sizes S-M: Work back and forth along the bottom edge of the front piece as follows: Fasten the strand with 1 double crochet around the chain-space in the corner and work from the wrong side: A.2a, A.2b as far as the next corner, A.2d around the chain-space in the corner. Turn and work back and forth for 4-2 rows. Cut and fasten the strand. Now work the shoulders and neck on the opposite side of the square: Insert 1 marker-thread on each side of the middle 6 or 7 treble-crochet groups (neck). If there are an even number of treble-crochet groups on the row, insert the marker-threads around the chain stitch on each side of the middle 6 treble-crochet groups, if there are an odd number of treble-crochet groups insert the marker-threads around the chain stitch on each side of the middle 7 treble-crochet groups. Start from the wrong side and work the right shoulder as follows: A.2a around the chain-space in the corner, A.2b as far as the chain stitch with the first marker-thread, work A.2c around this chain-stitch. Work back and forth like this for 4 rows (the piece measures approx. 5 cm from the square). Cut and fasten the strand. Skip the 6 or 7 treble-crochet groups and work the left shoulder from the wrong side: A.2e around the chain stitch with the marker-thread, work A.2b as far as the corner, A.2d around the chain-space in the corner. Continue like this for 4 rows (the piece measures approx. 5 cm from the square) – match to the right shoulder. Sizes L, XL, XXL and XXXL. Now work each side as follows: Fasten the strand with 1 double crochet around 1 corner of the square and work from the wrong side: A.2a, A.2b as far as the next corner, A.2d around the chain-space in the corner. Work 2-2-4-6 rows like this. Cut and fasten the strand and work the other side of the square in the same way. Now work along the bottom of the front piece as follows: Fasten the strand with 1 double crochet around the last row at the bottom corner and work from the wrong side: A.2e in the corner (NOTE: work around the last row in the corner), work 1-1-2-3 repeats of A.2b around the 2-2-4-6 rows worked along the side, A.2b as far as the other side, work 1-1-2-3 repeats of A.2b around the 2-2-4-6 rows worked on the other side and A.2c around the corner (NOTE: work around the last row in the corner). Work 2 rows like this. Cut and fasten the strand. Now work the shoulders and neck on the opposite side of the square: Insert 1 marker-thread on each side of the middle 7 or 8 treble-crochet groups (neck). If there are an even number of treble-crochet groups on the row, insert the marker-threads around the chain stitch on each side of the middle 8 treble-crochet groups, if there are an odd number of treble-crochet groups insert the marker-threads around the chain stitch on each side of the middle 7 treble-crochet groups. Start from the wrong side and work the right shoulder as follows: A.2e in the corner (NOTE: work around the last row in the corner), work 1-1-2-3 repeats of A.2b around the 2-2-4-6 rows worked on the side, A.2b as far as the chain stitch with the first marker-thread, work A.2c around this chain stitch. Work 4 rows like this (the piece measures approx. 5 cm from the square). Cut and fasten the strand. Skip the 7 or 8 treble-crochet groups and work the left shoulder from the wrong side: A.2e around the chain stitch with the marker-thread, work A.2b as far as the corner, work 1-1-2-3 repeats of A.2b around the 2-2-4-6 rows worked on the side, A.2c in the corner (NOTE: work around the last row). Continue like this for 4 rows (the piece measures approx. 5 cm from the square) – match to the right shoulder. BACK PIECE: Work in the same way as the front piece, but when working the shoulders and neck work the first 2 rows along the top side of the square + over the rows in each side (applies to sizes L, XL, XXL and XXXL) as follows in the different sizes – remember STRIPES BODY: SIZES S, M: Start in the corner from the wrong side and work A.2a around the chain-space in the corner, A.2b as far as the next corner, work A.2d around the corner. Work 1 row back from the right side (= 2 rows). Insert 1 marker-thread on each side of the middle 6 or 7 treble-crochet groups and work the shoulders and neck in the same way as the front piece, but finishing after you have worked 2 rows for the shoulder (a total of 4 rows from the square). Cut and fasten the strand. SIZES L, XL, XXL and XXXL: Start in the corner from the wrong side and work A.2e in the corner, work 1-1-2-3 repeats of A.2b around the 2-2-4-6 rows worked on the side, A.2b as far as the corner of the square, work 1-1-2-3 repeats of A.2b around the 2-2-4-6 rows on the side, A.2c in the corner (NOTE: work around the last row). Work back from the right side (= 2 rows). Insert 1 marker-thread on each side of the middle 7 or 8 treble-crochet groups and work the shoulders and neck in the same way as the front piece, but finishing after you have worked 2 rows for the shoulder (a total of 4 rows from the square). Cut and fasten the strand. ASSEMBLY: Sew the shoulder seams – sew in the outermost loop of the outermost stitch from the wrong side. Insert a marker-thread around the chain stitch after 7-7-8-8-9-9 treble-crochet groups down from the shoulder seam on each side of both armholes = approx. 18-18-20-20-23-23 cm from the shoulder seams (armholes). Crochet together the side seams working through both layers from the wrong side as follows: Start at one marker-thread and work 1 double crochet around the chain stitch, * 4 chain stitches, skip 3 treble crochets, 1 double crochet around the next chain stitch *, work from *-* until there is 15 cm left = split. SLEEVES: Read STRIPES SLEEVES. Start mid-under the armhole at the marker-thread and work the round marked with an arrow as follows: A.3a, work 7-7-8-8-9-9 repeats of A.3b as far as the shoulder seam, work the first treble crochet in A.3b in the seam, work 7-7-8-8-9-9 repeats of A.3b from the seam and finish with A.3C. Work A.3, three times in height, then continue as follows: A.2a, A.2b until there is 1 stitch left, A.2c. Continue this pattern until the sleeve measures 47-46-43-43-41-38 cm, Cut and fasten the strand. Work the other sleeve in the same way. NECK: Work with hook size 5 mm and the same colour as the last row on the shoulders. Fasten the strand with 1 double crochet in the shoulder seam, working first along the front piece, then the back piece: ROUND 1: Skip the first row, work (3 chain stitches, 1 double crochet around the next row) down to the first corner (= 4 chain-spaces), work (3 chain stitches, 1 double crochet) around each chain stitch along the last round of the square, work (3 chain stitches, 1 double crochet around the next row) as far as the next shoulder seam, skip the first row on the shoulder/neck on the back piece, work (3 chain stitches, 1 double crochet around the next row) down to the first corner, work (3 chain stitches, 1 double crochet) around each chain stitch along the last round on the square, work (3 chain stitches, 1 double crochet around the next row) as far as the shoulder seam (= 3 chain-spaces). |
||||||||||||||||||||||
Diagram explanations |
||||||||||||||||||||||
|
||||||||||||||||||||||
 |
||||||||||||||||||||||
 |
||||||||||||||||||||||
 |
||||||||||||||||||||||
Have you finished this pattern?Tag your pictures with #dropspattern #squaredrainbowsweater or submit them to the #dropsfan gallery. Do you need help with this pattern?You'll find 9 tutorial videos, a Comments/Questions area and more by visiting the pattern on garnstudio.com. © 1982-2026 DROPS Design A/S. We reserve all rights. This document, including all its sub-sections, has copyrights. Read more about what you can do with our patterns at the bottom of each pattern on our site. |
||||||||||||||||||||||


With over 40 years in knitting and crochet design, DROPS Design offers one of the most extensive collections of free patterns on the internet - translated to 17 languages. As of today we count 324 catalogues and 12290 patterns translated into English (UK/cm). 12290
We work hard to bring you the best knitting and crochet have to offer, inspiration and advice as well as great quality yarns at incredible prices! Would you like to use our patterns for other than personal use? You can read what you are allowed to do in the Copyright text at the bottom of all our patterns. Happy crafting!
Post a comment to pattern DROPS 240-18
We would love to hear what you have to say about this pattern!
If you want to leave a question, please make sure you select the correct category in the form below, to speed up the answering process. Required fields are marked *.