
Popular categories
Looking for a yarn?


Comments / Questions (6)
![]() Monika wrote:
Monika wrote:
Strikket 2 par votter, la en liten plastpose (halv brødpose) i tommelen og festet med sikkerhetsråd, akkurat slik det står i oppskriften. I maskinen på 40 grader normalprogram og med original grønnsåpe. Selve vottene er tovet bra, men tomlene er nesten ikke tovet, og er egentlig deformert. Vottene er ikke brukbare. Metode for toving anbefales ikke!
16.03.2025 - 09:58
![]() Cathrin wrote:
Cathrin wrote:
Ich habe diese Handschuhe genau nach Anleitung und dem angegebenen Garn in der größten Größe gestrickt. Leider reichen die 2 50g-Knäuel (=100g) jeweils nur für einen Handschuh ohne Daumen. Ich musste also Wolle nachbestellen. 100 g sind wirklich zu wenig bemessen. Denkbar ist, dass durch das Muster mehr Garn benötigt wird als bei glatt rechts gestrickten...
16.12.2024 - 17:18
![]() Emilia wrote:
Emilia wrote:
Tack så mycket för hjälpen, blev jättebra! Förutom att tummen inte tovades så mycket när jag hade plastpåse i den… Finns det något sätt att fixa det på?
06.12.2023 - 11:22DROPS Design answered:
Hej Emilie, vad kul :) hm.... skull du kunna doppa bara tummen i varmt vatten kanske...?
06.12.2023 - 15:27
![]() Emilia wrote:
Emilia wrote:
Hej igen, är det ett omslag på varv 1? Kan inte se det i diagrammet
30.11.2023 - 10:45DROPS Design answered:
Hej igen Emilie, jo du börjar varv 1 nederst i diagrammet till höger :)
30.11.2023 - 10:50
![]() Emilia wrote:
Emilia wrote:
Hej! I början står det att man ska sticka 20 maskor i A1, och sen upprepa det varvet tills arbetet når 3 cm. Men andra varvet i A1 är det 6 maskor och inte 5 som i första, undrar hur man ska gå tillväga då? Alltså hur nästkommande varv ska vara tack på förhand!
29.11.2023 - 21:49DROPS Design answered:
Hej Emilia, jo omslaget på varv 1 stickas rät på varv 2, det ser du i diagrammet :)
30.11.2023 - 10:42
![]() Rikke wrote:
Rikke wrote:
Hej. Det ser ud til at instruktionerne til denne opskrift på dansk mangler. Der bliver gentaget størrelse, materialer, pinde og strikkefasthed. Der er et diagram men ikke nogen instruktioner. Har i mulighed for at ligge instruktioner ind? Tak.
15.01.2022 - 21:04DROPS Design answered:
Hej Rikke. Tack för info, nu finns hela opskriften på dansk. Mvh DROPS Design
17.01.2022 - 13:45
|
||||||||||||||||
Find the Magic#findthemagicmittens |
||||||||||||||||
 |
 |
|||||||||||||||
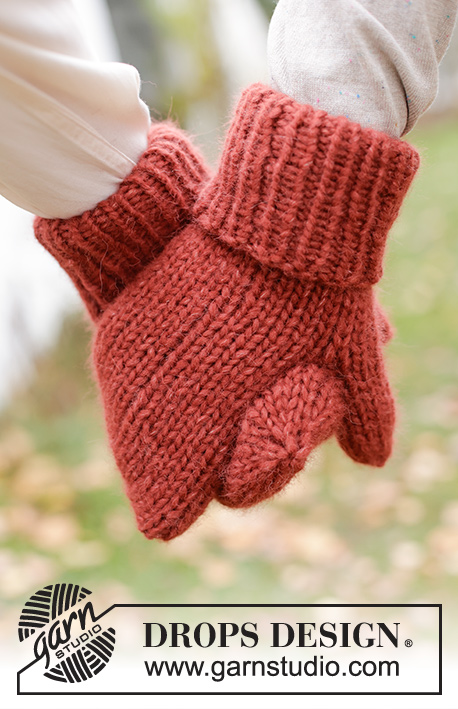
Knitted and felted mittens in DROPS Lima. Piece is knitted in stocking stitch and lace pattern.
DROPS 225-15 |
||||||||||||||||
|
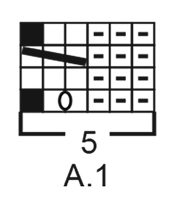
---------------------------------------------------------- EXPLANATION FOR THE PATTERN: ---------------------------------------------------------- PATTERN: See diagram A.1. NOTE! Each repetition will vary between 5 and 6 stitches because of the pattern. Number of stitches given in pattern is based on the fact that there is 5 stitches in each repetition but pay attention to this if you are on a round were there are 6 stitches in every repetition when counting number of stitches. DECREASE TIP-1 (evenly): To calculate how to decrease evenly, use the total number of stitches decreases are done over (e.g. 34 stitches) and divide by number of decreases to be done (e.g. 4) = 8.5. In this example decrease by knitting alternately every 7th and 8th stitch and every 8th and 9th stitch together. DECREASE TIP-2: Begin 2 stitches before marker and knit 2 stitches together, slip 1 stitch knitwise, knit 1, pass slipped stitch over stitch worked (= 2 stitches decreased). INCREASE TIP (applies to thumb gusset): Increase 1 stitch by working 2 stitches in same stitch. ---------------------------------------------------------- START THE PIECE HERE: ---------------------------------------------------------- MITTENS – SHORT SUMMARY OF PIECE: Worked in the round on double pointed needles. LEFT MITTEN: Cast on 59-61-63 stitches on double pointed needles size 4.5 mm with DROPS Lima. Work 4 rounds in stocking stitch. Work next round as follows: 2-2-3 stitches in stocking stitch, work A.1 over the next 20 stitches (= 4 repetitions of 5 stitches), work the first 3 stitches in A.1 so that pattern begins and ends the same way, and work 34-36-37 stitches in stocking stitch. Continue pattern like this. REMEMBER THE KNITTING TENSION! When piece measures 3 cm, decrease 4 stitches evenly over the 34-36-37 stitches at the end of round (i.e. after A.1) – read DECREASE TIP-1 (do not decrease over stitches in A.1). Repeat decrease every 1½ cm 3 times in total vertically = 47-49-51 stitches. When piece measures 8-8-7 cm, insert 1 marker in the last stitch on round. On next round increase for thumb gusset by increasing 1 stitch on each side of stitch with marker - read INCREASE TIP. Increase like this on the outside of the increased stitches every 4th round 6-7-8 times in total vertically = 59-63-67 stitches. When piece measures 16-17-18 cm (increases for thumb gusset should be done), slip stitch with marker + the increased stitches + 1 stitch on each side of these stitches on a stitch holder for thumb gusset = 15-17-19 thumb gusset stitches. Work in the round as before, and cast on 3 new stitches over stitches on stitch holder = 47-49-51 stitches. Work until 1 round remain before piece measures approx. 12-11½-11 cm from where new stitches over opening for thumb were cast on – finish after 3rd round in A.1. Piece now measures approx. 28-28½-29 cm from cast-on edge. Work 1 round in stocking stitch while at the same time decreasing 5 stitches evenly the 23 stitches in A.1 = 42-44-46 stitches remain. Now begin decrease at the top of mitten. Insert 1 marker in each side on mitten as follows: Insert 1 marker in first stitch on round and 1 marker in 22nd-23rd-24th stitch on round. Work all stitches in stocking stitch in the round. AT THE SAME TIME on first round decrease 1 stitch on both each side of both markers– read DECREASE TIP-2 (= 4 stitches decreased). Decrease like this every other round 4-5-6 times in total, and then on every round 4 times in total = 10-8-6 stitches remain. Cut the yarn and pull yarn through the remaining stitches, tighten together and fasten. Mitten measures approx. 32-33½-35 cm from top and down. THUMB: Work thumb stocking stitch in the round. Slip the 15-17-19 thumb gusset stitches on double pointed needles size 4.5 mm – pick in addition up 3 stitches in the 3 stitches cast on behind thumb = 18-20-22 stitches. Work stocking stitch in the round until thumb measures approx. 6-6½-7 cm. Now decrease 3 stitches evenly = 15-17-19 stitches. Work 3 rounds without decrease. On next round decrease 5-7-7 stitches evenly = 10-10-12 stitches. Work until thumb measures 7½-8-8½ cm. On next round knit all stitches together 2 by 2 = 5-5-6 stitches remain. Cut the yarn and pull yarn through the remaining stitches, tighten together and fasten. RIGHT MITTEN: Cast on 59-61-63 stitches on double pointed needles size 4.5 mm with DROPS Lima. Work 4 rounds in stocking stitch. Work next round as follows: 34-36-37 stitches in stocking stitch, work A.1 over the next 20 stitches (= 4 repetitions of 5 stitches), work the first 3 stitches in A.1 so that pattern begins and ends the same way, and work 2-2-3 stitches in stocking stitch. Continue pattern like this. When piece measures 3 cm, decrease 4 stitches evenly over the 34-36-37 stitches at beginning of round (i.e. before A.1) – remember DECREASE TIP-1 (do not decrease over stitches in A.1). Repeat decrease every 1½ cm 3 times in total vertically = 47-49-51 stitches. When piece measures 8-8-7 cm, insert 1 marker in the first stitch on round. On next round increase for thumb gusset by increasing 1 stitch on each side of stitch with marker - remember INCREASE TIP. Increase like this on the outside of the increased stitches every 4th round 6-7-8 times in total vertically = 59-63-67 stitches. When piece measures 16-17-18 cm (increases for thumb gusset should be done), slip stitch with marker + the increased stitches + 1 stitch on each side of these stitches on a stitch holder for thumb gusset = 15-17-19 thumb gusset stitches. Work in the round as before, and cast on 3 new stitches over stitches on stitch holder = 47-49-51 stitches. Work until 1 round remain before piece measures approx. 12-11½-11 cm from where new stitches over opening for thumb were cast on – finish after 3rd round in A.1. Piece now measures approx. 28-28½-29 cm from cast-on edge. Work 1 round in stocking stitch while at the same time decreasing 5 stitches evenly the 23 stitches in A.1 = 42-44-46 stitches remain. Now begin decrease at the top of mitten. Insert 1 marker in each side on mitten as follows: Insert 1 marker in 21st-22nd-23rd stitch on round and 1 marker in last stitch on round. Work all stitches in stocking stitch in the round. AT THE SAME TIME on first round decrease 1 stitch on both each side of both markers– remember DECREASE TIP-2 (= 4 stitches decreased). Decrease like this every other round 4-5-6 times in total, and then on every round 4 times in total = 10-8-6 stitches remain. Cut the yarn and pull yarn through the remaining stitches, tighten together and fasten. Mitten measures approx. 32-33½-35 cm from top and down. Work thumb the same way as on left mitten. FELTING: To avoid the thumb being felted to the mitten, turn it inside out and fasten a small plastic bag/silk ribbon over the top of the thumb with a safety pin. The opening of the safety pin should point towards the tip of the thumb so it is easy to remove after felting. Turn the mitten back to the right side, with the bag/ribbon inside the thumb. The piece can be felted either in the washing machine or the tumble dryer – read description below. Remember: Subsequent washes are as for a normal wool garment. IN WASHING MACHINE: Washing machines will vary when felting. If the piece is not felted enough, it can be felted again. If it is felted too much, it can be stretched to the correct size while still wet. DO THE FOLLOWING: Lay the piece in the washing machine and use a programme of approx. 40 minutes (not a wool programme). Wash at 40 degrees without pre-wash, detergent is optional. After washing, shape the piece while it is still wet. IN TUMBLE DRYER: Felting in a tumble dryer gives good control over the degree of felting. The tumble dryer can be opened during drying to check the size of the piece. If it is not felted enough it can be thoroughly wetted and felted again. If it is felted too much it can be stretched to the correct size while still wet. DO THE FOLLOWING: Lay the piece in water so it becomes completely wet, then place it in the tumble dryer and begin the drying process. Dry to the desired size, checking regularly. |
||||||||||||||||
Diagram explanations |
||||||||||||||||
|
||||||||||||||||
 |
||||||||||||||||
Have you finished this pattern?Tag your pictures with #dropspattern #findthemagicmittens or submit them to the #dropsfan gallery. Do you need help with this pattern?You'll find 19 tutorial videos, a Comments/Questions area and more by visiting the pattern on garnstudio.com. © 1982-2026 DROPS Design A/S. We reserve all rights. This document, including all its sub-sections, has copyrights. Read more about what you can do with our patterns at the bottom of each pattern on our site. |
||||||||||||||||


With over 40 years in knitting and crochet design, DROPS Design offers one of the most extensive collections of free patterns on the internet - translated to 17 languages. As of today we count 324 catalogues and 12290 patterns translated into English (UK/cm). 12290
We work hard to bring you the best knitting and crochet have to offer, inspiration and advice as well as great quality yarns at incredible prices! Would you like to use our patterns for other than personal use? You can read what you are allowed to do in the Copyright text at the bottom of all our patterns. Happy crafting!
Post a comment to pattern DROPS 225-15
We would love to hear what you have to say about this pattern!
If you want to leave a question, please make sure you select the correct category in the form below, to speed up the answering process. Required fields are marked *.