
Popular categories
Looking for a yarn?
































Comments / Questions (171)
 Essi wrote:
Olen tehnyt kuvioita ohjeen mukaan, mutta se ei näytä samalta kuin mallikuvissa. Kuvioon ei esimerkiksi jää reikiä, eikä kuvio erotu noin hyvin. Onkohan käsialani liian tiukkaa vai mistä voi olla kyse?
08.07.2026 - 22:08DROPS Design answered:
Hei, oletko tehnyt kaikki langankierrot ja kavennukset piirrosten mukaan? Tarkista, että neuletiheytesi on 24 silmukkaa sileää neuletta ja 32 kerrosta per 10 cm. Vaihda tarvittaessa paksumpiin puikkoihin.
10.07.2026 - 18:08
 Nea wrote:
Hello,i am stuck at left front piece. how to follow the pattern A.2 from Wrong Side. if knit 2 together from Wrong Side.. please help..
04.07.2026 - 07:07DROPS Design answered:
Dear Nea, when you start working back and forth the odd rows (from the bottom up) are rows from the right side, while even rows are rows from the wrong side. In those even rows you won't have the lace pattern; as you were warned in the body section: "Work until piece measures 23-24-25-25-26-27 cm - adjust so that next round is an odd numbered round in A.1 (this is important to avoid the lace pattern begin worked from wrong side when piece is divided into front and back piece)." When working the left front piece the V-neck and armhole decreases are only worked on right side rows, next to the edge stitches. In wrong side rows you will continue the knit/purl pattern, but in the last repeat, where stitches were decreased, the pattern will be unfinished. Happy knitting!
05.07.2026 - 20:49
 Lutz wrote:
A partir du moment où on a fait les 4 augmentations, on répartit ces 4 mailles sur les 7 m jersey du début du tour et les 7 m de la fin du tour ? On a donc 9 m jersey au début et 9 m pour finir le tour
24.06.2026 - 14:51DROPS Design answered:
Bonjour Mme Lutz, vous allez effectivement augmenter le nombre de mailles jersey de chaque côté (1 m au début du tour + 1 m de chaque côté du fil marqueur + 1 m à la fin du tour); tricotez ces nouvelles mailles en jersey, mais tricotez les en point ajouré quand vous aurez suffisamment de mailles pour tricoter un motif ajouré de A.1 et A.4 . Vous augmentez 4 fois au total (4 fois 4 mailles à chaque fois = 16 m au total). Bon tricot!
25.06.2026 - 17:39
Nea wrote:
Hi,can you explain for 5 cm from the pattern lace or from the rib pattern for measurement
22.06.2026 - 01:46DROPS Design answered:
Dear Nea, measure the 5 cm from the cast-on edge before starting increasing. Happy knitting!
22.06.2026 - 15:12
Day wrote:
Can you explain this (between 2 stitches make 1 yarn over) i confused to make them.
21.06.2026 - 04:48DROPS Design answered:
Hi Day, You work 1 stitch, then make 1 yarn over and finally work the 2nd stitch. Regards, Drops Team.
26.06.2026 - 06:14
Céline wrote:
Bonjour, N’y aurait-il pas une erreur à cet endroit (pour la taille S) ?: "Tricoter maintenant 2 côtes au POINT MOUSSE – au-dessus des 8-10-12-16-20-26 (...)" En effet en taille S, j’ai bien 201 mailles après les augmentations, mais cela correspond à 12 mailles et non 10 comme indiquées...car j’ai des paquets de 6 mailles. J’ai : 6 + 30(A1x3) + 29(A2) + 30(A3x3) + 6 /marqueur/ + 6 + 80(A1x8) + 8(A4) + 6 = 201 mailles..
18.06.2026 - 11:34DROPS Design answered:
Bonjour Céline, on tricote 10 m au point mousse de chaque côté pour la bordure des emmanchures, autrement dit, les autres mailles se tricotent comme avant, mais vous devez avoir 5 m au point mousse de chaque côté de chacun des marqueurs, vous rabattrez ensuite 8 m = il reste 1 m point mousse côté emmanchure pour le devant et le dos. Bon tricot!
18.06.2026 - 11:42
 Anne Gro Wilhelmsen wrote:
Trykker for rett størrelse, men det blir ikke markert i oppskriften....
17.06.2026 - 08:48
Carole Or wrote:
Bonjour pouvez-vous m'expliquer à quoi correspond : tricoter le tour suivant ainsi : 7-2-7-9-6-2 mailles Jersey, A1 au dessus des 40 mailles suivantes.... Je vous remercie. 😊
07.06.2026 - 16:18DROPS Design answered:
Bonjour Mme Or, c'est apparemment (d'après votre description), le 1er rang du point fantaisie que l'on va tricoter: entre 2 à 9 m (cf taille) mailles jersey, puis on tricote le diagramme A.1 2 à 5 fois, puis A.2, puis A.3 (2 à 5 fois), on tricote ensuite entre 4 et 18 m jersey, puis A.1 entre 6 à 13 fois, A.4 et on termine par 2 à 9 m jersey. On tricote ainsi en jersey et point ajouré en même temps, on va augmenter sur les côtés, puis on va diviser l'ouvrage pour les emmanchures et terminer chaque partie séparément. Bon tricot!
08.06.2026 - 09:50
 Josephine wrote:
Die einzelnen Löcher sind leider nicht ganz stimmig gesetzt, wenn man es links und rechts neben dem mittigen Muster betrachtet. Auf einer Seite beginnt es: Masche, Loch, Masche ... und auf der anderen Seite ergibt sich laut Strickschrift: Masche, Masche, Loch, Masche...
30.05.2026 - 16:29DROPS Design answered:
Liebe Josephine, das Lochmuster A.1/A.3 soll symmetrisch beidseitig von A.2 gestrickt werden, dh A.1 wird zuerst vor A.2 gestrickt, dann nach A.2 strickt man A.3 so wird das Muster symmetrisch sein. Viel Spaß beim Stricken!
01.06.2026 - 08:15
Loulou wrote:
Gleiche Frage für das Vorderteil
25.05.2026 - 17:59DROPS Design answered:
Auch das Vorderteil beginnt mit einer Rück-Reihe. Viel Spaß!
26.05.2026 - 08:50
|
||||||||||||||||
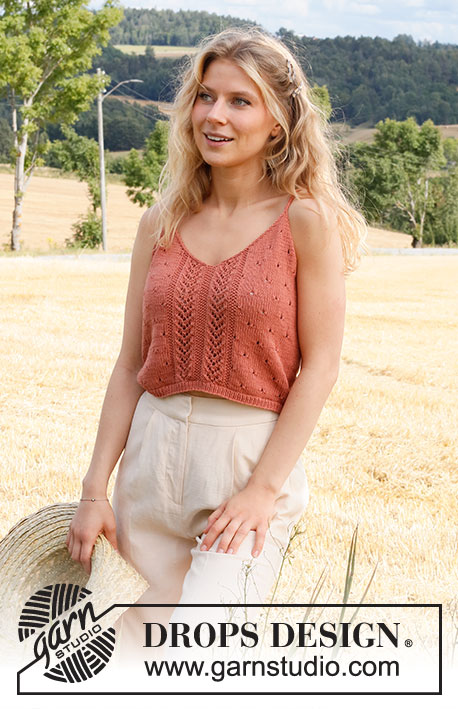
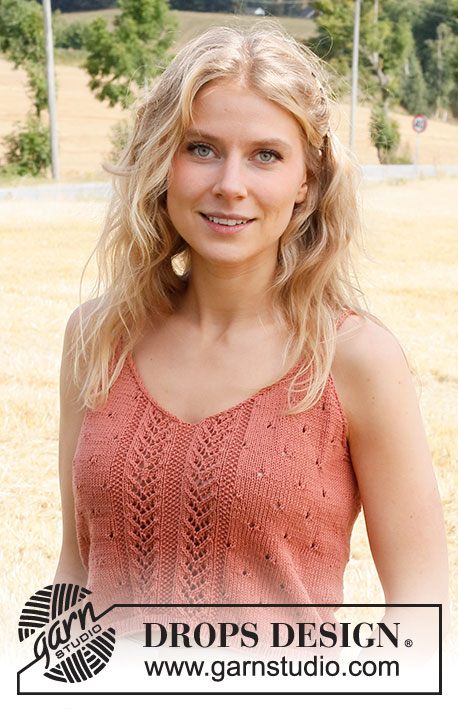
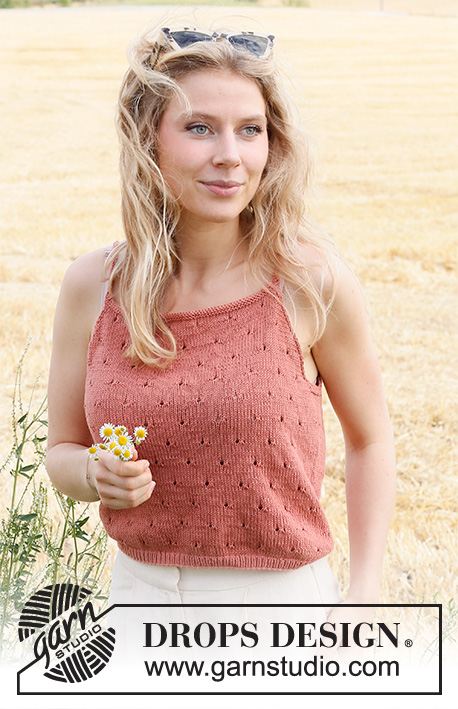
Heart on Fire#heartonfiretop |
||||||||||||||||
 |
 |
|||||||||||||||
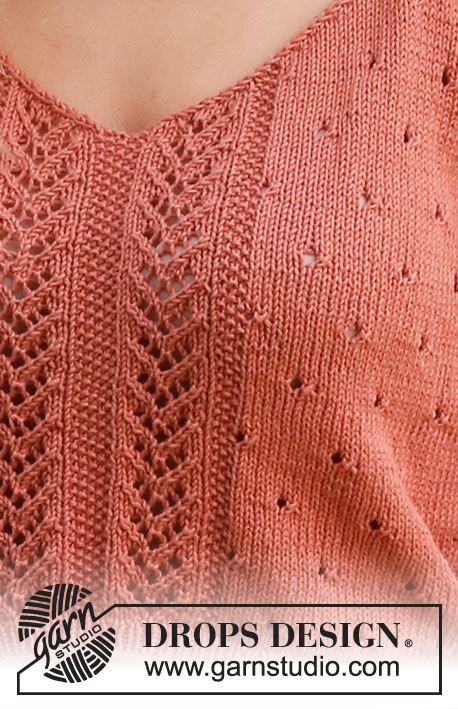
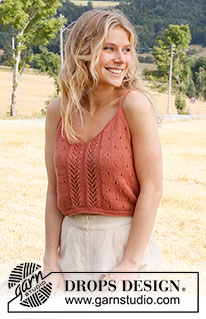
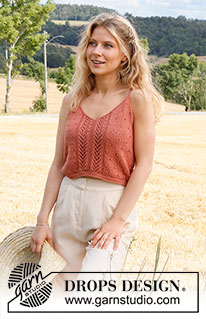
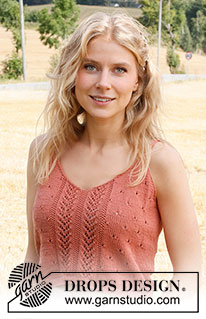
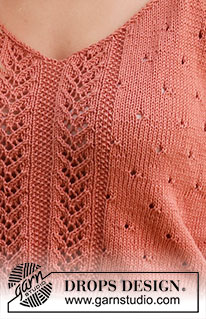
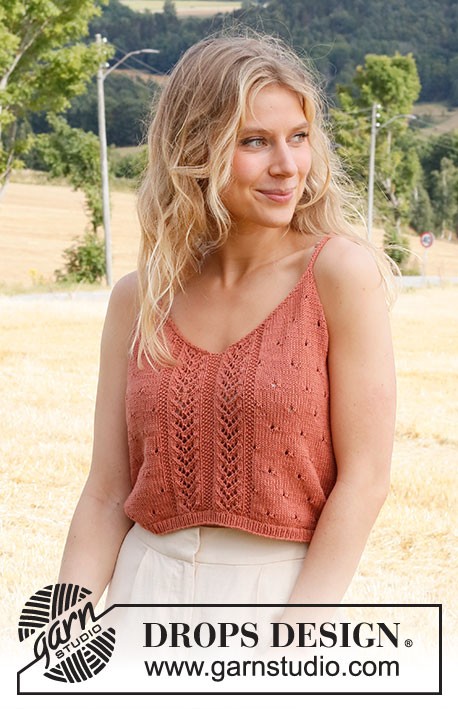
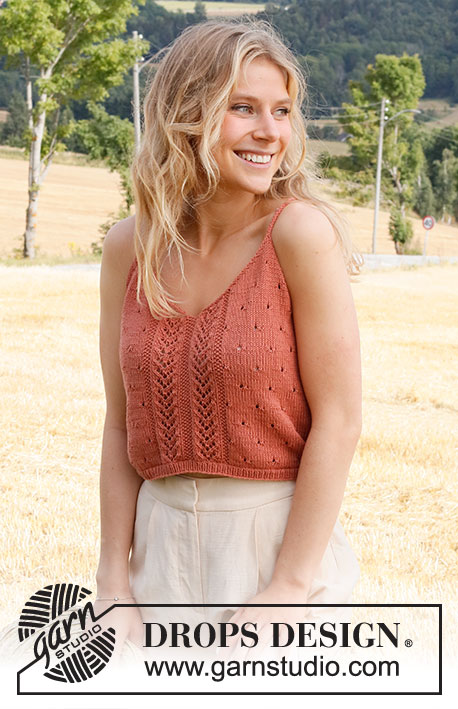
Knitted top in DROPS Safran or DROPS Magic. Piece is knitted with lace pattern and V-neck. Size: XS - XXL.
DROPS 223-27 |
||||||||||||||||
|
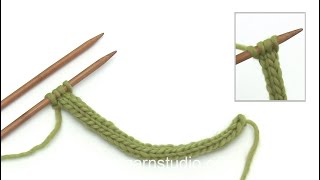
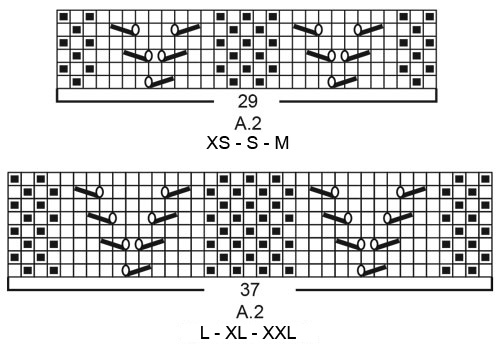
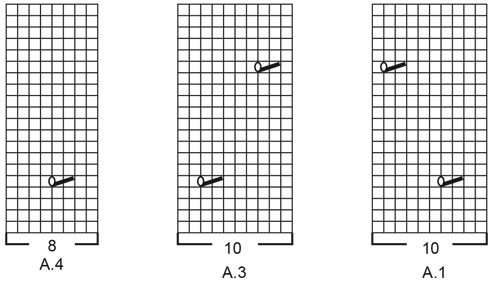
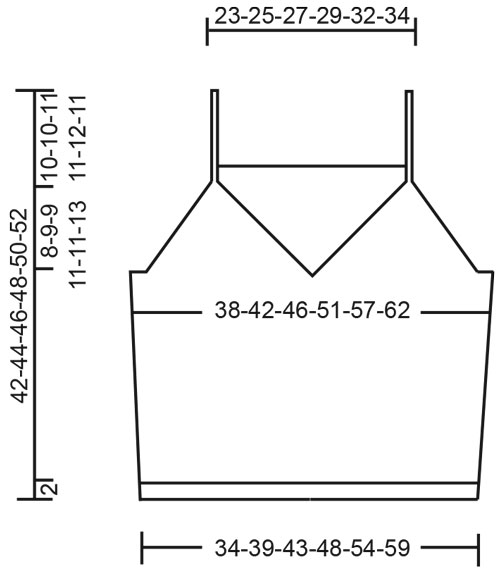
------------------------------------------------------- EXPLANATION FOR THE PATTERN: ------------------------------------------------------- GARTER STITCH (worked in the round): 1 ridge vertically = 2 rounds, i.e. knit 1 round and purl 1 round. GARTER STITCH (back and forth): Knit all rows. 1 ridge vertically = knit 2 rows. PATTERN: See diagrams A.1 to A.4. Choose diagram for your size (applies to A.2). Diagrams show all rows in pattern seen from the right side. DECREASE TIP-1 (evenly spaced): To calculate how to decrease evenly use the total number of stitches on row (e.g. 174 stitches) and divide stitches by number of decreases to be done (e.g. 10) = 17.4. In this example work alternately approx. every 16th and 17th stitch and every 17th and 18th stitch together. DECREASE TIP-2 (applies to the armholes and V-neck): Decrease inside 1 edge stitch in garter stitch. FROM RIGHT SIDE: DECREASE AS FOLLOWS AFTER 1 EDGE STITCH IN GARTER STITCH: Slip 1 stitch knitwise, knit 1, pass slipped stitch over stitch worked DECREASE AS FOLLOWS BEFORE 1 EDGE STITCH IN GARTER STITCH: Work until 2 stitches remain before edge stitch in garter stitch, knit these 2 together. FROM WRONG SIDE: DECREASE AS FOLLOWS AFTER 1 EDGE STITCH IN GARTER STITCH: Purl 2 together. DECREASE AS FOLLOWS BEFORE 1 EDGE STITCH IN GARTER STITCH: Work until 2 stitches remain before edge stitch in garter stitch, purl these 2 twisted together. INCREASE TIP (applies to sides of body): Work until 2 stitches remain before marker thread, make 1 yarn over, knit 4 (marker thread is in the middle of these 4 stitches), make 1 yarn over (= 2 stitches increased at the marker thread and 4 stitches increased on increase round in total). On next round knit yarns over twisted to avoid holes. Then work the new stitches in stocking stitch until they fit the pattern. ------------------------------------------------------- START THE PIECE HERE: ------------------------------------------------------- TOP - SHORT OVERVIEW OF THE PIECE: Work body in the round on circular needle, from the bottom and up to armholes. Then finish front piece and back piece separately. Divide the front piece mid front for V-neck, and work the two parts back and forth on circular needle separately until finished measurements, then work strap on each front piece. Work back piece back and forth on circular needle until finished measurements. Sew straps from front piece on to back piece. BODY: Cast on 174-196-216-244-272-298 stitches on circular needle size 2.5 mm with Safran or Magic. Knit 1 round. Then work rib in the round (= knit 1/purl 1) for 1½ to 2 cm. When rib is done, knit 1 round while decreasing 9-11-11-13-13-15 stitches evenly - read DECREASE TIP-1= 165-185-205-231-259-283 stitches. Switch to circular needle size 3 mm. Insert 1 marker thread at beginning of round and 1 marker thread after 83-93-103-115-129-141 stitches. 82-92-102-116-130-142 stitches remain on round for back piece. Move the marker threads upwards when working; they should be used for increase later in the sides on body. Work next round as follows: Work 7-2-7-9-6-2 stitches in stocking stitch, work A.1 over the next 20-30-30-30-40-50 stitches (= 2-3-3-3-4-5 repetitions of 10 stitches), work A.2 (= 29-29-29-37-37-37 stitches), work A.3 over the next 20-30-30-30-40-50 stitches (= 2-3-3-3-4-5 repetitions of 10 stitches), work 14-4-14-18-12-4 stitches in stocking stitch (marker thread is in the middle of these stitches), work A.1 over the next 60-80-80-90-110-130 stitches (= 6-8-8-9-11-13 repetitions of 10 stitches), work A.4 (= 8 stitches), and finish with 7-2-7-9-6-2 stitches in stocking stitch. Continue pattern like this. REMEMBER THE KNITTING TENSION! When piece measures 5-5-5-6-6-6 cm, increase 1 stitch on each side of both marker threads – read INCREASE TIP (= 4 stitches increased). Increase like this every 5-5-5-5½-5½-6 cm 4 times in total in each side = 181-201-221-247-275-299 stitches. Work until piece measures 23-24-25-25-26-27 cm - adjust so that next round is an odd numbered round in A.1 (this is important to avoid the lace pattern begin worked from wrong side when piece is divided into front and back piece). Now work in 2 ridges in GARTER STITCH - read explanation above, over the middle 8-10-12-16-20-26 stitches in each side (i.e. work 4-5-6-8-10-13 stitches in garter stitch on each side of both marker threads – work the other stitches as before). After the 2 ridges cast off for armholes and V-neck, i.e. work next round as follows: Cast off 3-4-5-7-9-12 stitches for armhole, work 42-46-50-54-59-62 stitches as before (= left front piece), cast off 1 stitch (= mid front), work 42-46-50-54-59-62 stitches as before (= right front piece), cast off 6-8-10-14-18-24 stitches for armhole, work as before over stitches on back piece until 3-4-5-7-9-12 stitches remain on round, and cast off the last 3-4-5-7-9-12 stitches for armhole. Cut the yarn and pull yarn through last stitch Finish back piece and front pieces separately. BACK PIECE: = 84-92-100-110-120-126 stitches. Begin from wrong side and continue pattern back and forth with 1 edge stitch in garter stitch in each side. AT THE SAME TIME on next row from right side begin decrease for armholes - read DECREASE TIP-2. Decrease for armholes in each side on every other row (i.e. every row from right side) 14-16-18-20-22-22 times in total in each side = 56-60-64-70-76-82 stitches. After last decrease work 1 row from wrong side as before. Switch to circular needle size 2.5 mm. Work 2 ridges back and forth over all stitches. Cast off knitting from right side. LEFT FRONT PIECE (when garment is worn): = 42-46-50-54-59-62 stitches. Begin from wrong side and continue pattern back and forth with 1 edge stitch in garter stitch in each side. AT THE SAME TIME on next row from right side begin decrease for armholes and V-neck and decrease as explained below – read DECREASE TIP-2: ARMHOLE: Decrease 1 stitch on every other row 13-14-15-17-18-20 times in total. V-NECK: Decrease 1 stitch on every row (i.e. from both right and wrong side) 24-27-30-32-36-37 times total. After all decreases for armholes and V-neck, 5 stitches remain on row for strap. Work strap as explained below. STRAP: Switch to 2 double pointed needles 2.5 mm (slip stitches on one needle and work with the other). * Move stitches to the beginning of row, tighten yarn and knit the 5 stitches from right side *, work from *-* until strap measures approx. 18-18-19-20-21-20 cm (10-10-11-11-12-11 cm of this length belongs to front piece, the rest belongs to back piece - sew strap to back piece). Cut the yarn and pull yarn through the 5 stitches, tighten together and fasten. RIGHT FRONT PIECE (when garment is worn): = 42-46-50-54-59-62 stitches. Begin from wrong side and continue pattern back and forth with 1 edge stitch in garter stitch in each side. AT THE SAME TIME on next row from right side begin decreases for V-neck and armholes and decrease as explained below – read DECREASE TIP-2: V-NECK: Decrease 1 stitch on every row (i.e. from both right and wrong side) 24-27-30-32-36-37 times total. ARMHOLE: Decrease 1 stitch on every other row 13-14-15-17-18-20 times in total. After all decreases for V-neck and armholes, 5 stitches remain on row for strap. Work strap the same way as on left front piece. ASSEMBLY: Sew straps to back piece at the edge in each side. |
||||||||||||||||
Diagram explanations |
||||||||||||||||
|
||||||||||||||||
 |
||||||||||||||||
 |
||||||||||||||||
 |
||||||||||||||||
Have you finished this pattern?Tag your pictures with #dropspattern #heartonfiretop or submit them to the #dropsfan gallery. Do you need help with this pattern?You'll find 14 tutorial videos, a Comments/Questions area and more by visiting the pattern on garnstudio.com. © 1982-2026 DROPS Design A/S. We reserve all rights. This document, including all its sub-sections, has copyrights. Read more about what you can do with our patterns at the bottom of each pattern on our site. |
||||||||||||||||






With over 40 years in knitting and crochet design, DROPS Design offers one of the most extensive collections of free patterns on the internet - translated to 17 languages. As of today we count 333 catalogues and 12532 patterns translated into English (UK/cm). 12532
We work hard to bring you the best knitting and crochet have to offer, inspiration and advice as well as great quality yarns at incredible prices! Would you like to use our patterns for other than personal use? You can read what you are allowed to do in the Copyright text at the bottom of all our patterns. Happy crafting!
Post a comment to pattern DROPS 223-27
We would love to hear what you have to say about this pattern!
If you want to leave a question, please make sure you select the correct category in the form below, to speed up the answering process. Required fields are marked *.