
Popular categories
Looking for a yarn?
































Comments / Questions (171)
 Hanne wrote:
Hej jeg skal starte på mønster A.1 men forstår det ikke Ved det læses fra højre
21.10.2026 - 22:29
 Valérie wrote:
Bonjour, Je ne comprends pas comment commencer le devant gauche sur l envers. Faut il partir depuis la maille du milieu du devant? Comment démarrer avec les aiguilles? Merci de votre réponse.
18.09.2026 - 22:28DROPS Design answered:
Bonjour Valérie, vous allez effectivement commencer le devant gauche en commençant juste après la maille rabattue au milieu du devant, puis tricotez toutes les mailles comme avant, avec 1 m point mousse de chaque côté. Joignez simplement le fil en tricotant la 1ère maille. Vous tricoterez les mailles du devant droit après. Bon tricot!
21.09.2026 - 07:47
 ANDROMACHI wrote:
I think that the eyelets should be knitted through the back loop in every other row. Otherwise the garment tents to lean in one side.
12.09.2026 - 15:11
 Hannah wrote:
Hi! I love this pattern and finally knit it. I knit size M with 100% cotton, but the finished bust size of the garment is 122cm?! I've tried shrinking it with hot wash/dry but I think steeking might be my only option. It's the front and back panels that seem overly wide. Where best would I steek? Or are you able to suggest anything else? I'm so sad that it's 12cm bigger than I expected ot to be!
07.09.2026 - 09:35DROPS Design answered:
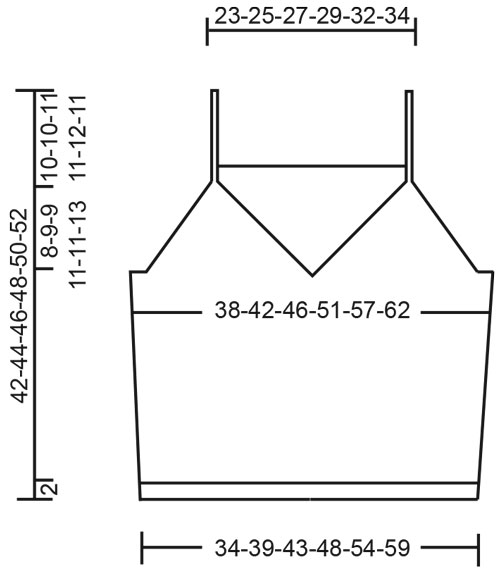
Dear Hannah, in size M the piece should be 92 cm (see chart: 46 cm from one side to the other measured flat); so with 24 sts for 10 cm the 221 sts you get after the last increases should be 92 cm, if your tension was not the same, this might have altered the finished measurements; for any further assistance about the chosen yarn, feel free to contact the store where you bought it. Thanks for your comprehension. Happy knitting!
08.09.2026 - 08:32
 Anna wrote:
Mitt linne är färdigt och blev superfint! Det gick snabbt att sticka linnet och kul att lära sig nya tekniker. Jag ska nog göra ett till i en annan färg. Tack för ett fint mönster
05.09.2026 - 00:49DROPS Design answered:
Hei Anna. Takk for hyggelig tilbakemeldig. Legg gjerne et ferdig bilde av toppen under #dropsfan galleriet så andre får gleden av å se. mvh DROPS Design
10.09.2026 - 14:41
Anna wrote:
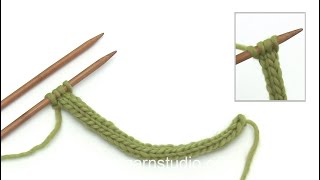
Hej! Tack för en jättebra video. Textbeskrivningen under var också bra där stod det att detta visst kallad i cord och beskrivs såhär: *Sticka 1 v på strumpsticka. Skjut maskorna till andra änden på stickan, vänd inte arbetet*, upprepa *-*. Endast hälften av det står med i detta mönster. Det är ju trots allt ganska relevant att det endast ska stickas från ett håll utan att arbetet vänds på. Hälsningar Anna
04.09.2026 - 16:02
Anna wrote:
Hej! Jag har ni kommit så långt som till axelbanden. Nu står det "AXELBAND: Byt till 2 stycken strumpstickor 2,5 (sätt maskorna på den ena strumpstickan och sticka med den andra). * Skjut maskorna till början av stickan, strama tråden och sticka de 5 maskorna räta från rätsidan *, sticka *-* till axelbandet mäter ca 18-18-19-20-21-20 cm" Betyder detta rätstickning? Jag vet inte om det kanske saknas nått i texten eller om jag missat nått annat.
03.09.2026 - 23:46DROPS Design answered:
Hej Anna. Det saknas inget i texten, se gärna på denna video så tror jag du förstår hur du ska göra. Mvh DROPS Design
04.09.2026 - 13:47
Anna wrote:
Alltså kan ni snälla, snälla börja ta bilder så man ser baksidan också?
31.08.2026 - 00:52DROPS Design answered:
Hei Anna. Om det er mulig tar vi bilde av baksiden, men det er ikke alltid det går. mvh DROPS Design
31.08.2026 - 13:06
 Catherine wrote:
Bonjour, Pouvez vous m'expliquer cette partie : Tricoter maintenant 2 côtes au POINT MOUSSE – voir ci-dessus, au-dessus des 8-10-12-16-20-26 mailles au milieu de chaque côté (c'est-à-dire tricoter 4-5-6-8-10-13 mailles au point mousse de chaque côté des 2 fils marqueurs – tricoter les autres mailles comme avant). Que veux dire tricoter 2 côtes ? Merci
20.08.2026 - 22:24DROPS Design answered:
Bonjour Catherine, pour tricoter 1 côte mousse, on doit tricoter 1 tour en mailles endroit + 1 tour en mailles envers, cf POINT MOUSSE (en rond) au début des explications; autrement dit, vous allez ici tricoter ces mailles alternativement à l'envers et à l'endroit sur les 4 tours suivants, en même temps, tricotez les autres mailles comme avant. Bon tricot!
21.08.2026 - 07:08
 Anna wrote:
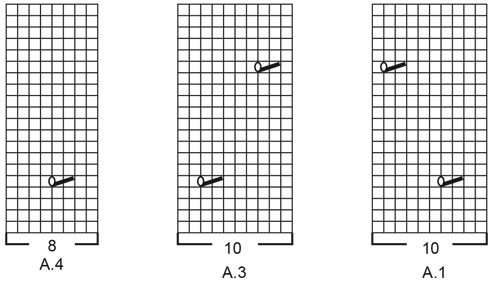
Pls answer this: Can you please explain why I do not get the small holes in the correct sequence for A1, A3 & A4. As I understand it (cost timer), that say for A1, I would do 3 rows of 10, then 9 rows of 10, and work up the chart. When I’ve done 20 rows, I start at the bottom of that chart and work up again. Is that correct? The same for A3 & A4? My holes end up in a straight line up 1st attempt, then just too close and too far apart next times. What am I doing wrong?
17.08.2026 - 09:28DROPS Design answered:
Dear Anna, when working A.1, A.3 and A.4 you should work each row each diagram like that: start with the first 10 sts A.1, then repeat the 10 sts A.3 and work the 8 sts A.4. You first work 4 rows stocking stitch, then start lace pattern just as shown in the next row each diagram. Read more about diagrams here. Happy knitting!
17.08.2026 - 16:22
|
||||||||||||||||
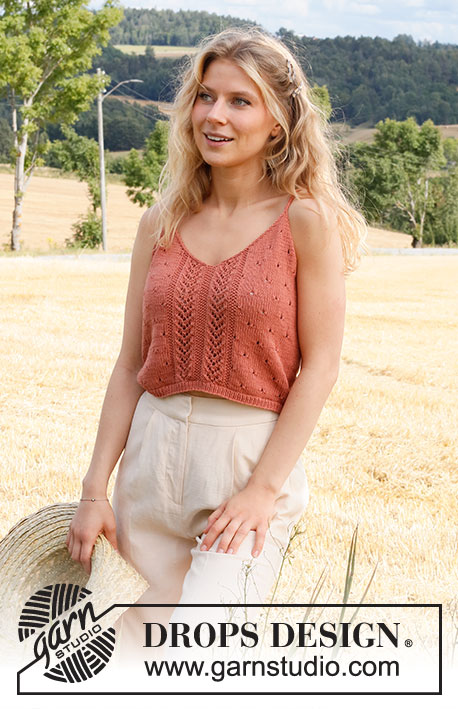
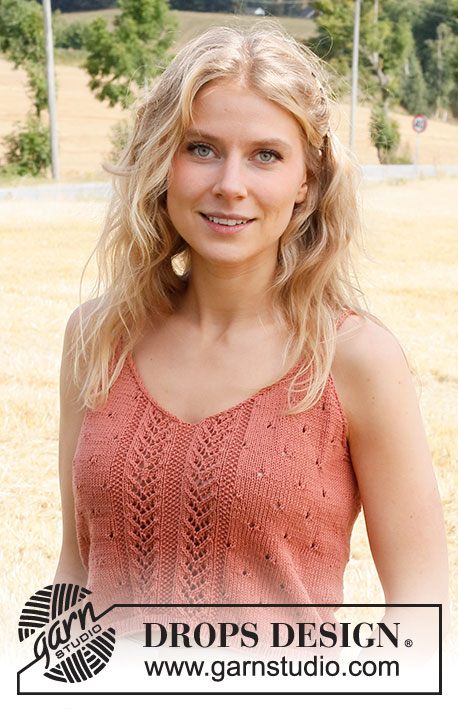
Heart on Fire#heartonfiretop |
||||||||||||||||
 |
 |
|||||||||||||||
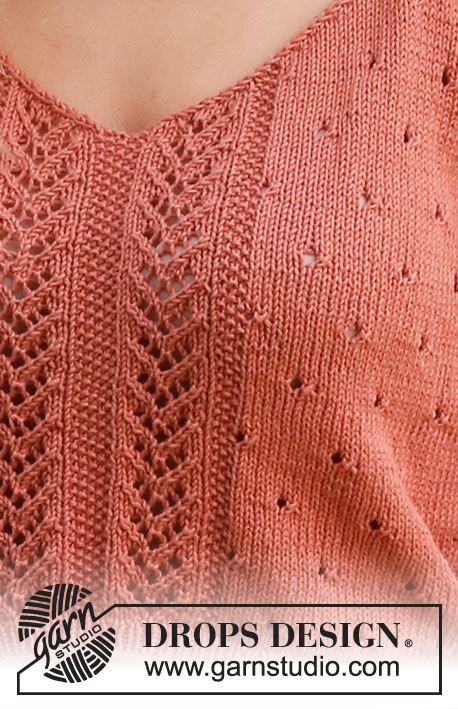
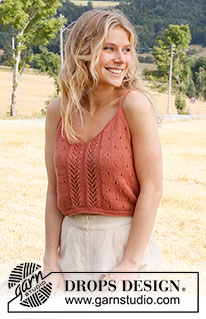
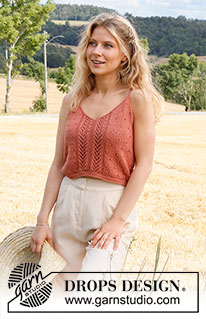
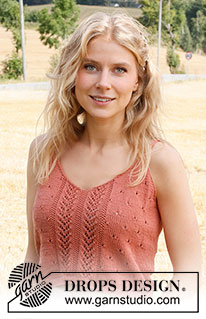
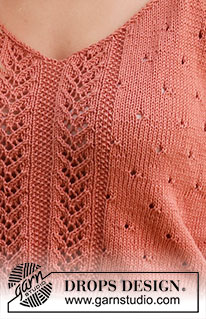
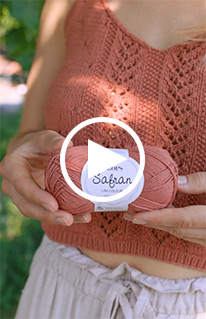
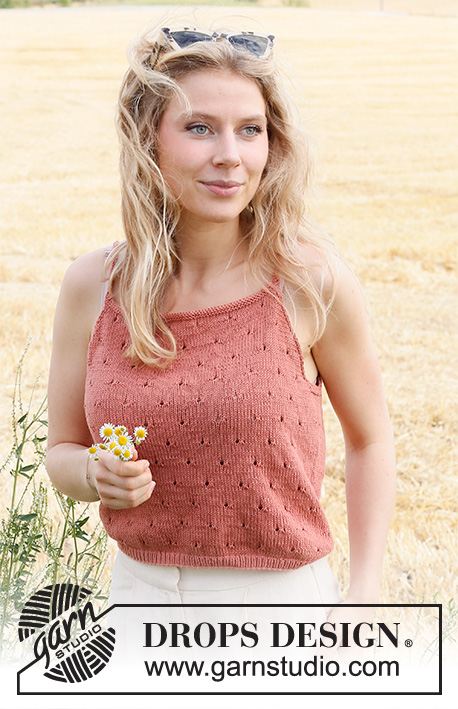
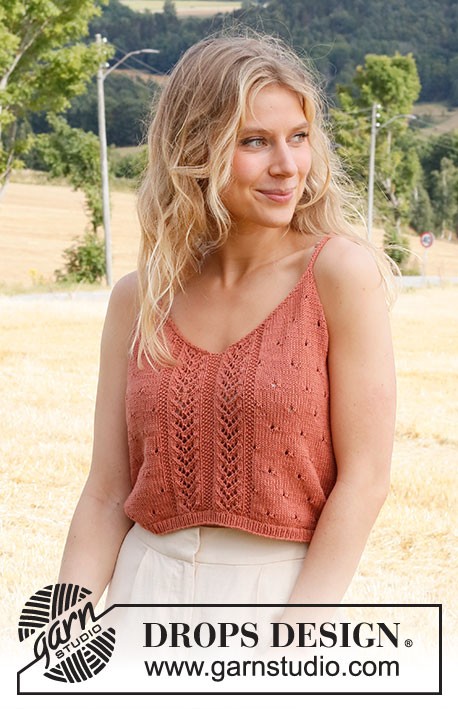
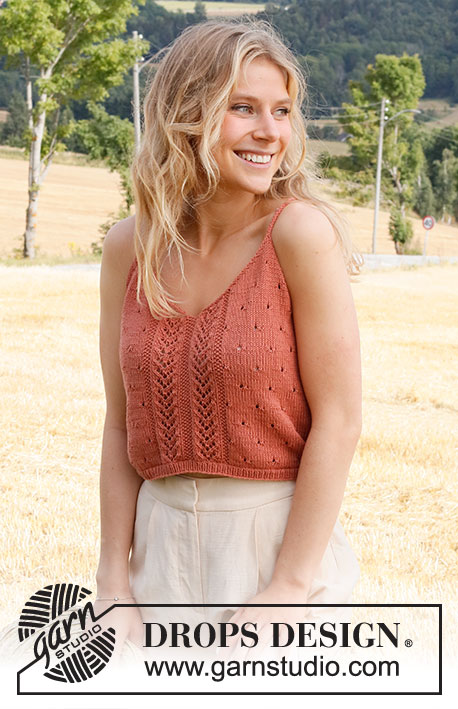
Knitted top in DROPS Safran or DROPS Magic. Piece is knitted with lace pattern and V-neck. Size: XS - XXL.
DROPS 223-27 |
||||||||||||||||
|
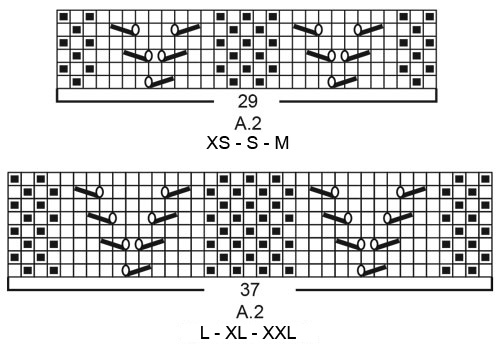
------------------------------------------------------- EXPLANATION FOR THE PATTERN: ------------------------------------------------------- GARTER STITCH (worked in the round): 1 ridge vertically = 2 rounds, i.e. knit 1 round and purl 1 round. GARTER STITCH (back and forth): Knit all rows. 1 ridge vertically = knit 2 rows. PATTERN: See diagrams A.1 to A.4. Choose diagram for your size (applies to A.2). Diagrams show all rows in pattern seen from the right side. DECREASE TIP-1 (evenly spaced): To calculate how to decrease evenly use the total number of stitches on row (e.g. 174 stitches) and divide stitches by number of decreases to be done (e.g. 10) = 17.4. In this example work alternately approx. every 16th and 17th stitch and every 17th and 18th stitch together. DECREASE TIP-2 (applies to the armholes and V-neck): Decrease inside 1 edge stitch in garter stitch. FROM RIGHT SIDE: DECREASE AS FOLLOWS AFTER 1 EDGE STITCH IN GARTER STITCH: Slip 1 stitch knitwise, knit 1, pass slipped stitch over stitch worked DECREASE AS FOLLOWS BEFORE 1 EDGE STITCH IN GARTER STITCH: Work until 2 stitches remain before edge stitch in garter stitch, knit these 2 together. FROM WRONG SIDE: DECREASE AS FOLLOWS AFTER 1 EDGE STITCH IN GARTER STITCH: Purl 2 together. DECREASE AS FOLLOWS BEFORE 1 EDGE STITCH IN GARTER STITCH: Work until 2 stitches remain before edge stitch in garter stitch, purl these 2 twisted together. INCREASE TIP (applies to sides of body): Work until 2 stitches remain before marker thread, make 1 yarn over, knit 4 (marker thread is in the middle of these 4 stitches), make 1 yarn over (= 2 stitches increased at the marker thread and 4 stitches increased on increase round in total). On next round knit yarns over twisted to avoid holes. Then work the new stitches in stocking stitch until they fit the pattern. ------------------------------------------------------- START THE PIECE HERE: ------------------------------------------------------- TOP - SHORT OVERVIEW OF THE PIECE: Work body in the round on circular needle, from the bottom and up to armholes. Then finish front piece and back piece separately. Divide the front piece mid front for V-neck, and work the two parts back and forth on circular needle separately until finished measurements, then work strap on each front piece. Work back piece back and forth on circular needle until finished measurements. Sew straps from front piece on to back piece. BODY: Cast on 174-196-216-244-272-298 stitches on circular needle size 2.5 mm with Safran or Magic. Knit 1 round. Then work rib in the round (= knit 1/purl 1) for 1½ to 2 cm. When rib is done, knit 1 round while decreasing 9-11-11-13-13-15 stitches evenly - read DECREASE TIP-1= 165-185-205-231-259-283 stitches. Switch to circular needle size 3 mm. Insert 1 marker thread at beginning of round and 1 marker thread after 83-93-103-115-129-141 stitches. 82-92-102-116-130-142 stitches remain on round for back piece. Move the marker threads upwards when working; they should be used for increase later in the sides on body. Work next round as follows: Work 7-2-7-9-6-2 stitches in stocking stitch, work A.1 over the next 20-30-30-30-40-50 stitches (= 2-3-3-3-4-5 repetitions of 10 stitches), work A.2 (= 29-29-29-37-37-37 stitches), work A.3 over the next 20-30-30-30-40-50 stitches (= 2-3-3-3-4-5 repetitions of 10 stitches), work 14-4-14-18-12-4 stitches in stocking stitch (marker thread is in the middle of these stitches), work A.1 over the next 60-80-80-90-110-130 stitches (= 6-8-8-9-11-13 repetitions of 10 stitches), work A.4 (= 8 stitches), and finish with 7-2-7-9-6-2 stitches in stocking stitch. Continue pattern like this. REMEMBER THE KNITTING TENSION! When piece measures 5-5-5-6-6-6 cm, increase 1 stitch on each side of both marker threads – read INCREASE TIP (= 4 stitches increased). Increase like this every 5-5-5-5½-5½-6 cm 4 times in total in each side = 181-201-221-247-275-299 stitches. Work until piece measures 23-24-25-25-26-27 cm - adjust so that next round is an odd numbered round in A.1 (this is important to avoid the lace pattern begin worked from wrong side when piece is divided into front and back piece). Now work in 2 ridges in GARTER STITCH - read explanation above, over the middle 8-10-12-16-20-26 stitches in each side (i.e. work 4-5-6-8-10-13 stitches in garter stitch on each side of both marker threads – work the other stitches as before). After the 2 ridges cast off for armholes and V-neck, i.e. work next round as follows: Cast off 3-4-5-7-9-12 stitches for armhole, work 42-46-50-54-59-62 stitches as before (= left front piece), cast off 1 stitch (= mid front), work 42-46-50-54-59-62 stitches as before (= right front piece), cast off 6-8-10-14-18-24 stitches for armhole, work as before over stitches on back piece until 3-4-5-7-9-12 stitches remain on round, and cast off the last 3-4-5-7-9-12 stitches for armhole. Cut the yarn and pull yarn through last stitch Finish back piece and front pieces separately. BACK PIECE: = 84-92-100-110-120-126 stitches. Begin from wrong side and continue pattern back and forth with 1 edge stitch in garter stitch in each side. AT THE SAME TIME on next row from right side begin decrease for armholes - read DECREASE TIP-2. Decrease for armholes in each side on every other row (i.e. every row from right side) 14-16-18-20-22-22 times in total in each side = 56-60-64-70-76-82 stitches. After last decrease work 1 row from wrong side as before. Switch to circular needle size 2.5 mm. Work 2 ridges back and forth over all stitches. Cast off knitting from right side. LEFT FRONT PIECE (when garment is worn): = 42-46-50-54-59-62 stitches. Begin from wrong side and continue pattern back and forth with 1 edge stitch in garter stitch in each side. AT THE SAME TIME on next row from right side begin decrease for armholes and V-neck and decrease as explained below – read DECREASE TIP-2: ARMHOLE: Decrease 1 stitch on every other row 13-14-15-17-18-20 times in total. V-NECK: Decrease 1 stitch on every row (i.e. from both right and wrong side) 24-27-30-32-36-37 times total. After all decreases for armholes and V-neck, 5 stitches remain on row for strap. Work strap as explained below. STRAP: Switch to 2 double pointed needles 2.5 mm (slip stitches on one needle and work with the other). * Move stitches to the beginning of row, tighten yarn and knit the 5 stitches from right side *, work from *-* until strap measures approx. 18-18-19-20-21-20 cm (10-10-11-11-12-11 cm of this length belongs to front piece, the rest belongs to back piece - sew strap to back piece). Cut the yarn and pull yarn through the 5 stitches, tighten together and fasten. RIGHT FRONT PIECE (when garment is worn): = 42-46-50-54-59-62 stitches. Begin from wrong side and continue pattern back and forth with 1 edge stitch in garter stitch in each side. AT THE SAME TIME on next row from right side begin decreases for V-neck and armholes and decrease as explained below – read DECREASE TIP-2: V-NECK: Decrease 1 stitch on every row (i.e. from both right and wrong side) 24-27-30-32-36-37 times total. ARMHOLE: Decrease 1 stitch on every other row 13-14-15-17-18-20 times in total. After all decreases for V-neck and armholes, 5 stitches remain on row for strap. Work strap the same way as on left front piece. ASSEMBLY: Sew straps to back piece at the edge in each side. |
||||||||||||||||
Diagram explanations |
||||||||||||||||
|
||||||||||||||||
 |
||||||||||||||||
 |
||||||||||||||||
 |
||||||||||||||||
Have you finished this pattern?Tag your pictures with #dropspattern #heartonfiretop or submit them to the #dropsfan gallery. Do you need help with this pattern?You'll find 14 tutorial videos, a Comments/Questions area and more by visiting the pattern on garnstudio.com. © 1982-2026 DROPS Design A/S. We reserve all rights. This document, including all its sub-sections, has copyrights. Read more about what you can do with our patterns at the bottom of each pattern on our site. |
||||||||||||||||






With over 40 years in knitting and crochet design, DROPS Design offers one of the most extensive collections of free patterns on the internet - translated to 17 languages. As of today we count 333 catalogues and 12532 patterns translated into English (UK/cm). 12532
We work hard to bring you the best knitting and crochet have to offer, inspiration and advice as well as great quality yarns at incredible prices! Would you like to use our patterns for other than personal use? You can read what you are allowed to do in the Copyright text at the bottom of all our patterns. Happy crafting!
Post a comment to pattern DROPS 223-27
We would love to hear what you have to say about this pattern!
If you want to leave a question, please make sure you select the correct category in the form below, to speed up the answering process. Required fields are marked *.