
Popular categories
Looking for a yarn?


Comments / Questions (14)
![]() Sally wrote:
Sally wrote:
I swapped row one of the A1 diagram with row 2 of the A1 diagram. I made the slip, knit, knit and place slipped stitch over the two knit stitches first. Then on the second row I did the yarn over between the two knit stitches. Otherwise you end up with an extra stitch. I looked up how to do a mock cable pattern and that was the recommendation. Hope this helps someone.
04.01.2025 - 17:20
![]() Liese wrote:
Liese wrote:
Guten Tag, nach der Erhöhung beginnt das Muster. Bei einer Länge von 11cm beginnen die Zunahmen. Meine Frage: von wo messe ich die 11cm? vom Bündchen? Im unteren Abschnitt heißt es, bis die Arbeit eine Länge von 17cm hat. Können Sie mir helfen? Danke
11.11.2024 - 07:09DROPS Design answered:
Liebe Lise, Messen Sie an der mittleren Vorne, dh nicht mit den verkürzten Reihen, aber ab Anschlagksante. Viel Spaß beim Stricken!
11.11.2024 - 12:35
![]() Natise Houston wrote:
Natise Houston wrote:
I do not understand. Where do you knit in the cables? It doesn\'t mention it in the pattern. Only has a small chart.
07.03.2024 - 03:55DROPS Design answered:
Dear Mrs Houston, cables are worked after elevation is done, when working A.1 = diagram for the cables. Happy knitting!
07.03.2024 - 08:40
![]() Uschi wrote:
Uschi wrote:
Hallo, ich stricke Gr 68/74. Leider habe ich 8 M zu viel für jedes Bein. 120+16 M zugenommen=136 M, 136-8 M Schritt=128 M, 128 M ÷ 2 = 64 M pro Bein. Laut Angabe sollen es 56 M sein. Ich habe also 8 M zu viel bei jedem Bein? Ich finde den Fehler leider nicht. Können Sie mir helfen? Lieben Dank Uschi
10.12.2023 - 10:53DROPS Design answered:
Liebe Uschi, Größe 68/74 ist die 3. Größe, so soll man 126 Maschen anschlagen, 26 Maschen nach Bündchen abnehmen = 100 Maschen, dann 2 Maschen 8 Mal zunehmen = 116 Maschen, dann 4 Maschen für den Schritt (vorne und hinten = insgesamt 8 Maschen) abketten = 54 Maschen sind jetzt übrig für jedes Bein. Viel Spaß beim stricken!
11.12.2023 - 09:00
![]() Uschi wrote:
Uschi wrote:
Notiz: Rippenmaschen an den äußeren Beinseiten stricken, Lochreihe für Einzugband nach Bündchen stricken, Bündchenmuster verlängern?
09.12.2023 - 21:13
![]() Stina wrote:
Stina wrote:
Hejsa. Strikker den mindste størrelse, og kan ikke få indtagningerne til at passe. Benet skal være 3 cm før man begynder at tage ind. Og så skal man tage ind 4 gange på hver 2. cm. Så har man 3+8=11 cm. Men benet skal kun være 9 cm, før man skal til at lave rib og tage ud? Er der en fejl i opskriften? Skulle der have stået omgang og ikke cm?
02.12.2023 - 20:05DROPS Design answered:
Hei Stina. Du har felt 5 ganger, men det skal felles totalt 4 ganger. Første gang når arbeidet måler 3 cm, så når det måler 5 cm (3+2), så når arbeidet måler 7 cm (3+2+2), og 4. og siste gang når arbeidet måler 9 cm ( 3+2+2+2). Du vil da ha riktig lengde og maskeantall. mvh DROPS Design
04.12.2023 - 09:36
![]() April wrote:
April wrote:
Hi, Do we increase only at the FRONT mid? So the back stays flat? It looks like so for this model but all other baby pants tells to increase 1 stitch on each side of the middle 2 stitches front and back. Thank you...
26.10.2023 - 05:04DROPS Design answered:
Hi April, In this pattern you only increase mid-front, to give the shape shown in the picture. It is the decreases towards the gusset which are both front and back. Happy knitting!.
26.10.2023 - 07:21
![]() April wrote:
April wrote:
Hi, Do we increase only at the FRONT mid? So the back stays flat? It looks like so for this model but all other baby pants tells to increase 1 stitch on each side of the middle 2 stitches front and back. Thank you...
25.10.2023 - 23:48
![]() Hanna wrote:
Hanna wrote:
Hej! Jag undrar om man ska sticka omslaget i diagrammet vridet rätt i nästa varv?
21.01.2023 - 12:41DROPS Design answered:
Hei Hanna. Nei, kastet strikkes rett (i iagrammet). Se evnt hjelpevideoen: Hur man stickar en enkel liten fläta utan att använda en flätsticka (fusk-fläta). mvh DROPS Design
23.01.2023 - 11:47
![]() Guðrún Sigríður Þorsteinsdóttir wrote:
Guðrún Sigríður Þorsteinsdóttir wrote:
Er það rétt að eigi bara að auka í framan á buxunum?
10.04.2022 - 22:22DROPS Design answered:
Blessuð Guðrún. Það er rétt. Það á að auka út hvoru megin við 4 miðjulykkjur að framan. Gangi þér vel.
11.04.2022 - 18:46
|
||||||||||||||||
Little Cherub Pants#littlecherubpants |
||||||||||||||||
 |
 |
|||||||||||||||
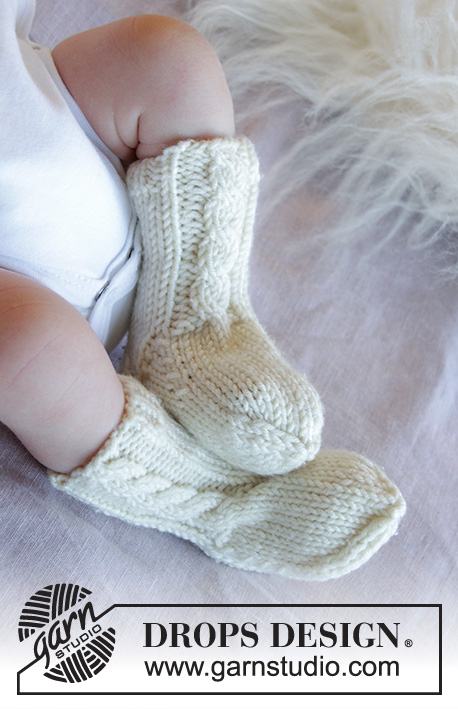
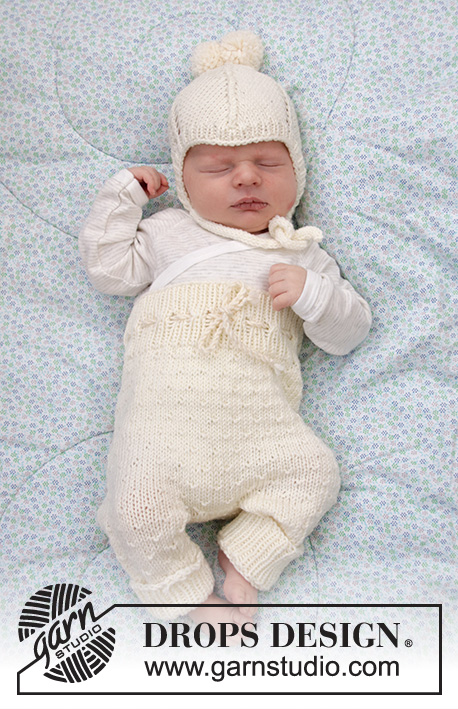
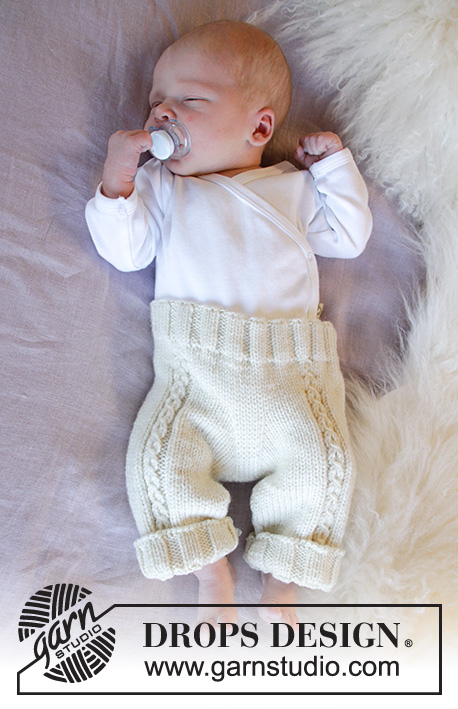
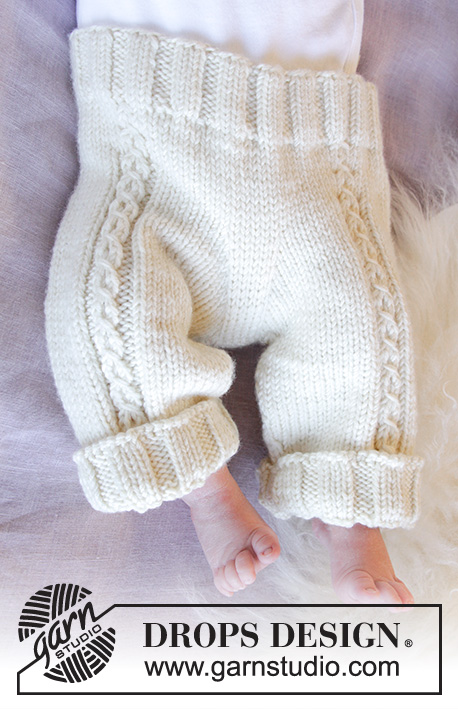
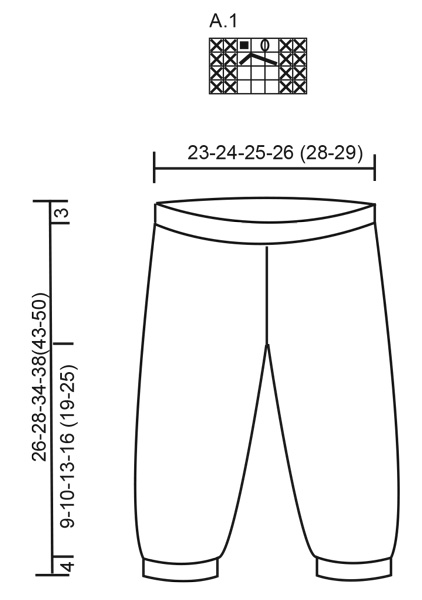
Knitted pants for baby in DROPS Merino Extra Fine. Piece is knitted top down with false cables. Size 1 month - 4 years
DROPS Baby 33-18 |
||||||||||||||||
|
---------------------------------------------------------- EXPLANATION FOR THE PATTERN: ---------------------------------------------------------- PATTERN: See diagram A.1. DECREASE/INCREASE TIP (evenly): To calculate how to decrease/increase, use the total number of stitches on row (e.g. 114 stitches) , and divide stitches by number of decreases/increases to be done (e.g. 22) = 5.2. In this example decrease by knitting approx. every 4th and 5th stitch together. When increasing make a yarn over in this example after approx. every 5th stitch. On next row purl yarn overs twisted to avoid holes. INCREASE TIP: Increase on each side of the middle 4 stitches at the front (marker thread is in the middle of these 4 stitches). Increase 1 stitch by making 1 yarn over, on next round work yarn over twisted to avoid holes. DECREASE TIP-2: Decrease as follows before marker: Knit 2 together. Decrease as follows after marker: Slip 1 stitch knitwise, knit 1, pass slipped stitch over. ---------------------------------------------------------- START THE PIECE HERE: ---------------------------------------------------------- PANTS - SHORT OVERVIEW OF THE PIECE: Worked in the round on circular needles/double pointed needles, top down. PANTS: Cast on 114-120-126-132 (138-144) stitches on circular needle size 3.5 mm with Merino Extra Fine. Work rib = knit 3/purl 3 for 3 cm. Switch to circular needle size 4.5 mm knit 1 round, AT THE SAME TIME decrease 22-24-26-28 (26-28) stitches evenly = 92-96-100-104 (112-116) stitches – read DECREASE/INCREASE TIP. Insert 1 marker mid front and 1 marker mid back (= 46-48-50-52 (56-58) stitches between markers). ELEVATION AT THE BACK: To get a better fit work pants higher at the back than at the front. This is done by working short rows back and forth as follows: Begin from right side and knit 10 stitches past marker mid back, turn, tighten yarn and purl 20 stitches. Turn, tighten yarn and knit 30, turn, tighten yarn and purl 40. Continue this way until 40-40-60-60 (60-60) stitches have been purled. Turn piece, tighten yarn and knit until mid back. Work over all stitches for 1 cm. Then work as follows from mid back: 31-32-34-35-38-40 stitches in stocking stitch, A.1 (= 7 stitches), 16-18-18-20-22-22 stitches in stocking stitch, A.1, 31-32-34-35-38-40 stitches in stocking stitch. Continue this pattern. REMEMBER THE KNITTING TENSION! When piece measures 7-8-11-12 (12-13) cm, increase 1 stitch on each side of 4 stitches mid front - read INCREASE TIP, increase every other round 8-8-8-8 (10-10) times in total = 108-112-116-120 (132-136) stitches. On next round cast off 4 stitches mid front and mid back (i.e. 2 stitches on each side of markers) and finish each leg separately. Piece measures approx. 13-14-17-18 (20-21) cm. Slip stitches from one leg on 1 stitch holder and stitches for the other leg on double pointed needles size 4.5 mm. LEG: = 50-52-54-56 (62-64) stitches. Work in stocking stitch and pattern as before – insert 1 marker at beginning of round = inside of leg. When leg measures 3 cm, decrease 1 stitch on each side of marker - read DECREASE TIP-2, repeat decrease every 2-2-3-4 (5-6) cm 4 times in total = 42-44-46-48 (54-56) stitches. When leg measures 9-10-13-16 (19-25) cm, switch to double pointed needles size 3.5 mm. Knit 1 round while AT THE SAME TIME increasing 6-10-8-12 (6-10) stitches evenly = 48-54-54-60 (60-66) stitches. Then work rib = knit 3/purl 3 for 4 cm, then loosely cast off with knit over knit and purl over purl. Work the other leg the same way. The entire pants measures 26-28-34-38 (43-50) cm. ASSEMBLY: Sew together the opening between the legs. |
||||||||||||||||
Diagram explanations |
||||||||||||||||
|
||||||||||||||||
 |
||||||||||||||||
Have you finished this pattern?Tag your pictures with #dropspattern #littlecherubpants or submit them to the #dropsfan gallery. Do you need help with this pattern?You'll find 22 tutorial videos, a Comments/Questions area and more by visiting the pattern on garnstudio.com. © 1982-2026 DROPS Design A/S. We reserve all rights. This document, including all its sub-sections, has copyrights. Read more about what you can do with our patterns at the bottom of each pattern on our site. |
||||||||||||||||


With over 40 years in knitting and crochet design, DROPS Design offers one of the most extensive collections of free patterns on the internet - translated to 17 languages. As of today we count 324 catalogues and 12290 patterns translated into English (UK/cm). 12290
We work hard to bring you the best knitting and crochet have to offer, inspiration and advice as well as great quality yarns at incredible prices! Would you like to use our patterns for other than personal use? You can read what you are allowed to do in the Copyright text at the bottom of all our patterns. Happy crafting!
Post a comment to pattern DROPS Baby 33-18
We would love to hear what you have to say about this pattern!
If you want to leave a question, please make sure you select the correct category in the form below, to speed up the answering process. Required fields are marked *.