
Popular categories
Looking for a yarn?


Comments / Questions (31)
![]() Caroline Richter wrote:
Caroline Richter wrote:
Beautiful pattern!
30.06.2024 - 15:51
![]() ANTOINETTE VAN KESSEL wrote:
ANTOINETTE VAN KESSEL wrote:
Snap telpatroon 209-9 niet
04.01.2024 - 11:03DROPS Design answered:
Dag Antoinette,
Misschien is het mogelijk om aan te geven waar je precies tegenaan loopt, zodat we je beter kunnen helpen. Via deze link vind je een uit leg over hoe je telpatronen voor breien leest. Wellicht heb je hier wat aan.
07.01.2024 - 13:57
![]() ANTOINETTE VAN KESSEL wrote:
ANTOINETTE VAN KESSEL wrote:
Snap het telpatroon niet van drops 209-9
04.01.2024 - 11:01
![]() Christine wrote:
Christine wrote:
J’ai tout défait et refait les 8 dernières mailles il n’y a pas de marqueurs donc encore 54 m Comment faut il diminuer ? Merci
28.04.2023 - 20:20DROPS Design answered:
Bonjour Christine, avant de mettre les marqueurs, vous devez avoir 90 m, tricotez ainsi: *tricotez jusqu'à ce qu'il reste 2 m avant le marqueur, tricotez 2 m ensemble à l'endroit*, répétez de *à* jusqu'à la fin du rang, tournez, tricotez 3 rangs sans diminuer. Répétez ces 4 rangs encore 3 fois - il reste 50 m. Diminuez maintenant tous les rangs sur l'endroit seulement (tricotez 1 rang sans diminuer entre les rangs avec diminutions) jusqu'à ce qu'il reste 10 mailles. Bon tricot!
02.05.2023 - 07:59
![]() Christine wrote:
Christine wrote:
Bonjour, j'avais 90 m puis j'ai fait ce que vous m'avez dit mais il me reste 54 mailles et pas 50 ?? J'ai diminuer tous les 4 rands en tricotant 2m ensembles avant le marqueur Merci de m'aider
28.04.2023 - 12:11DROPS Design answered:
Bonjour Christine, vous devez diminuer 10 mailles à chaque rang de diminutions (à chaque marqueur), 4 fois au total = vous diminuez 40 mailles au total. Vous aviez 90 mailles - 40 diminutions = il doit vous rester 50 mailles. Vérifiez que vous avez bien diminué 10 mailles à chaque fois. Bon tricot!
28.04.2023 - 13:19
![]() Christine wrote:
Christine wrote:
Quand vous dites tricoter le 1er rang sur l'envers que voulez vous dire car c'est du point mousse ? tout à l'endroit ? Merci
25.04.2023 - 13:04DROPS Design answered:
Bonjour Christine, par "sur l'envers", on entend l'envers de l'ouvrage, qui va se tricoter certes à l'endroit car on tricote au point mousse, mais ce rang se trouve sur l'envers (la partie des rangs qui se trouve à l'intérieur du chapeau quand il est terminé et assemblé). Bon tricot!
25.04.2023 - 14:48
![]() Christine wrote:
Christine wrote:
J'ai besoin d'explication s'il vous plait à partir de Tricoter 1 rang sur l'envers et. jusqu'à au total toutes les 2 côtes mousse (= tous les 4 rangs) = 50-50 mailles. merci cdlt
25.04.2023 - 01:07DROPS Design answered:
Bonjour Christine, tricotez ce rang sur l'envers en mettant 10 marqueurs (mettez le 1er marqueur après 8 mailles, puis espacez les suivants de 9 mailles); au rang suivant sur l'endroit, diminuez 1 maille avant chaque marqueur, tricotez 3 rangs endroit sans diminuer. Répétez 4 fois ces 4 rangs; vous diminuez 10 mailles à chaque rang de diminution. Vous aviez 90 mailles, vous avez diminué 4 fois 10 mailles (= 40 diminutions) = il reste 50 mailles. Bon tricot!
25.04.2023 - 08:28
![]() Courtney Marek wrote:
Courtney Marek wrote:
Hello I have been trying to knit the chart and I can not get the same results as the image. Do you knit on the round? If you knit this pattern on the round it will create stockinette st. I could really use help I am on the verge of giving up.
17.03.2023 - 12:55DROPS Design answered:
Dear Mrs Marek, this pattern is worked in garter stitch with some slipped stitches : ex. row 1 (with 1st colour): K1 (A.1), *K2, slip 1 as if to P with yarn in front, K1*, repeat from *-* (A.2) row 2: *K1, slip 1 as if to P with yarn in front, K2*, repeat from *-* (A.2) and finish with K1 (A.1). Then row 3 with 2nd colour: K1, *slip 1 as if to P with y in front, K3*, repeat from *-*.. Row 4: *K3, slip 1 as if to P with yarn in front*, repeat from *-* and finish with K1. you might need some repeats in height to see the pattern. Try first on your swatch so that y ou get use for hat. Happy knitting!
17.03.2023 - 14:57
![]() Marianne Sandberg wrote:
Marianne Sandberg wrote:
Hej, jag förstår inte hur jag ska följa mönstret, var finns det? Ska jag bara följa instruktionsvideon? Eller ska jag upprepa A1 och A2 hela tiden när jag stickar mönstret? Ursäkta så dumma frågor...
06.03.2023 - 09:16DROPS Design answered:
Hej Marianne. Du ska sticka som det står i beskrivningen dvs 5 cm rätstickning och sedan minska det antal maskor som står i beskrivningen för din storlek. Efter det stickar du (från rätsidan) första maskan som A.1 och efter det repeterar du A.2 varvet ut. Du stickar på detta sätt tills arbetet mäter 17 cm. Kom ihåg att diagrammen stickas från vänster till höger från avigsidan. Fortsätt sedan som det står i beskrivningen. Mvh DROPS design
07.03.2023 - 13:55
![]() Dohány Edit wrote:
Dohány Edit wrote:
Nem értem a mintaleírásban azt, hogy "sima a színe oldalon, sima a fonákoldalon" valamint a 4 átemelt szemnél is azonos szöveghez különböző jelet használ. Elkezdtem megkötni, de elakadtam. A fényképen lévő minta nem úgy néz ki, mint a leírás szerinti kötés...
16.05.2021 - 19:16DROPS Design answered:
Kedves Edit, a S a SUO-n és a FO-n azt jelenti, hogy a szemet listakötéssel kötjük, vagyis mindig S szemként, az egyik jelnél a lime színnel a másiknál a törtfehér színnel. A 4 átemelt szemnél az eltérés a fonal színében van és/vagy abban, hogy a fonalat a darab előtt vagy mögött vezetjük. Sikeres kézimunkázást!
16.05.2021 - 21:08
|
|||||||||||||||||||
Beach Friend#beachfriendhat |
|||||||||||||||||||
 |
 |
||||||||||||||||||
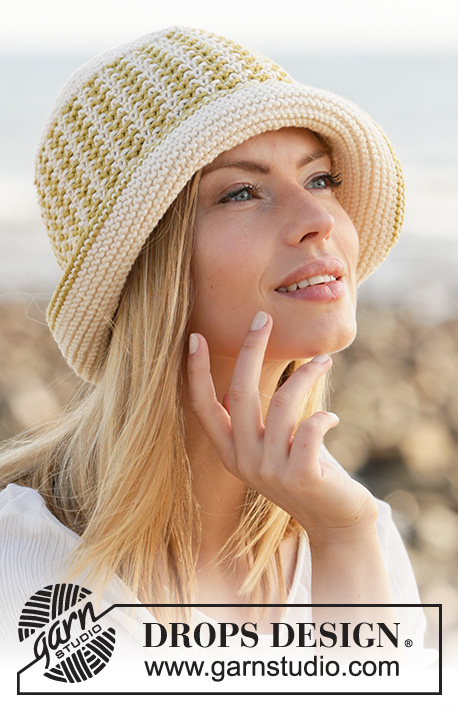
Knitted hat with raised stitches in DROPS Paris. The piece is worked back and forth with mosaic pattern from the brim upwards.
DROPS 209-9 |
|||||||||||||||||||
|
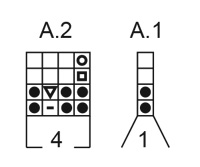
------------------------------------------------------- EXPLANATIONS FOR THE PATTERN: ------------------------------------------------------- RIDGE/GARTER STITCH (worked back and forth): Knit all rows. 1 ridge in height = Knit 2 rows. PATTERN: See diagrams A.1 and A.2. The diagrams show all the rows in the pattern seen from the right side. DECREASE TIP (evenly spaced): To work out how to decrease evenly, count the total number of stitches on needle (e.g. 132 stitches) and divide by the number of decreases to be made (e.g. 35) = 3.7. In this example decrease by knitting approx. each 3rd and 4th stitch together. ------------------------------------------------------- START THE PIECE HERE: ------------------------------------------------------- HAT – SHORT OVERVIEW OF THE PIECE: The piece is worked back and forth with circular needle from the brim upwards. Then the piece is sewn together mid-back. HAT: Cast on 132-136 stitches with circular needle size 3.5 mm and lime. Change to off-white and work back and forth with GARTER STITCH – read description above. When the piece measures 5 cm knit 1 row from the wrong side where you decrease 35-35 stitches evenly spaced READ DECREASE TIP above = 97-101 stitches. Now work pattern according to diagrams A.1 and A.2 as follows from the right side: Work diagram A.1 over 1 stitch and work A.2 to the end of the row. REMEMBER THE KNITTING TENSION! Work like this, according to the diagrams, until the piece measures a total of 17 cm; adjust so the next row is worked with off-white from the right side. Continue with garter stitch and off-white and on the first row decrease 7-11 stitches evenly spaced = 90-90 stitches. Work 1 row from the wrong side and then insert 10 markers in the piece with 9 stitches between each marker – marker 1 is inserted after 8 stitches so there is 1 stitch left after the last marker. Then decrease 1 stitch before each marker from the right side by knitting 2 stitches together. Decrease like this every 2nd ridge (= every 4th row) a total of 4 times = 50-50 stitches. Then decrease every ridge (= every 2nd row) a total of 4 times = 10-10 stitches. Knit all stitches together, 2 and 2 = 5-5 stitches. Cut the strand, pull it through the last stitches and pull tight. Sew the hat together mid-back; sew in the outermost loop of the outermost ridge so the seam is flat. The hat measures approx. 23 cm in height. |
|||||||||||||||||||
Diagram explanations |
|||||||||||||||||||
|
|||||||||||||||||||
 |
|||||||||||||||||||
Have you finished this pattern?Tag your pictures with #dropspattern #beachfriendhat or submit them to the #dropsfan gallery. Do you need help with this pattern?You'll find 9 tutorial videos, a Comments/Questions area and more by visiting the pattern on garnstudio.com. © 1982-2026 DROPS Design A/S. We reserve all rights. This document, including all its sub-sections, has copyrights. Read more about what you can do with our patterns at the bottom of each pattern on our site. |
|||||||||||||||||||


With over 40 years in knitting and crochet design, DROPS Design offers one of the most extensive collections of free patterns on the internet - translated to 17 languages. As of today we count 324 catalogues and 12291 patterns translated into English (UK/cm). 12291
We work hard to bring you the best knitting and crochet have to offer, inspiration and advice as well as great quality yarns at incredible prices! Would you like to use our patterns for other than personal use? You can read what you are allowed to do in the Copyright text at the bottom of all our patterns. Happy crafting!
Post a comment to pattern DROPS 209-9
We would love to hear what you have to say about this pattern!
If you want to leave a question, please make sure you select the correct category in the form below, to speed up the answering process. Required fields are marked *.